2N IP Intercoms - External IP camera connection (Axis IP camera guide included)
The steps in this article require using the web interface of a 2N device. Please follow this manual in case this is your first time using the web interface.
You can add an external IP camera to the 2N IP Intercom to see second video stream e.g. during call. IP camera can be placed for example behind the front door as well as somewhere outside the building. This is very useful because you can check if the calling person is there alone, if he/she already enters the building, if there is some intruder next to him/her, etc. It is possible to specify which picture will be the first one that you see when somebody calls from the intercom – would it be a picture from internal camera or from external camera? Then you can easily switch between them. 2N IP Intercom is processing stream from external camera by itself, so SIP video call will use still the same codecs no matter what camera input is used.
Prerequisities
- 2N IP Intercom with the latest firmware
- 2N IP AudioKit and 2N IP Uni are not supported
- GOLD license is necessary
- More information you can find here: Model Differences and Function Licensing
- 2N IP AudioKit and 2N IP Uni are not supported
- A supported answering unit for switching between internal and external camera during call
- 2N Indoor Compact with the latest firmware
- 2N Indoor Touch 2.0 with the latest firmware
- 2N Indoor View with the latest firmware
- My2N app the latest version
More information here: My2N platform - registration and setup of cloud calling - 3rd party video SIP phone
- 2N Indoor Compact with the latest firmware
- IP camera providing RTSP stream
- Required resolution: 640 x 480 px
- Required coding format: H.264 Baseline or MJPEG
- Already tested IP cameras: 2N® IP Interoperability / IP Cameras
- Axis IP Camera instructions:
- Create a new stream profile in the camera with the following settings:
- H.264 Baseline or MJPEG coding format
- 640 x 480 px resolution
- 15 FPS frame rate
- Bitrate limited to 5Mbps
- Use the following address to obtain the stream:
rtsp://CAMERA-IP/axis-media/media.amp?streamprofile=PROFILE-NAME
- Create a new stream profile in the camera with the following settings:
- Axis IP Camera instructions:
- Required resolution: 640 x 480 px
Read more about the differences in long-term support and active track 2N OS.
Firmware 2.50 and older (LTS)
Adding external IP camera to 2N IP Intercom
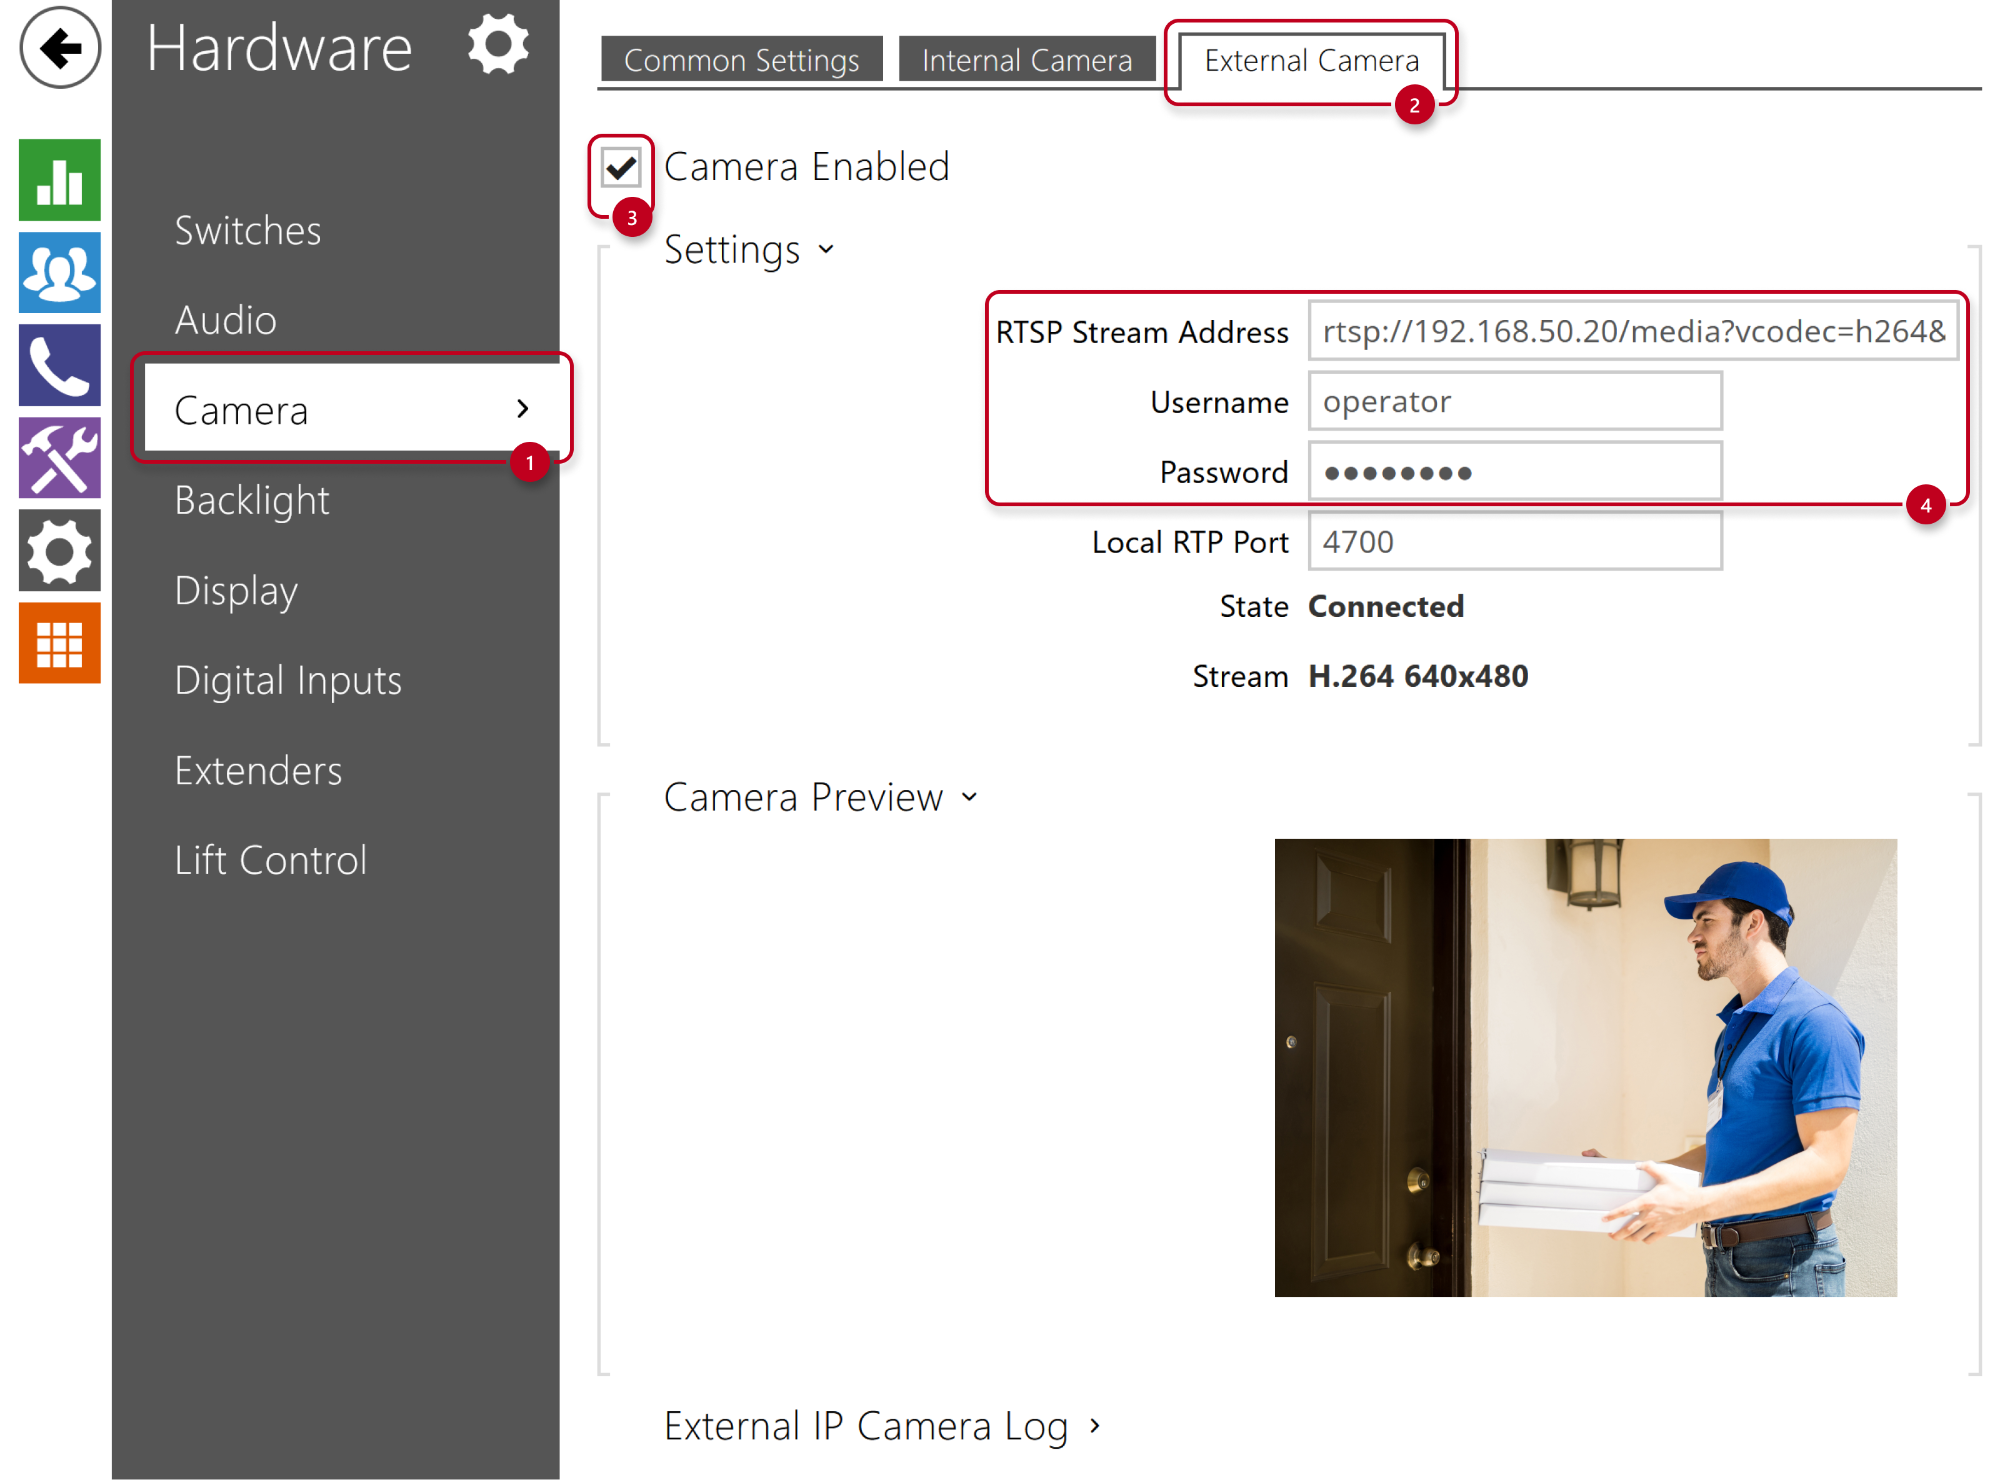
- Go to 2N IP Intercom web interface, section Hardware - Camera - External Camera.
- Enable the feature.
- Fill in RTSP stream address in following format: rtsp://ip_camera_address/parameters
(parameters depend on the connected IP camera model). - Fill in the username and password if the external IP camera requires authentication.
- After saving, you should be able to see Camera Preview if you configured everything correctly.
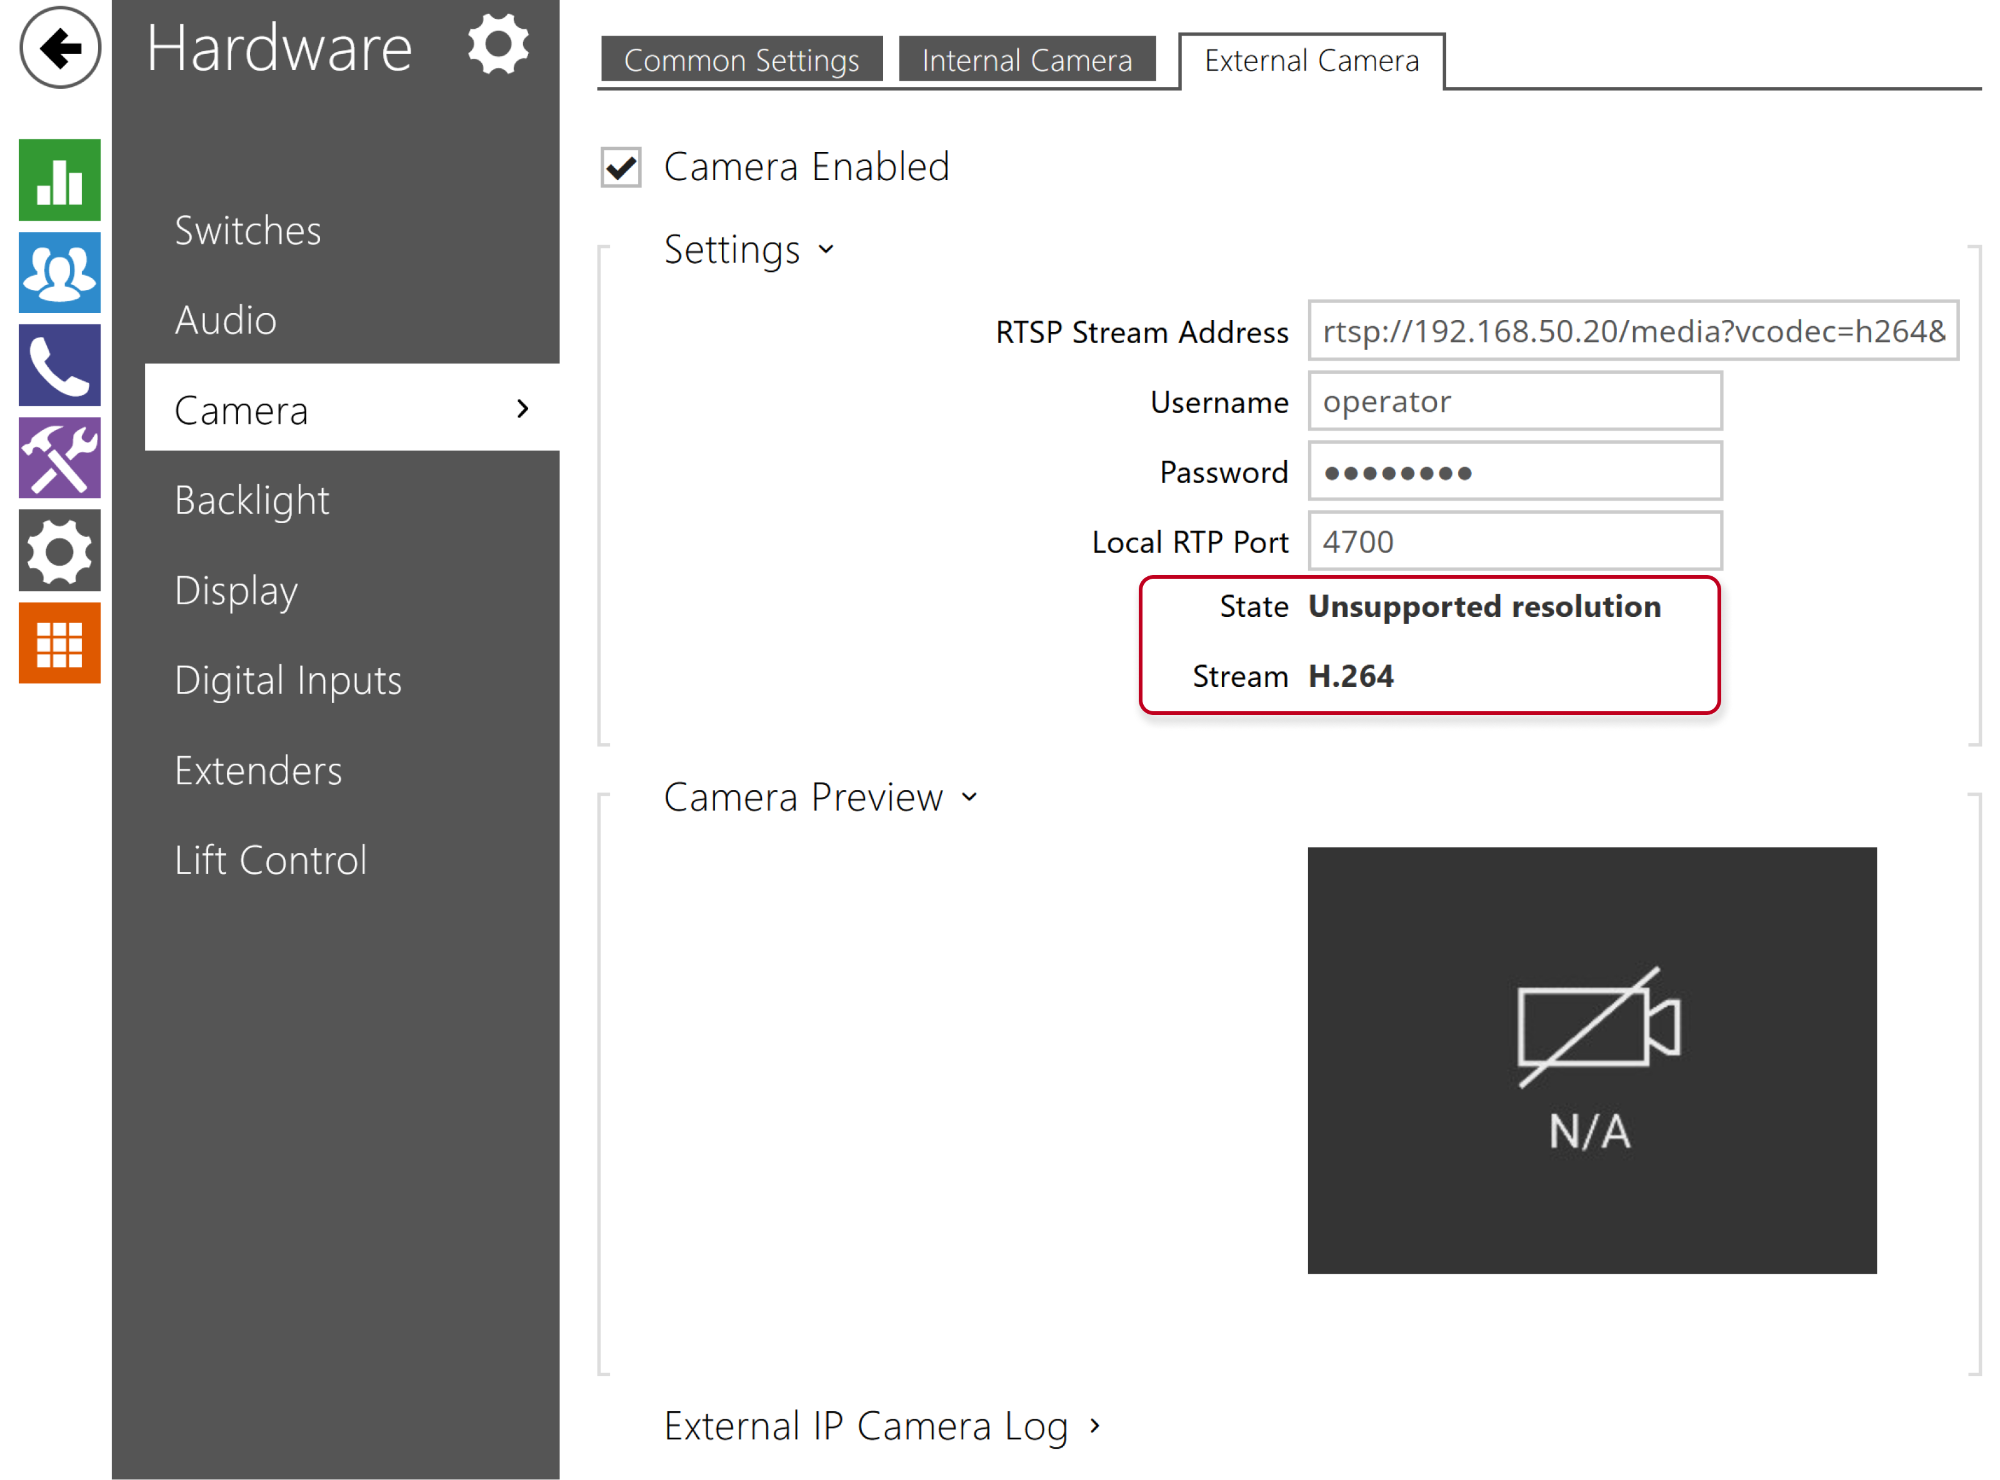
- Common issues you can meet:
- State: Connected > Unsupported resolution
Reason: Resolution is higher than 640 x 480 px or not in aspect ratio 4:3
- State: Connected > Unsupported resolution

-
- State: Network error
Reason: Wrong format of RTSP stream address, e.g. invalid IP address.
- State: Network error
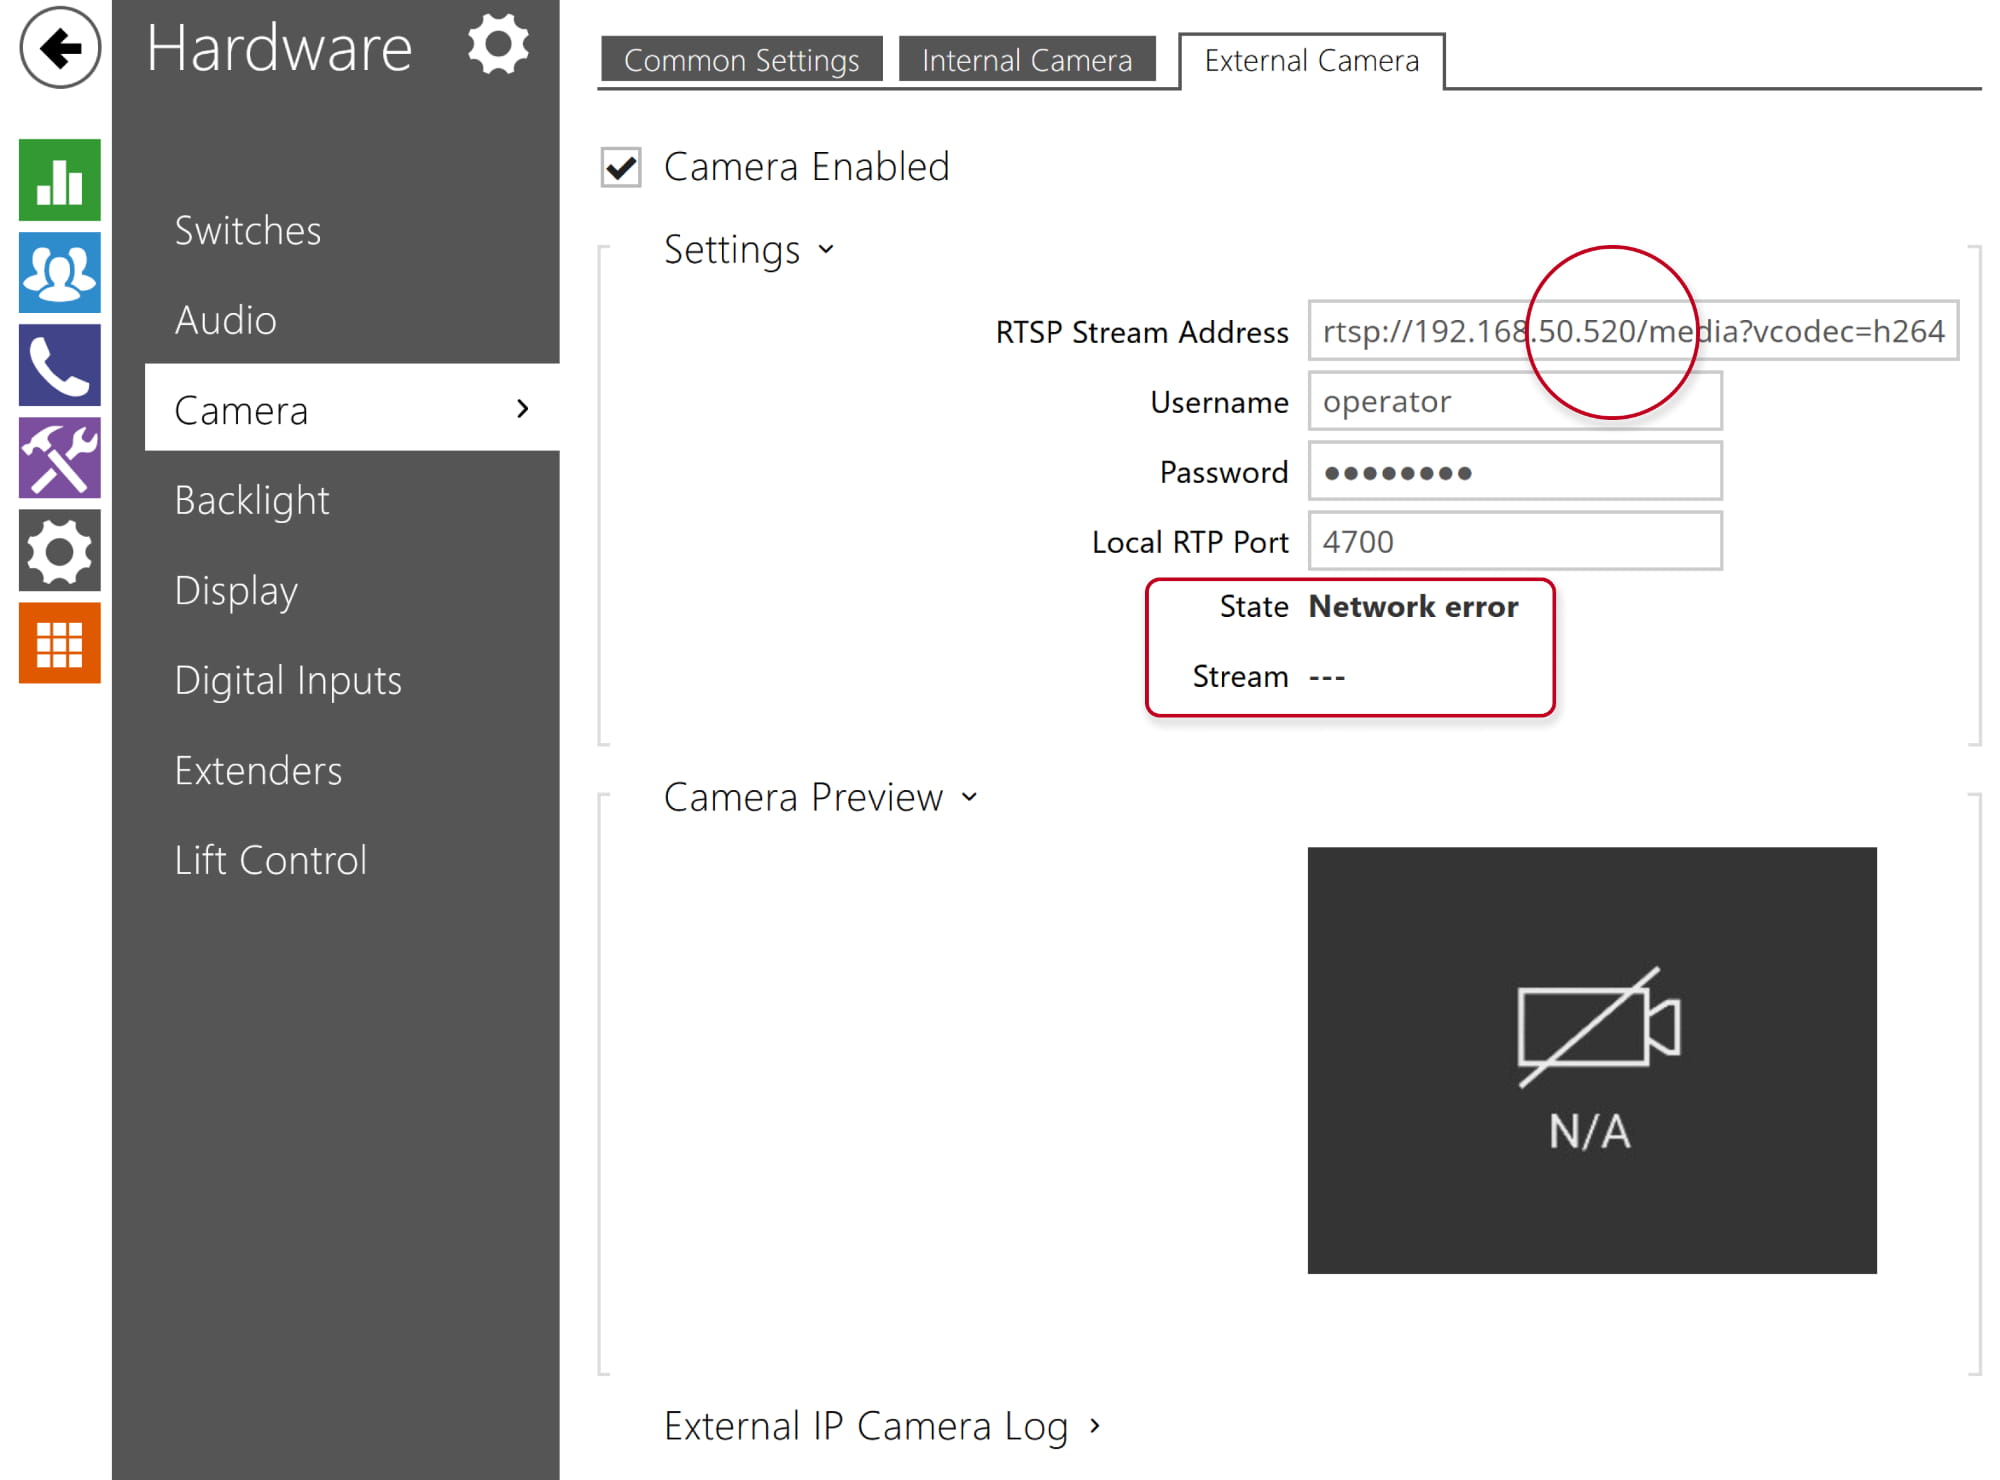
-
-
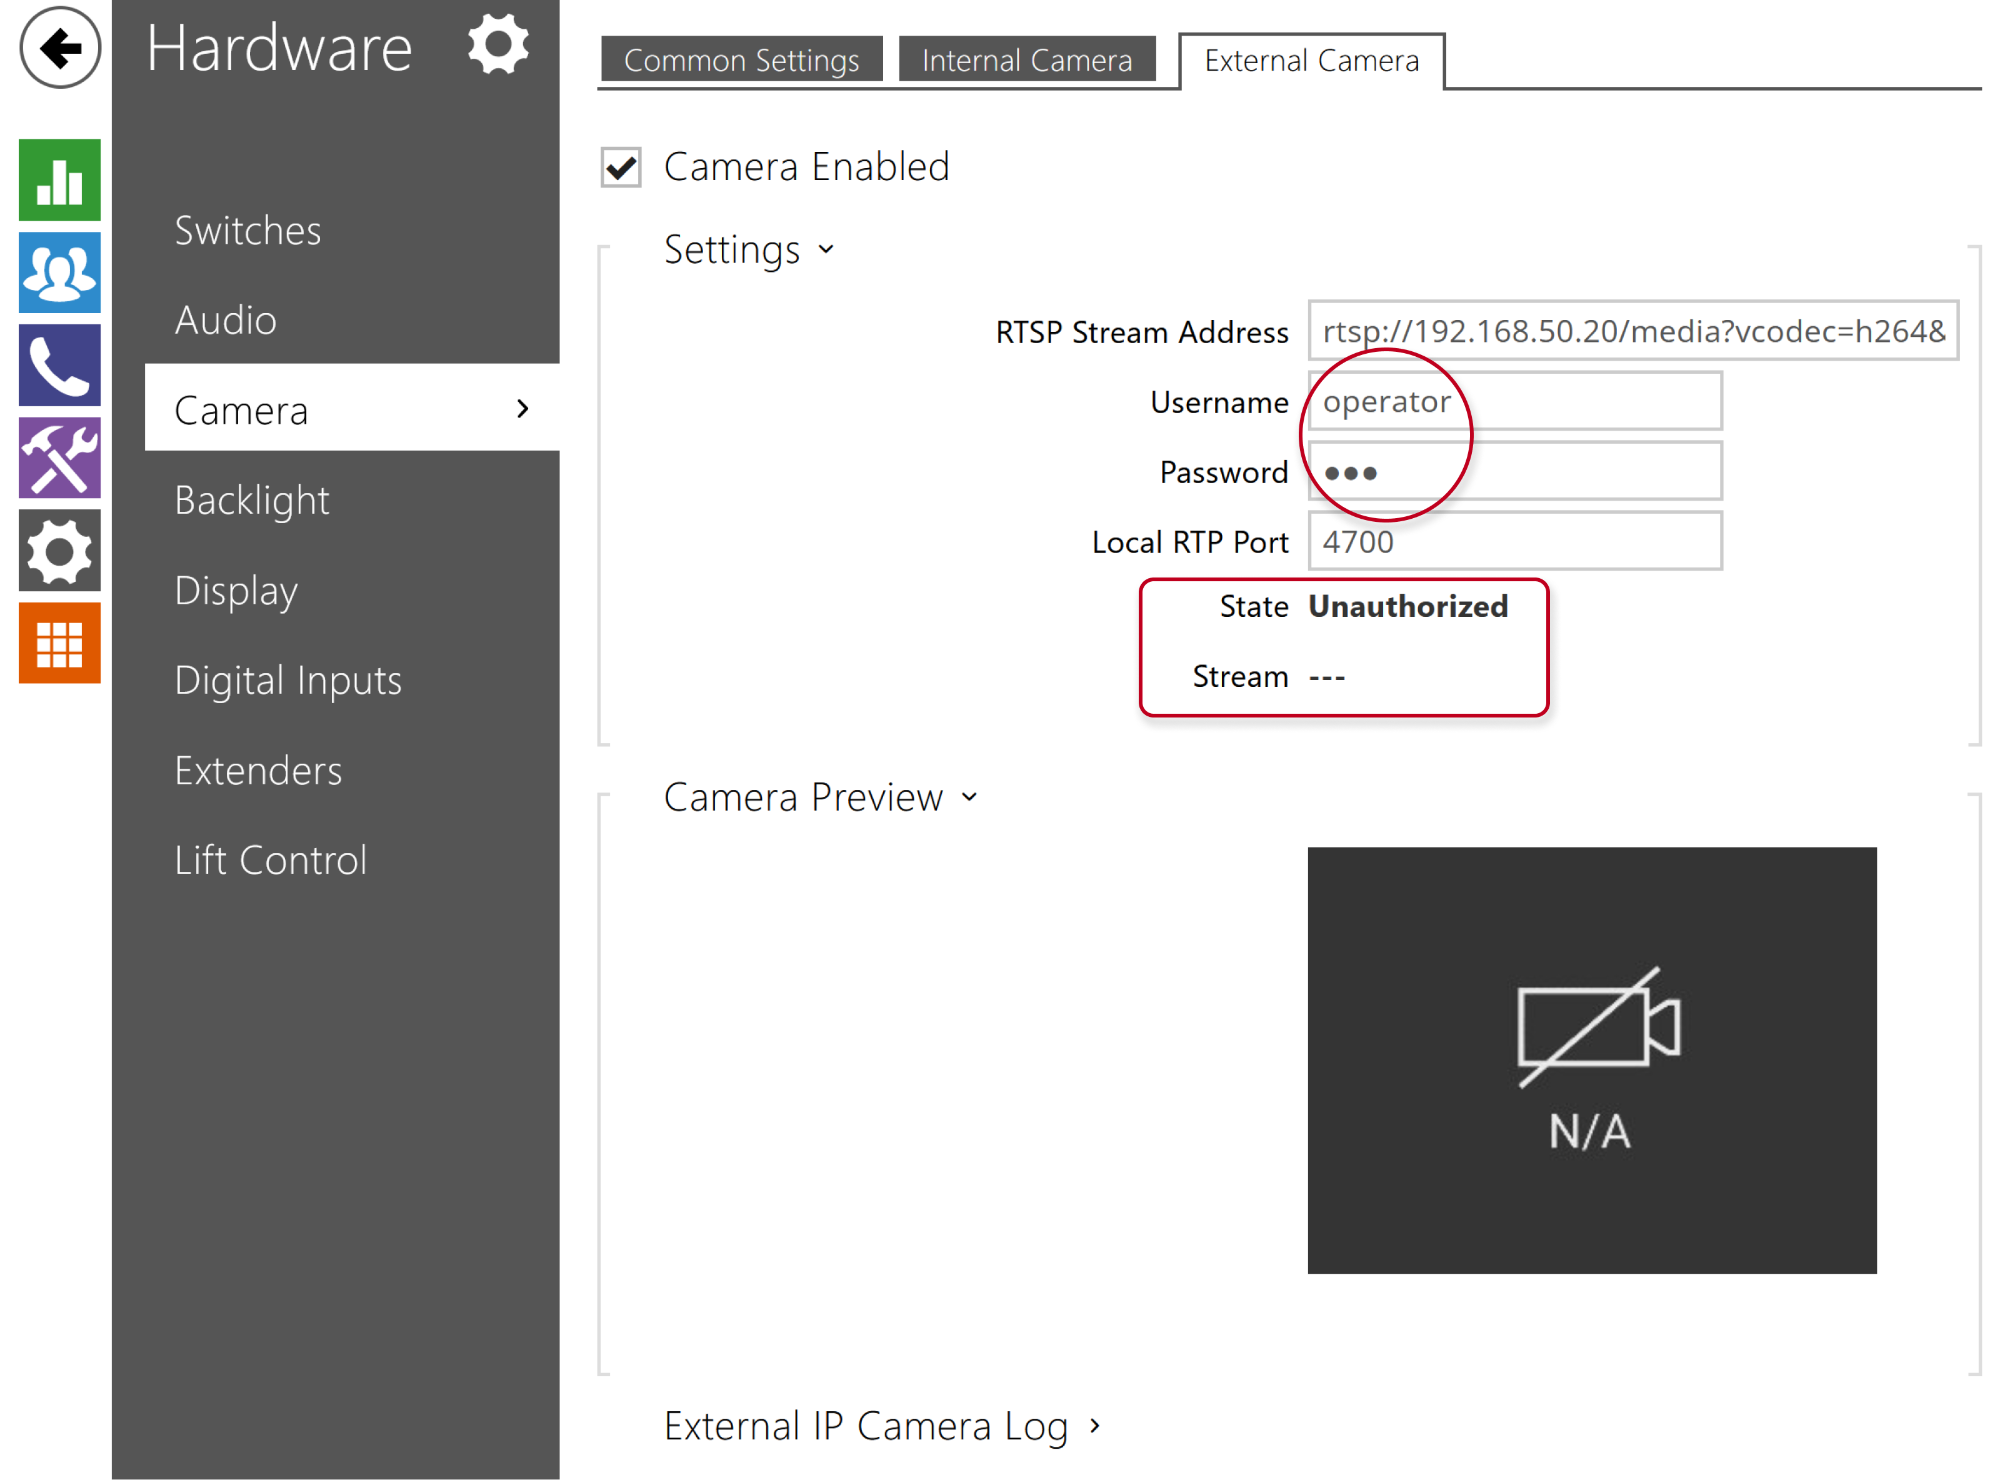
- State: Unauthorized
Reason: Invalid username or password
-
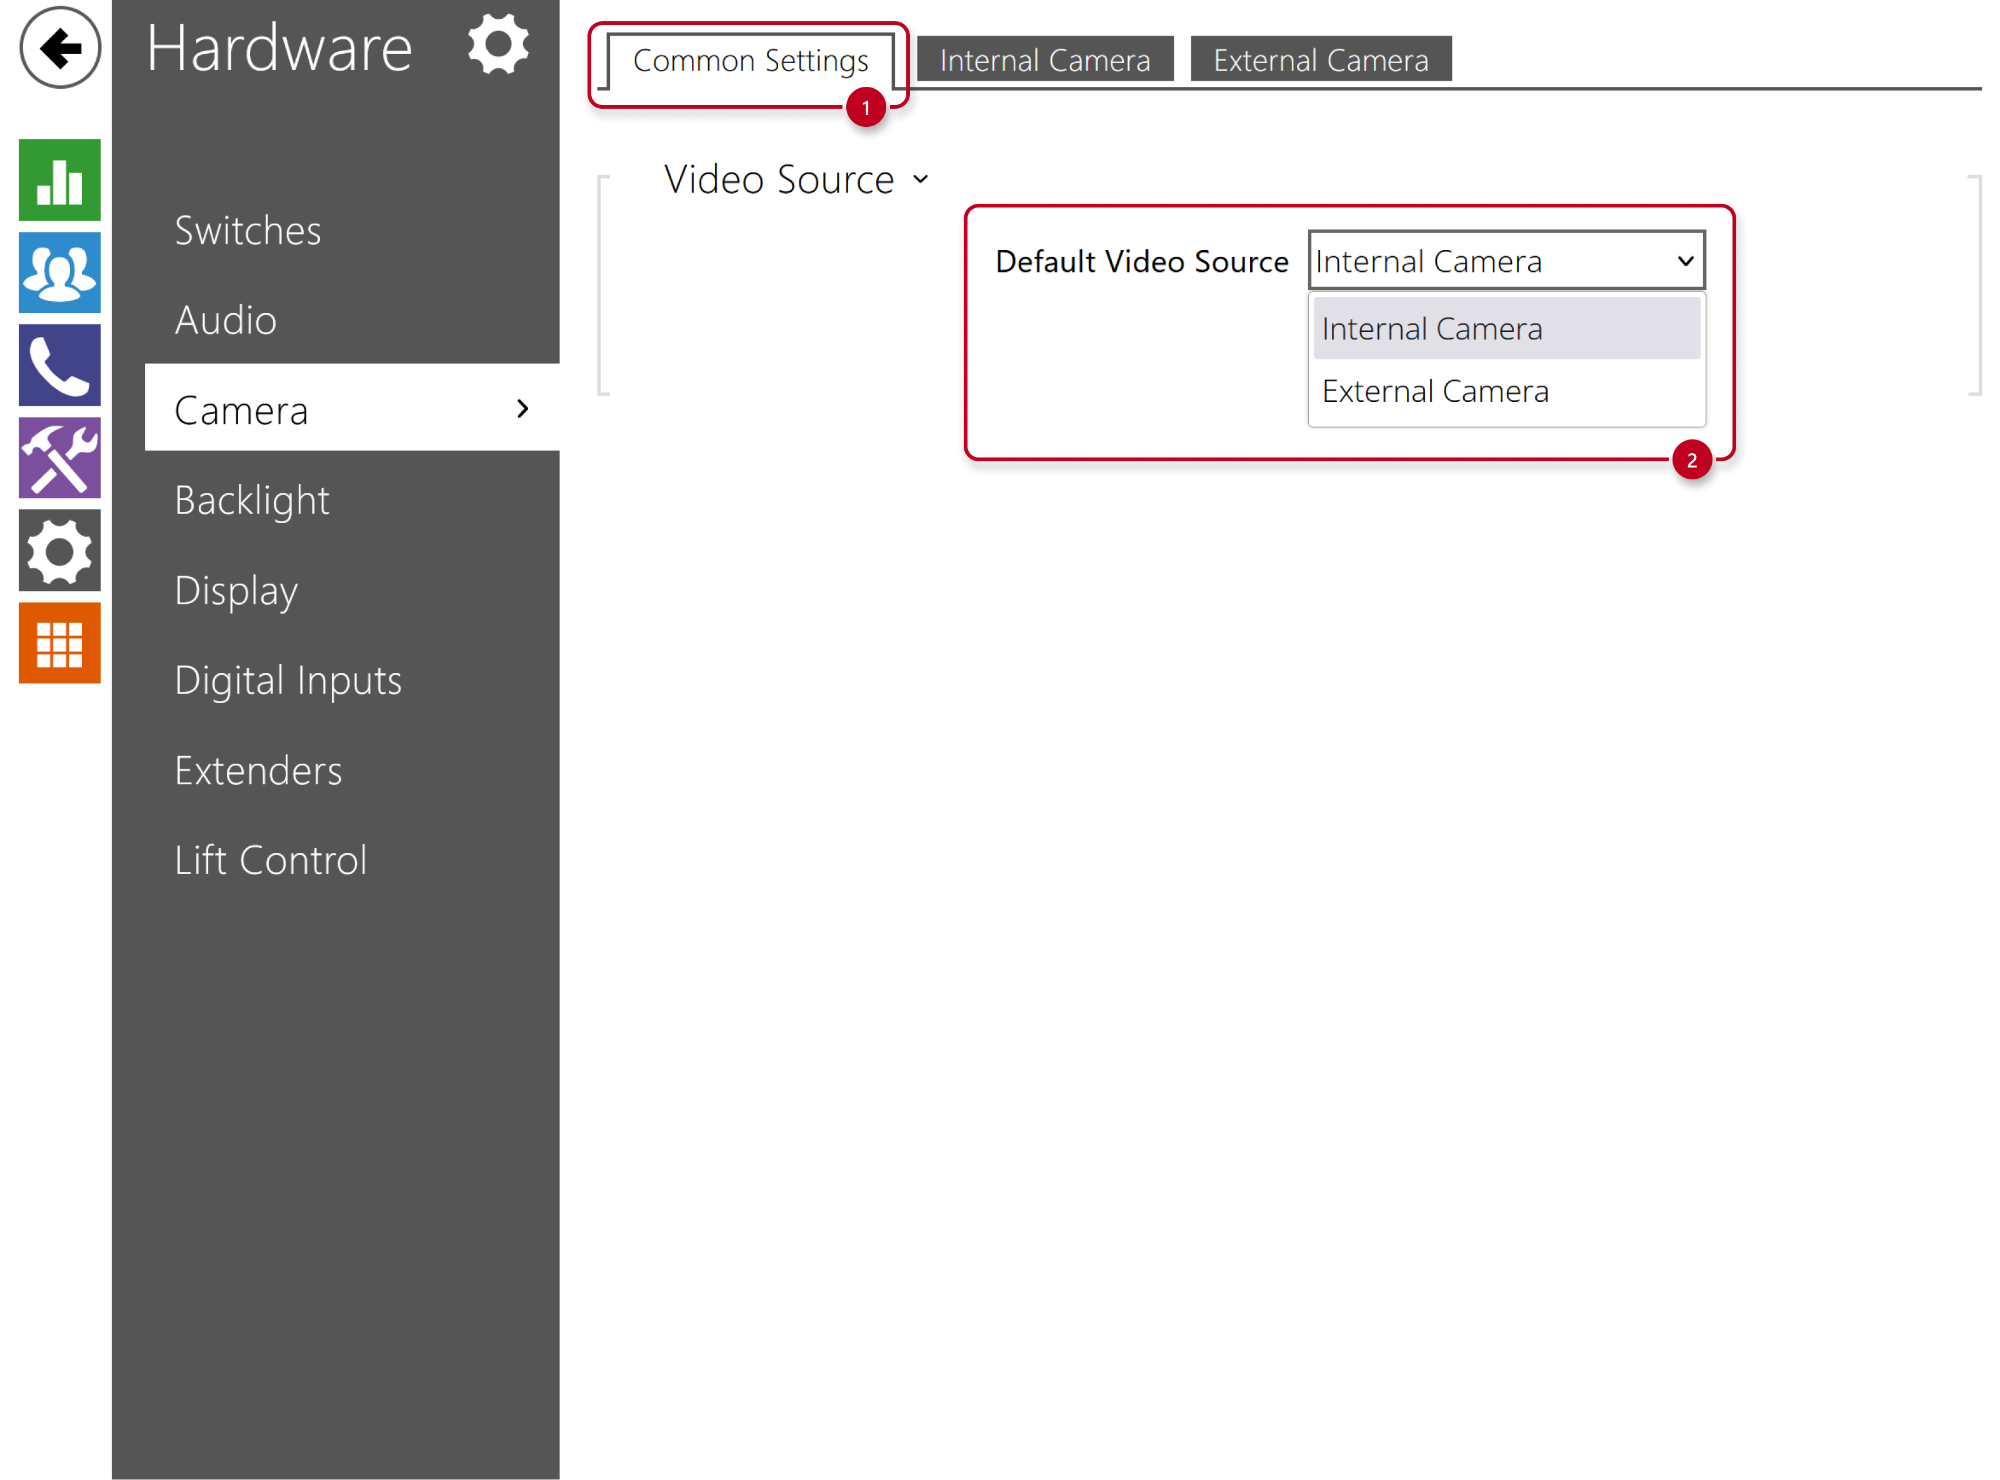
Select the default video source (from internal or external camera)
Still you will be able to switch between them during call.
Switch between internal and external camera during call
We will show you how to enable this feature on supported answering units.
- 2N Indoor Compact or 2N Indoor View
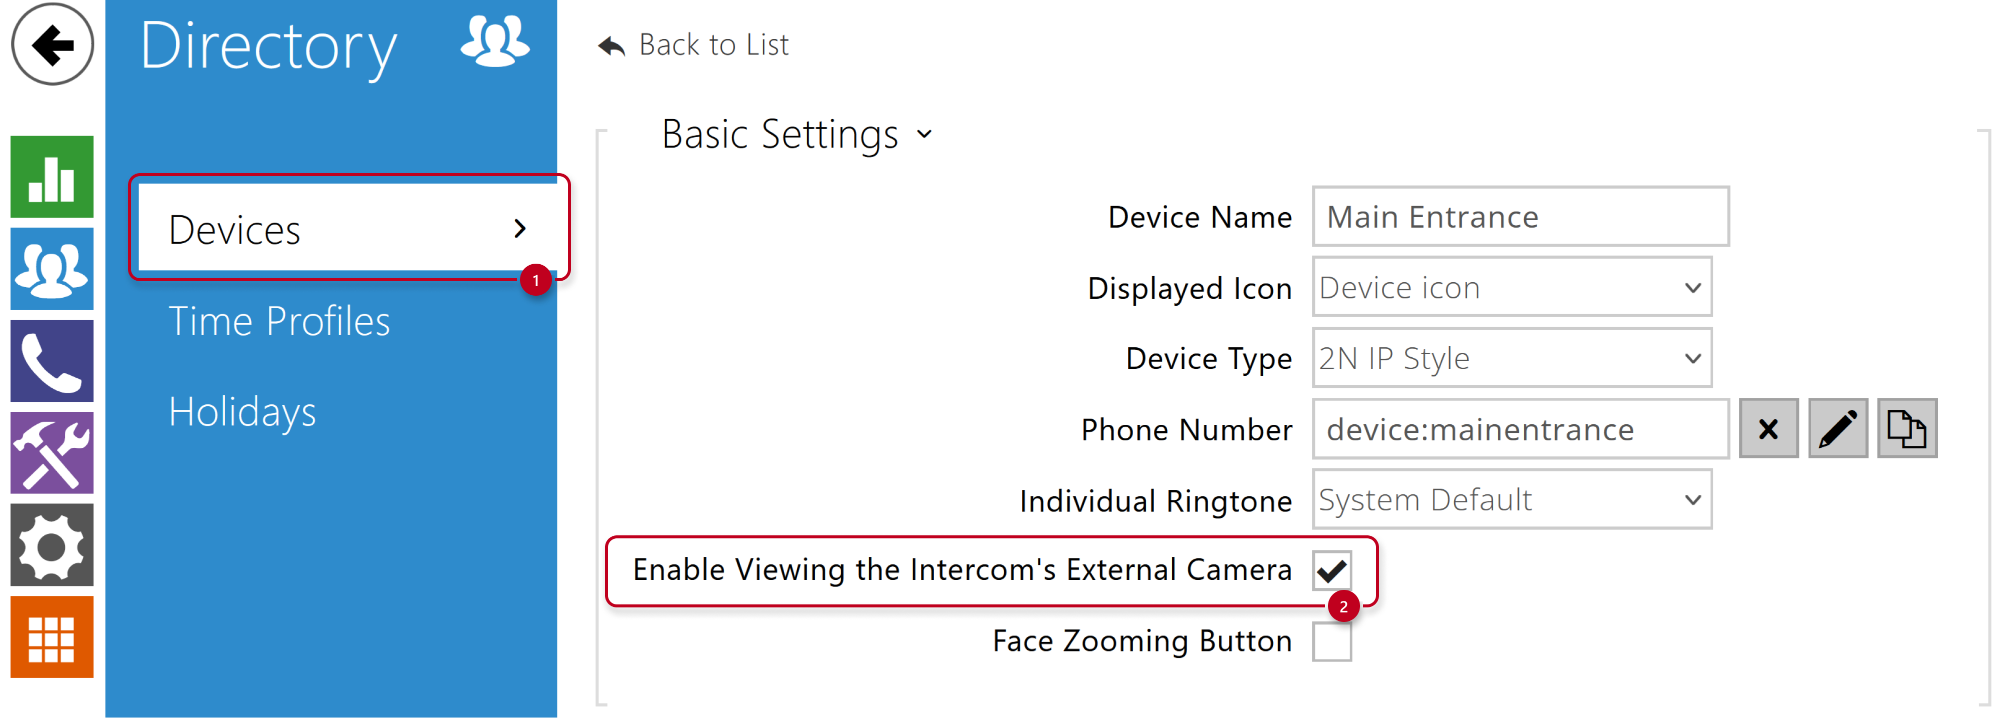
- Go to the device´s web interface - Directory - Devices.
- Add 2N IP Intercom to the devices list and enable viewing the external camera.
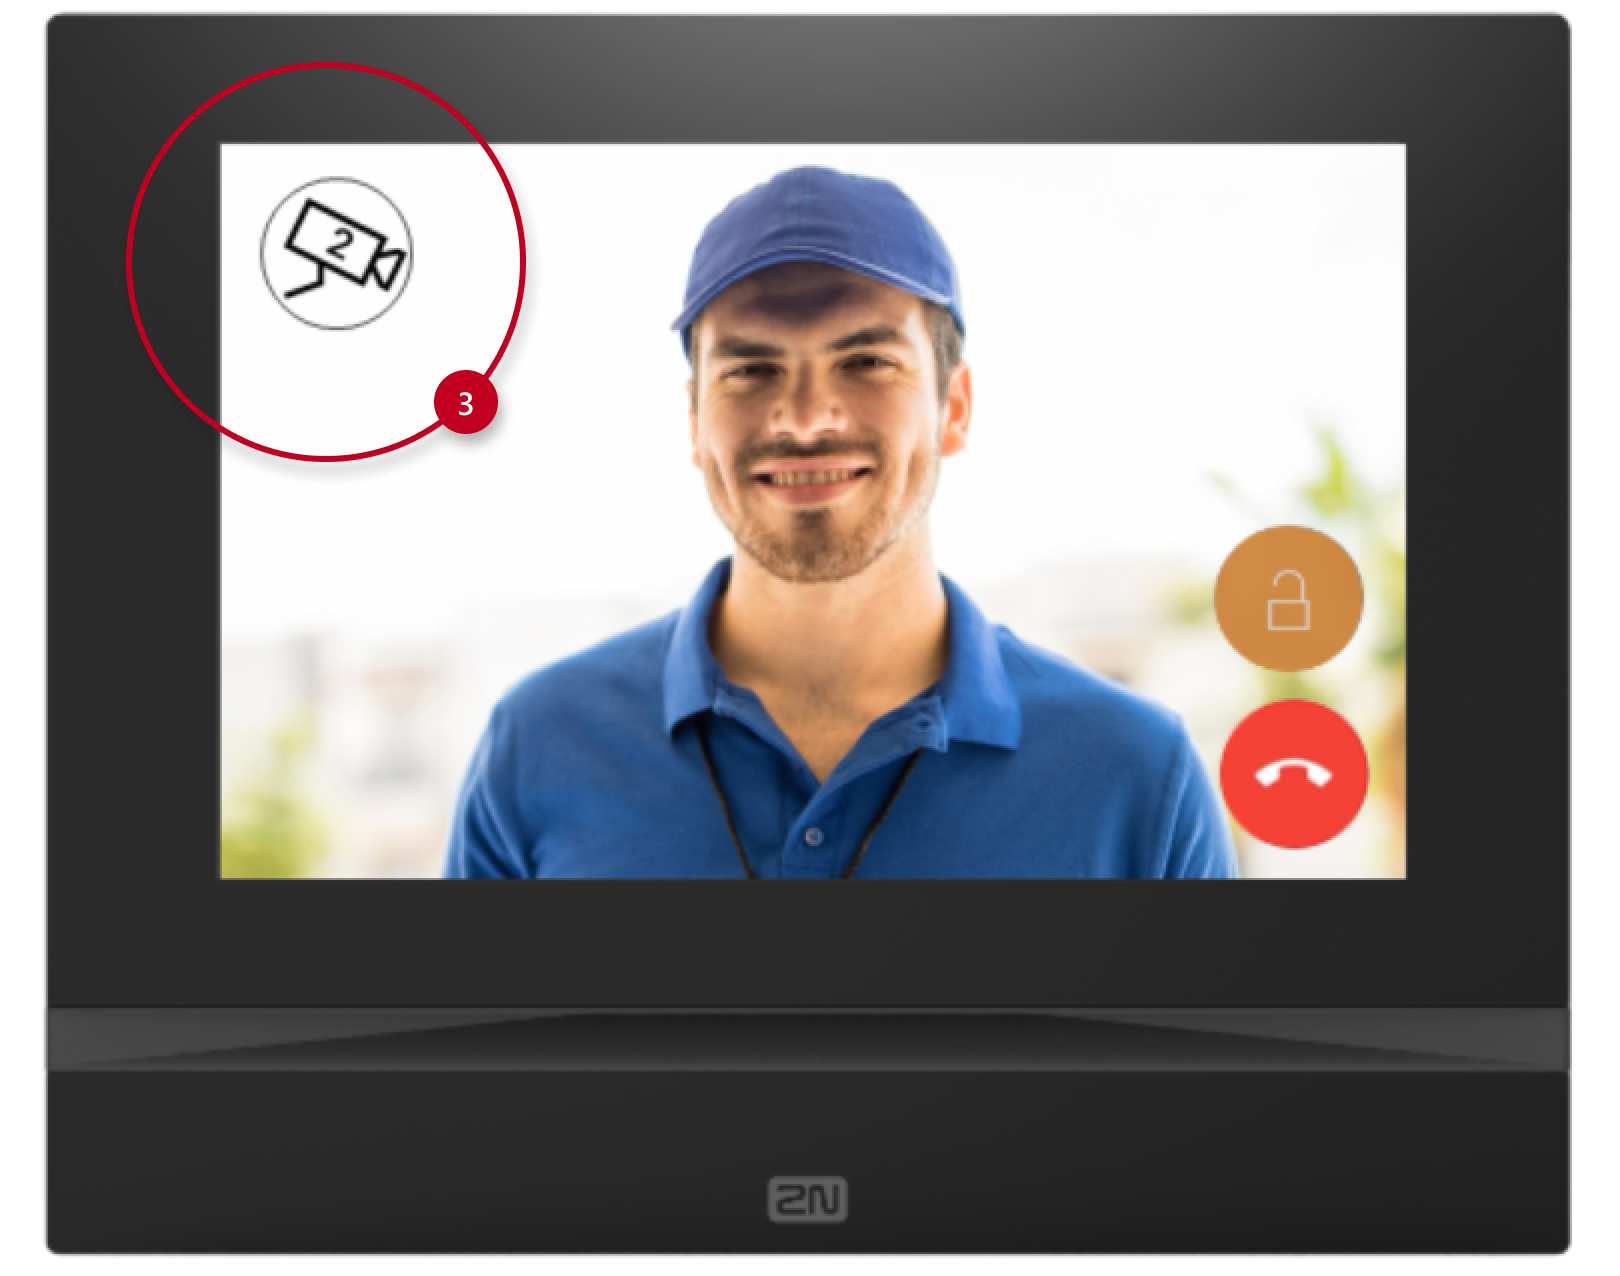
- Then you will see the camera icon during call.
- 2N Indoor Touch 2.0
- Go to the 2N IP Intercom web interface.
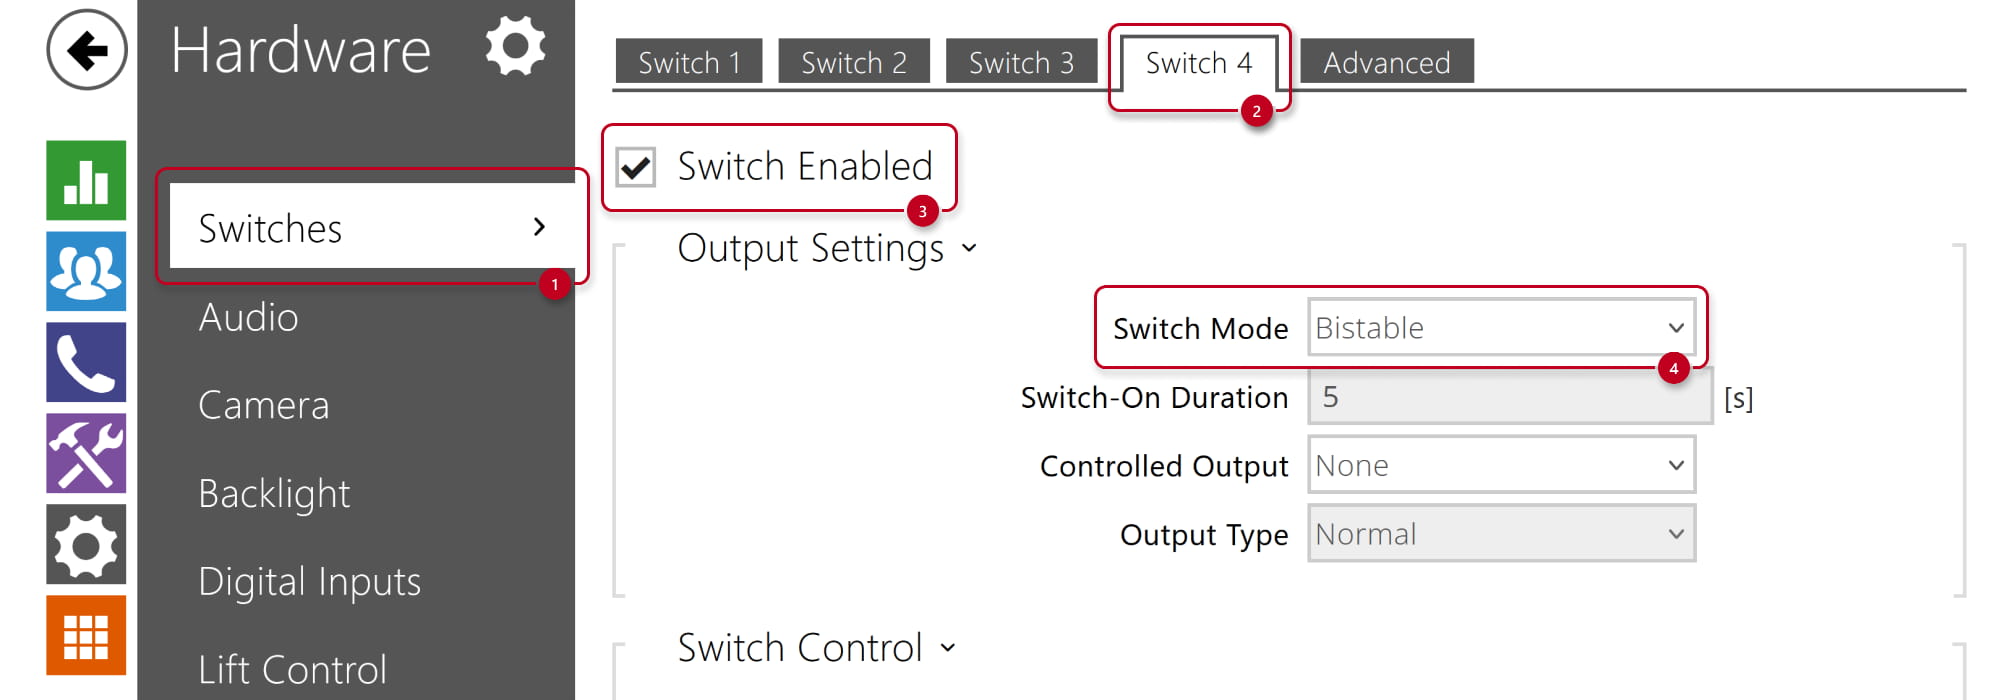
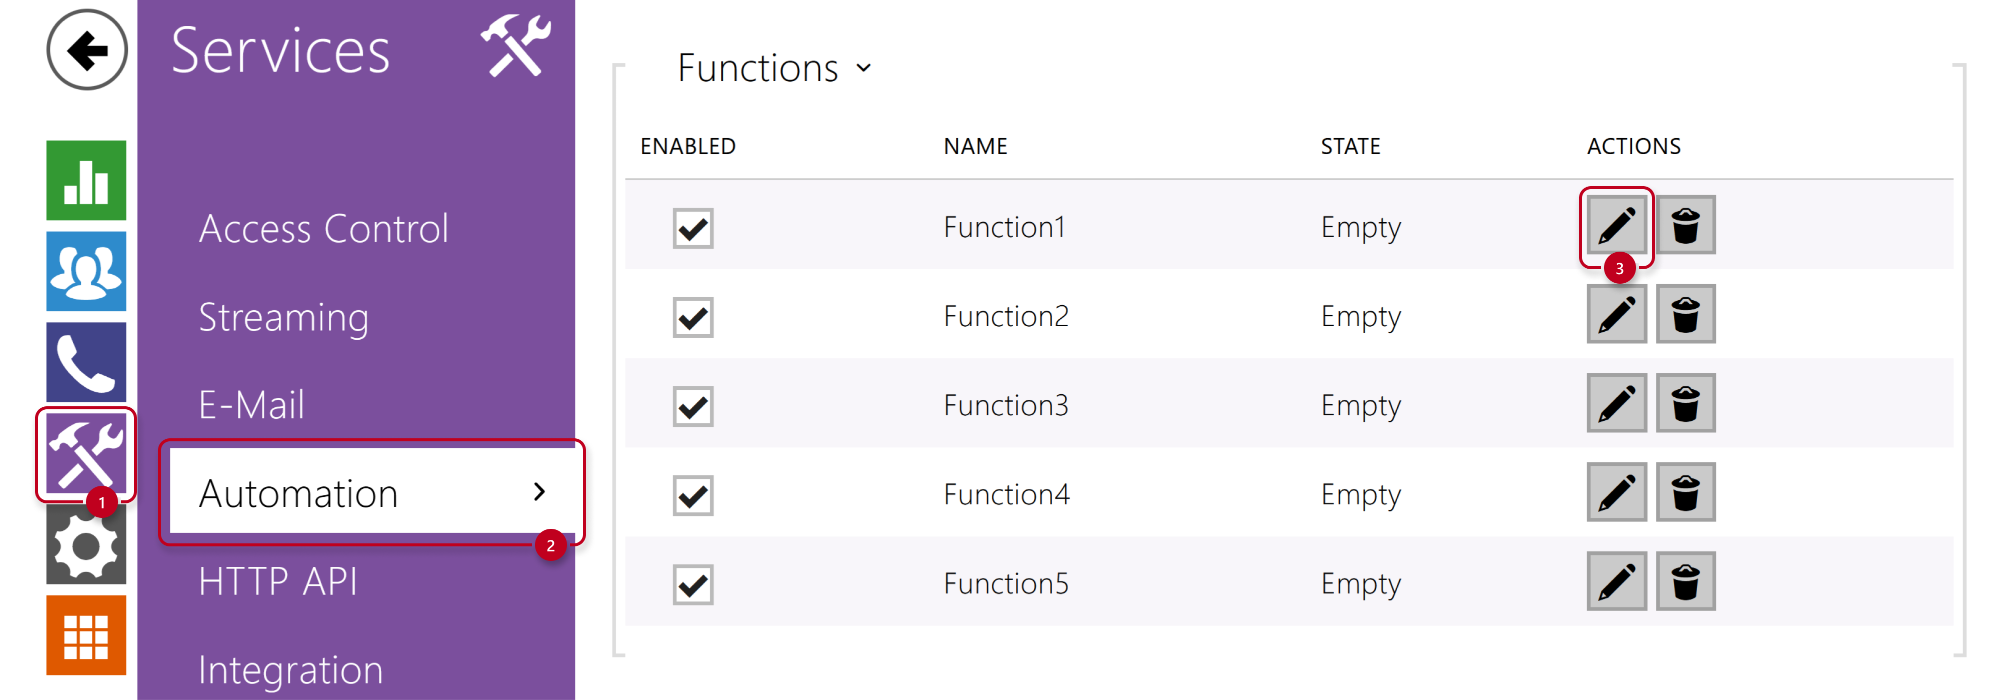
- In section Hardware - Switches configure the switch, you chose for the control of the cameras,
parameter "Switch Mode" has to be set to "Bistable".
- In section Hardware - Switches configure the switch, you chose for the control of the cameras,
- Go to the 2N IP Intercom web interface.
-
-
- In section Services - Automation configure the function to switch between cameras by activating the selected switch.
More information: Automation manual
- In section Services - Automation configure the function to switch between cameras by activating the selected switch.
-

-
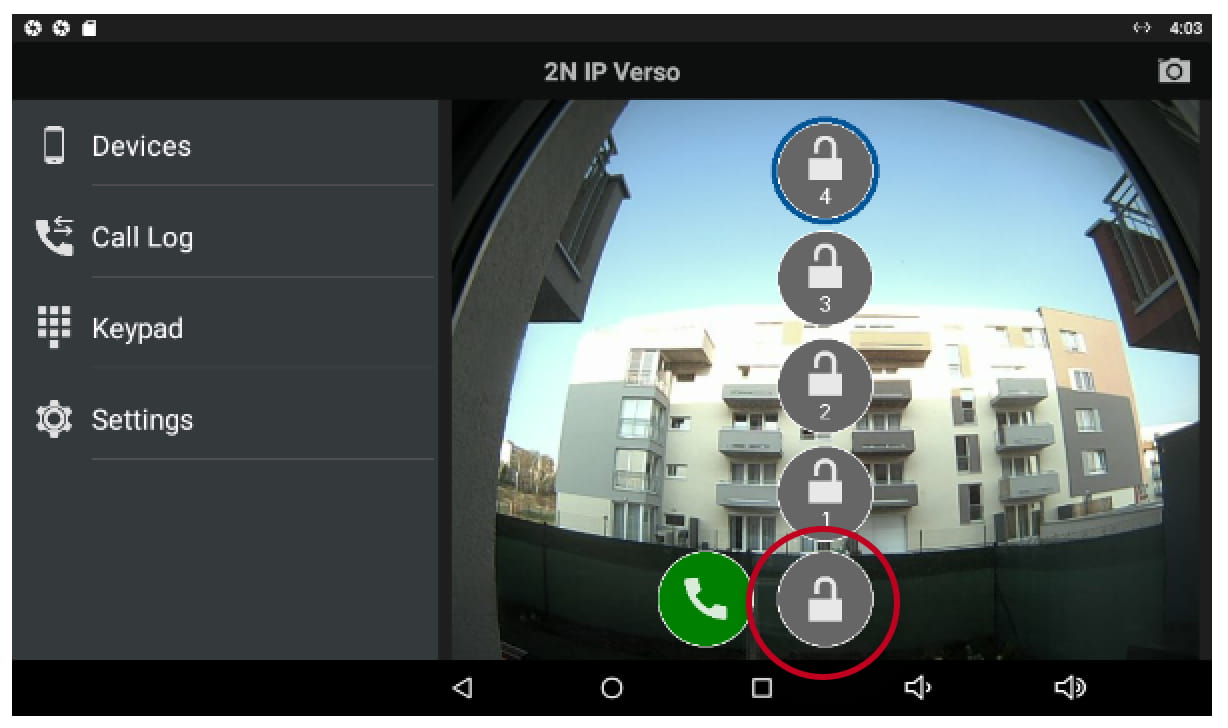
- Now you have to tap and hold the padlock icon during call until the 4 locks representing 4 switches in the 2N IP Intercom appear.
After that, you can easily switch between the cameras by tapping on a particular switch you've used in the 2N IP Intercom configuration.
- Now you have to tap and hold the padlock icon during call until the 4 locks representing 4 switches in the 2N IP Intercom appear.
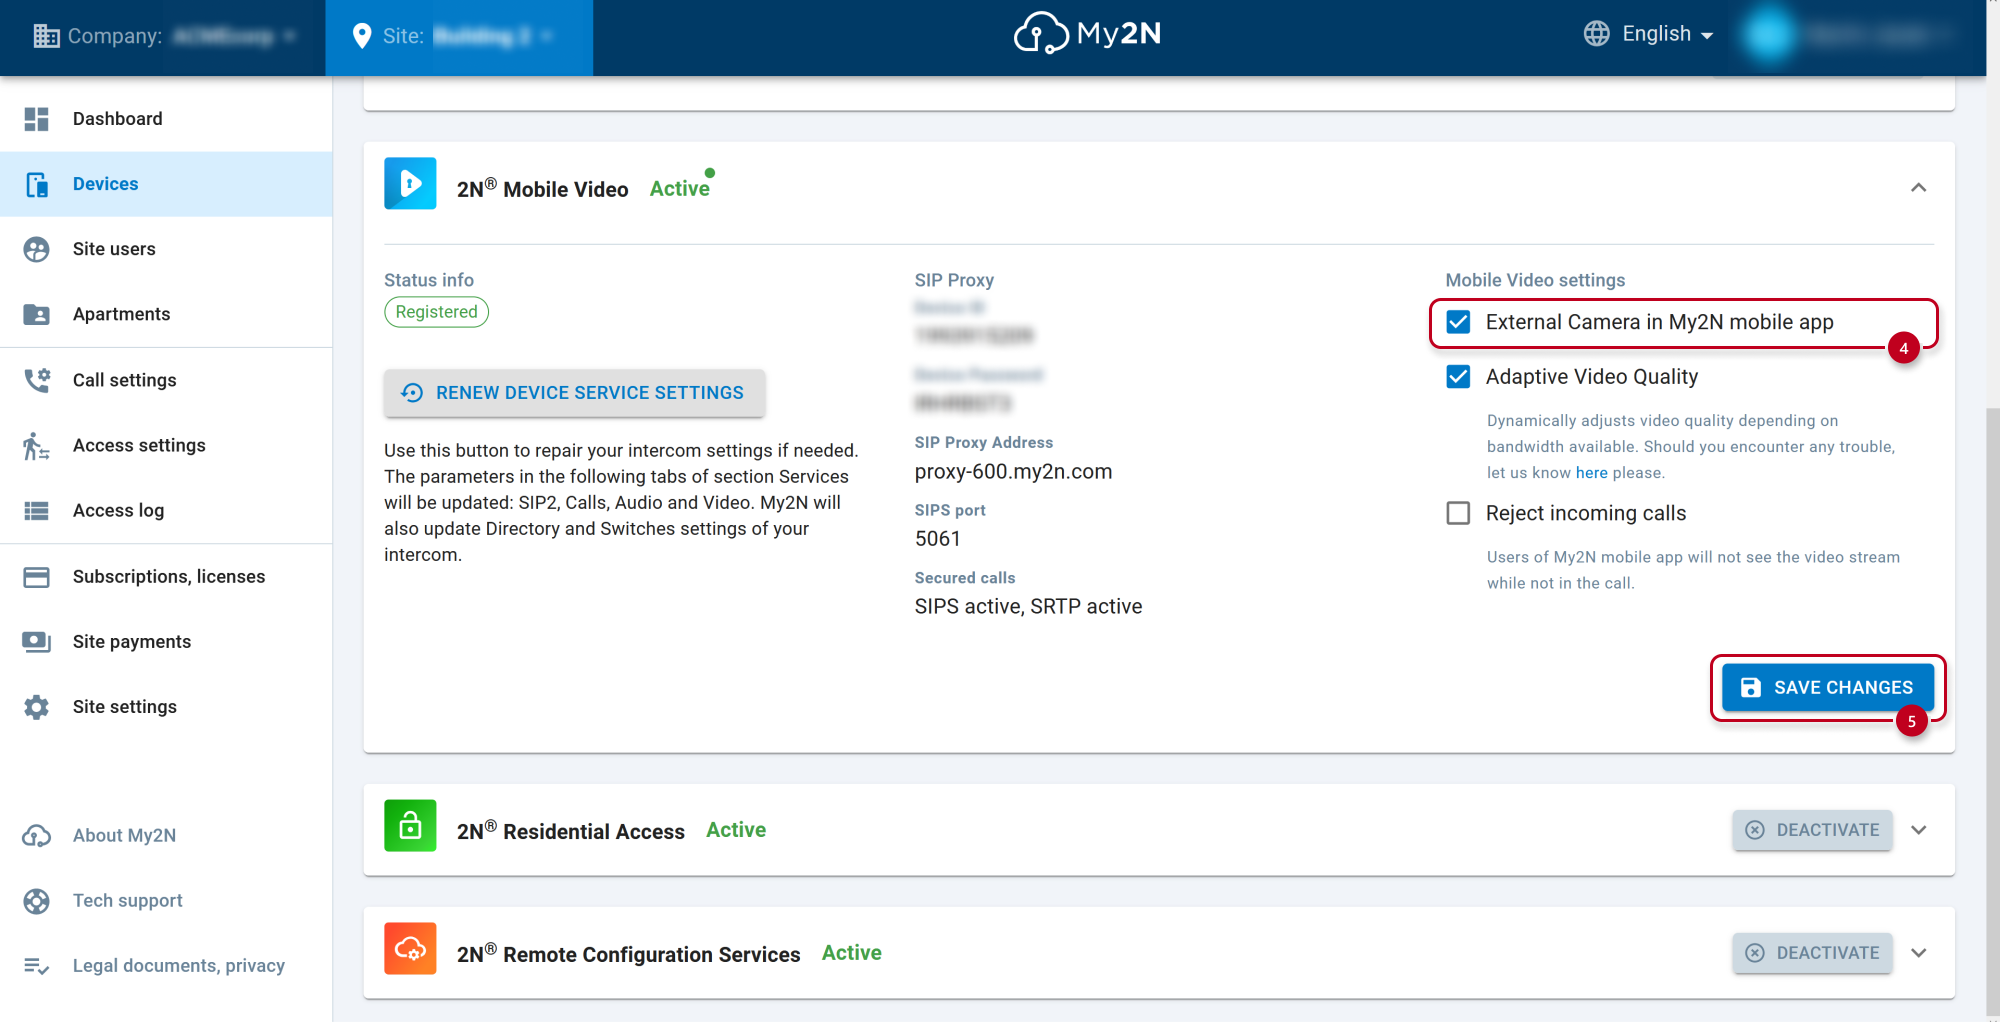
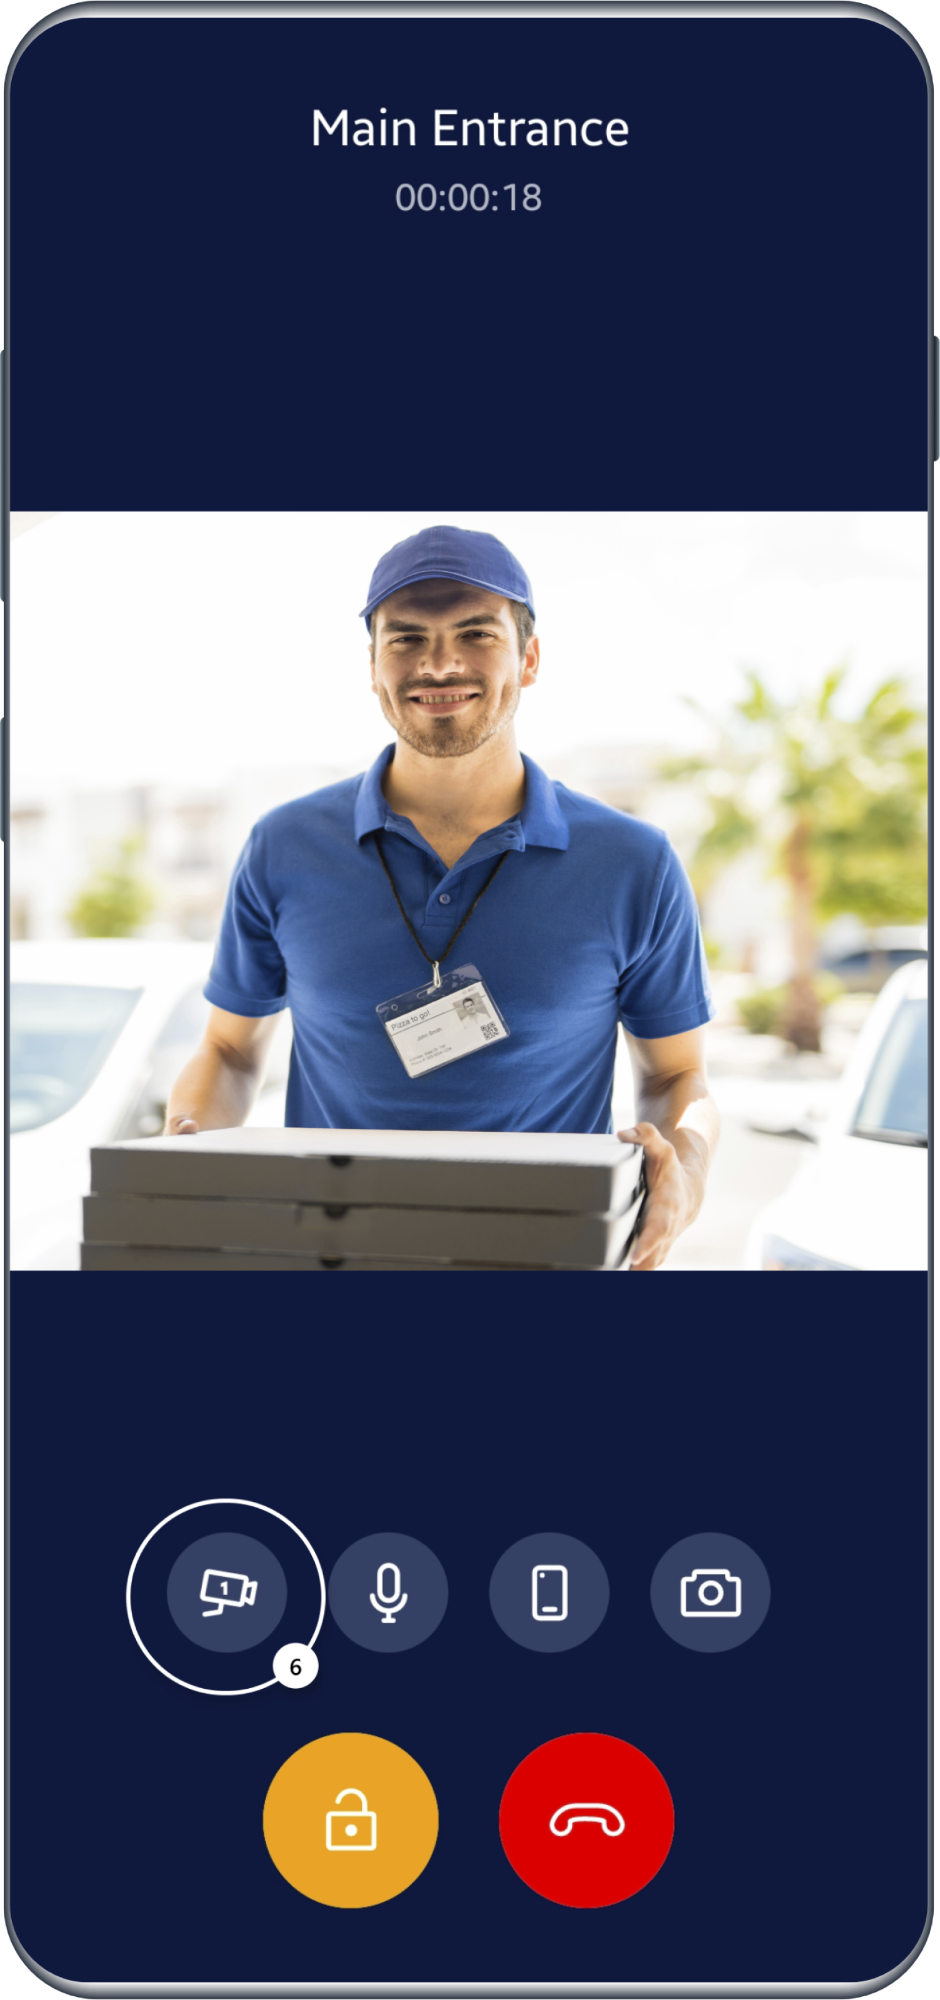
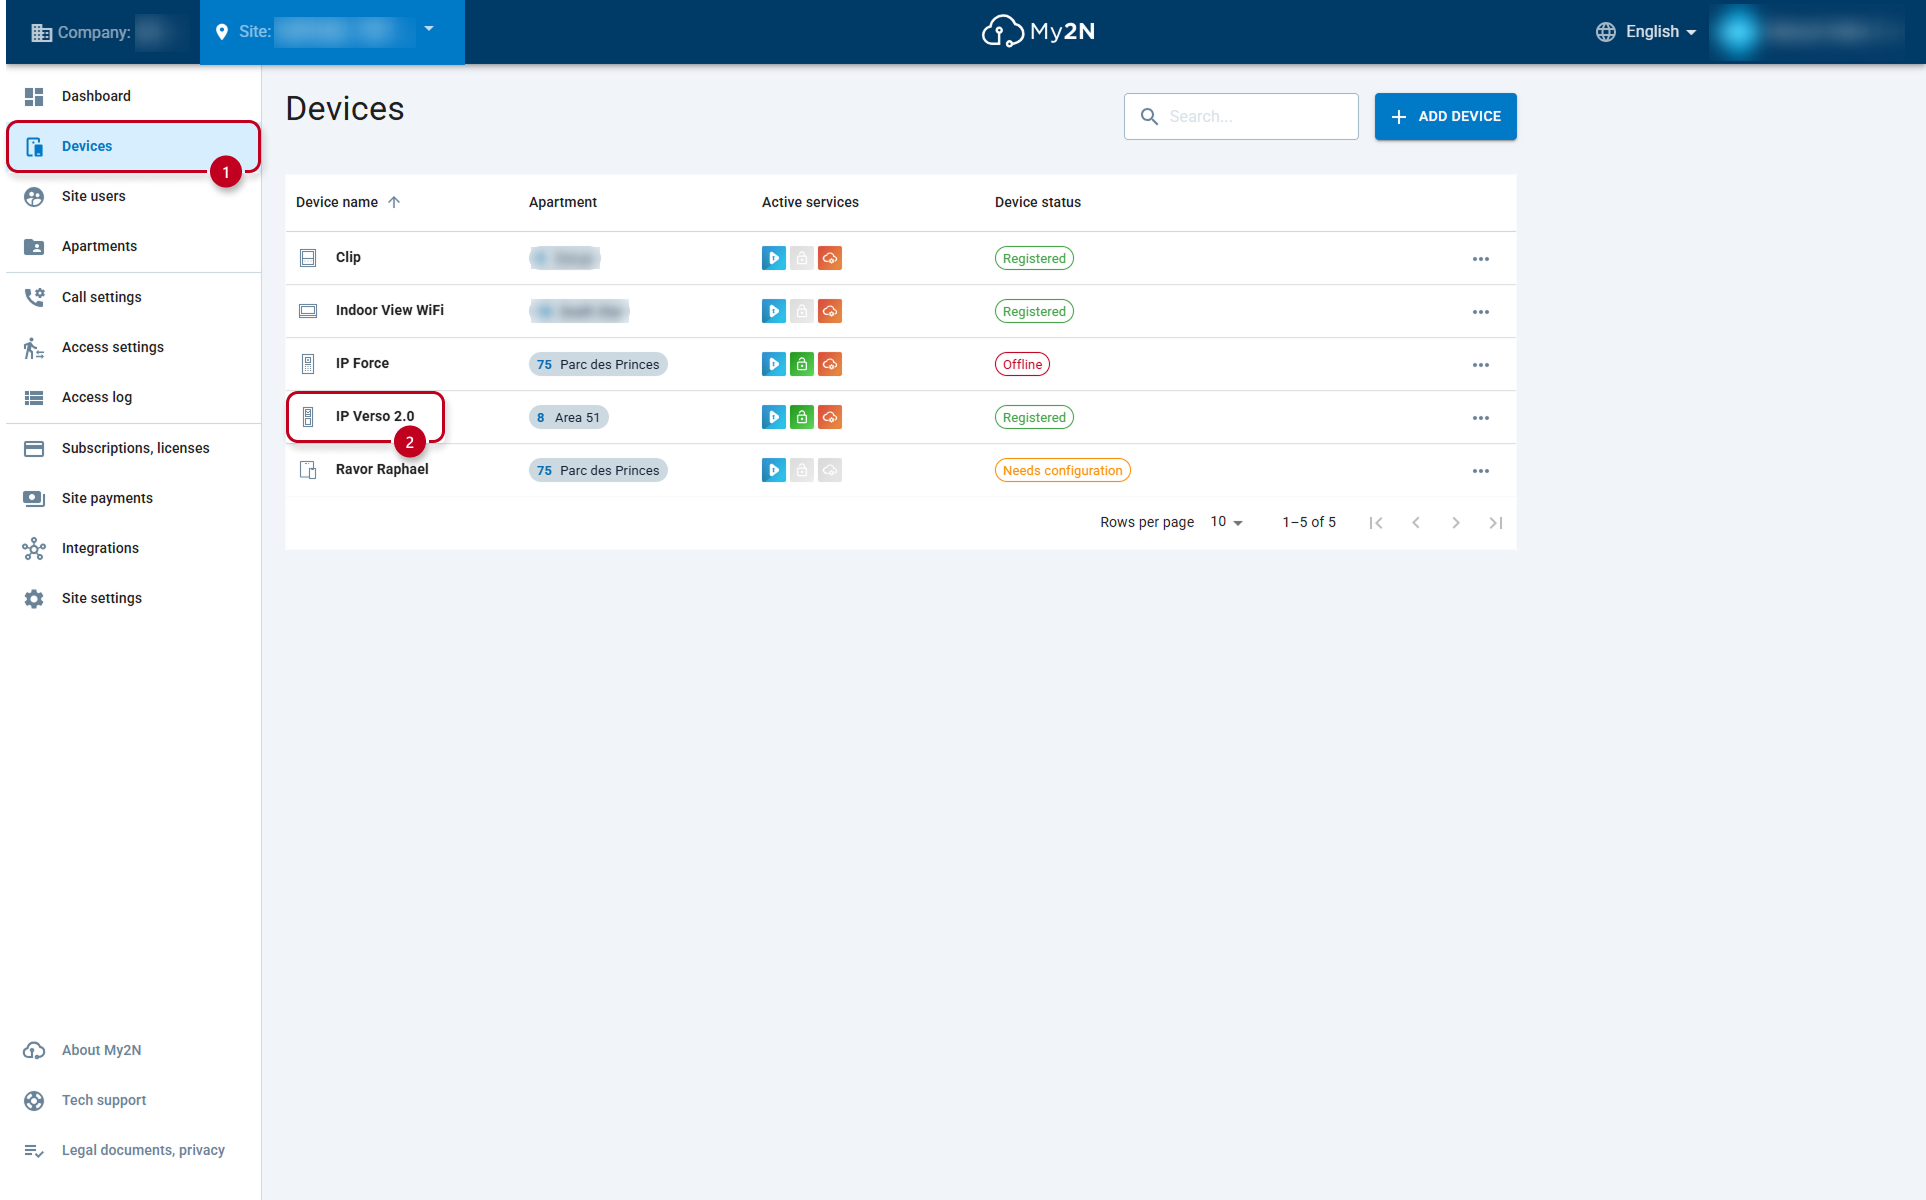
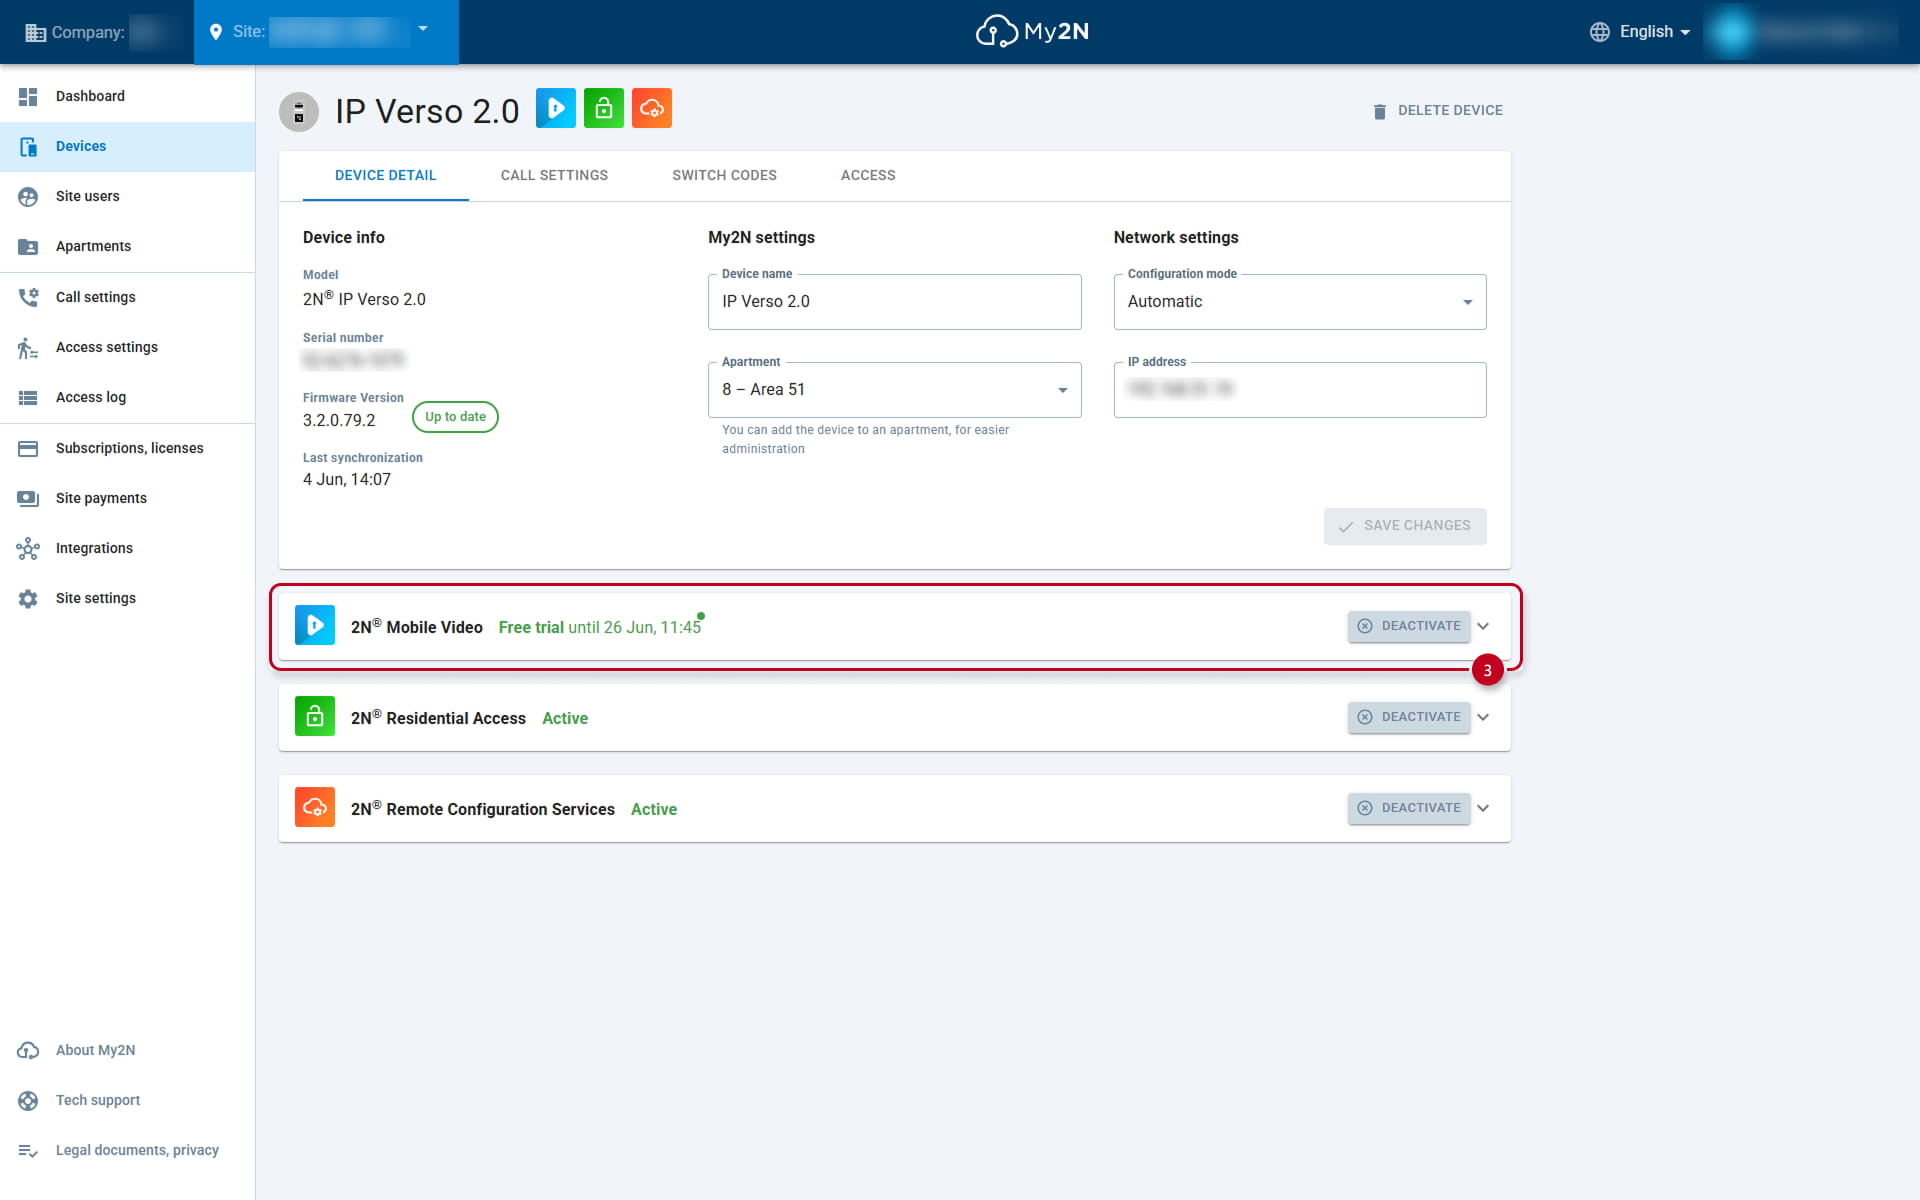
- My2N app
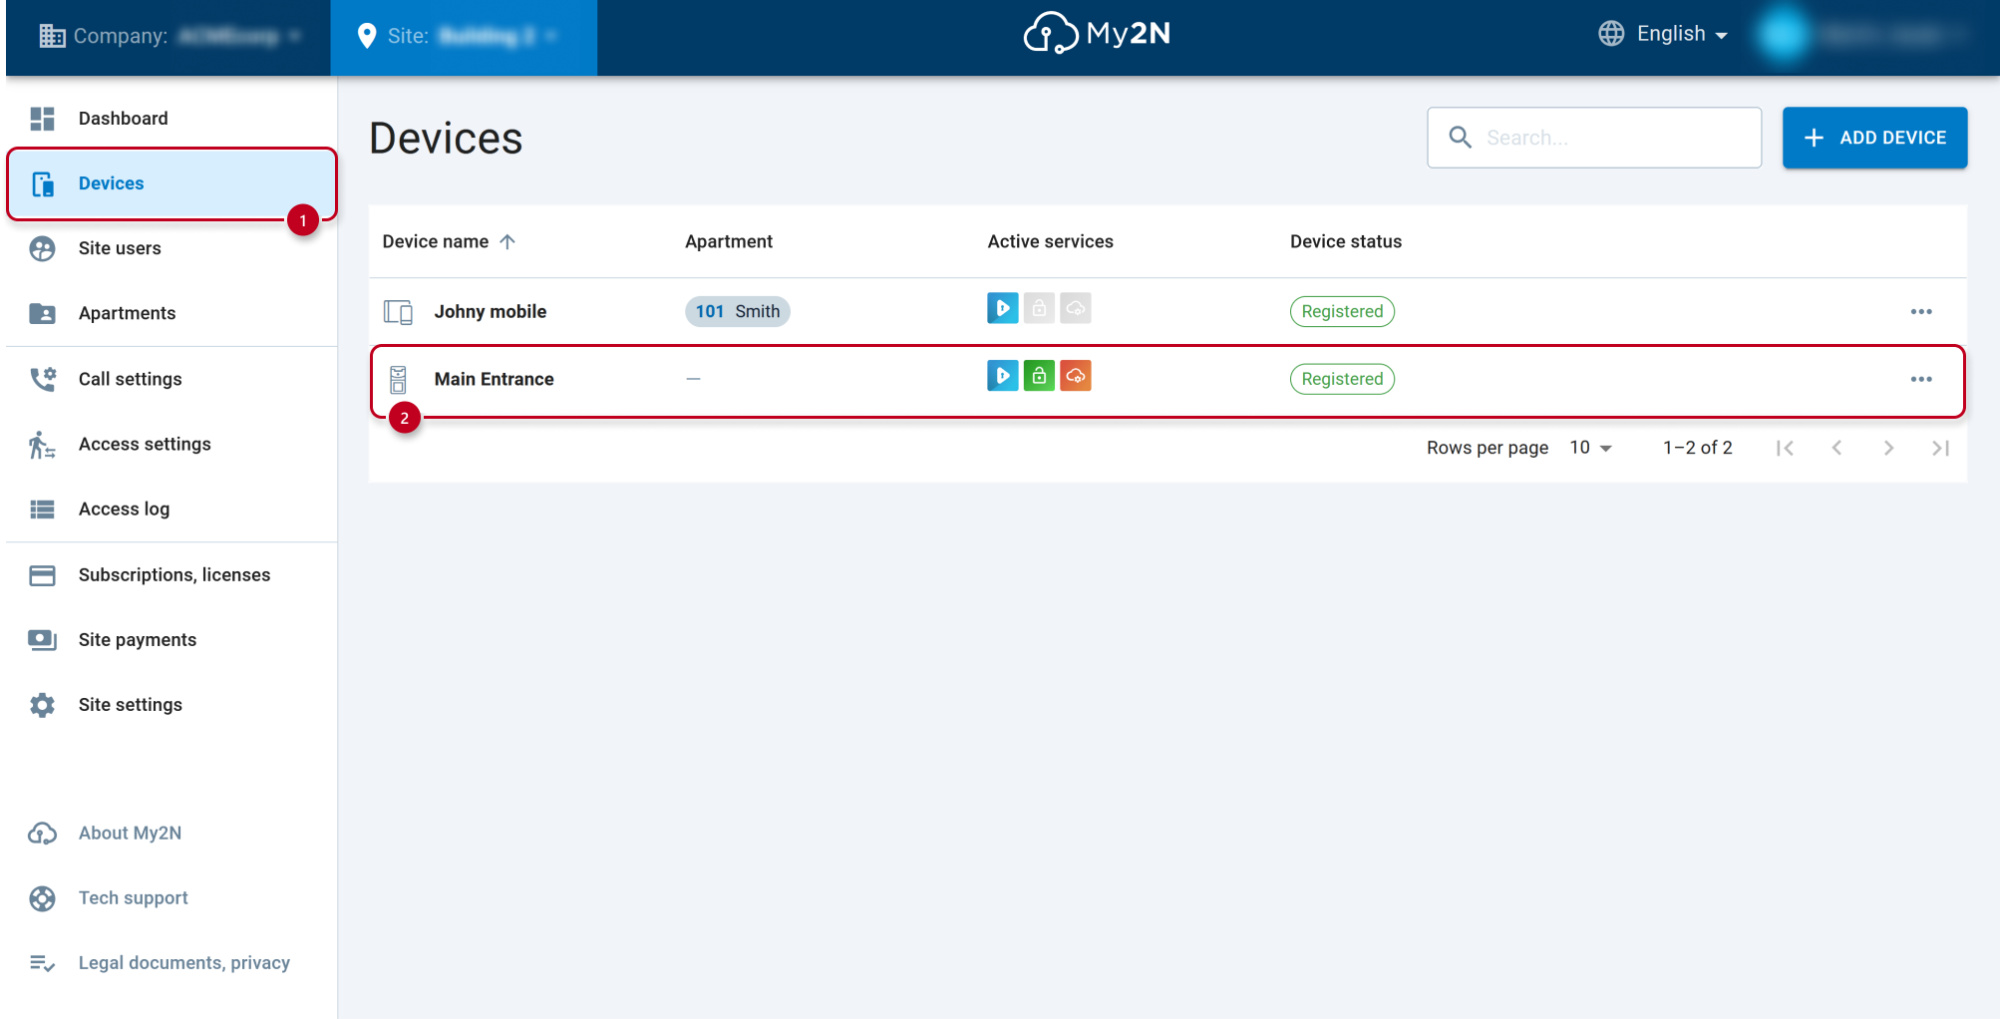
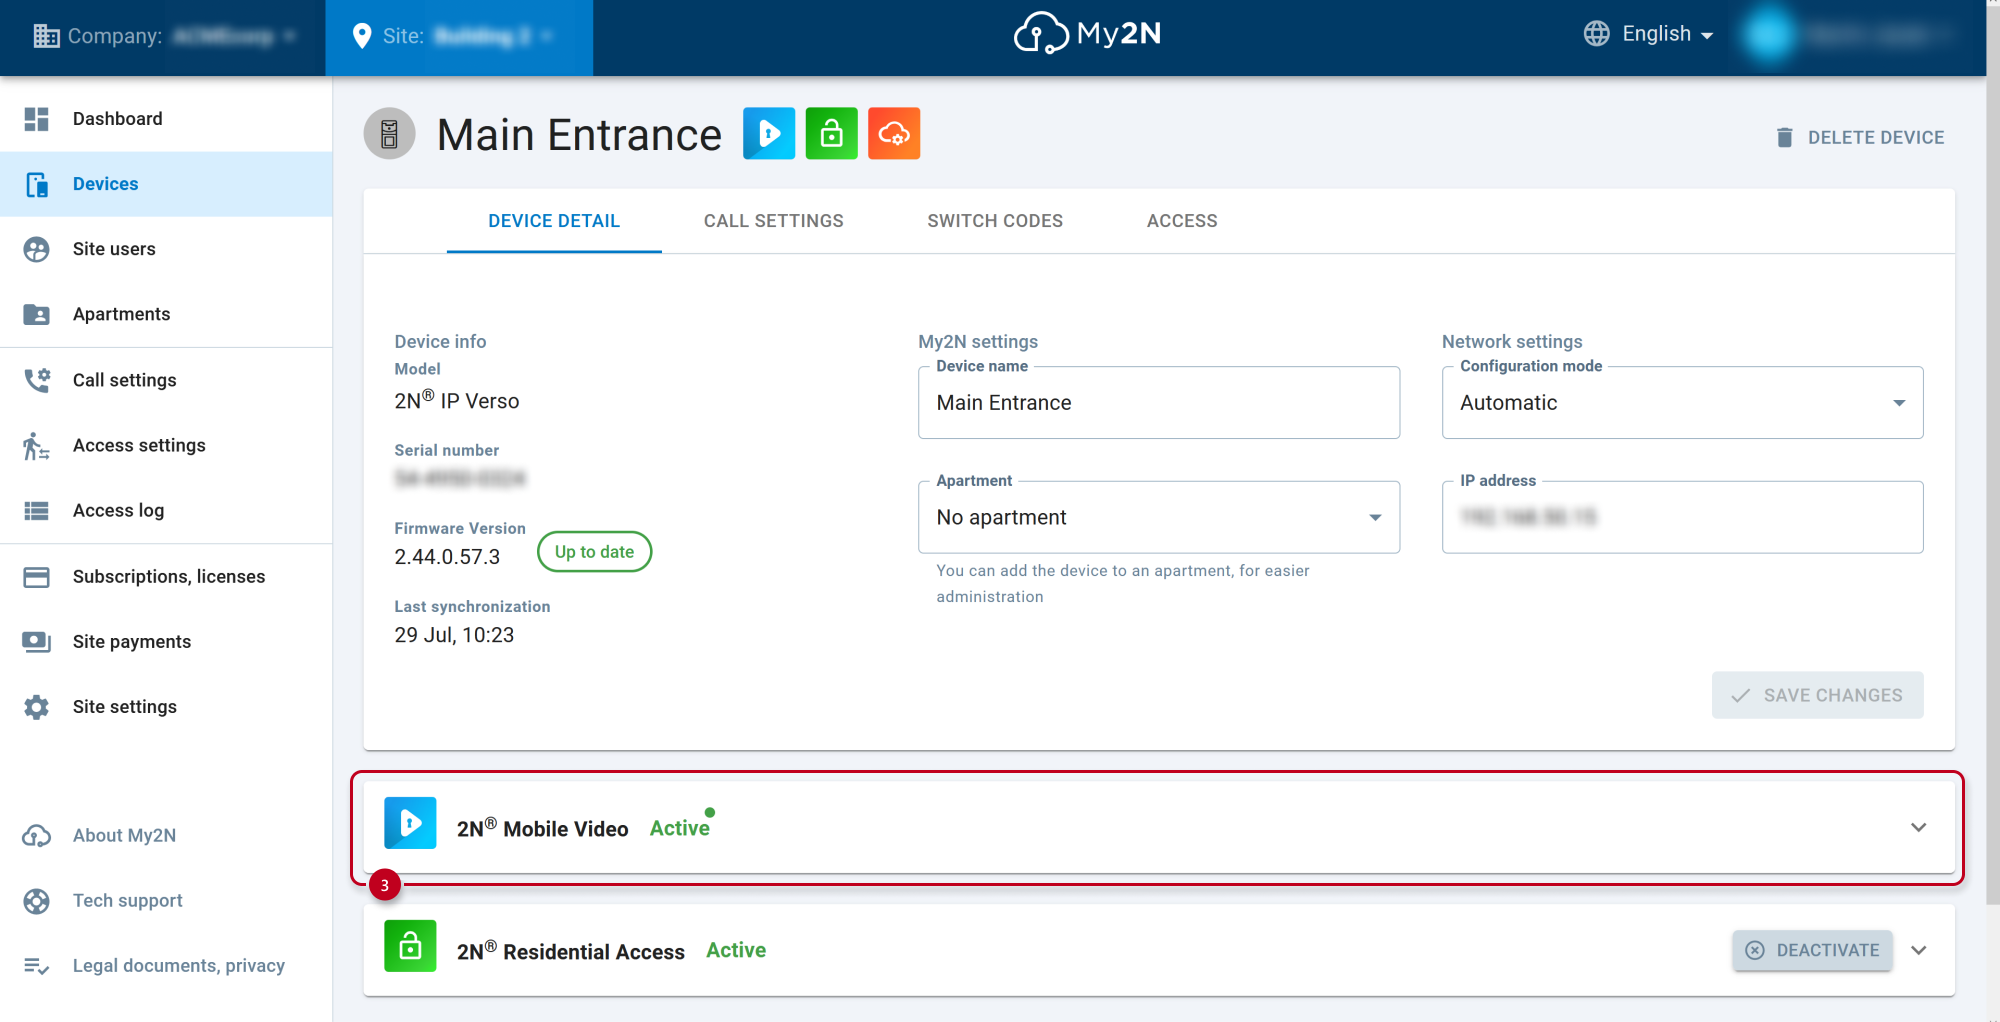
- Go to the My2N platform portal - Devices section and open the IP Intercom details.
- In the 2N Mobile Video part enable External Camera.
- Then you will see the camera icon during call.
- 3rd party video answering unit
- This devices can switch between internal and external camera by sending DTMF code thanks to set automation function in 2N IP Intercom.
- All the procedure is described in this video:
Get RTSP stream from 2N IP Intercom
You can get RTSP stream also from our 2N IP Intercom to behave as an IP camera in VMS systems.
- Go to 2N IP Intercom web interface - section Services - Streaming and enable RTSP server.
- Generate the RTSP Stream URL and create a user account for the stream authentication.
- Now you can capture the stream e.g. by VMS system or VLC Player.
VLC Player - How to watch and record video from 2N IP Intercom
Firmware 3.0 and newer
Adding external IP camera to 2N IP Intercom
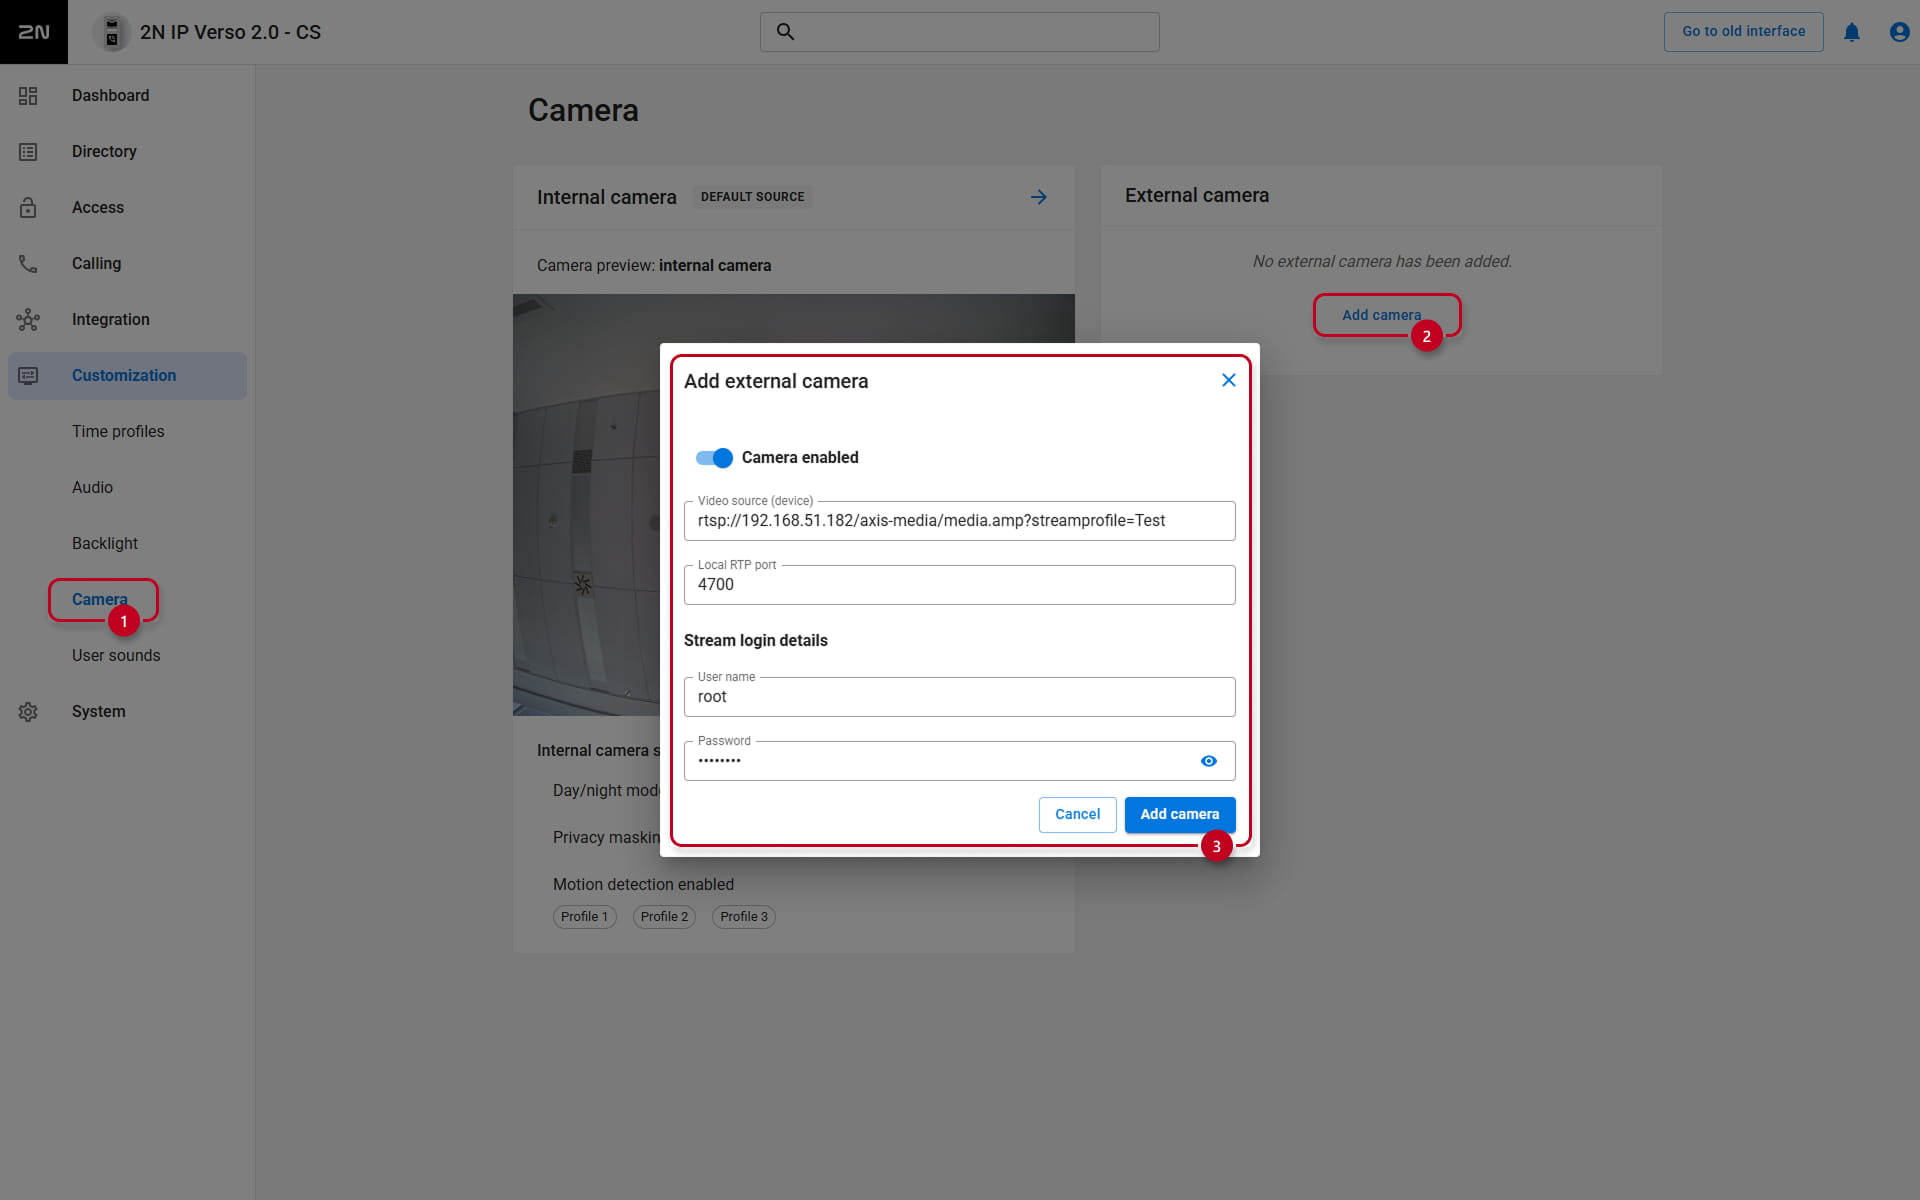
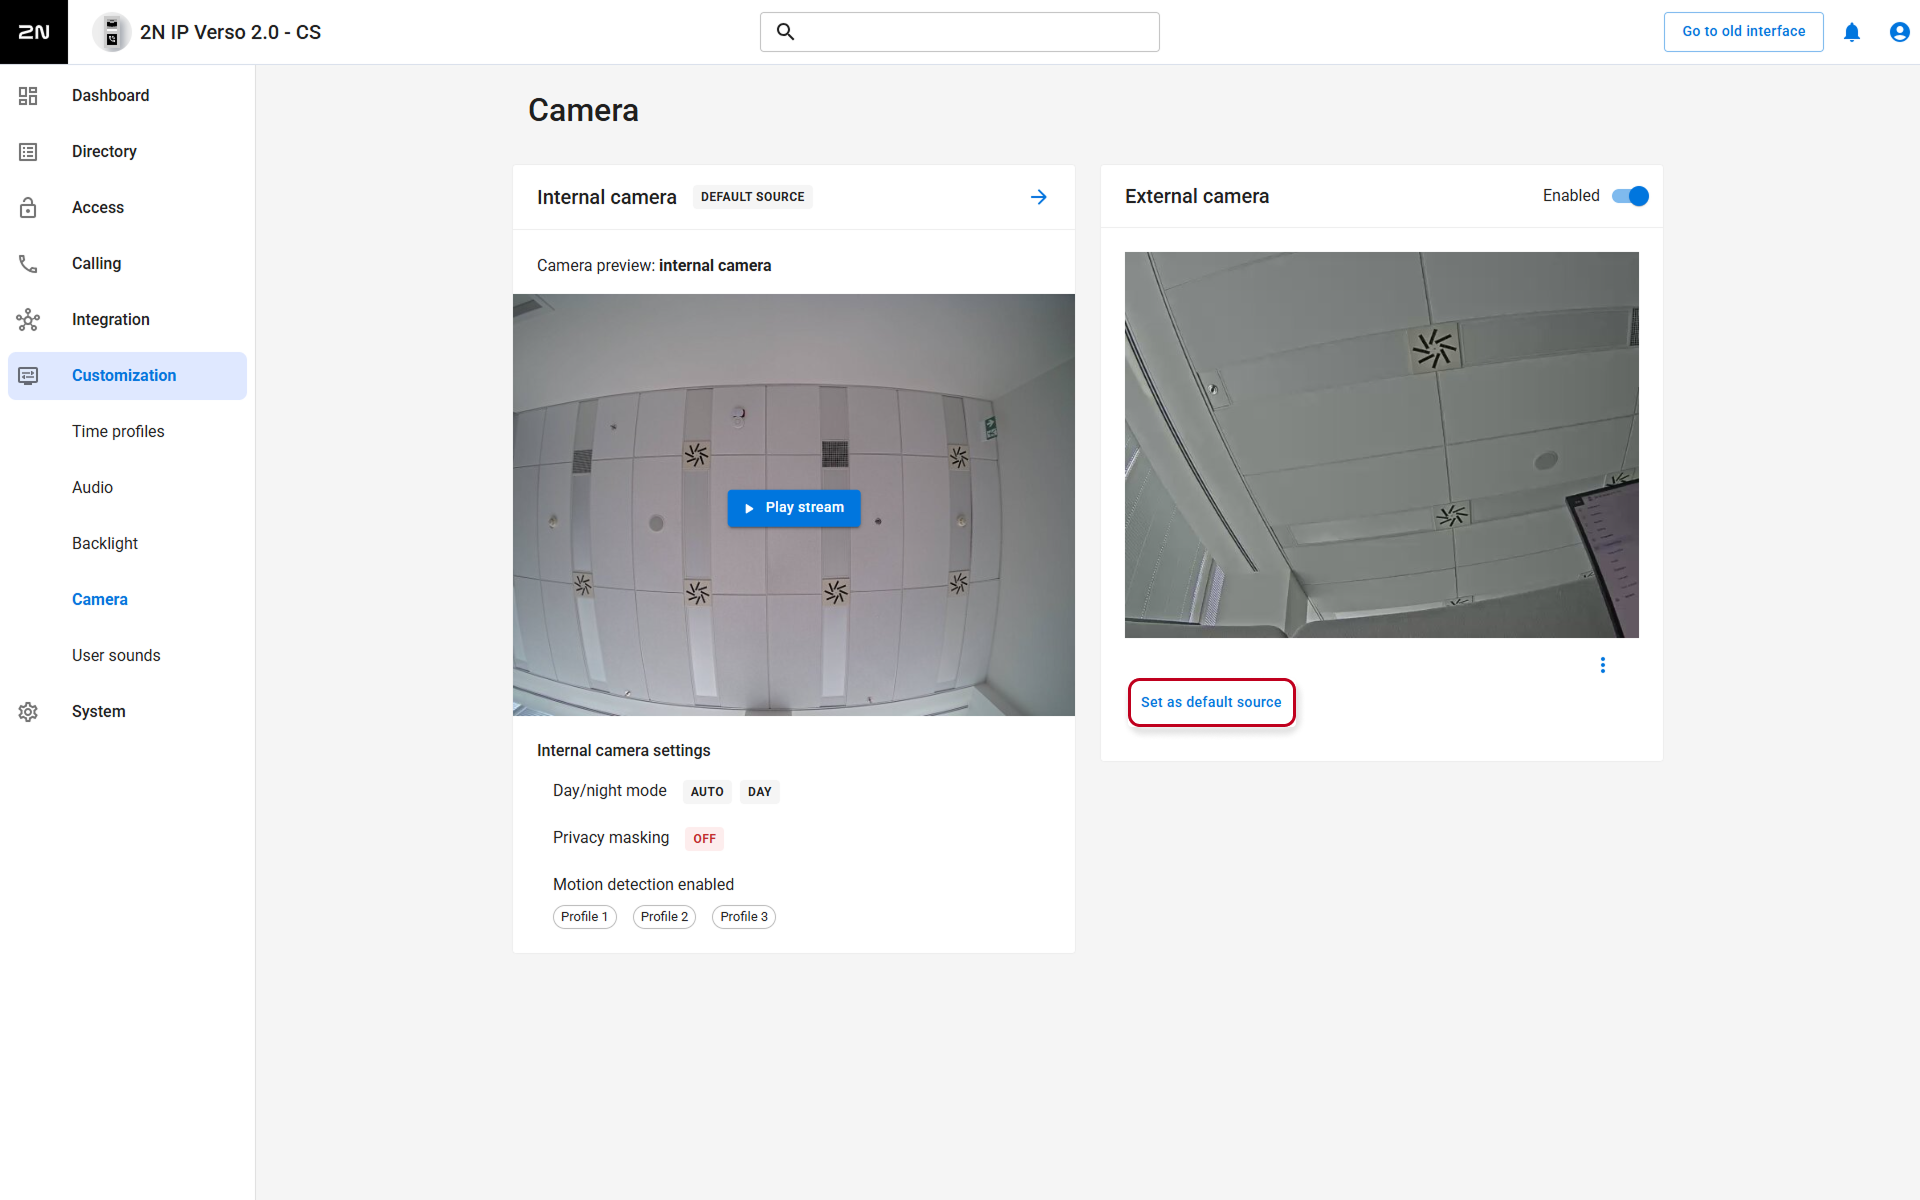
- Go to 2N IP Intercom web interface, section Customization - Camera.
- Click Add Camera in the section External Camera.
- In the new pop-up window, enable the camera and fill in RTSP stream address in the following format: rtsp://ip_camera_address/parameters
(parameters depend on the connected IP camera model. We use an AXIS camera in the example below.) - Fill in the User name and password if the external IP camera requires authentication.
- Click Add Camera.
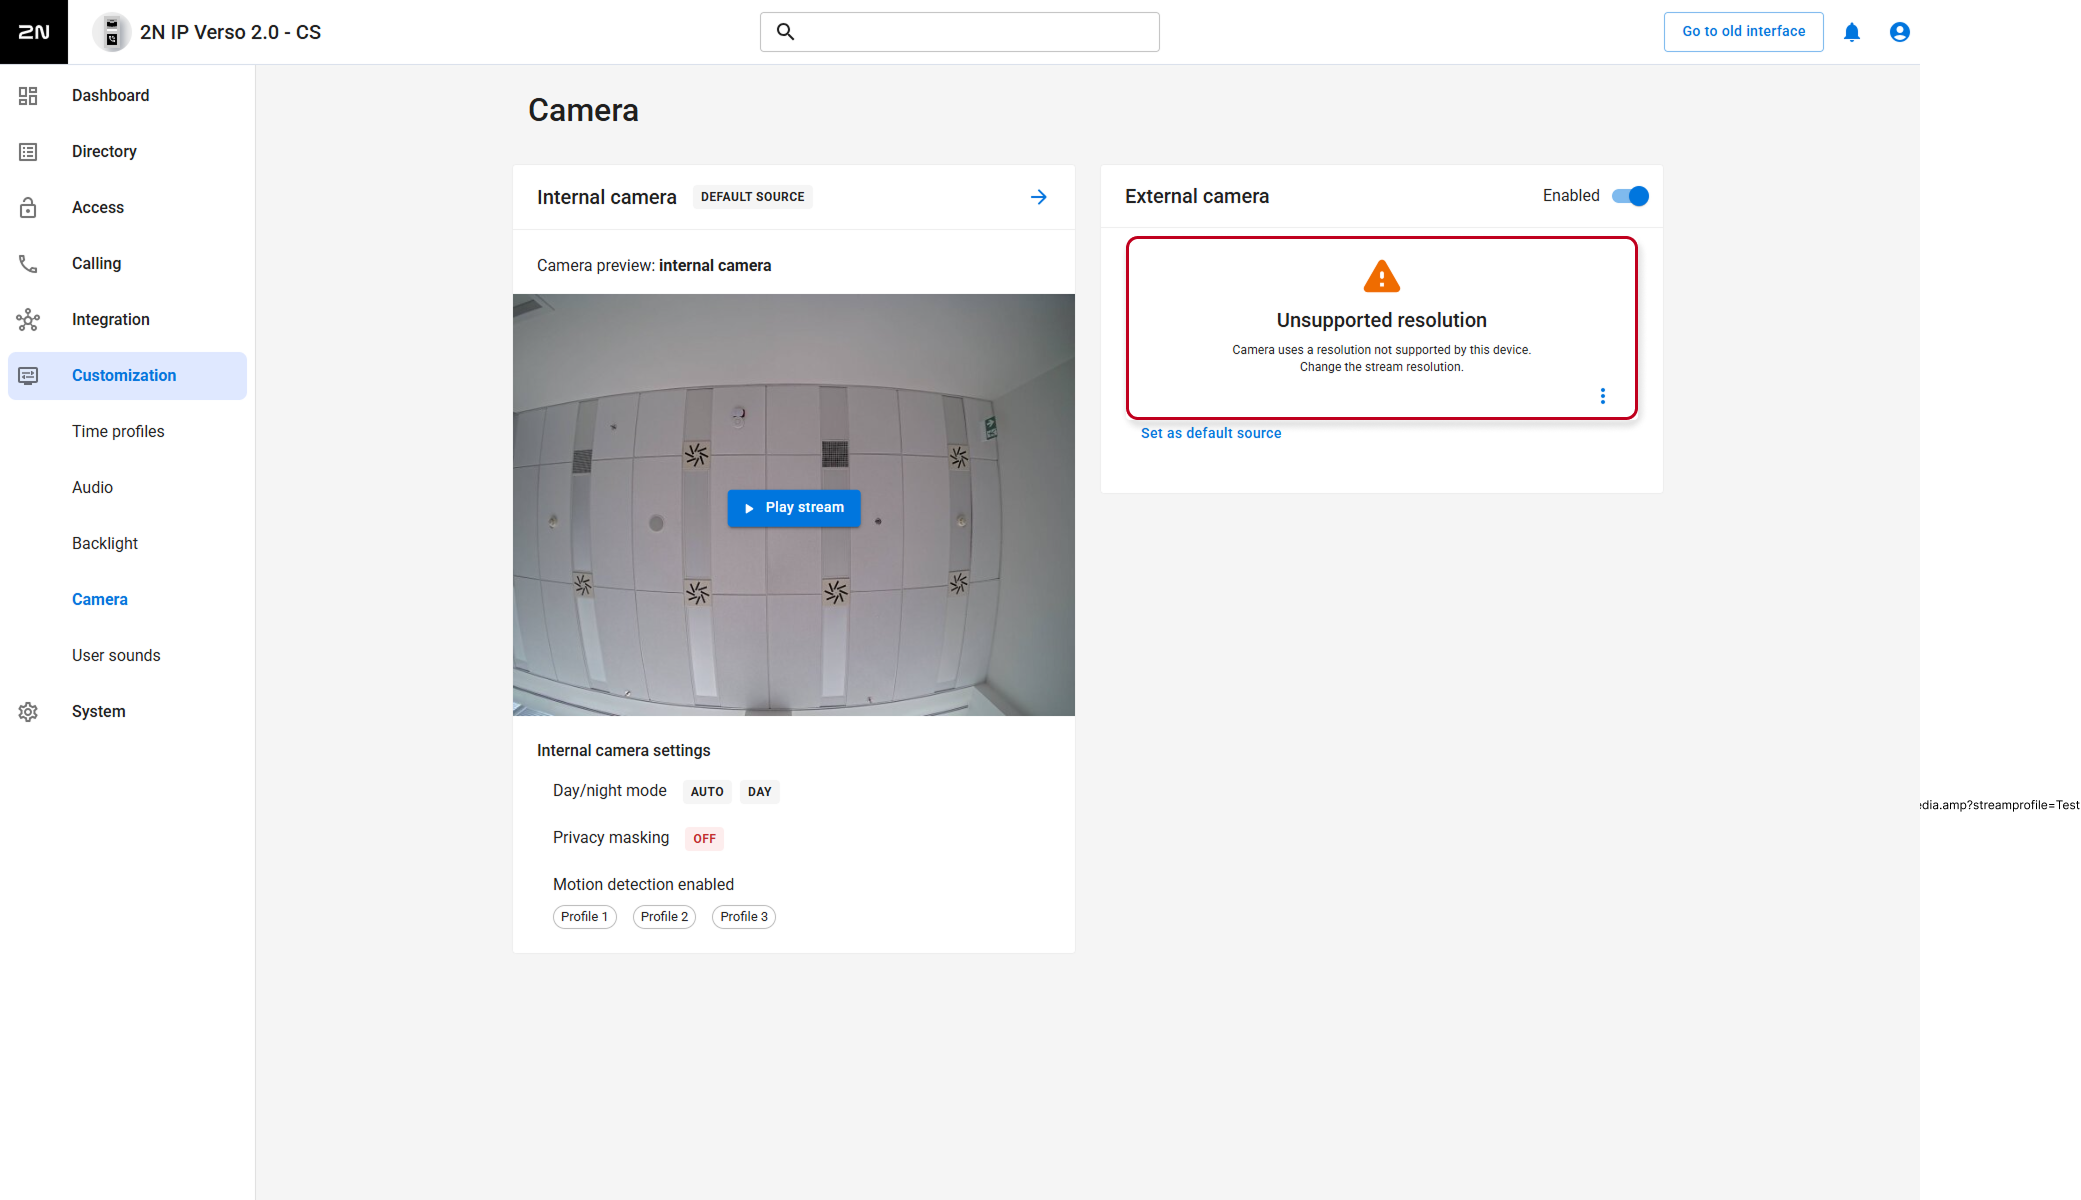
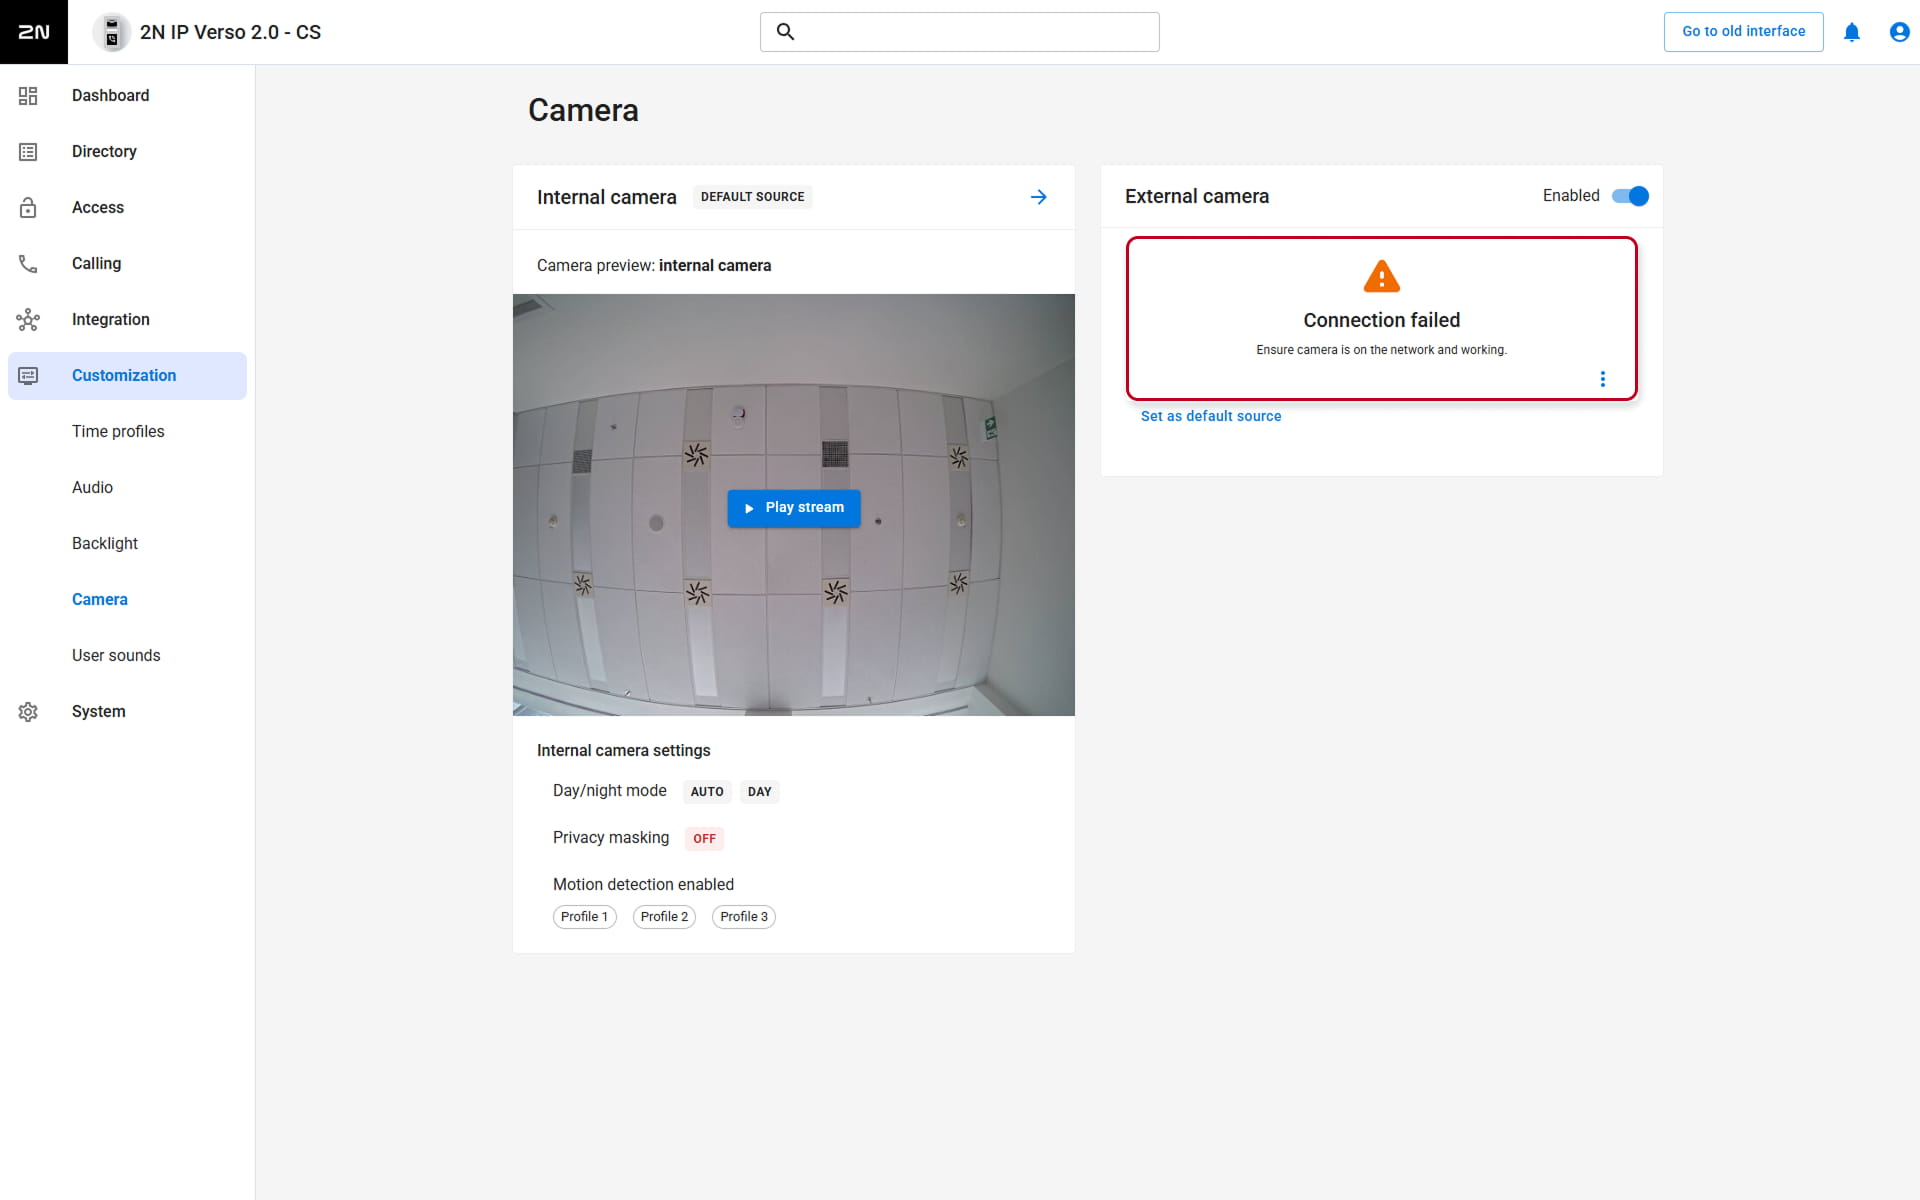
- After saving, you should be able to see Camera Preview if you configured everything correctly.
- Common issues you can meet:
- Unsupported resolution
Reason: Resolution is higher than 640 x 480 px or not in aspect ratio 4:3
- Unsupported resolution
-
- Connection failed
Reason: Wrong format of RTSP stream address, e.g. invalid IP address.
- Connection failed
-
-
- Authentication failed
Reason: Invalid username or password
-

Select the default video source (from internal or external camera)
Still you will be able to switch between them during call.
Switch between internal and external camera during call
We will show you how to enable this feature on supported answering units.
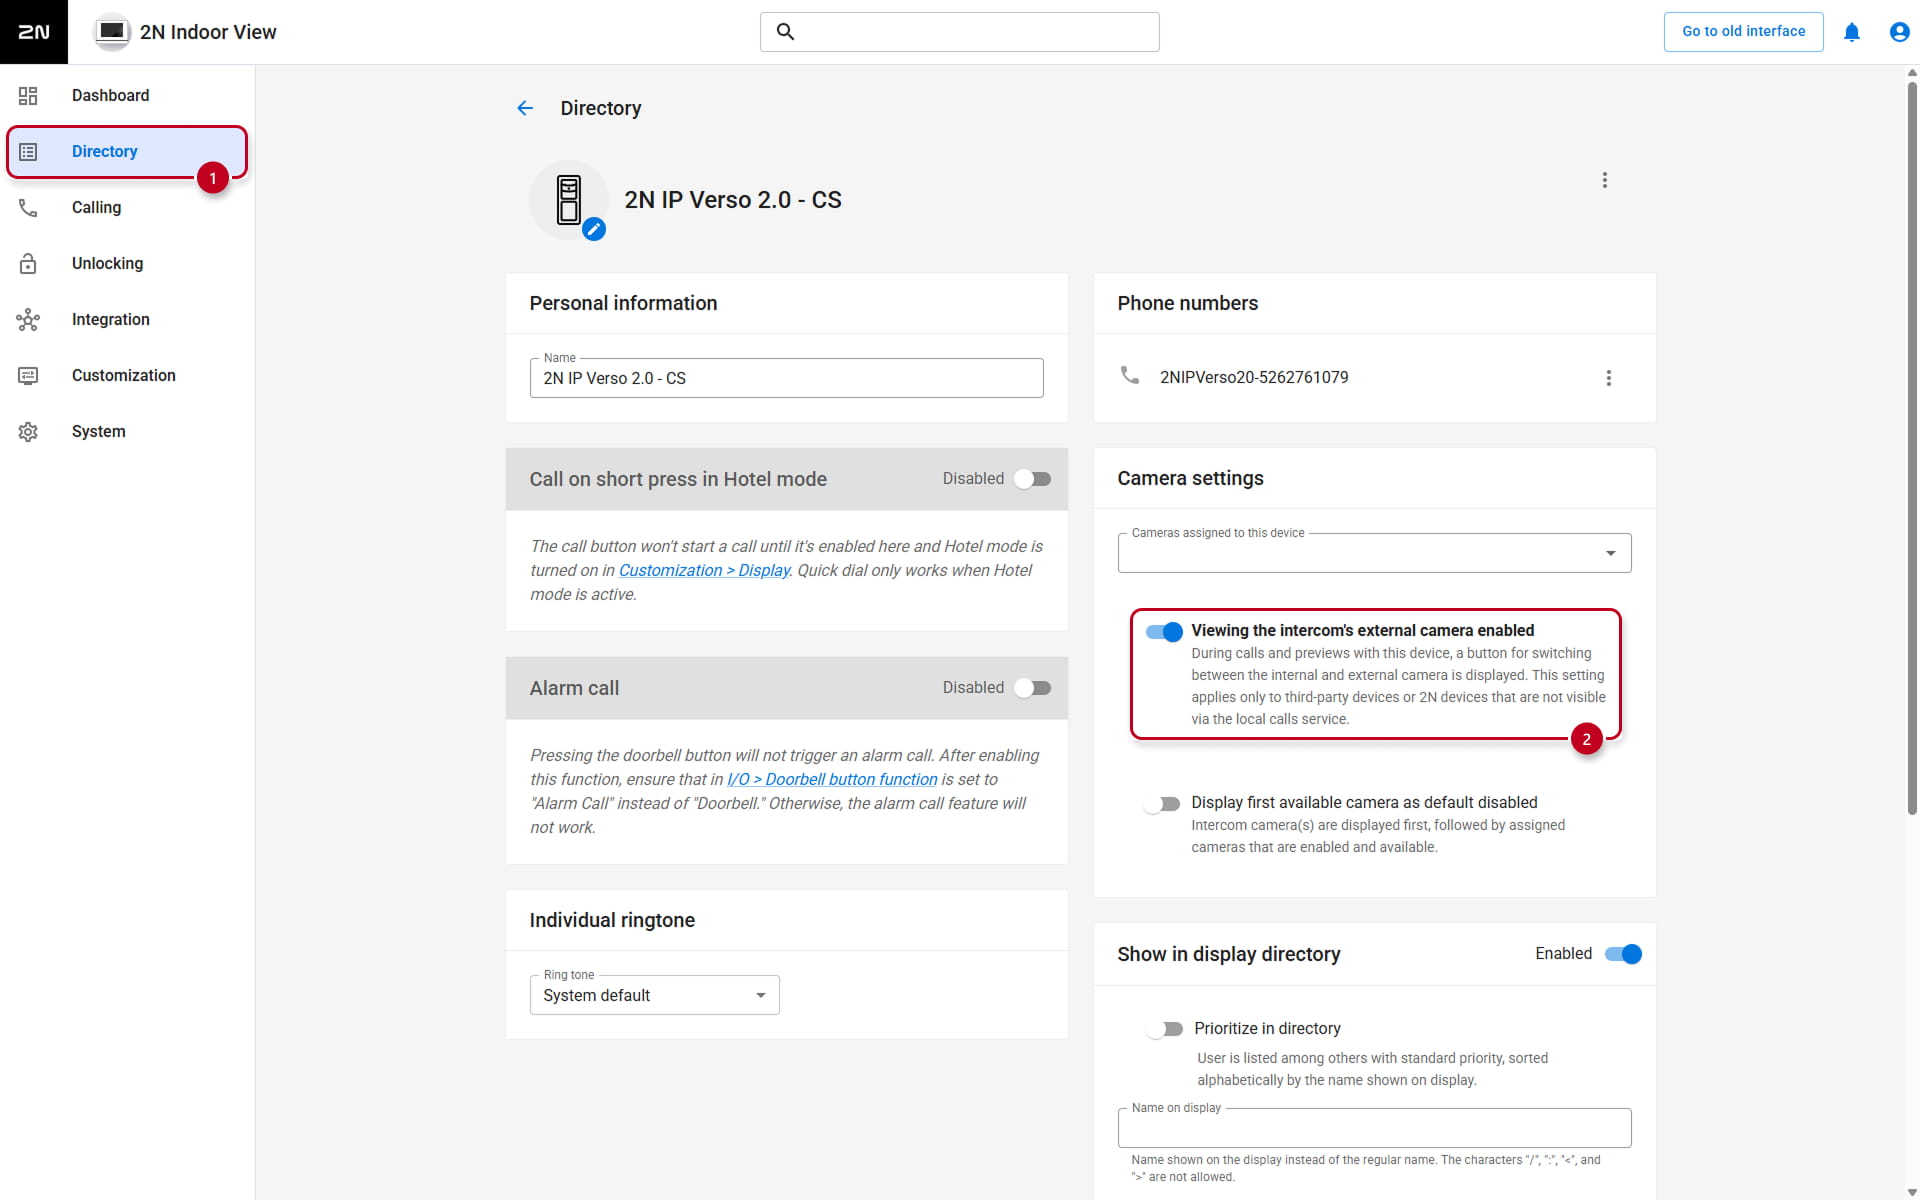
- 2N Indoor Compact or 2N Indoor View
- Go to the device´s web interface - Directory.
- Add 2N IP Intercom to the devices list and enable viewing the external camera.
- Then you will see the camera icon during call.
- 2N Indoor Touch 2.0
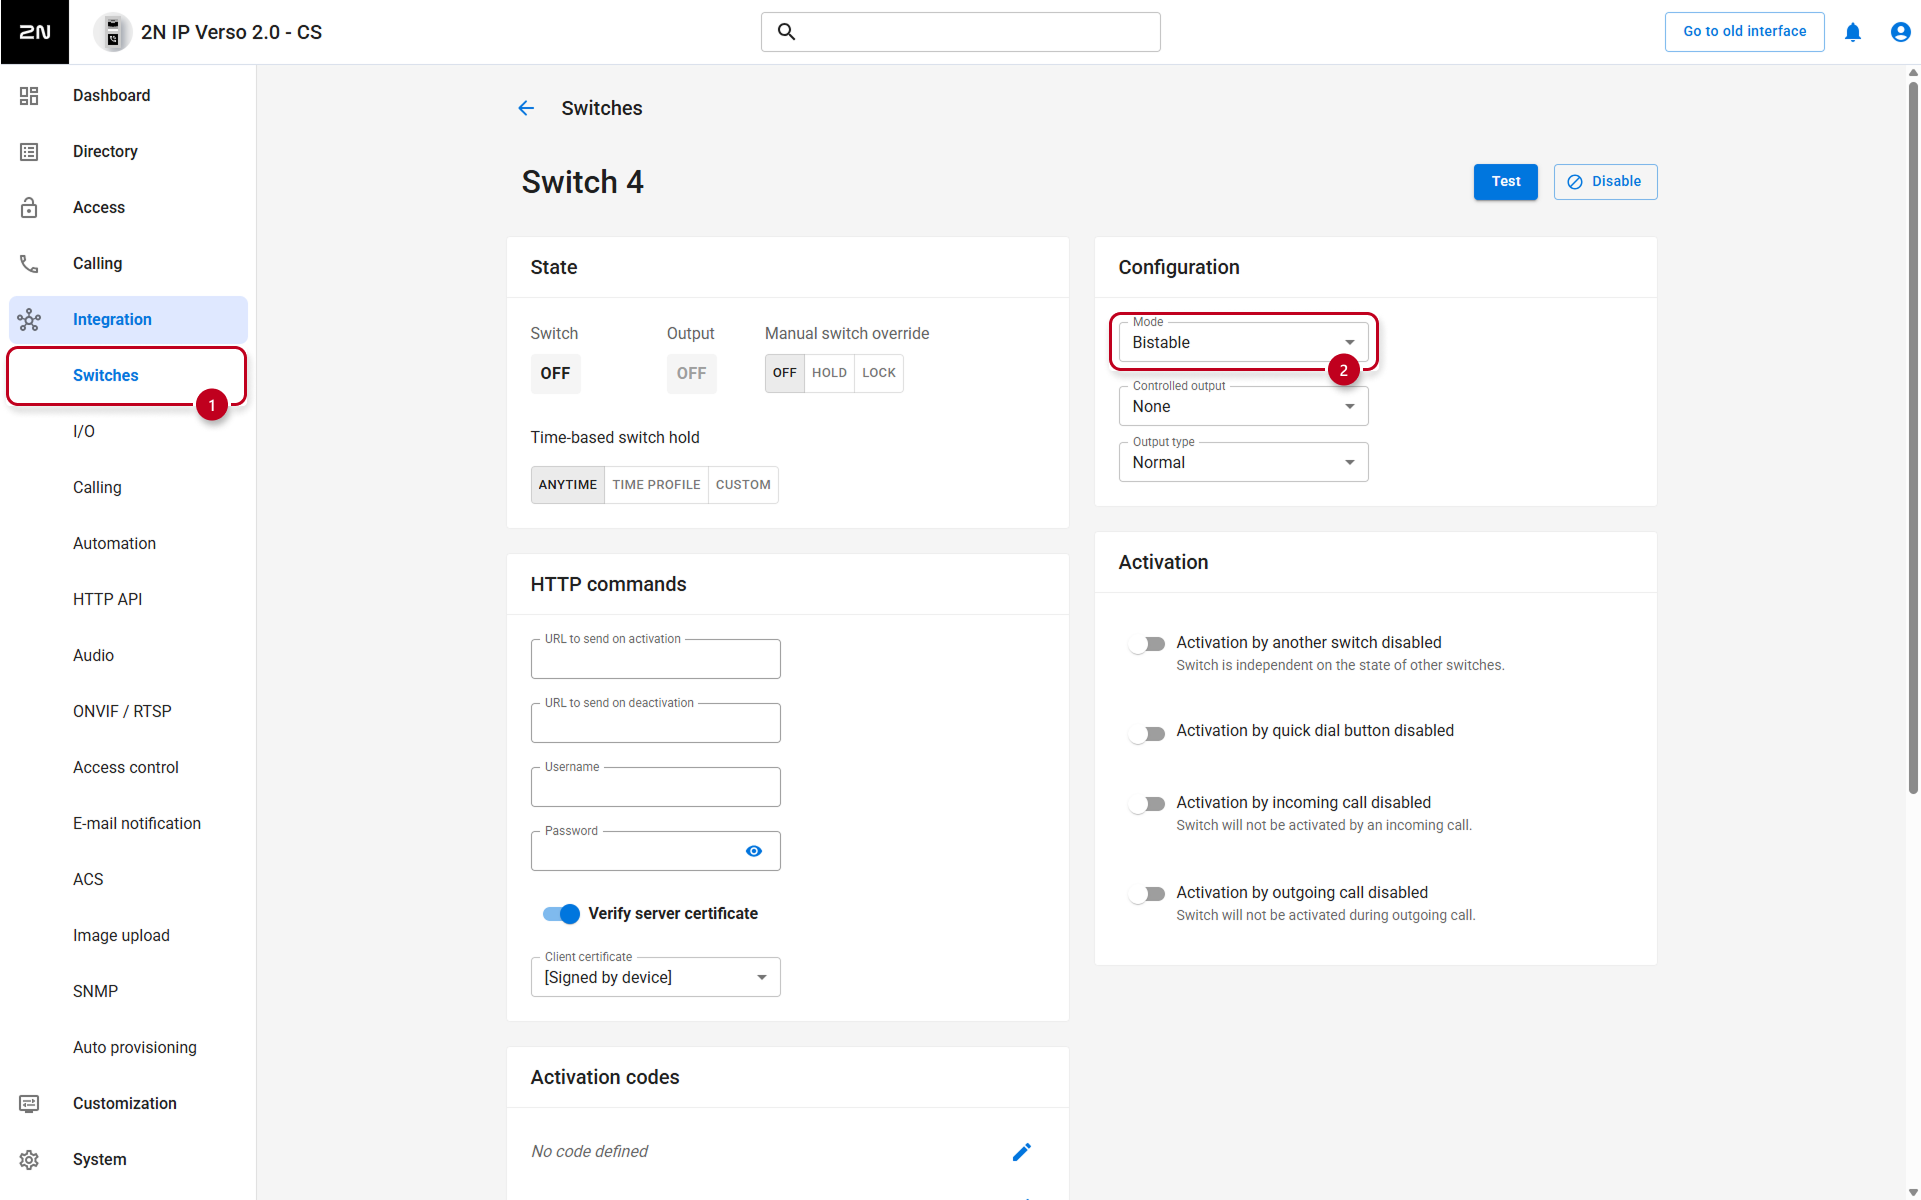
- Go to the 2N IP Intercom web interface.
- In the section Integration - Switches configure the switch, you chose for the control of the cameras,
The parameter "Mode" has to be set to "Bistable".
- In the section Integration - Switches configure the switch, you chose for the control of the cameras,
- Go to the 2N IP Intercom web interface.
-
-
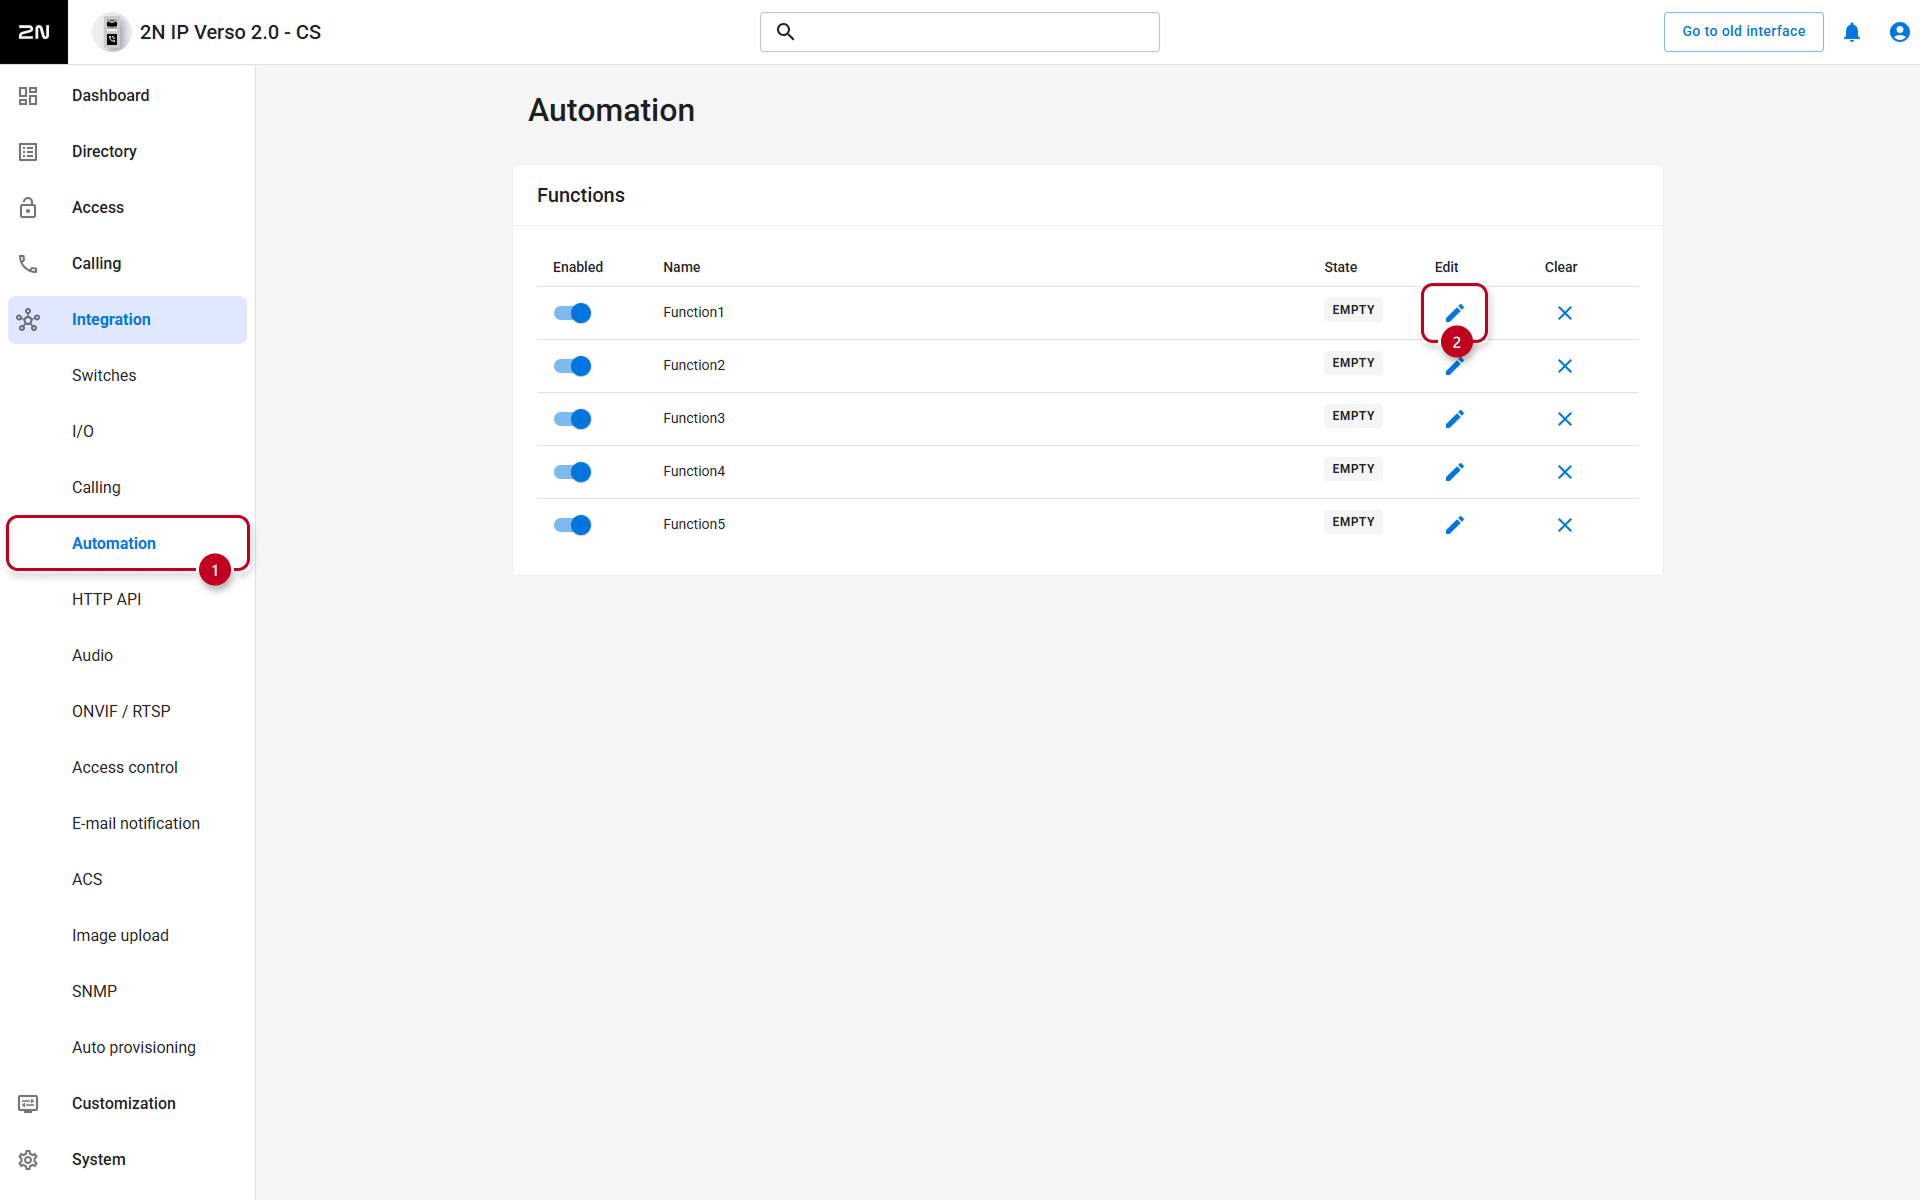
- In the section Integration - Automation, configure the function to switch between cameras by activating the selected switch.
More information: Automation manual
- In the section Integration - Automation, configure the function to switch between cameras by activating the selected switch.
-
-
- Now you have to tap and hold the padlock icon during call until the 4 locks representing 4 switches in the 2N IP Intercom appear.
After that, you can easily switch between the cameras by tapping on a particular switch you've used in the 2N IP Intercom configuration.
- Now you have to tap and hold the padlock icon during call until the 4 locks representing 4 switches in the 2N IP Intercom appear.
- My2N app
- Go to the My2N platform portal - Devices section and open the IP Intercom details.
- In the 2N Mobile Video part enable External Camera.
- Then you will see the camera icon during call.

- 3rd party video answering unit
- This devices can switch between internal and external camera by sending DTMF code thanks to set automation function in 2N IP Intercom.
Get RTSP stream from 2N IP Intercom
You can get RTSP stream also from our 2N IP Intercom to behave as an IP camera in VMS systems.
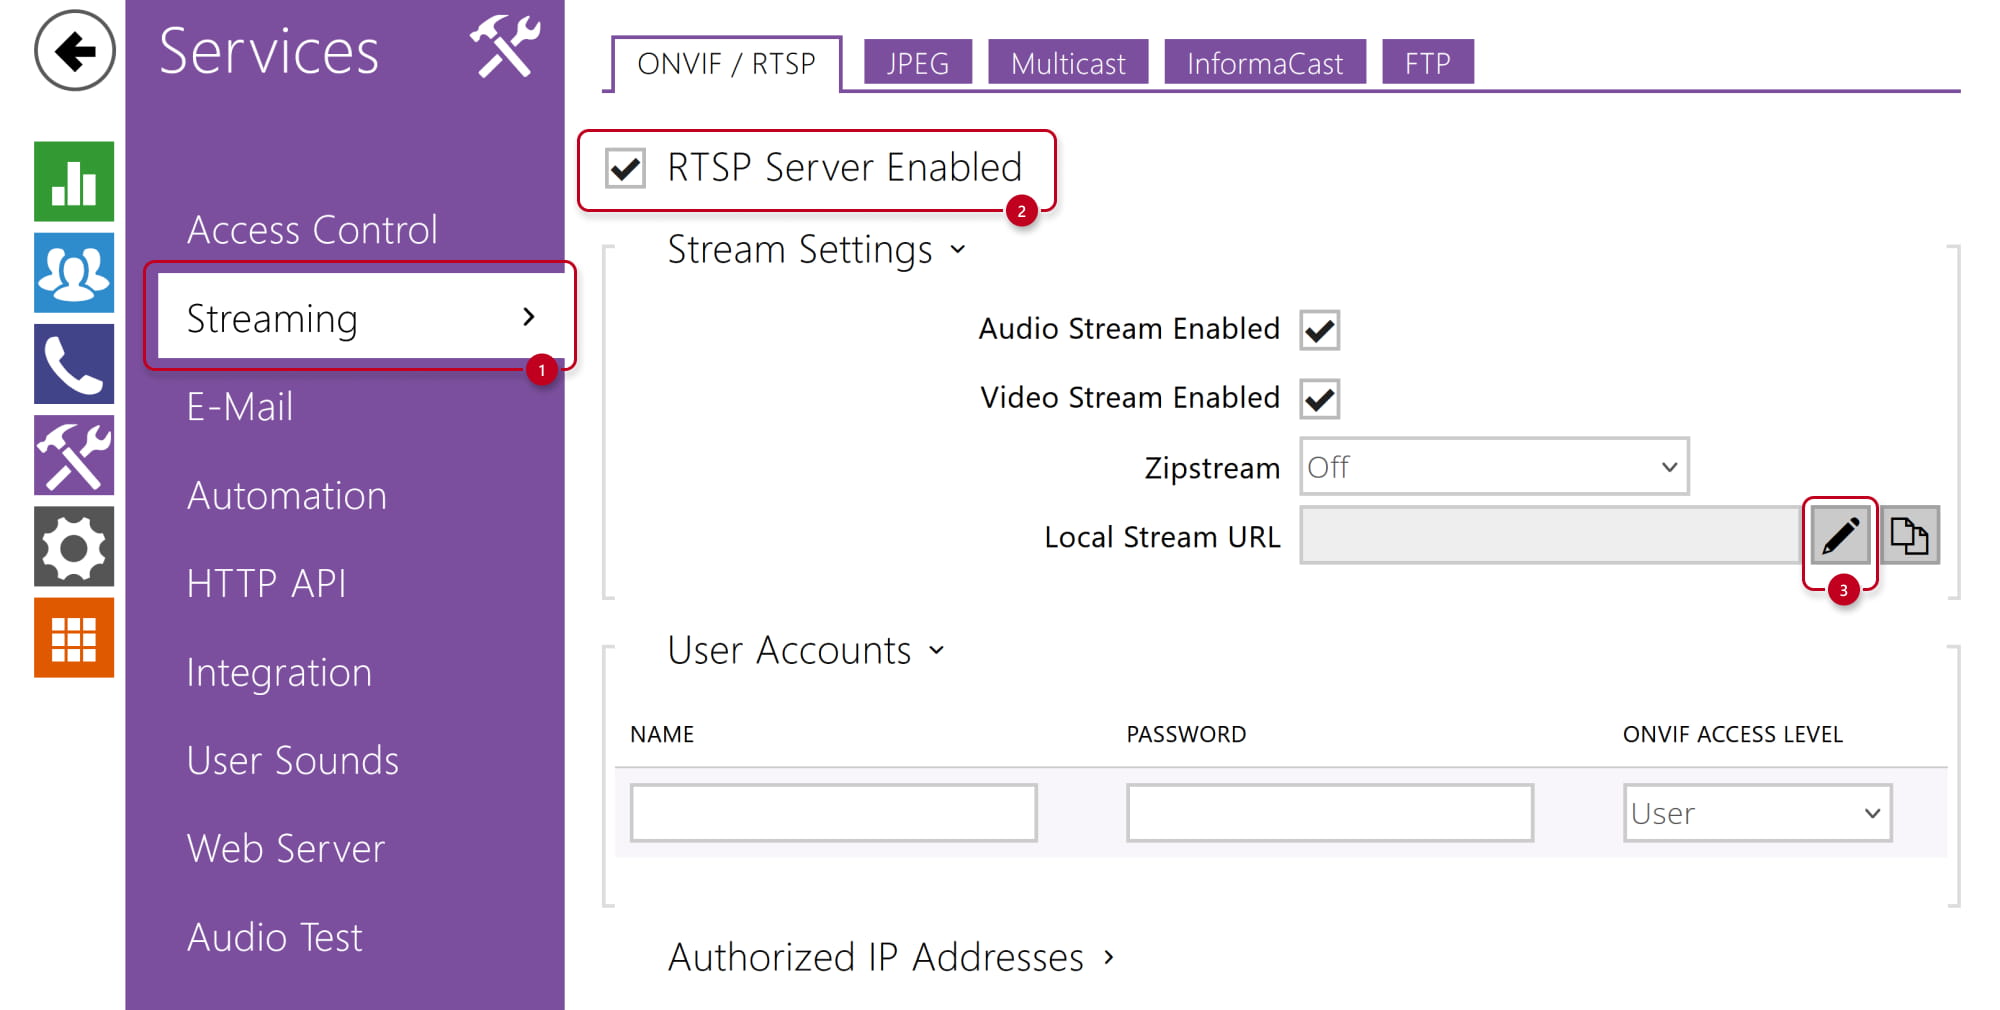
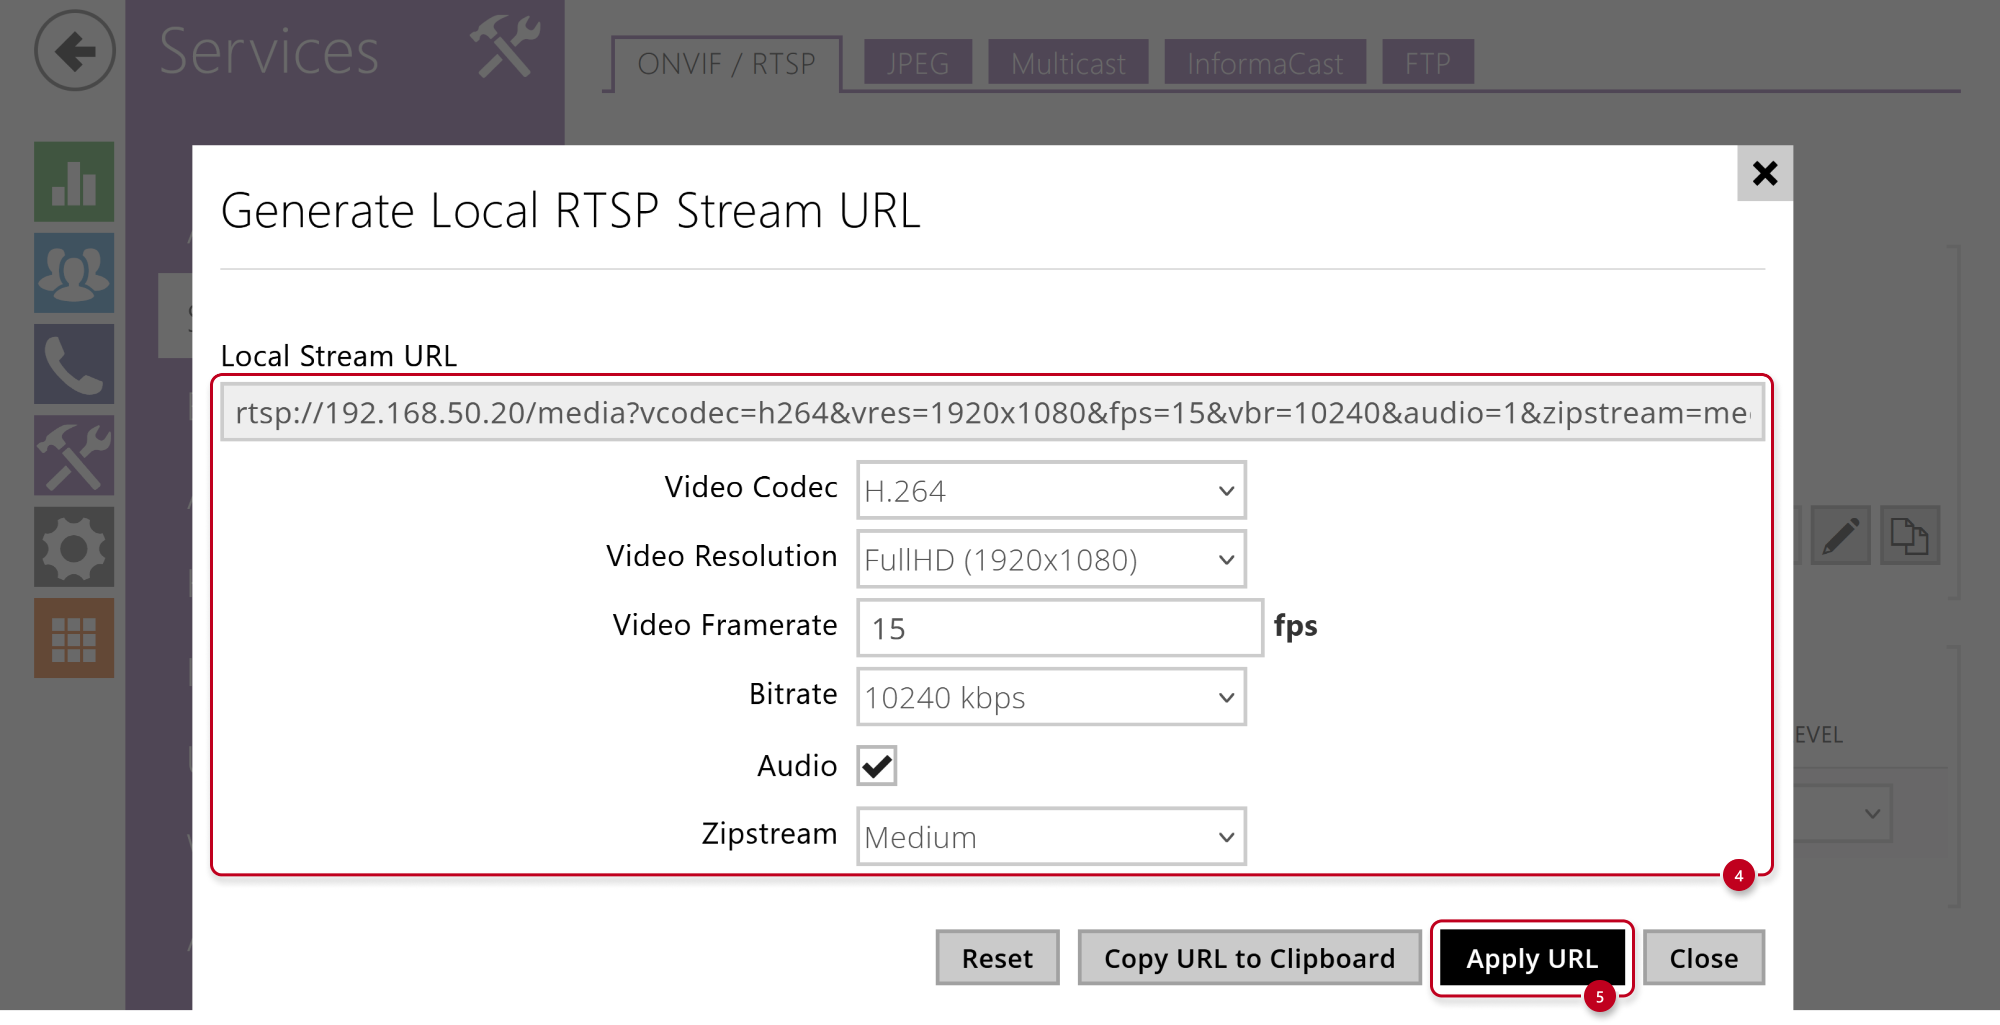
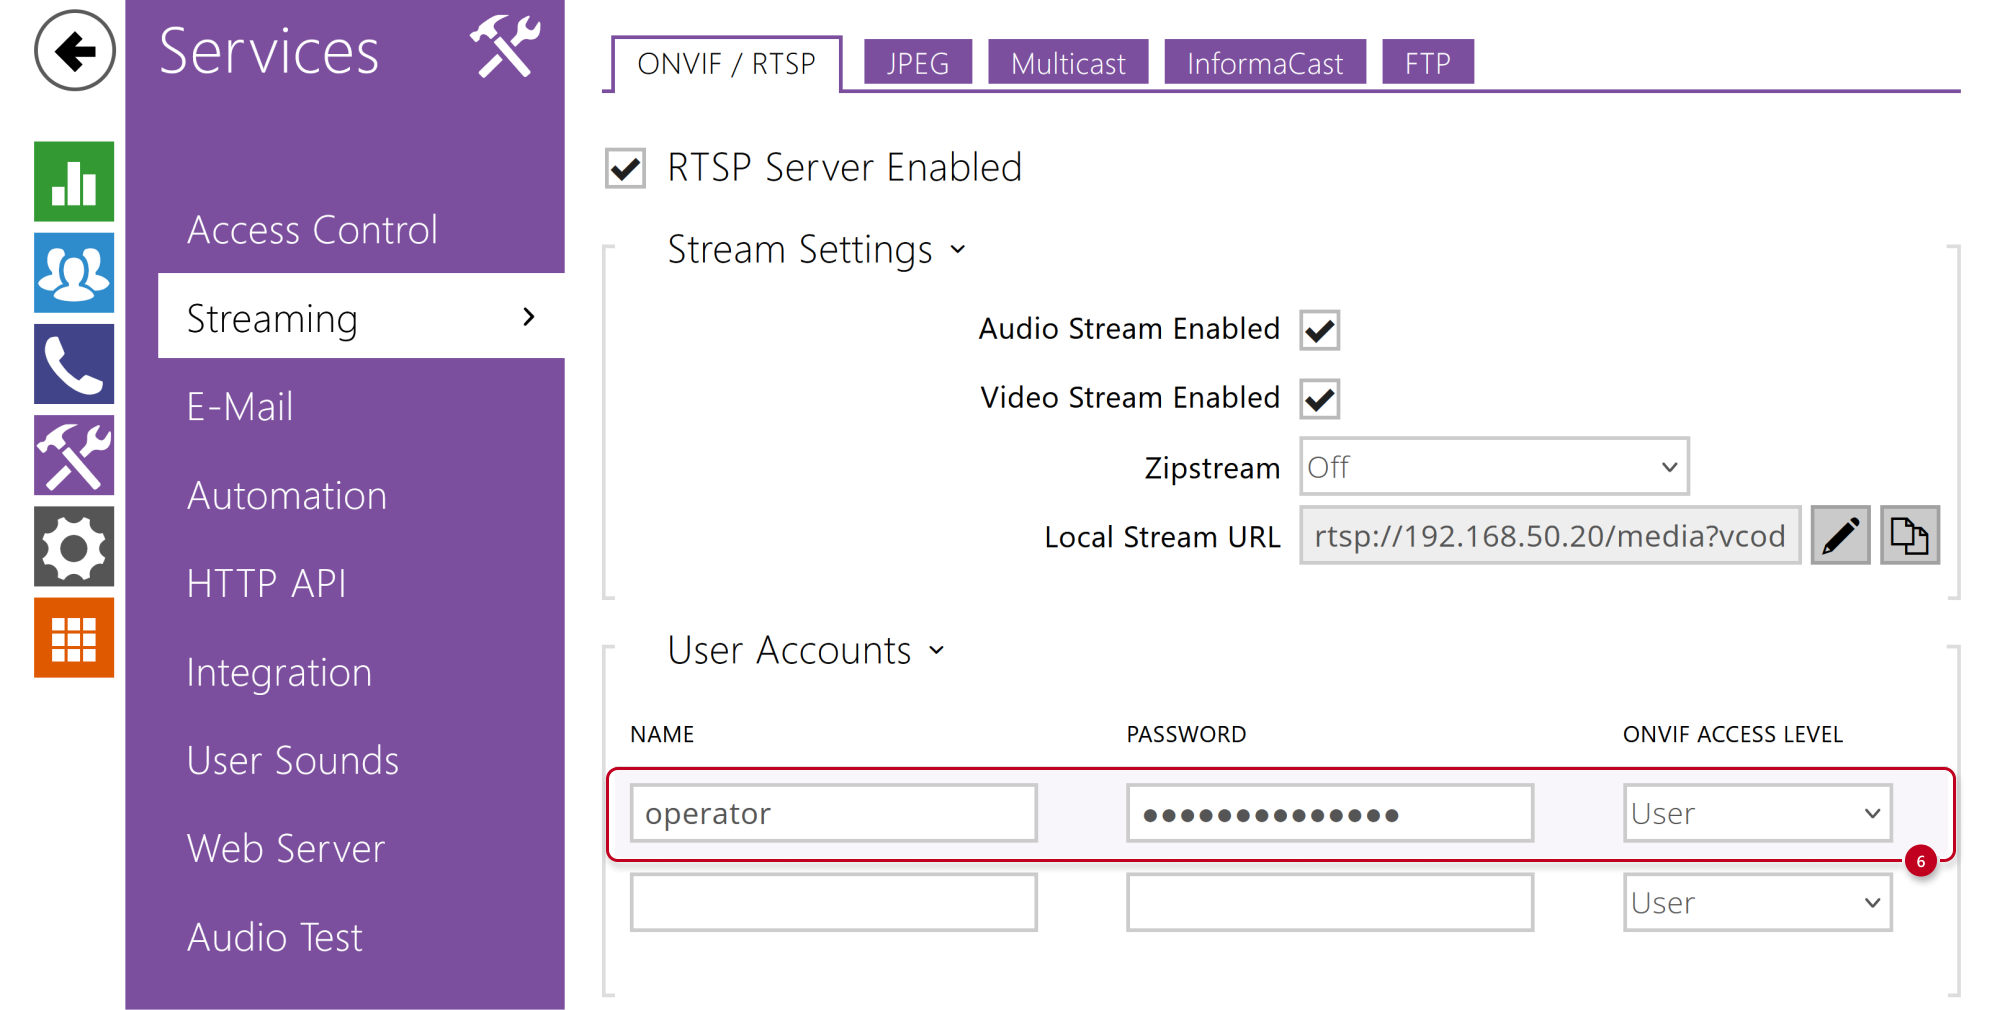
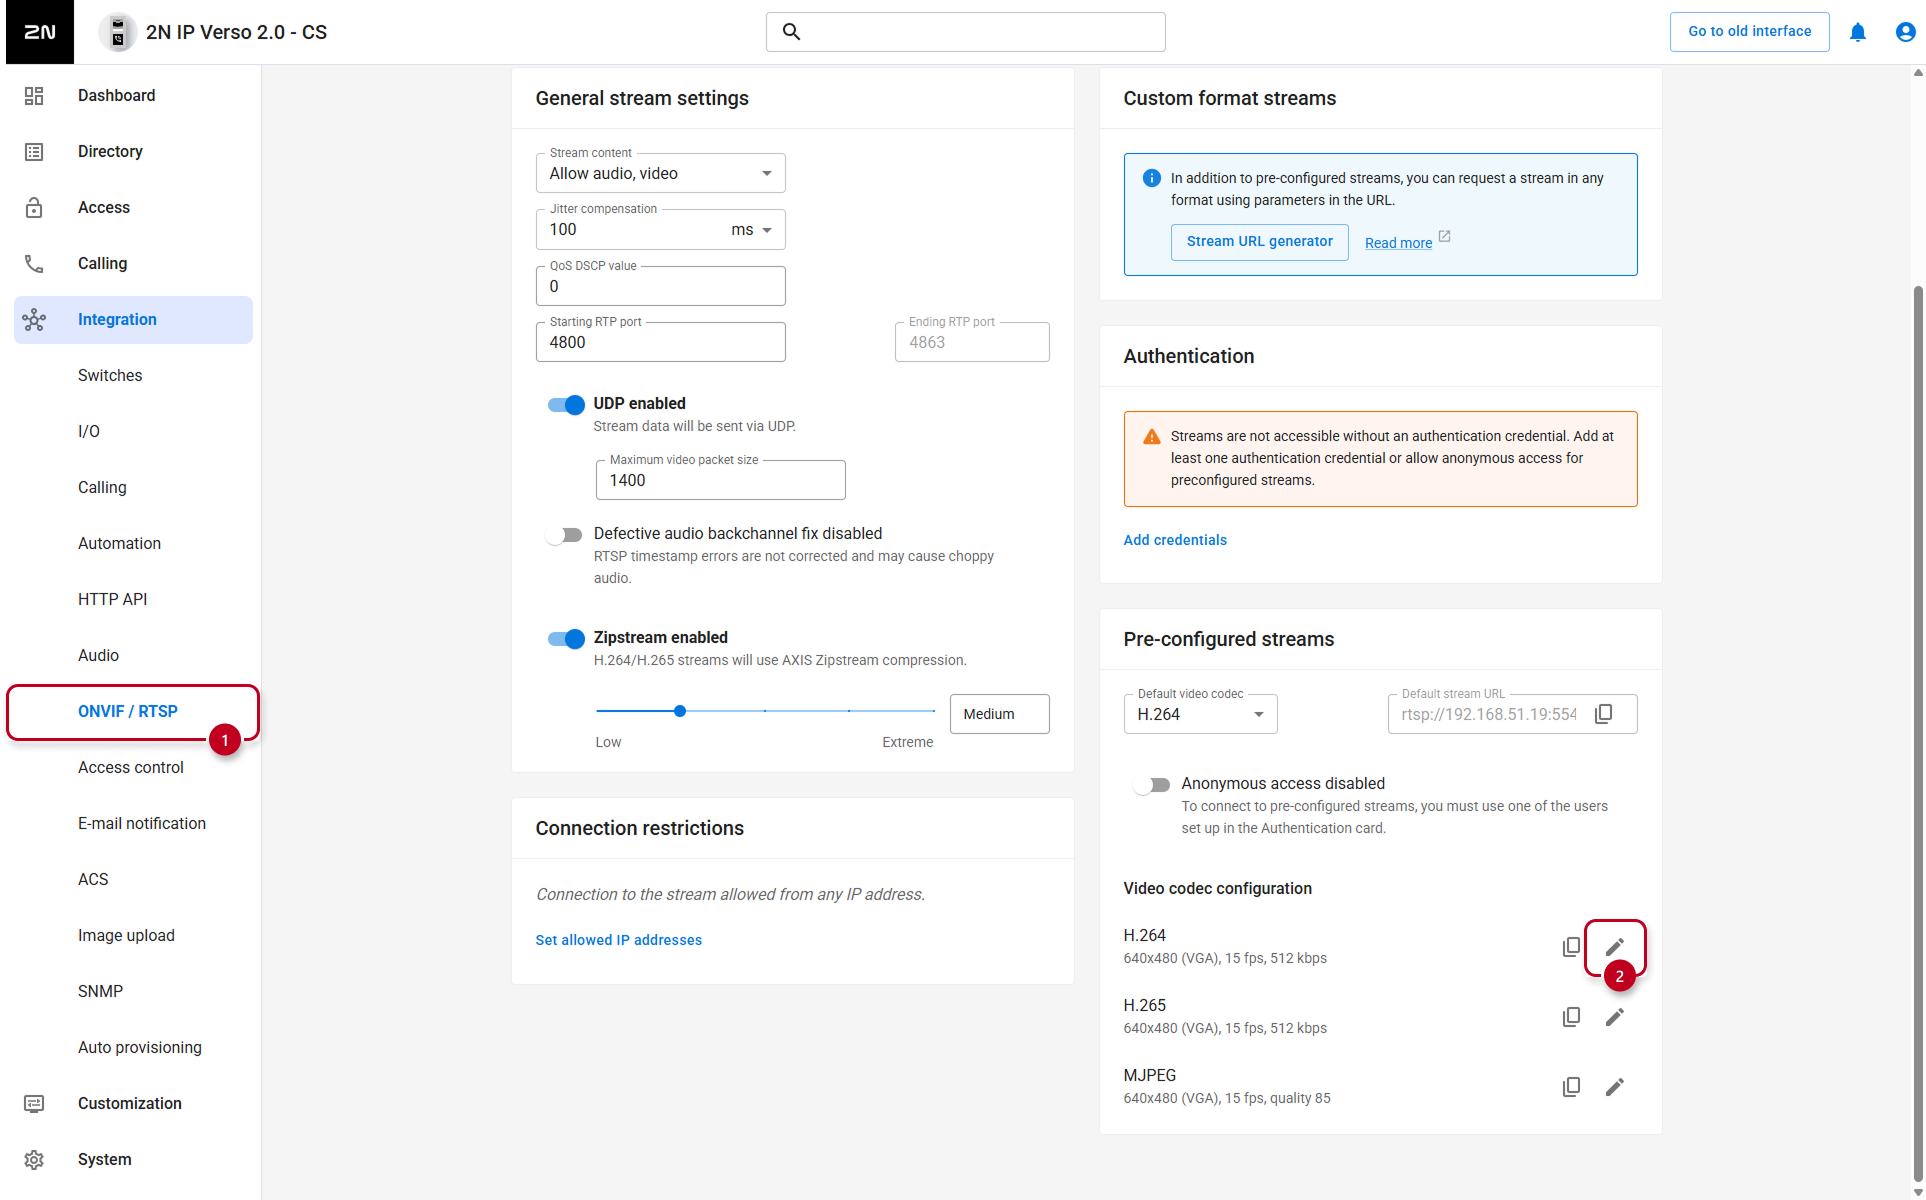
- Go to 2N IP Intercom web interface - section Integration - ONVIF / RTSP and enable RTSP server.
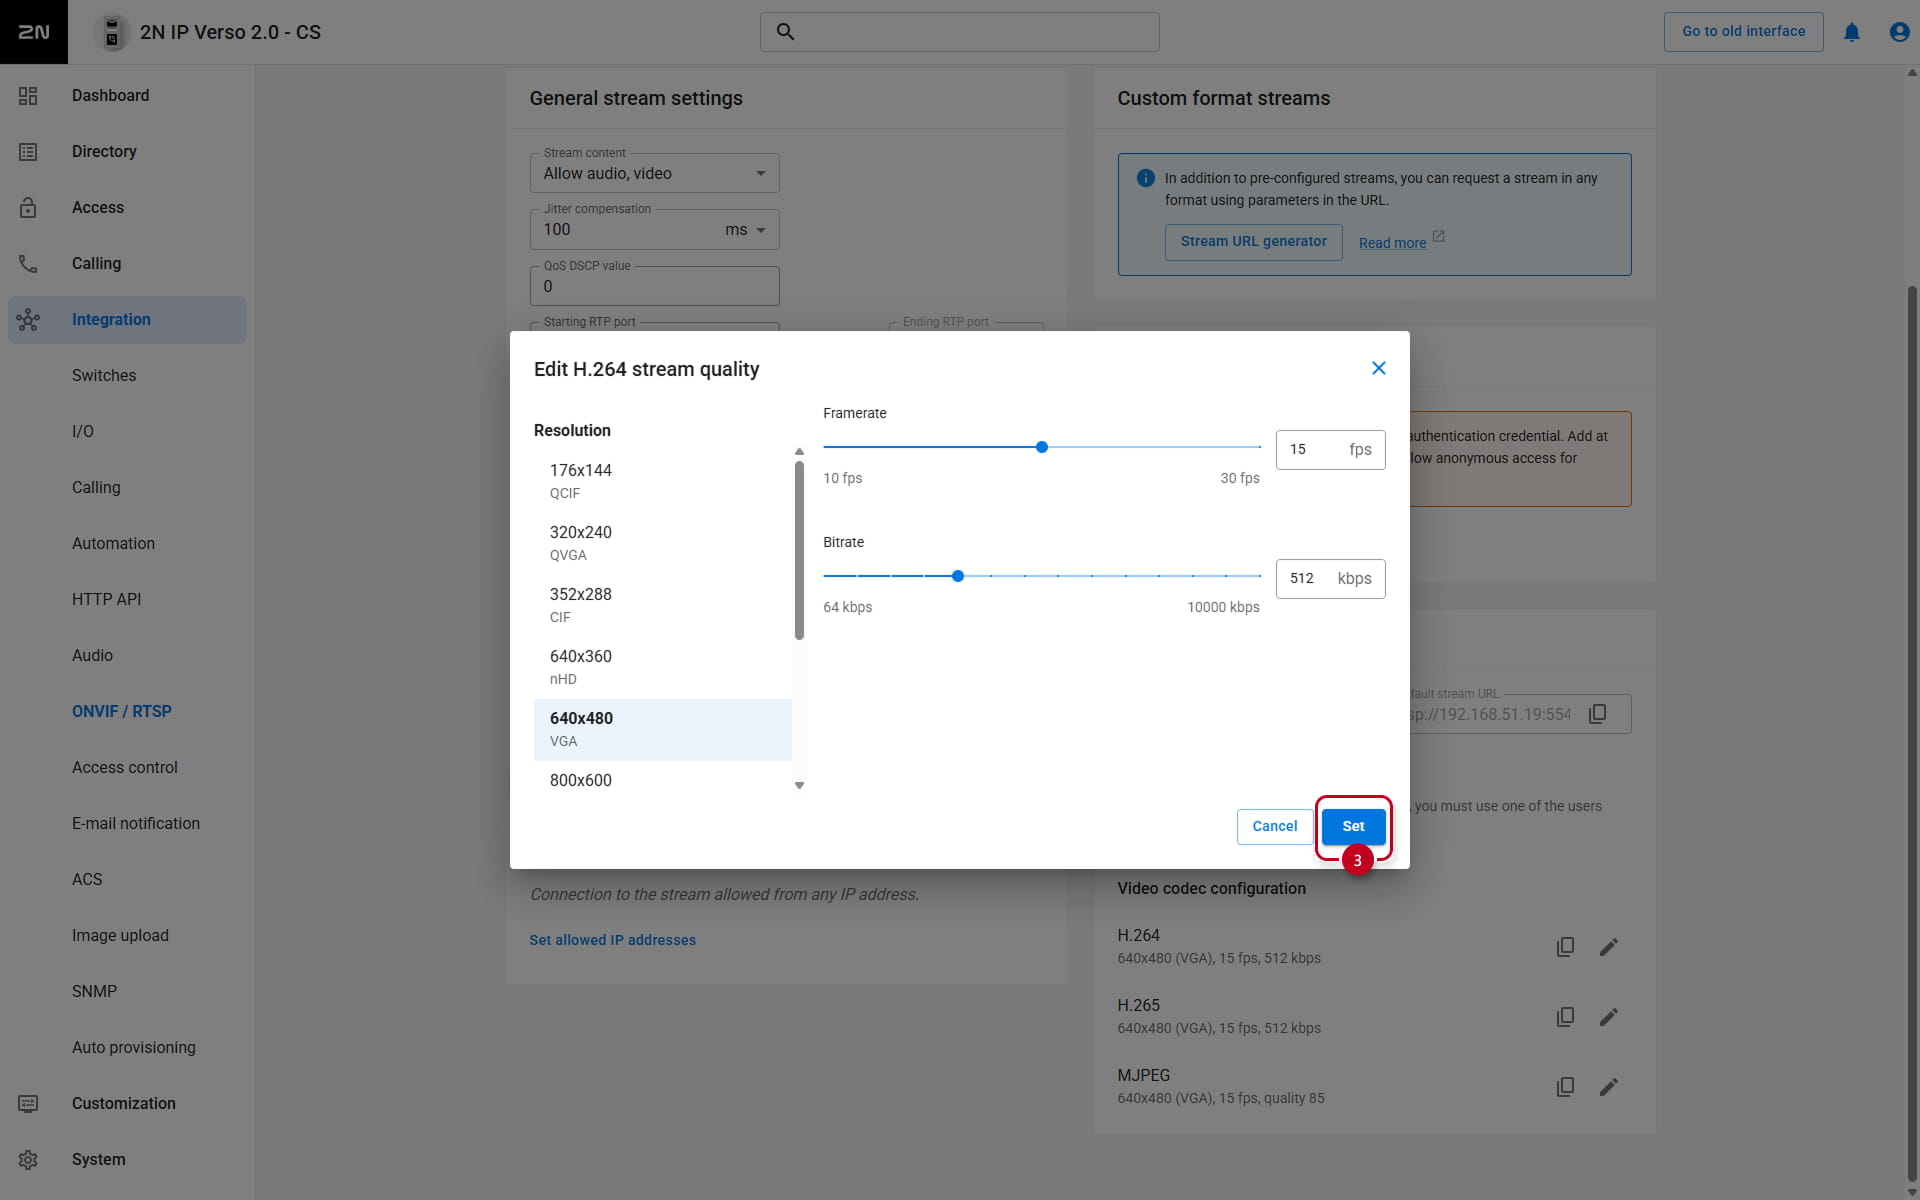
- Edit the stream settings, Set, and copy the URL.
- Click Add credentials, and choose Username, Password, and ONVIF access level.
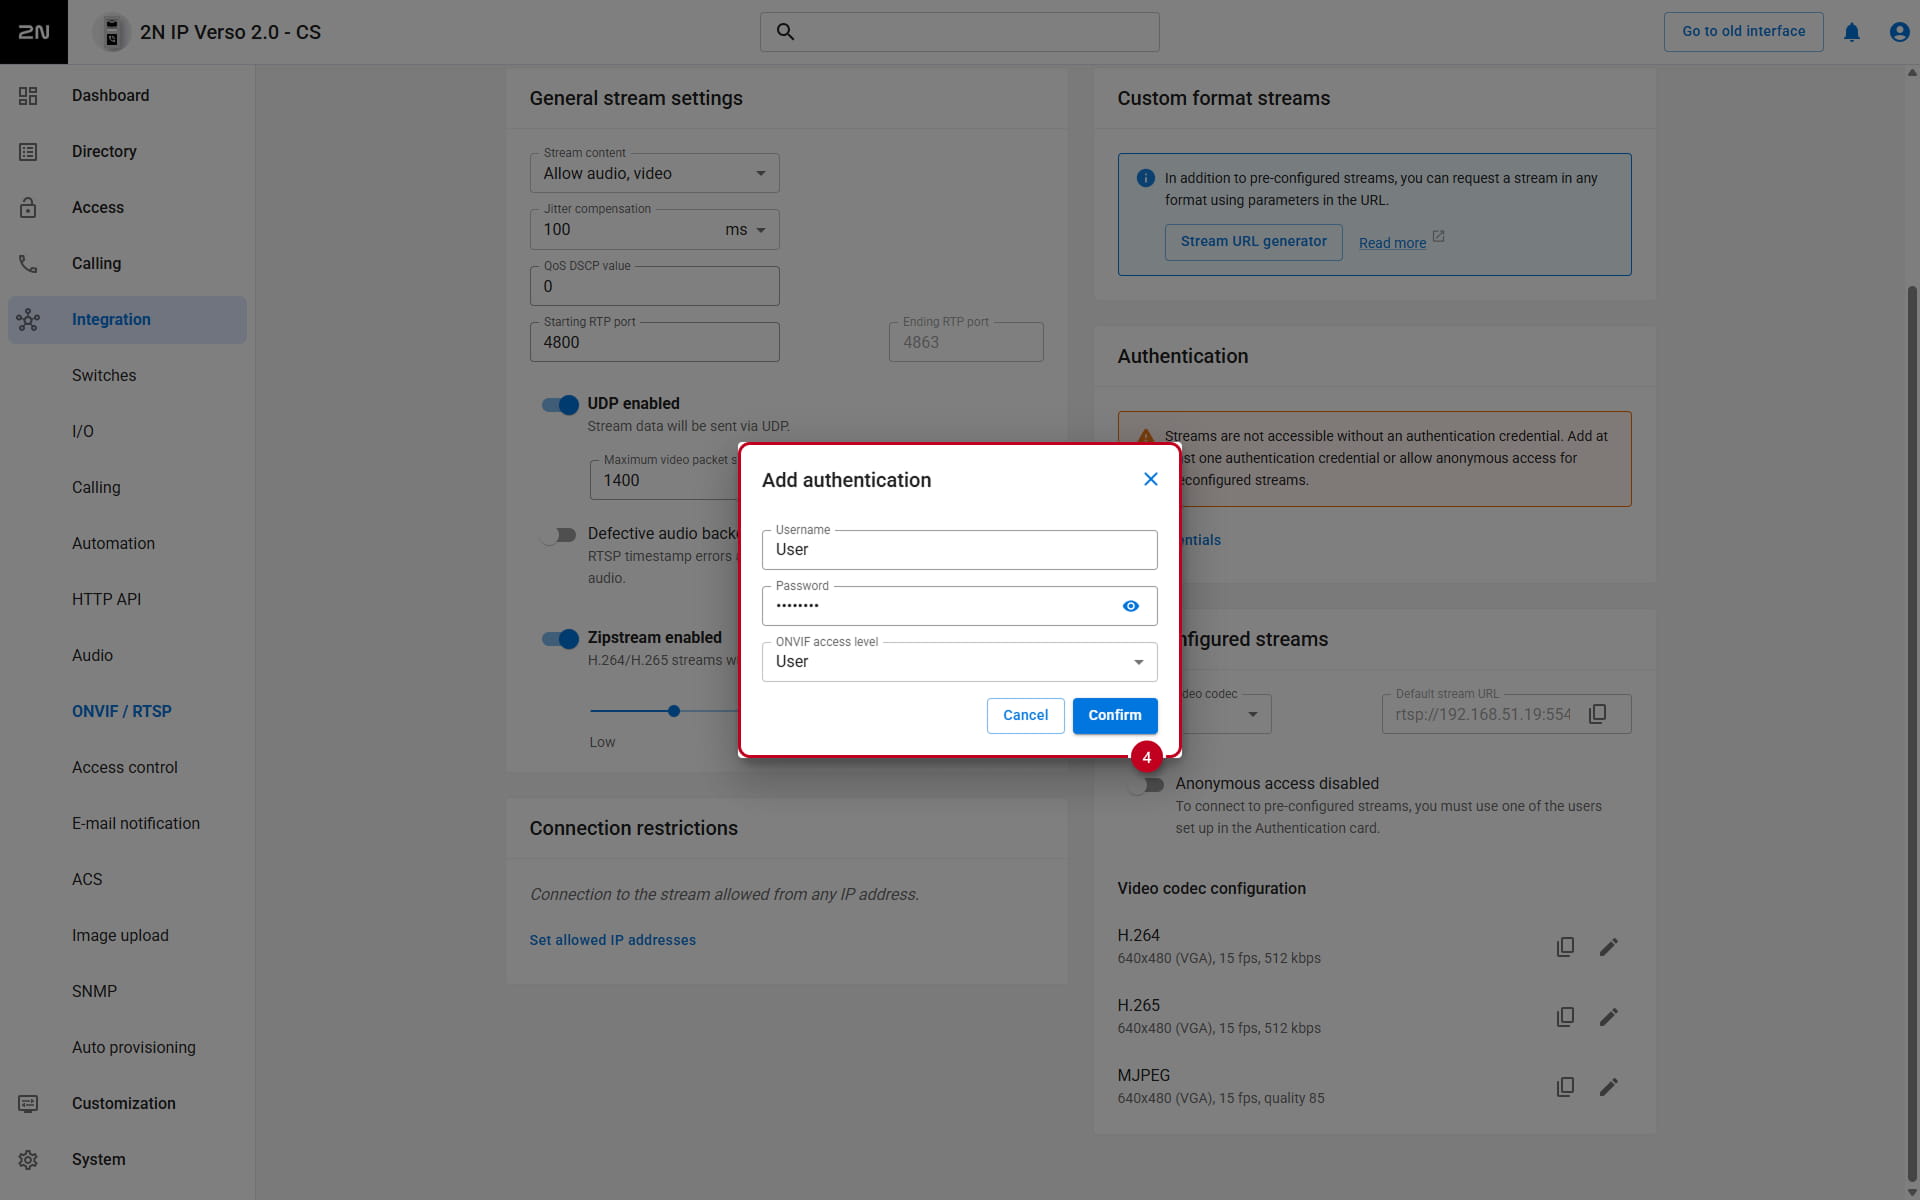
- Now you can capture the stream e.g. by VMS system or VLC Player.
VLC Player - How to watch and record video from 2N IP Intercom