Devices
The My2N platform enables remote management of different types of devices across the entire installation. To ensure the functionality of such services as calling, mobile app access or integration with other systems, add the device to the platform first.
In this section, you will learn which types of devices can be added to the platform, how to add them successfully to the system and how to properly configure the device to use 2N services.
Adding 2N Devices
Follow the procedure below to add 2N devices:
Select the location to which you want to add the device on the Company and Site tab.
Go to Devices.
Click Add Device.
Click 2N Devices.
Complete the mandatory data.
The serial number and security code can be found on the certificate inside the product package.
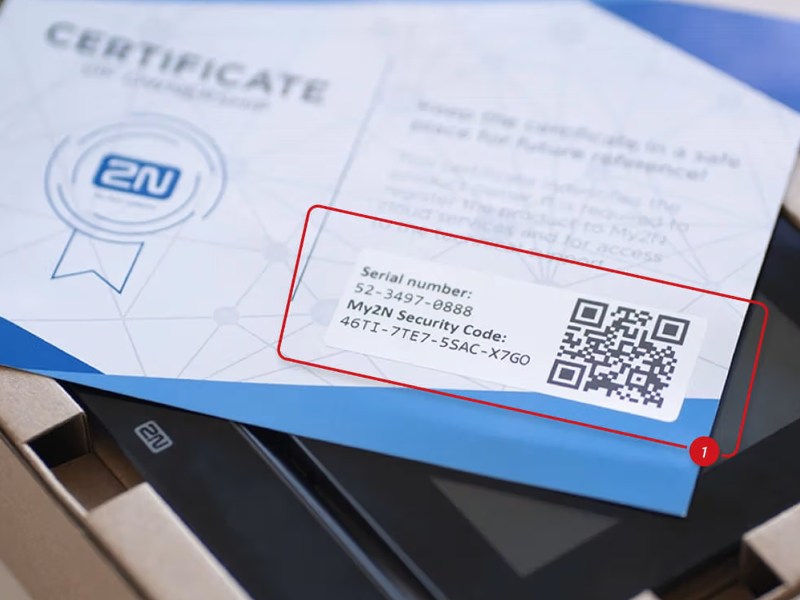
Alternatively, you can click SCANNING QR CODE and point the laptop or phone camera at the certificate to easily fill in the two pieces of information.
See here for the instructions for obtaining the serial number and security code in case you do not have the certificate from the device you are adding.
We recommend checking Remember Security Code to allow the connection to be automatically restored in case of accidental disconnection.
Device Name can be arbitrary – e.g. according to the Site of the device, but it must not be the same as that of another device.
If you are adding an answering unit or access reader to a Residential site type, select the apartment in which the device is located.
Click Next.
Select Configuration Mode.
We recommend leaving Auto Configure Mode (set by default) so that My2N can automatically configure the device. This avoids unwanted configuration and security issues for the site.
If you select Manual Configuration Mode, you will make all the configuration settings (access and calling) manually.
Access Logging is an optional feature, which allows you to view the access logs of the devices in the My2N platform. See Access Logs for more information.
If you are adding an answering unit or access reader, select Connection Mode. The Connection Mode will later affect the device configuration, refer to 2N Answering Unit Configuration. The Connection Mode can always be changed in the device details. Click Devices > ... > Edit Device to open the device details.
Click Next.
Click Close to close the window or click Add New Device to add another device.
Adding Smartphone / Tablet
To make calls from the 2N intercoms to tablets and smartphones based on Android or iOS, you must first add them to the My2N platform.
Prerequisites:
A tablet or smartphone running Android 10 and higher or a tablet or smartphone running iOS version 16 and higher.
My2N App on Mobile Phone
Select the location to which you want to add the device on the Company and Site tabs.
Go to Devices.
Click Add Device.
Click Smartphone or Tablet.
Fill in the mandatory fields.
Click Next.
The SIP device login credentials for My2N will be sent to the selected user email address.
Click Next again.
The platform will, directly after a smartphone or tables is added, prompt you to set up a call button on the intercom. In the meantime, we recommend clicking Finish Later and setting up the call later in order to simplify configuring calls for multiple devices at the same time. See Intercom Call Settings for more details on call settings for intercoms.
Select the Intercom with which the smartphone or tablet will be connected.
Click Completed.
Click Close to close the window or click Add New Device to add another device.
Upon completion, an email will be sent to the user email address and a confirmation dialog box will be displayed.
Adding Third-Party Devices
Prerequisites:
2N device added to the My2N account.
Third party devices or applications that support:
SIP (signaling protocol)
Codecs G.711a/G.711u (PCMA/PCMU) for audio
Codec H.264 for video
Select the location to which you want to add the device on the Companies and Site tabs.
Go to Devices.
Click Add Device.
Click Third Party Devices.
Fill in the mandatory fields.
Assign users.
Device Name can be arbitrary – e.g. according to the location of the device.
You can also select an Apartment for better management.
Click Next.
The device login credentials will be sent by to the email address of the selected user.
Click Next again.
Select the Intercom with which the third-party device will be associated.
Click Completed.
Click Close to close the window or click Add New Device to add another device.
The registration details can be found in the device details. Click Devices and ... to open the device details.
Open the Mobile Video tab and make sure that Activated is on.
The Status Information is displayed as Needs configuration.
Find the SIP Proxy data in the device details and copy it to the appropriate SIP registration account on the SIP device:
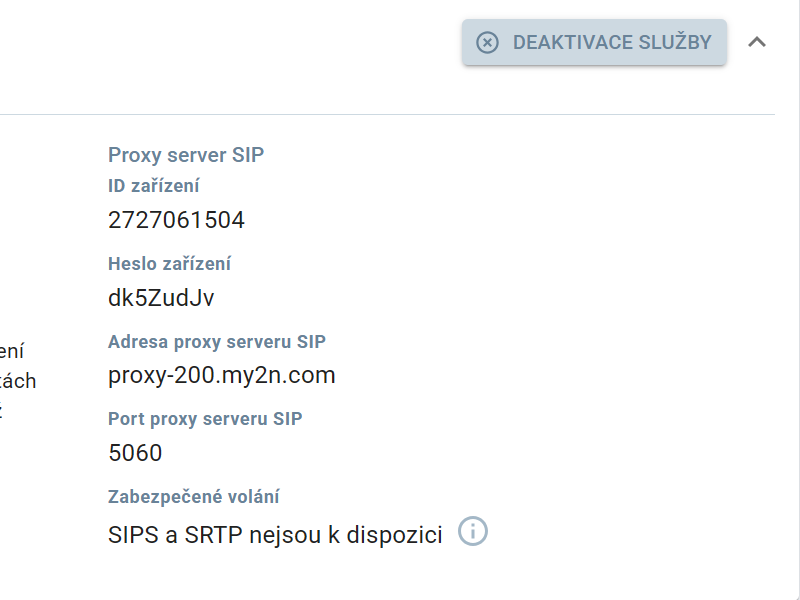
Device ID is the phone number/username for SIP registration.
SIP Proxy Server Address is both the SIP Proxy address and the SIP Registrar address.
Secure Call – only UDP or TCP can be used.
If the registration is successful on both sides, the Device Status will change to Registered.
The configuration of the third-party device is complete.
Adding Axis Devices
Select the desired Company and Site.
Go to Devices.
Click Add Device.
Select AXIS device.
Choose the device type.
Complete the mandatory data.
Device Name can be arbitrary – e.g. according to the location of the device.
Tip
MAC Address is the same as the serial number – see the printed label directly on the AXIS device (the label may be hidden if the Axis device is installed).
Close the window by clicking Close or add another device by clicking Adding a new device.
Device Configuration
Configuring each device is a key step to making it work properly. The configuration includes:
Call settings
Unlock code settings
Switch code settings
Caution
The device configuration procedures in this manual assume the use of Automatic Configuration Mode.
Configuration Mode
There are two device configuration modes in the My2N platform.
Tip
The configuration mode selection is available during adding a device and in the device details - Devices > ... > Edit Device.
Automatic Configuration
The auto-configuration mode configures devices automatically, according to the needs of the integrator. We recommend this mode in almost all cases - auto-configuration maximizes security and facilitates the use of the device and platform in common scenarios.
Manual Configuration
The manual configuration mode allows for manual configuration of the device. We recommend this mode if you need to configure the device for specific needs or if you are combining the use of 2N services with another platform (2N Access Commander, e.g.).
Caution
Visit Frequently Asked Questions on our website to set up specific functionalities in the Manual Configuration Mode.
Connection Modes
There are two connection modes for the devices in the My2N platform.
Cloud Mode
This mode allows you to make calls via 2N Mobile Video and across different networks. For example, you can use this mode in situations where the answering unit is located on a different LAN than the intercom.
Local Mode
Local Mode allows you to use your LAN devices. We recommend this mode if you want to make it easier to configure the intercom without disabling the automatic configuration. Simply select Local Mode while adding a device and the intercom will be configured automatically. In this mode , the device must be located on the same LAN as the intercom.
Intercom Call Settings
Call Setup is the main prerequisite for making a smooth call and using the 2N Mobile Video subscription service. To properly set up intercom calls, follow the procedure below.
Go to the details of the selected intercom – Device > ... > Edit Device.
Expand the Call Settings tab.
Add the device to be called in Call Destination.
Click Save for saving.
Answering Unit Call Settings
To properly set up intercom calls, follow the procedure below.
You can create a list of the devices that will be the call destinations on the device.
First open the device details – Devices > ... > Edit Device.
Expand the Call Settings tab.
Select the device that will be the call destination in Device to call to.
You can also name a contact in Contact Name.
Click Save to save the configuration.
Unlock Code Settings
You can also change the unlock code sequence.
First open the device details – Devices > ... > Edit Device.
Go to Unlock Settings.
The code can be changed in Default Unlock Code, the default code is 00*.
Click Save to save the configuration.
Note
The code can contain 1 to 15 digits including * or #.
When used with a 2N intercom, the code must contain one * character, which must be at the end.
Switch Code Settings
The switch codes help you control such peripheral devices as electric door locks, lighting and other signaling functions. In this section, you will learn how to configure the switch codes in the My2N platform.
Note
If you do not have an electric lock connected to an intercom, read the following articles before configuring the switch:
Open the device details – Devices > ... > Edit Device.
Go to Switch Codes.
Here you can configure the activation code for each switch. You can also set a custom switch name. The switch name is displayed in the My2N application.
Select a switch and enter the custom code into DTMF Code and name the switch in Function Name.
Check My2N Administration in Setup Source.
Click Save for confirmation.
The code is automatically uploaded to the intercom, but you can also look into the intercom settings to check if the code has been uploaded to the intercom or, in the case of remote configuration, set the code in Hardware > Switches > Switch 1.
Tip
Should there be door opening problems, open 2N Remote Configuration Calling > SIP2 > Audio in the interface and select RTP and SIP INFO in the DTMF Receiving section.
Services Provided by Devices
The devices compatible with My2N provide up to three services.
2N Mobile Video
2N Residential Access
2N Remote Configuration
2N Mobile Video
2N Mobile Video is a cloud service for receiving calls from the 2N intercoms by receiving devices (answering units, smartphones, tablets, etc.) via the My2N platform. It provides a reliable video call channel between an intercom and a user, without a need for local SIP server configuration. Refer to for calling details.
2N Mobile Video Settings
To set up 2N Mobile Video, go to the device details – Devices > Desired Device > 2N Mobile Video. Find the 2N Mobile Video Settings section to the right.
2N Residential Access
2N Residential Access is a cloud service, through which the entire access mechanism of the device takes place. The access methods depend on the device. Most devices are compatible with the following options:
PIN code
Access card / fob
Bluetooth access
Refer to Access for access management in My2N.
2N Remote Configuration
2N Remote Configuration is a web-based device configuration interface, through which you can remotely manually configure devices or observe specific actions without direct access to the local network.
Opening 2N Remote Configuration
To open the configuration web interface, go to the device details – Devices > Desired Device > 2N Remote Configuration and click Open Configuration.
Activating / Deactivating Paid Services
To activate or deactivate the paid services, follow the procedure below.
Select the desired Company and Location.
Go to Apartments.
Toggle the switch at Paid Services for the desired apartment.
Device Status
See Devices for an overview of all the devices added. Device Status shows the current status of the device:
Registered – the device is successfully registered inMy2N (with the My2N mobile app this means that the app is currently open and on the foreground).
Online – The device is registered on the My2N server but unable be used yet.
Ready – this status is displayed for the application registered on the My2N server, but currently on the background of the mobile device.
Unregistered – the device was previously registered in My2N, but currently is no longer registered. Check the device configuration and connectivity as well as license validity if applicable. If the problem persists, contact technical support, see Technical Support.
Offline – the device is registered in My2N, but disconnected. Make sure the device is connected via a LAN cable to the network.
Missing Call Settings – the device is registered in My2N, but the Call Settings have not been configured. Refer to Intercom Call Settings for more information on call settings.
Needs Configuration – this status means that the device has been created in My2N, but not yet configured.
Waiting for Response – the device is not connected to My2N or has not updated firmware.
License Status
This section describes the license status for each device. Refer to My2N Basic Settings for more information on subscriptions and licenses.
Ready/Registered – the device is used as part of a free trial and/or the license has been paid for. The device works as intended.
Deactivated – the device service has been deactivated in the device details. For activation, click Activate by the required service in device details (Devices > ... > Edit device).
Unlicensed – together with Use of Available Credit – subscription has been paid but the credit has not been assigned to this device or apartment, click Use of Available Credit to use the available credit in the location.
If you use the Residential location type, make sure the device is assigned to the appropriate apartment.
Unlicensed – together with Purchase – no subscription has been purchased, you can click Purchase to purchase a new subscription.