LDAP - Users synchronisation from a remote directory
The nerve centre of our access control solution is 2N Access Commander. Use it for managing access to the building and monitoring the status of 2N access devices in real time. Its intuitive user interface lets you set up the system quickly and delegate everyday activities directly to the customer.
2N Access Commander can be also synchronised with other directories using the LDAP protocol.
Prerequisities
- 2N Access Commander the latest version;
license Pro or Unlimited required - Remote directory supporting LDAP;
tested with MS Active Directory, OpenLDAP, Apache DS.
Connection to the remote directory
-
Log in to your 2N Access Commander installation web interface.
-
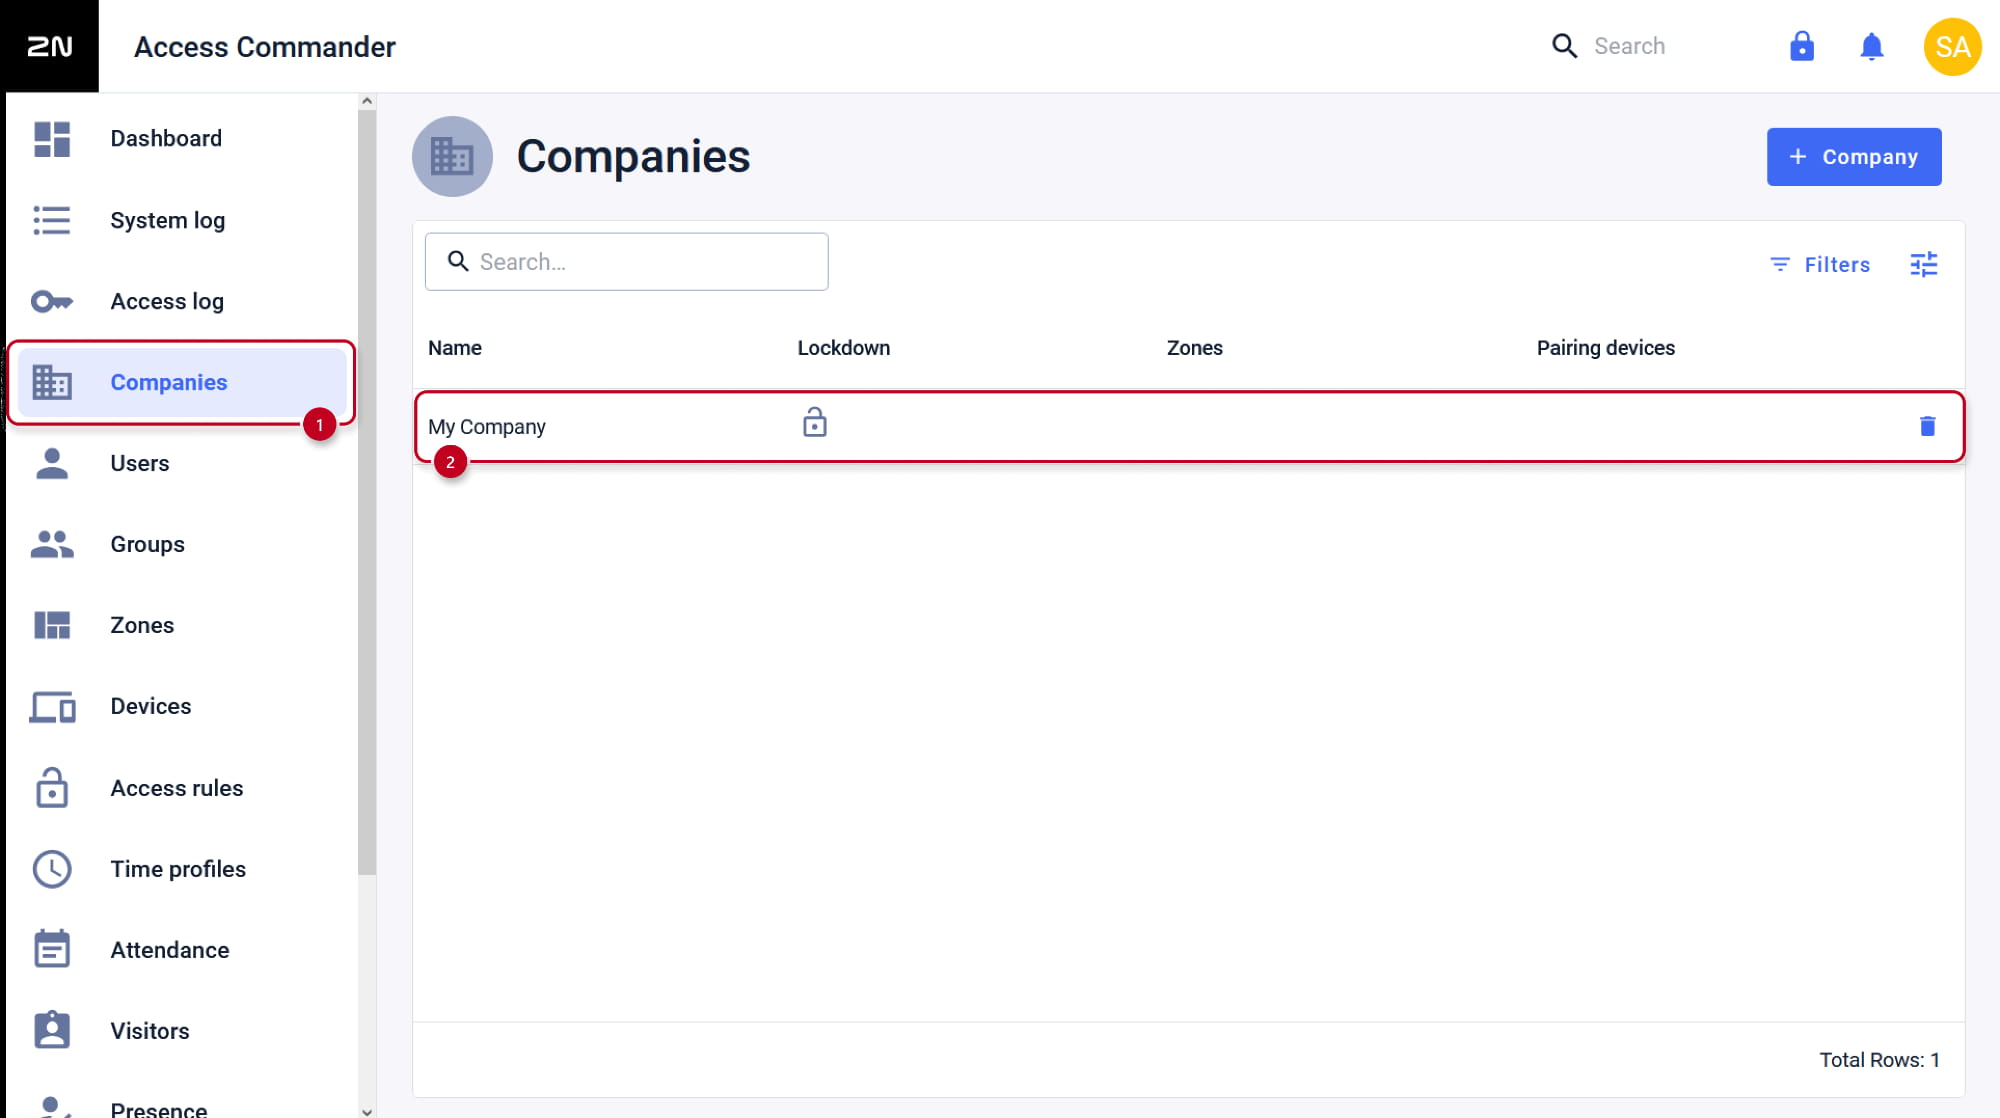
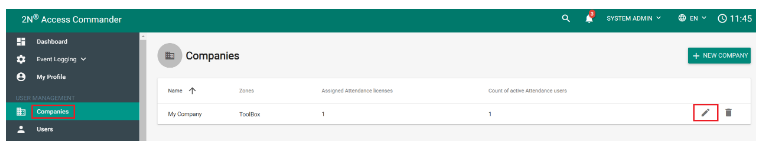
Open the Companies section and click on the company to which you want to import users from the given directory.
- In the company settings select the USER SYNCHRONISATION tab and click on Create LDAP configuration.

- Fill in the Server name, Login name, Password and LDAP schema (Base DN) and save.
- Since the 3.2 version of the Access Commander, it is possible to use the TLS secure connection with the TLS certificate verification option.
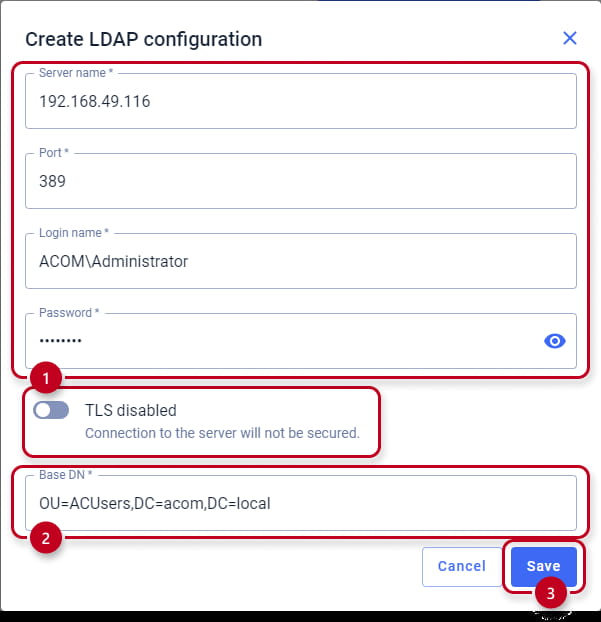
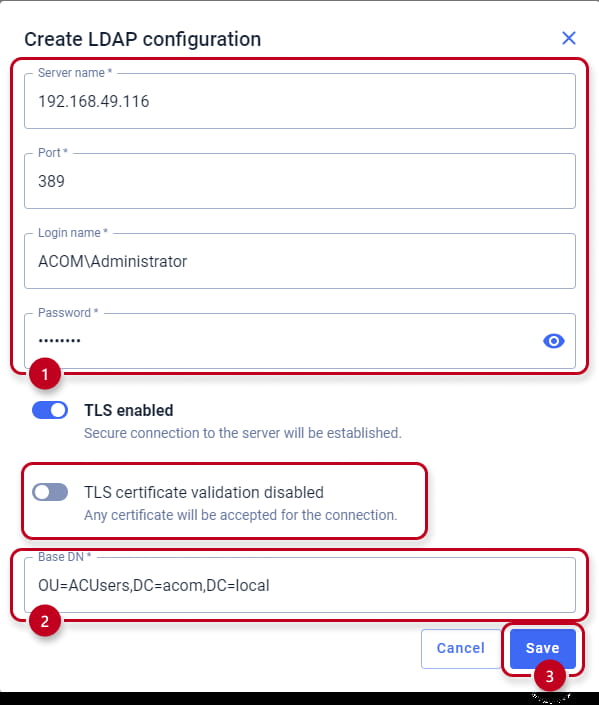

As an example, the figure uses the Administrator account (from the directory),
which is located in the directory in the container ACUsers on the acom.local directory domain.
Universal Login name:
CN=<login>,
CN=<container_name_in_directory_containing_administrator_with_the_given_login>,
DC=<domain>,
DC=<domain_suffix>
Just in case of MS Active Directory the input can be: [email protected]
LDAP Schema (BaseDN):
OU=<organisation_unit_name_in_the_directory_containing_the_users_for_synchronisation>,
DC=<domain>,
DC=<domain_suffix>
If the users we want to import are deeper in the directory hierarchy, you must fill in the full path. For example, for users who are located in the Sales organisational unit, which is part of the 2N organisational unit, which is already at the root of the directory in the acom.local domain, the schema looks like this: OU=Sales,OU=2N,DC=acom,DC=local
Including user contacts and accesses for import
- In the user synchronisation options, click on Edit schema button.


-
Here we define the User filter, User name and names of the attributes under which the given information is located in the directory.
-
In case of MS Active Directory, we can use the already preset User filter "(&(objectclass=user)(objectcategory=person))", thereby importing only users that have user in the "objectclass" attribute and person in the "objectcategory" attribute.
More information here: https://docs.classic.secureauth.com/display/KBA/Active+Directory+Attributes+List -
In case of synchronisation from other directories, it is necessary to adjust the filter accordingly to match the requirement of the given directory.
-
- In the case of cards or PIN codes, we often have to use the box for another item, as there is usually no space in the directory for a card identifier or PIN code. The following example shows that for the identifier of card 1 we used the Description field in the directory and for the PIN code the Fax field in the user detail. Therefore, in order to be able to import the given information, it is necessary to set up 2N Access Commander to search for this information in the given user's detail fields in the directory.
-
-
PIN Code we entered for example into the "Fax" field in the directory
- the name of this attribute in the directory is: facsimileTelephoneNumber -
Card Number #1 we entered for example into the "Description" field in the directory
- the name of this attribute in the directory is description
For the second card a separate field must be selected in the user's detail.
-

Synchronisation options

- Users removed from LDAP
Choose what Access Commander should do (no change / deactivate / delete) if a user in the given directory is deleted. - Users disabled in Active Directory
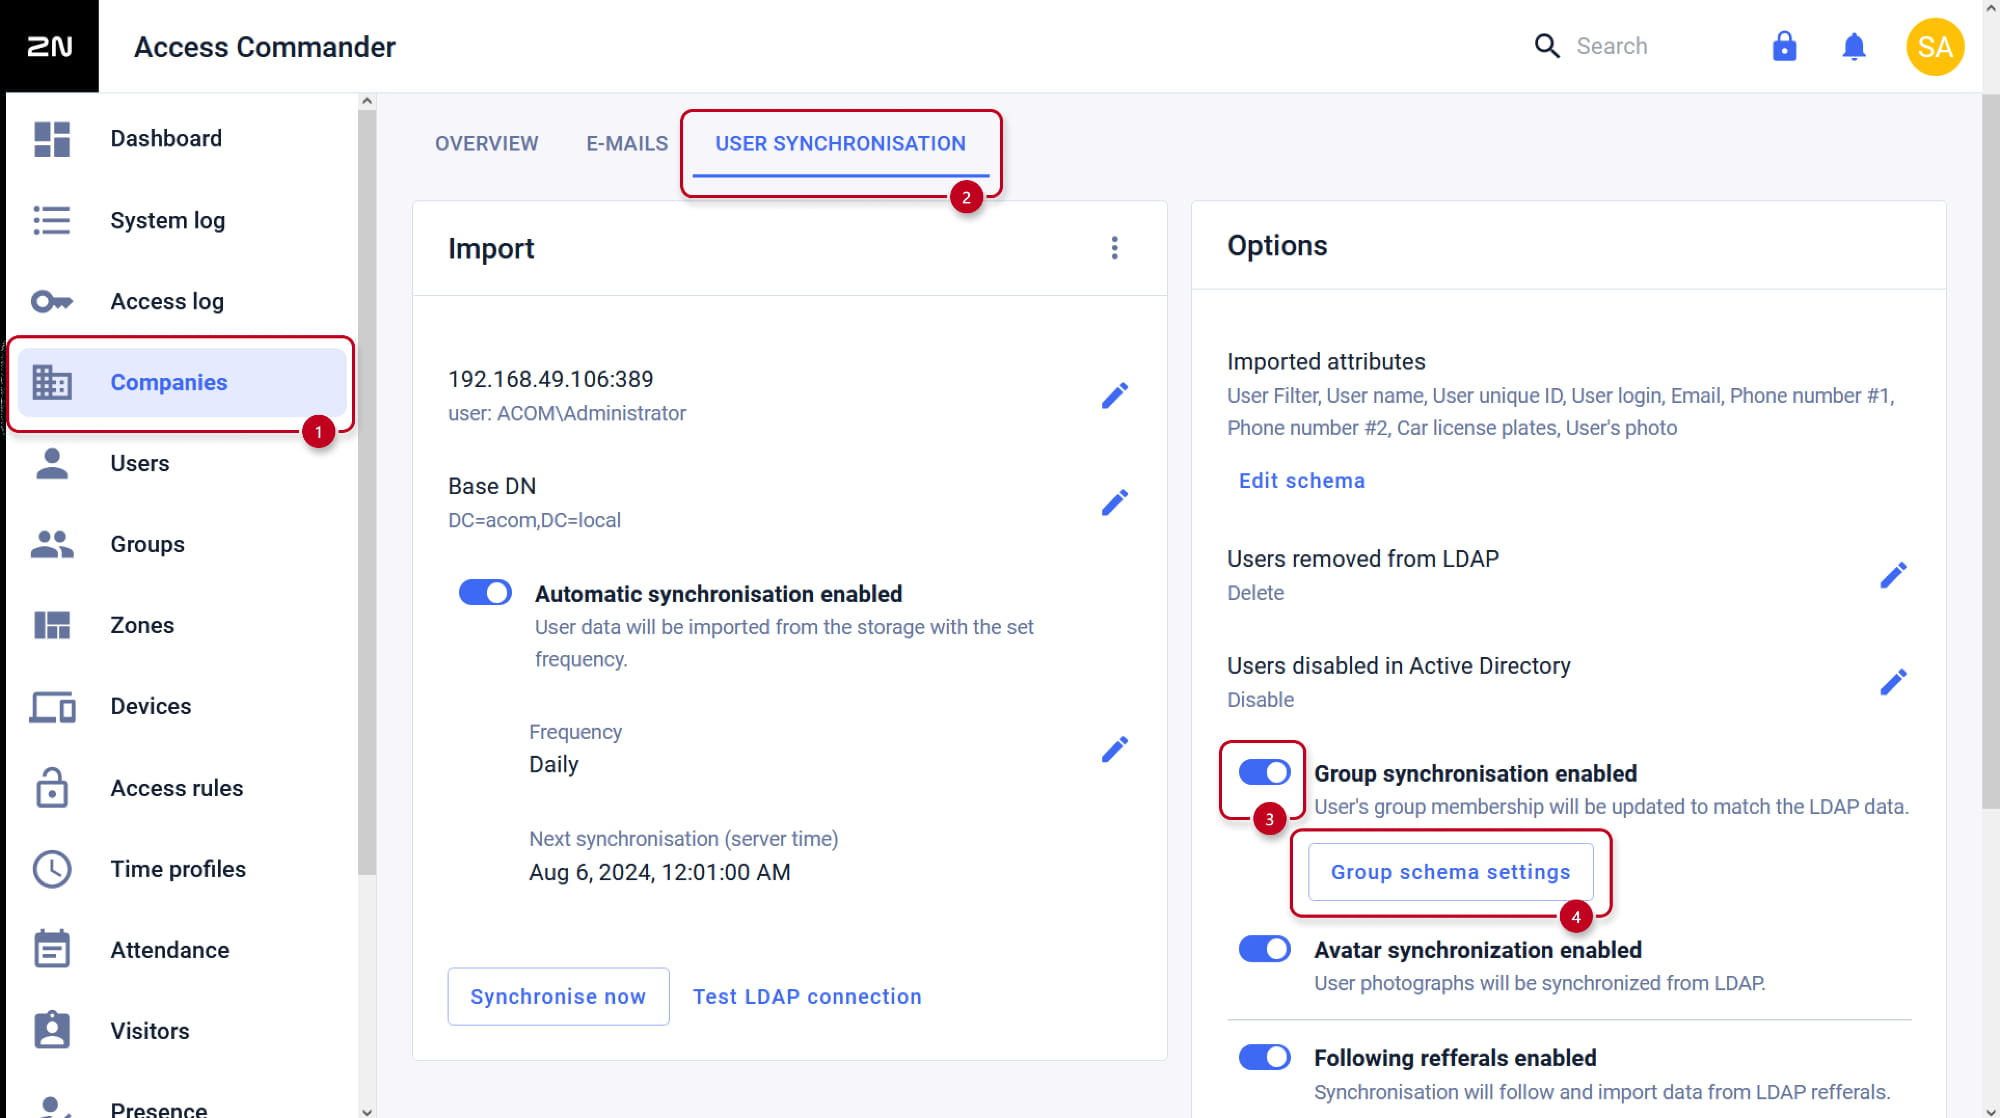
If the user is deactivated in the directory, it will be imported and deactivated in Access Commander (he won't have access to the door, it won't be able to call him). - Group synchronisation
Synchronisation of the membership, you need to manually create those groups in your Access Commander database.
This was done to prevent importing all unnecessary groups, that are not tied with access.
We will show you in more detail later on. - Avatar synchronisation
If users have a photo assigned to them in the directory, it can also be imported. - Following referrals
Imports the given users from any other repositories of the given directory.
- Nested search
Imports the given users also from subfolders (organisational units or containers) of the selected BaseDN directory. - Pagination:
If Access Commander asks the directory for a user, they are sent on so-called pages (to avoid server overload).
Define here how many users will be sent on one "page" (the value must not exceed the value set in the directory).
Starting synchronisation
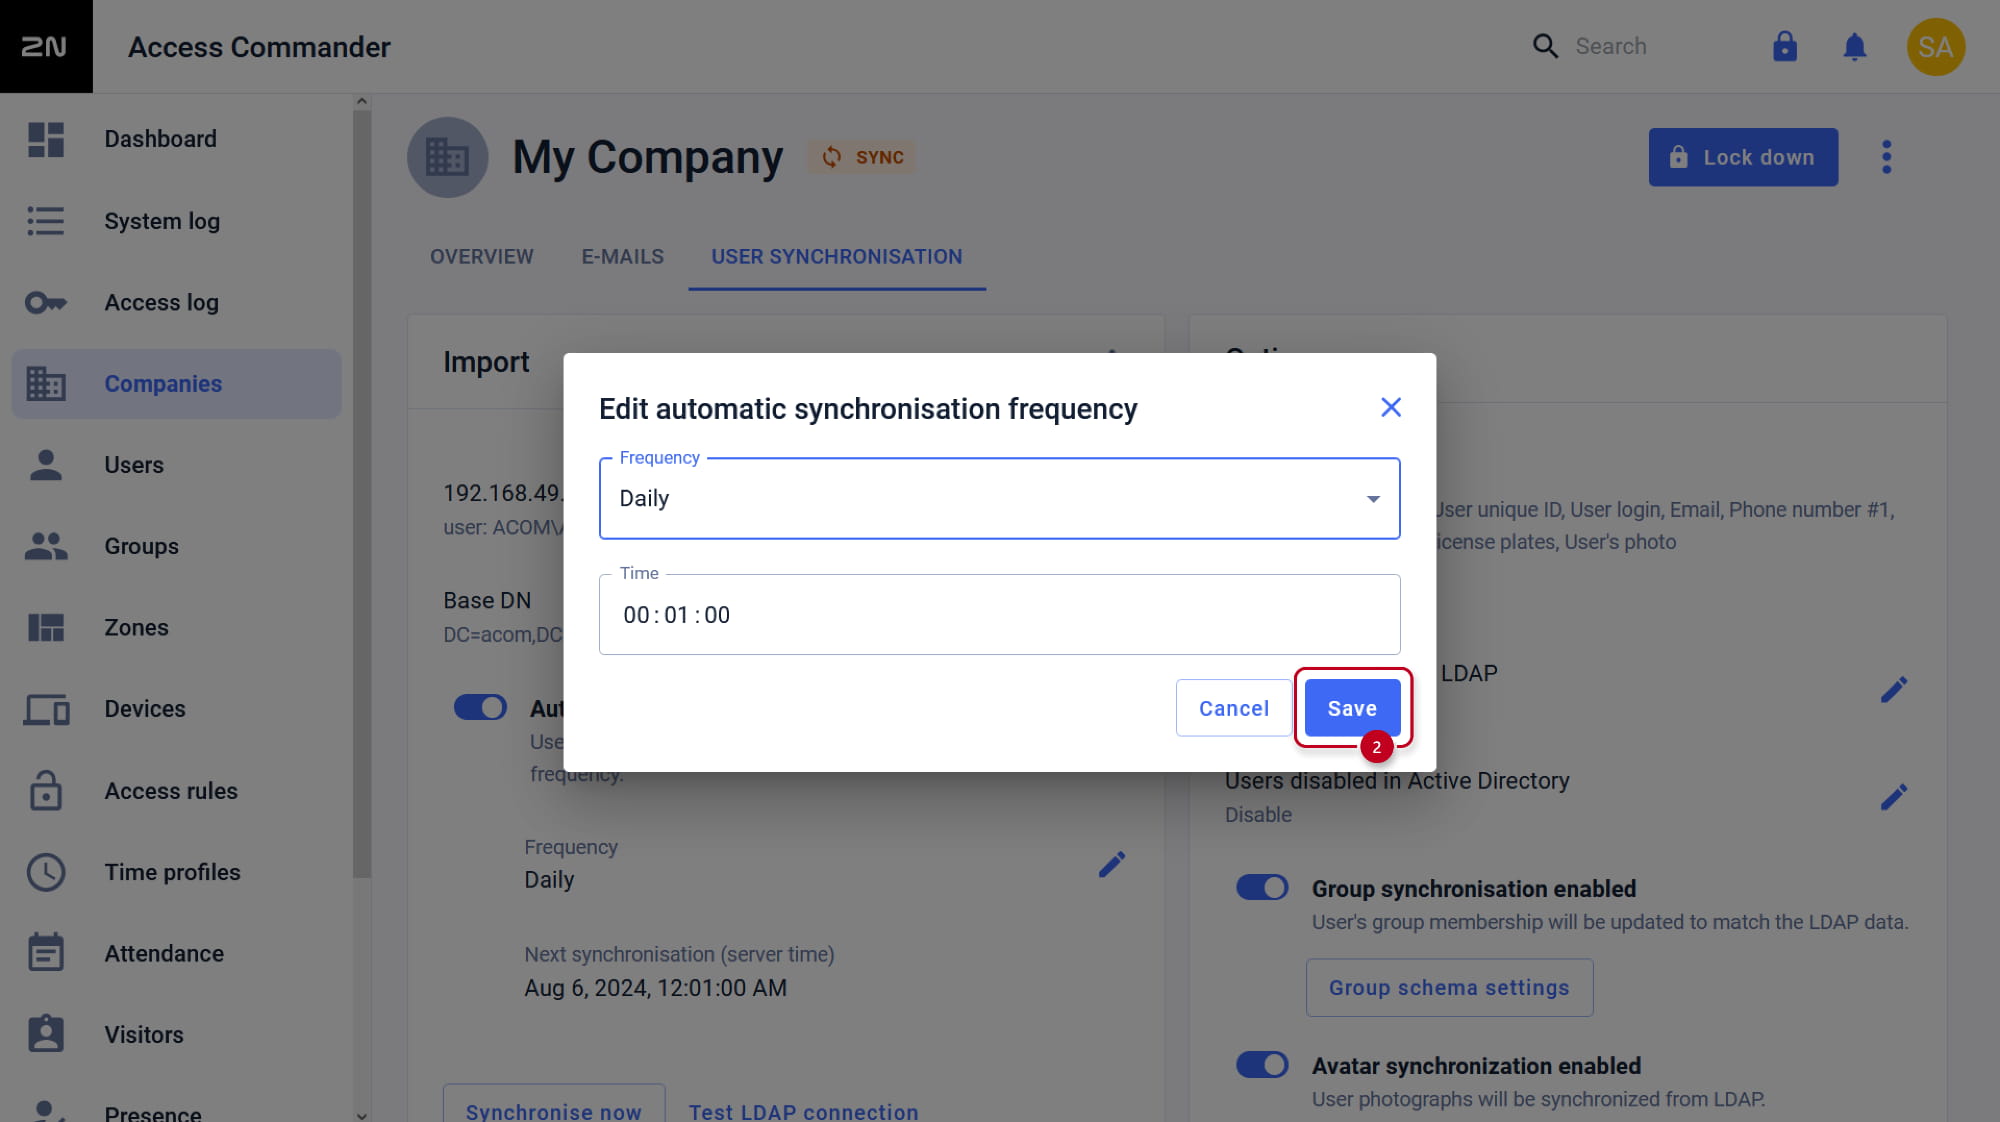
- Automatic synchronisation
The users can be synchronised to 2N Access Commander automatically, we choose between hourly, daily and weekly intervals.

- Test LDAP connection
You can check if the LDAP connection is ready.


-
Finally, you can start the synchronisation now to download the users from the given directory to the 2N Access Commander.
You can find the imported users in the Users section under the given Company in the 2N Access Commander.

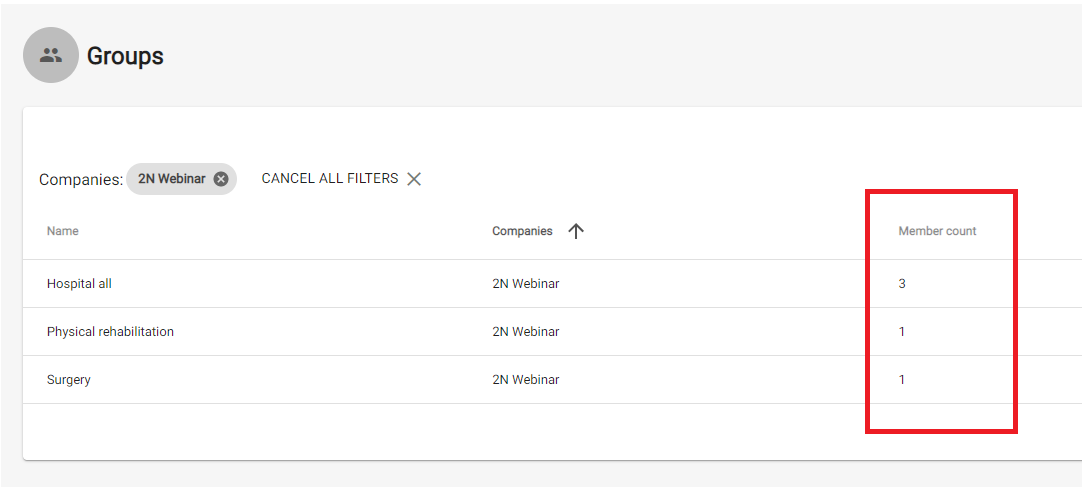
Group membership for imported users
This is not an import of the groups from the LDAP directory, this is only a synchronisation of the membership,
you need to manually create those groups in your Access Commander first.
This was done to prevent importing all unnecessary groups, that are not tied with access.
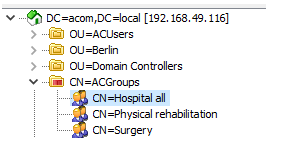
- Create groups in the Access Commander, keep in mind that the name of the group is case sensitive and must be exactly the same as you use in your remote directory.


- Enable synchronisation in the Access Commander and edit group schema settings according to your needs.

Additional Group DN:
CN=<container_name_in_directory_containing_groups_of_users>
do not insert BaseDN as it will be automatically used according to the LDAP schema set in previous steps)
Group Filter:
In our example, we used a filter for MS Active Directory (&(objectClass=group)(member=*)),
thereby synchronising the users with groups that have "groupin the "objectclass" attribute
and "member" in the "objectcategory" attribute and they are also simultaneously created in the Access Commander.
The default Group Name ("cn") and Group Member ("member") above may apply only to MS Active Directory,
and in case of synchronisation from other directories, those that differ must be adjusted according to the given directory.
- Now you can import the LDAP settings and check if everything is properly synchronised and the users are assigned to the correct groups.

Delete LDAP connectivity
- If needed, you can completely delete the LDAP configuration.

If you have older version of the system (2.7 and older) with different look of the web interface, please click here.
Connection to the remote directory
- Log in to your 2N® Access Commander installation.
- Make sure you have the Integration License activated (Settings > Licenses > LDAP synchronisation: Yes).
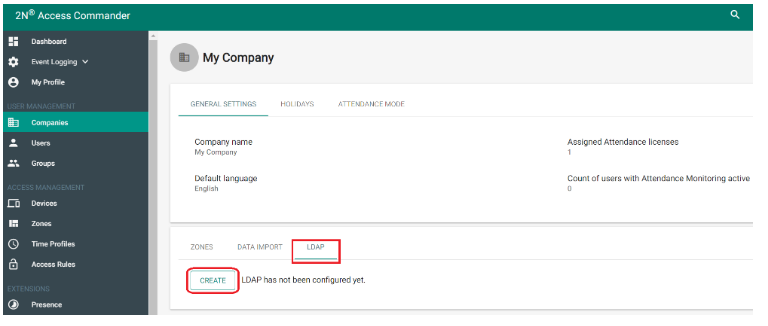
- Open the Companies section and enter the edit of the company to which you want to import users from the given directory:
- In the company settings select the LDAP tab and click on CREATE (LDAP configuration):
-
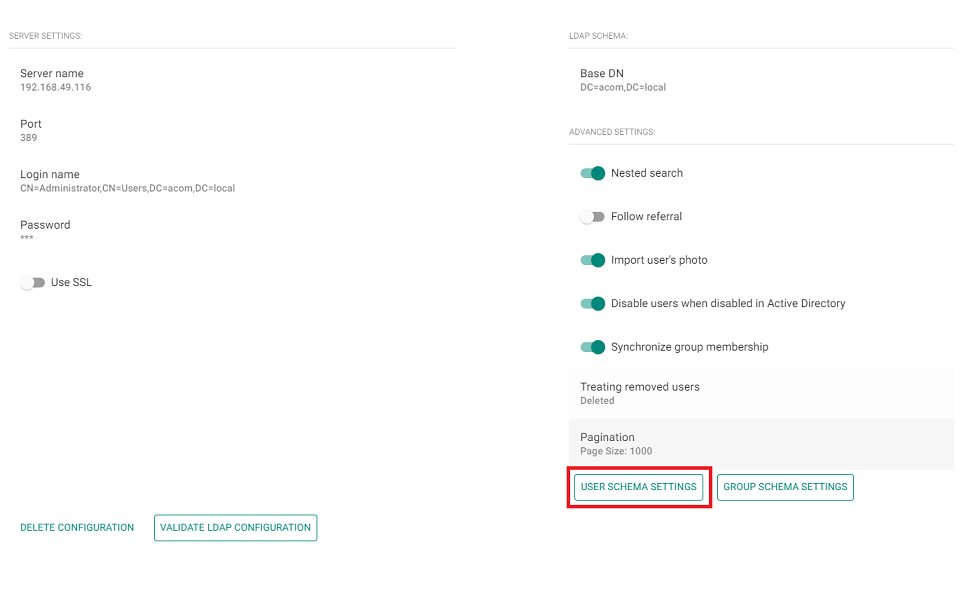
Fill in the Server name, Login name, Password and LDAP Schema and click CREATE at the bottom right.
As an example, the following figure uses the Administrator account (from the directory),
which is located in the directory in the container Users on the acom.local directory domain.
SSL is not used here - the connection to the server is therefore unsecure.
Universal Login name:
CN=<login>,
CN=<container_name_in_directory_containing_administrator_with_the_given_login>,
DC=<domain>,
DC=<domain_suffix>Just in case of MS Active Directory the input can be: [email protected]
LDAP Schema (BaseDN):
OU=<organisation_unit_name_in_the_directory_containing_the_users_for_synchronisation>,
DC=<domain>,
DC=<domain_suffix>
If the users we want to import are deeper in the directory hierarchy, you must fill in the full path.
For example, for users who are located in the Sales organisational unit, which is part of the 2N organisational unit, which is already at the root of the directory in the acom.local domain, the schema looks like this: OU=Sales,OU=2N,DC=acom,DC=local
Including user contacts and accesses for import
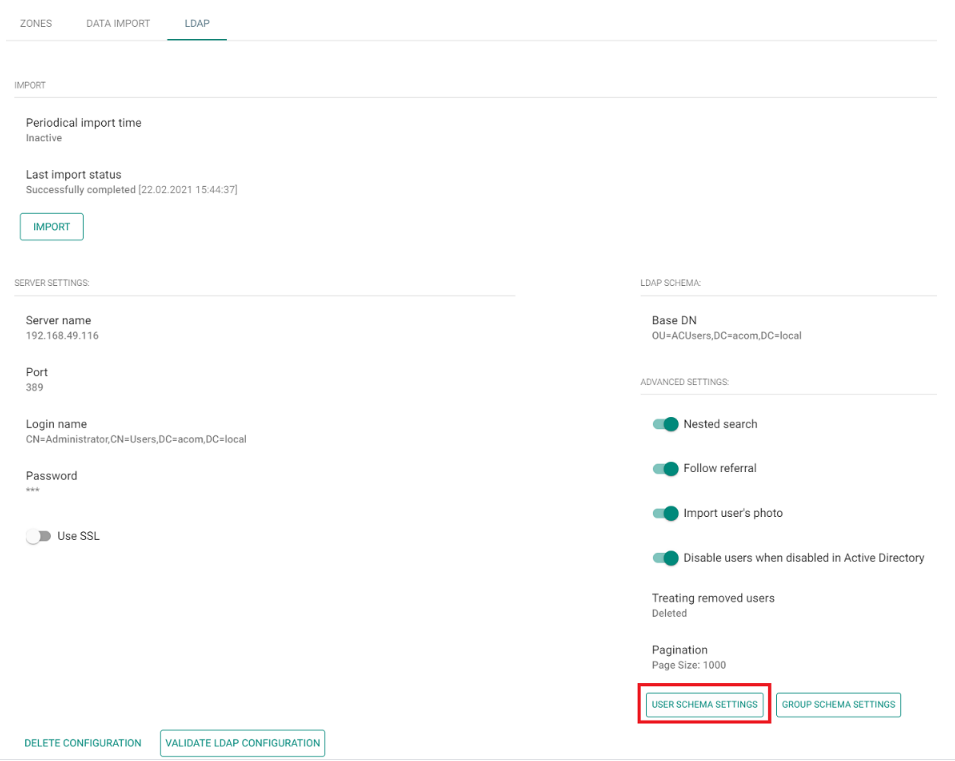
- After creating a connection to the remote directory, click the USER SCHEMA SETTINGS button:
 Here we define the User filter, User name and names of the attributes under which the given information is located in the directory.
In case of MS Active Directory, we can use the already preset User filter "(&(objectclass=user)(objectcategory=person))",
thereby importing only users that have user in the "objectclass" attribute and person in the "objectcategory" attribute.
In case of synchronisation from other directories, it is necessary to adjust the filter accordingly to match the requirement of the given directory.
The default User Name ("cn") and attributes below may apply only to MS Active Directory, and in case of synchronisation from other directories, those that differ must be adjusted according to the given directory.

Then confirm by clicking on the CHANGE button.
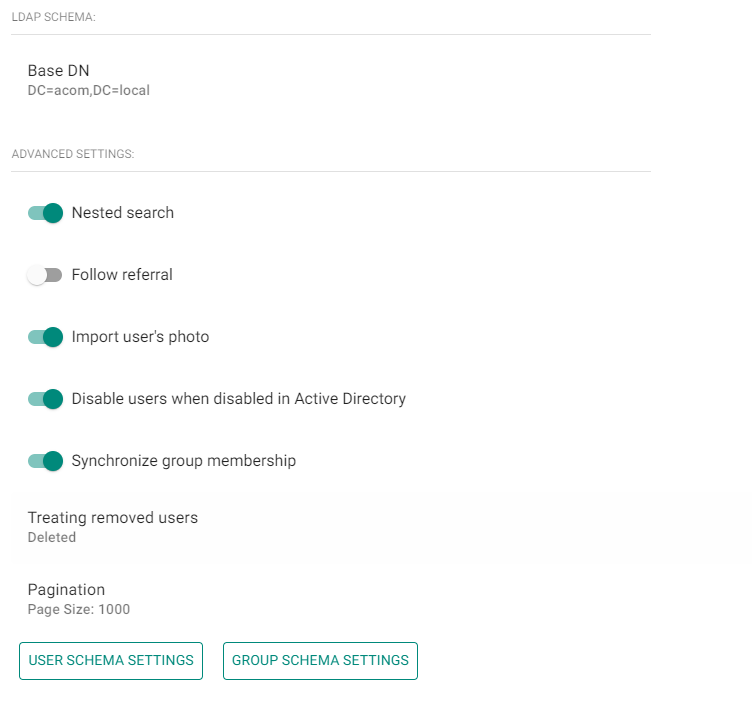
Synchronisation advanced settings
- Set other parameters of the LDAP synchronisation
-
- Nested search
Imports the given users also from subfolders (organisational units or containers) of the selected BaseDN directory. - Follow referral
Imports the given users from any other repositories of the given directory. - Import user's photo
If users have a photo assigned to them in the directory, it can also be imported. - Disable users when disabled in Active Directory
If the user is deactivated in the directory, it will be imported and deactivated in Access Commander (he won't have access to the door, it won't be able to call him). - Treating removed users
Choose what Access Commander should do if a user in the given directory is deleted. Either No Change, or Deactivate, or Delete in Access Commander. - Pagination
If Access Commander asks the directory for a user, they are sent on so-called pages (to avoid server overload).
So define here how many users will be sent on one "page" (the value must not exceed the value set in the directory).
- Nested search
Starting synchronisation
-
If you need users from the given directory to be synchronised to 2N® Access Commander automatically,
set the parameter Periodical import time, where we choose between hourly, daily and weekly intervals,
select the minute, hour or day of the regular synchronisation and confirm by clicking on the CHANGE button: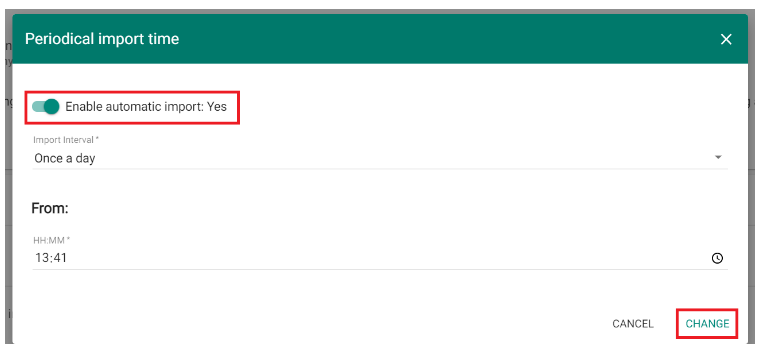
-
Finally, you can validate the LDAP configuration by clicking on the appropriate button below and by clicking the IMPORT button (above left) information about users from the given directory will be downloaded to the 2N® Access Commander (see the picture below). You can find the imported users in the Users section under the given Company in the 2N® Access Commander.
At the top left you can check the Last import status under the appropriate field
and you can completely delete the LDAP synchronisation with the DELETE CONFIGURATION button at the bottom left.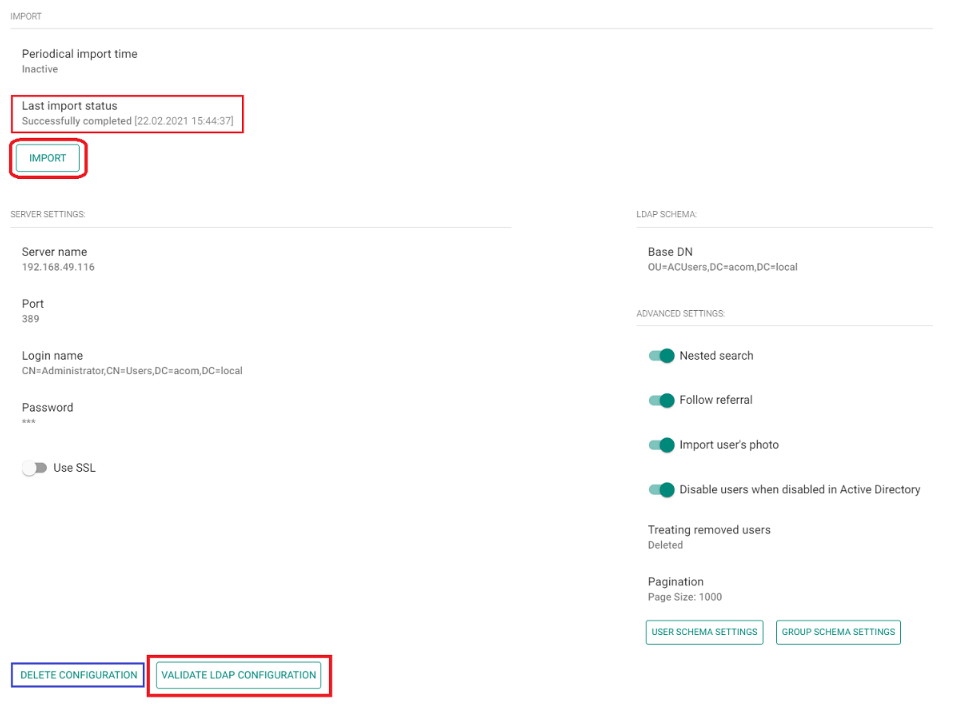
How to import an RFID card identifier or PIN code with the user
- Click the USER SCHEMA SETTINGS button:
-
Here we define the names of the attributes in the directory from which the individual information is downloaded.
In the case of cards or PIN codes, we often have to use the box for another item, as there is usually no space in the directory for a card identifier or PIN code.
The following example shows that for the identifier of card 1 we used the Description field in the directory and for the PIN code the Fax field in the user detail.
Therefore, in order to be able to import the given information, it is necessary to set up 2N® Access Commander to search for this information in the given user's detail fields in the directory: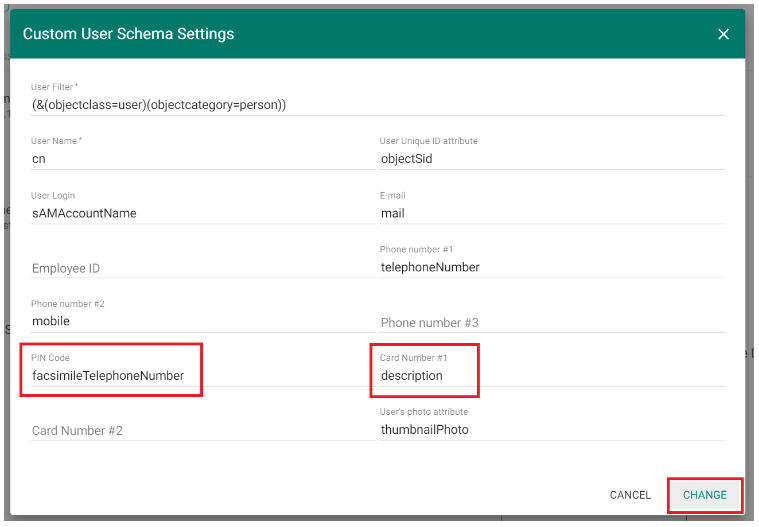
The names of the individual attributes (for MS Active Directory) are then described here: https://docs.classic.secureauth.com/display/KBA/Active+Directory+Attributes+List)
Example:
-
PIN Code we entered for example into the "Fax" field in the directory - the name of this attribute in the directory is: facsimileTelephoneNumber
-
Card Number #1we entered for example into the "Description" field in the directory - the name of this attribute in the directory is:description
For the second card a separate field must be selected in the user's detail.
-
Group membership for imported users
This is not an import of the groups from the LDAP directory, this is only a synchronisation of the membership,
you need to manually create those groups in your Access Commander first.
This was done to prevent importing all unnecessary groups, that are not tied with access.
- If you have done all of the steps above, you now should have users in your database with their accesses, phone numbers etc.
-
Now you can create groups in the Access Commander, keep in mind that the name of the group is case sensitive and must be exactly the same as you use in your remote directory.
-
After you create all the necessary groups, you need to enable synchronisation in the Access Commander and edit group schema settings according to your needs
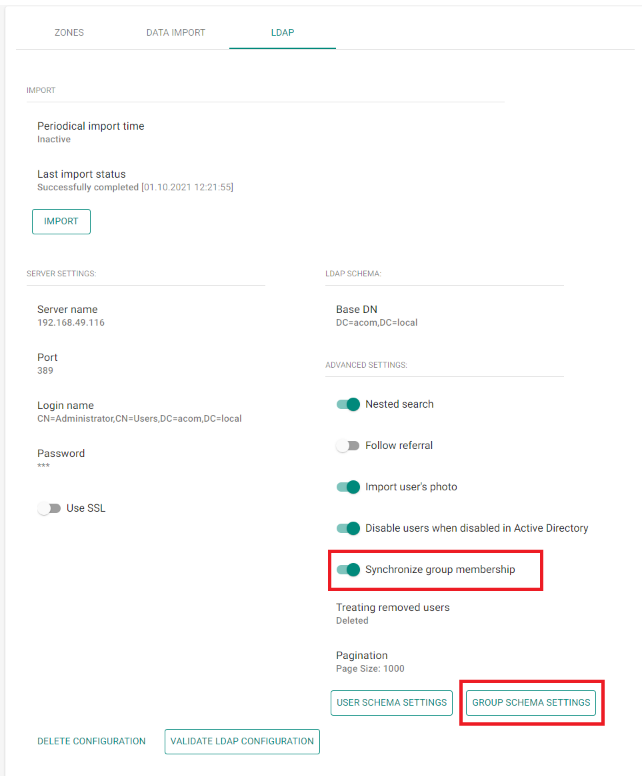

Additional Group DN:
CN=<container_name_in_directory_containing_groups_of_users>
(do not insert BaseDN as it will be automatically used according to the LDAP schema set in previous steps)
Group Filter:
In our example, we used a filter for MS Active Directory (&(objectClass=group)(member=*)),
thereby synchronising the users with groups that have "group" in the "objectclass" attribute and "member" in the "objectcategory" attribute and they are also simultaneously created in the Access Commander.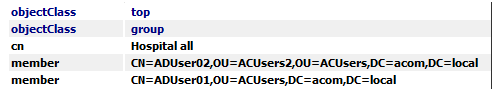
The default Group Name ("cn") and Group Member ("member") above may apply only to MS Active Directory, and in case of synchronisation from other directories, those that differ must be adjusted according to the given directory. -
Now you can import the LDAP settings and check if everything is properly synchronised and the users are assigned to the correct groups