2N IP Intercom - Ripristino delle impostazioni di fabrica
Citofoni IP 2N - Ripristino delle impostazioni di fabbrica
I passaggi descritti in questo articolo richiedono l'utilizzo dell'interfaccia web di un dispositivo 2N. Si prega di seguire questo manuale se si utilizza l'interfaccia web per la prima volta.
Se necessario, è possibile ripristinare il dispositivo alle impostazioni di fabbrica. Se si riesce ad accedere all'interfaccia web (conoscenza della password di accesso), è possibile eseguire il backup della configurazione e utilizzare il ripristino software, mantenendo le impostazioni di rete. In alternativa, è possibile eseguire il ripristino hardware.
Il ripristino delle impostazioni di fabbrica cancella anche la chiave di licenza (se inserita); si consiglia di conservarla per reinserirla al termine della procedura.
In caso di installazione online, il dispositivo può recuperare la licenza dal nostro server licenze autonomamente.
Prerequisiti
Citofono IP 2N con il firmware più recente, se possibile
(soprattutto in caso di ripristino tramite software)
Ripristino tramite software
Clicca qui per il firmware 3.0 e successivi.
Scopri di più sulle differenze tra supporto a lungo termine e sistema operativo 2N Active Track.
Firmware 2.50 e precedenti (LTS)
Per prima cosa, esegui un backup della configurazione nell'interfaccia web di IP Intercom, sezione Sistema - Manutenzione.
2N IP Intercom - Sistema - Manutenzione - Backup della configurazione
Ora, nella stessa pagina, clicca sul pulsante Ripristina configurazione e conferma. Puoi scegliere se mantenere le impostazioni di rete.
La procedura si completa in pochi istanti e ti verrà richiesta una nuova password di accesso.
2N IP Intercom - Sistema - Manutenzione - Ripristina configurazione
2N IP Intercom - Sistema - Manutenzione - Ripristina configurazione - Conferma
2N IP Intercom - Sistema - Manutenzione - Ripristina configurazione - Modifica la password dopo il ripristino
Firmware 3.0 e successivi
Per prima cosa, esegui un backup della configurazione nell'interfaccia web di IP Intercom, sezione Sistema - Manutenzione.
Ora, nella stessa pagina, clicca sul pulsante Ripristina configurazione e conferma. Puoi scegliere se mantenere le impostazioni di rete.
La procedura si completa in pochi istanti e ti verrà richiesta una nuova password di accesso.
Ripristino hardware
Clicca sul componente (modello) che ti interessa e verrà visualizzato.
Ripristino Hardware
Fate clic sul componente (modello) che vi interessa e verrà visualizzato.
2N IP Audio/Video Kit
- Press and hold the RESET button.
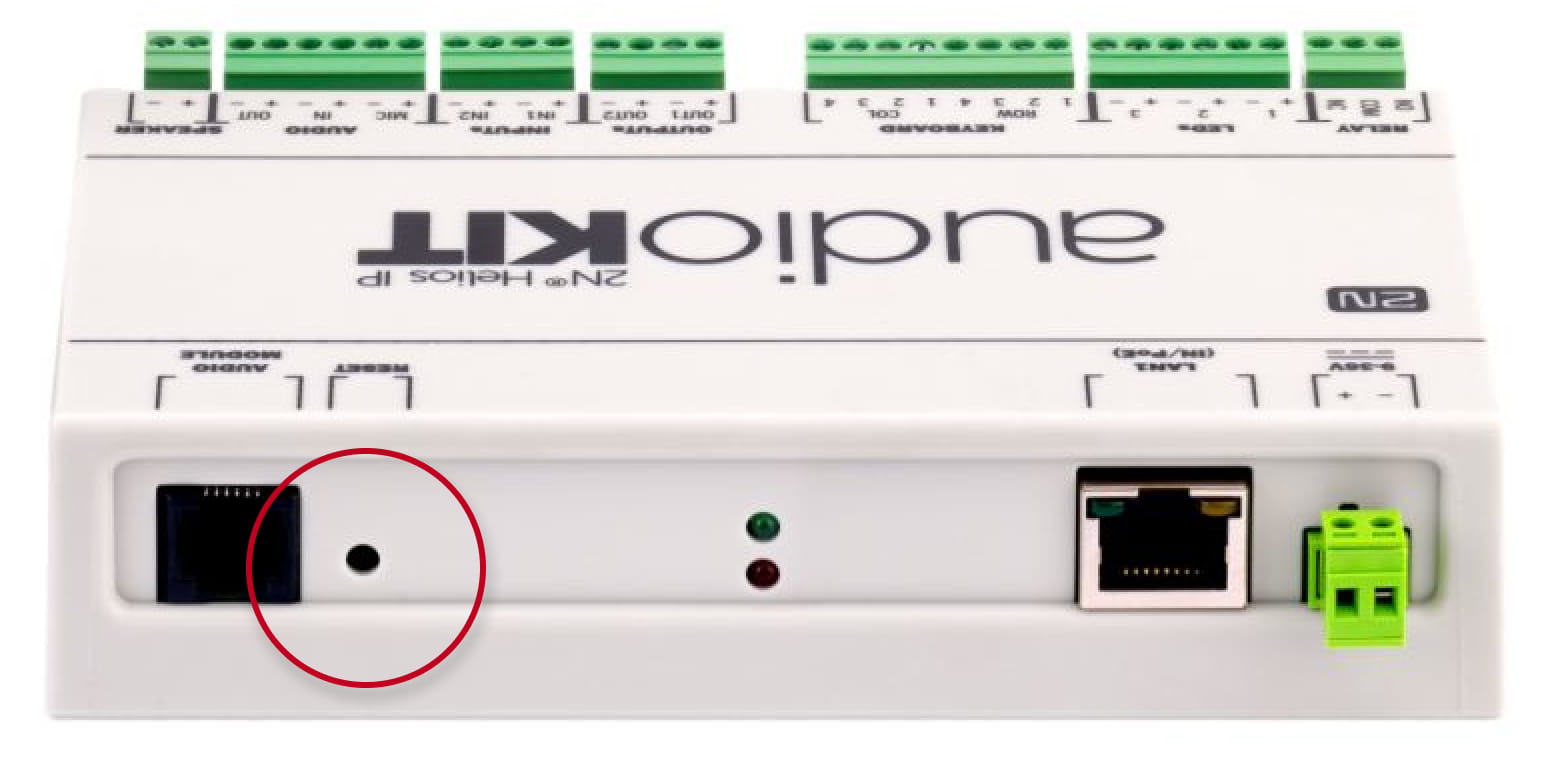
- Watch and hear (if connected speaker) this LED / beep sequence

approx. 15 seconds approx. 3 seconds approx. 3 seconds approx. 3 seconds approx. 3 seconds __ _ __ _ __ _ __ _ __ _ __ _ __ _ __ _ __ _ __ _ 🔈 ) 🔈 )) 🔈 ))) 🔈 )))) -
Release the RESET button immediately when the last step starts (when you hear 4 beeps).
If pressed longer till finishing boot, then factory reset is not proceeded.
2N IP Base
- Press and hold the RESET button.
- Watch and hear this LED / beep sequence
approx. 15 seconds approx. 3 seconds approx. 3 seconds approx. 3 seconds approx. 3 seconds __ _ __ _ __ _ __ _ __ _ __ _ __ _ __ _ __ _ __ _ 🔈 ) 🔈 )) 🔈 ))) 🔈 )))) -
Release the RESET button immediately when the last step starts (when you hear 4 beeps).
If pressed longer till finishing boot, then factory reset is not proceeded.
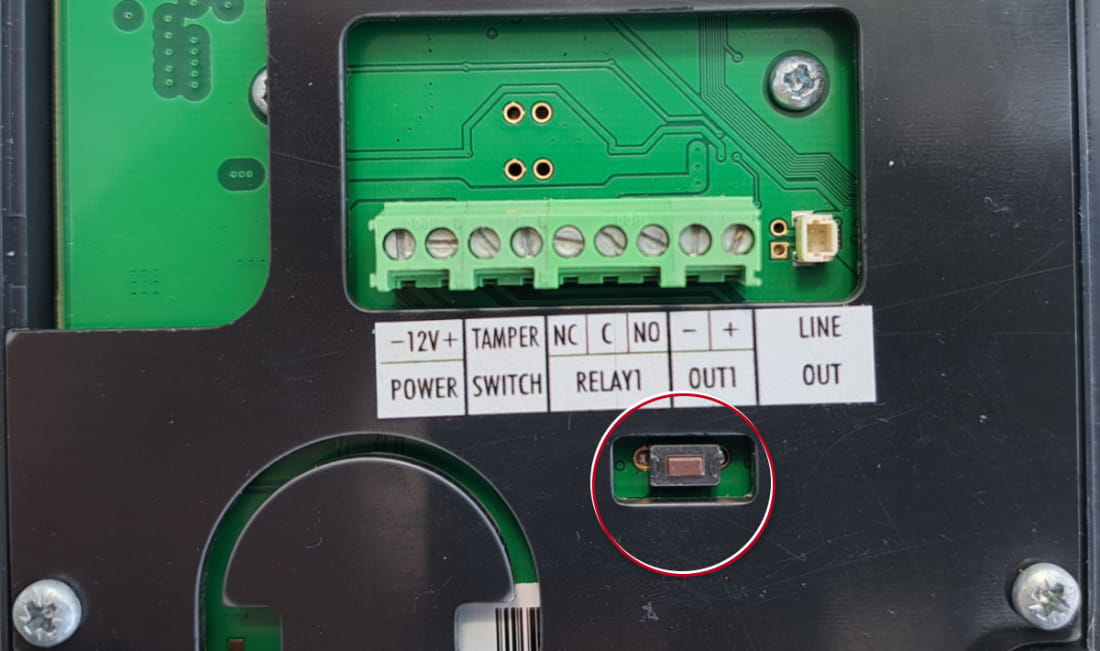
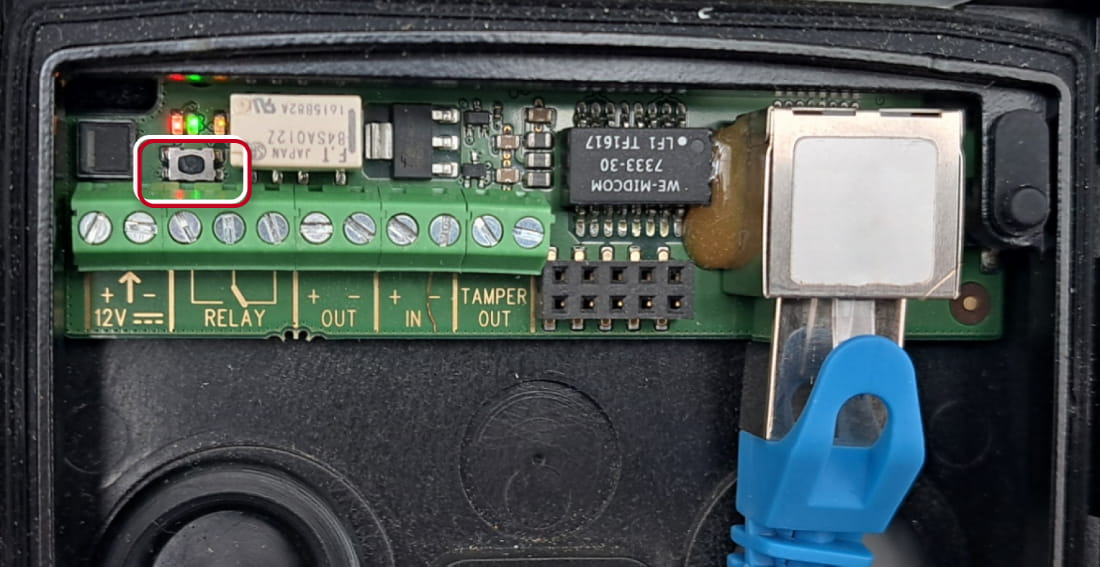
2N IP Force/Safety
The procedure depends on version of PCB, you can find this information here: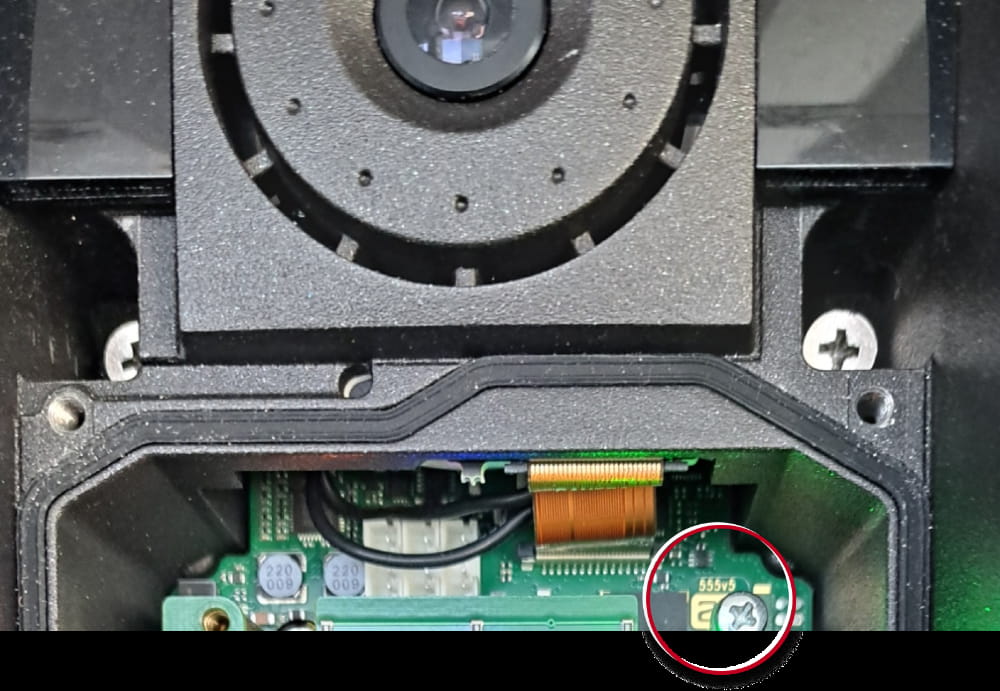
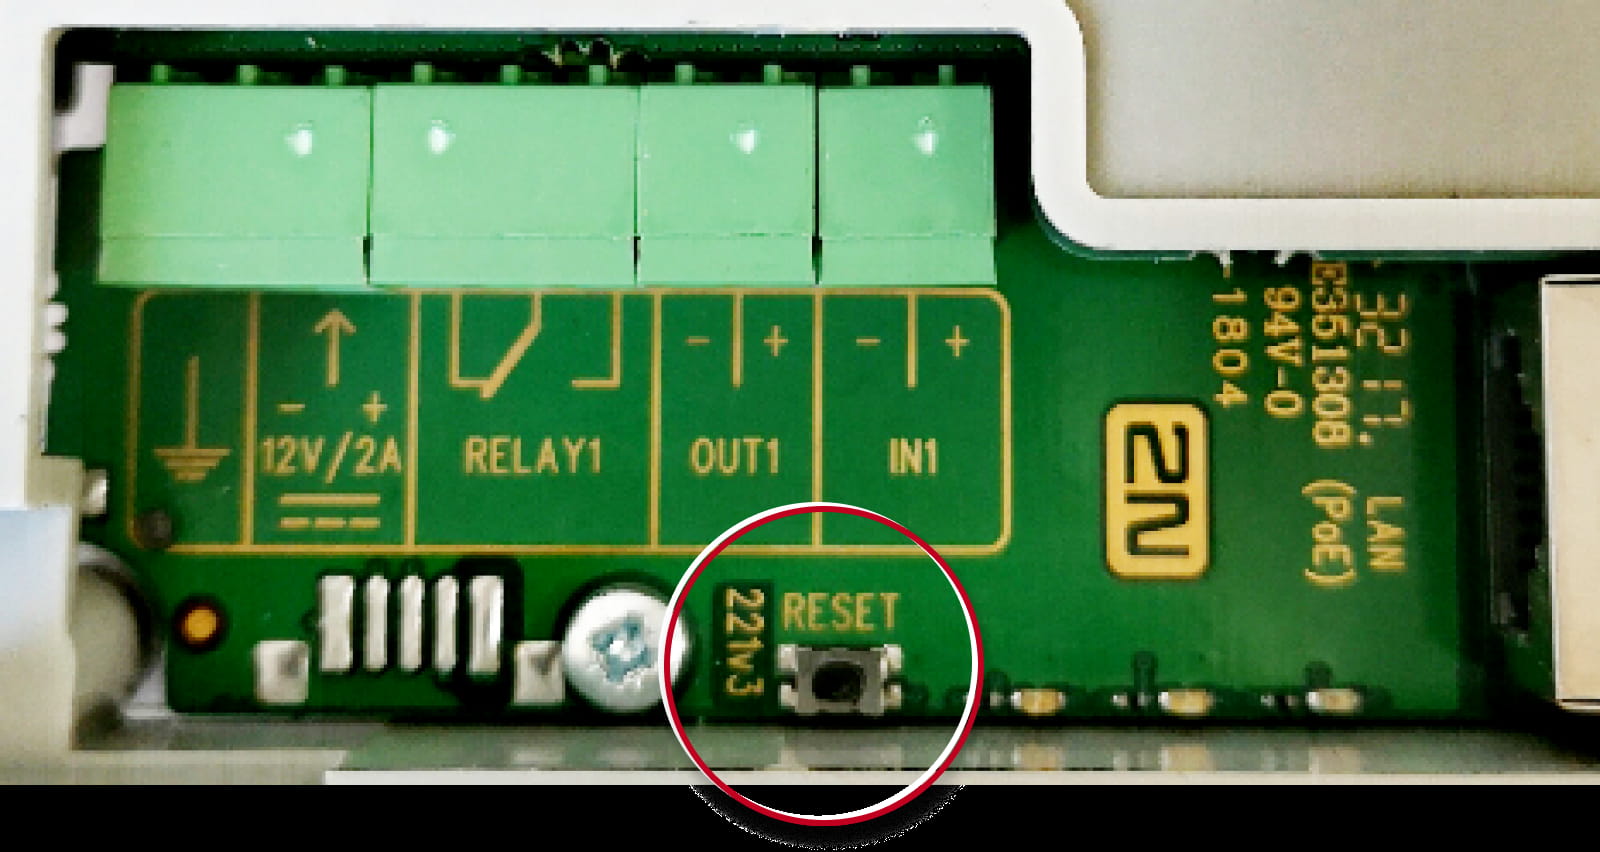
PCB version 555v5 (the actual procedure)
- Press and hold the RESET button.
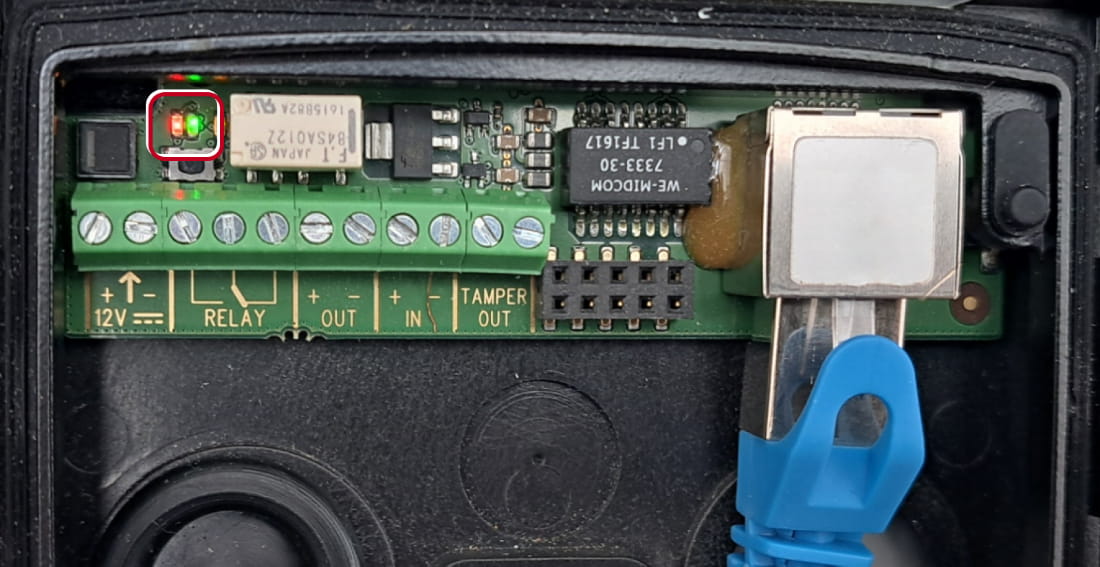
- Watch and hear this LED / beep sequence
approx. 15 seconds approx. 3 seconds approx. 3 seconds approx. 3 seconds approx. 3 seconds __ _ __ _ __ _ __ _ __ _ __ _ __ _ __ _ __ _ __ _ 🔈 ) 🔈 )) 🔈 ))) 🔈 )))) -
Release the RESET button immediately when the last step starts (when you hear 4 beeps).
If pressed longer till finishing boot, then factory reset is not proceeded.
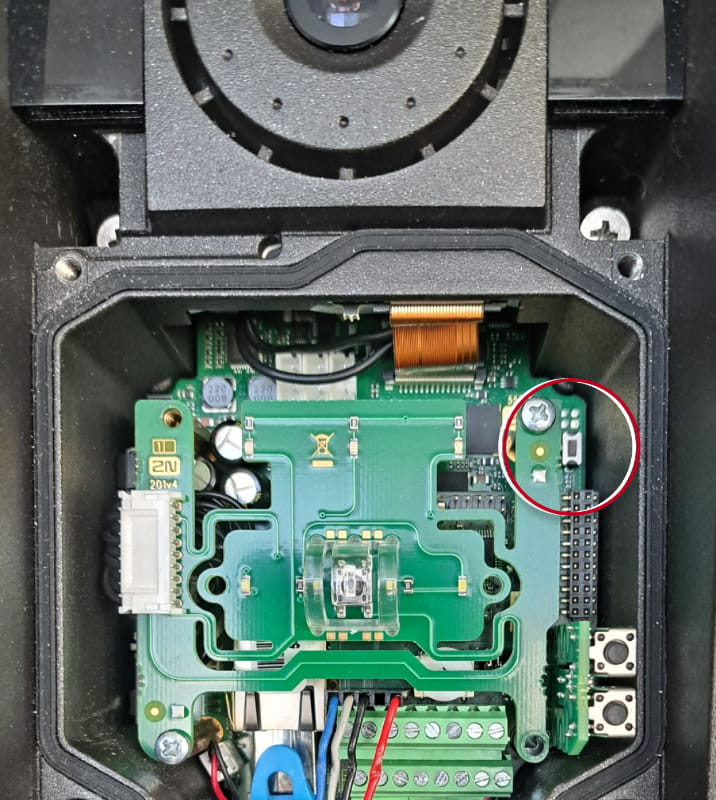
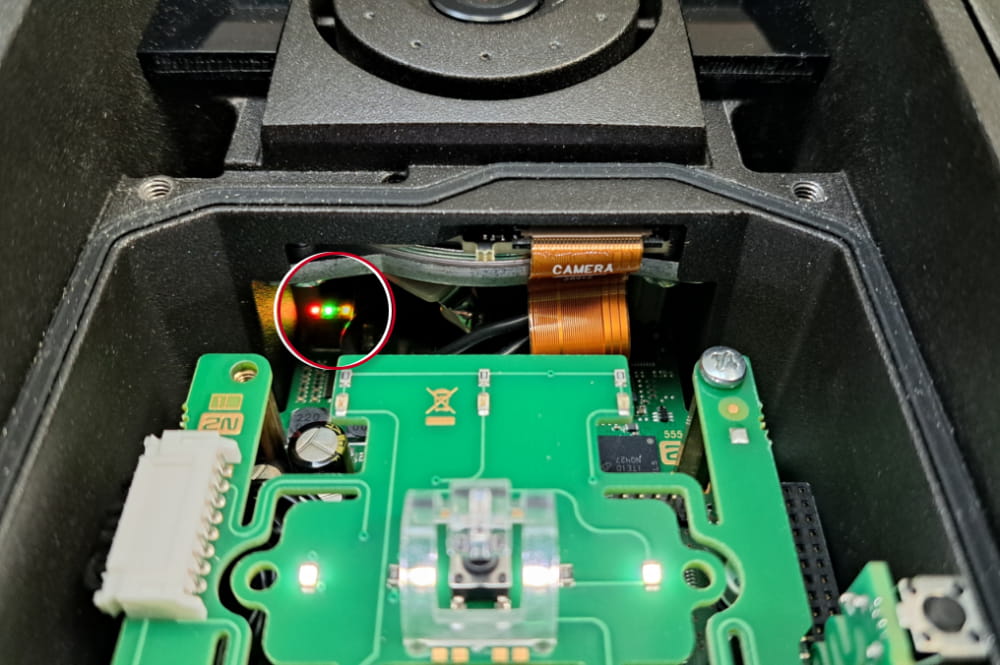
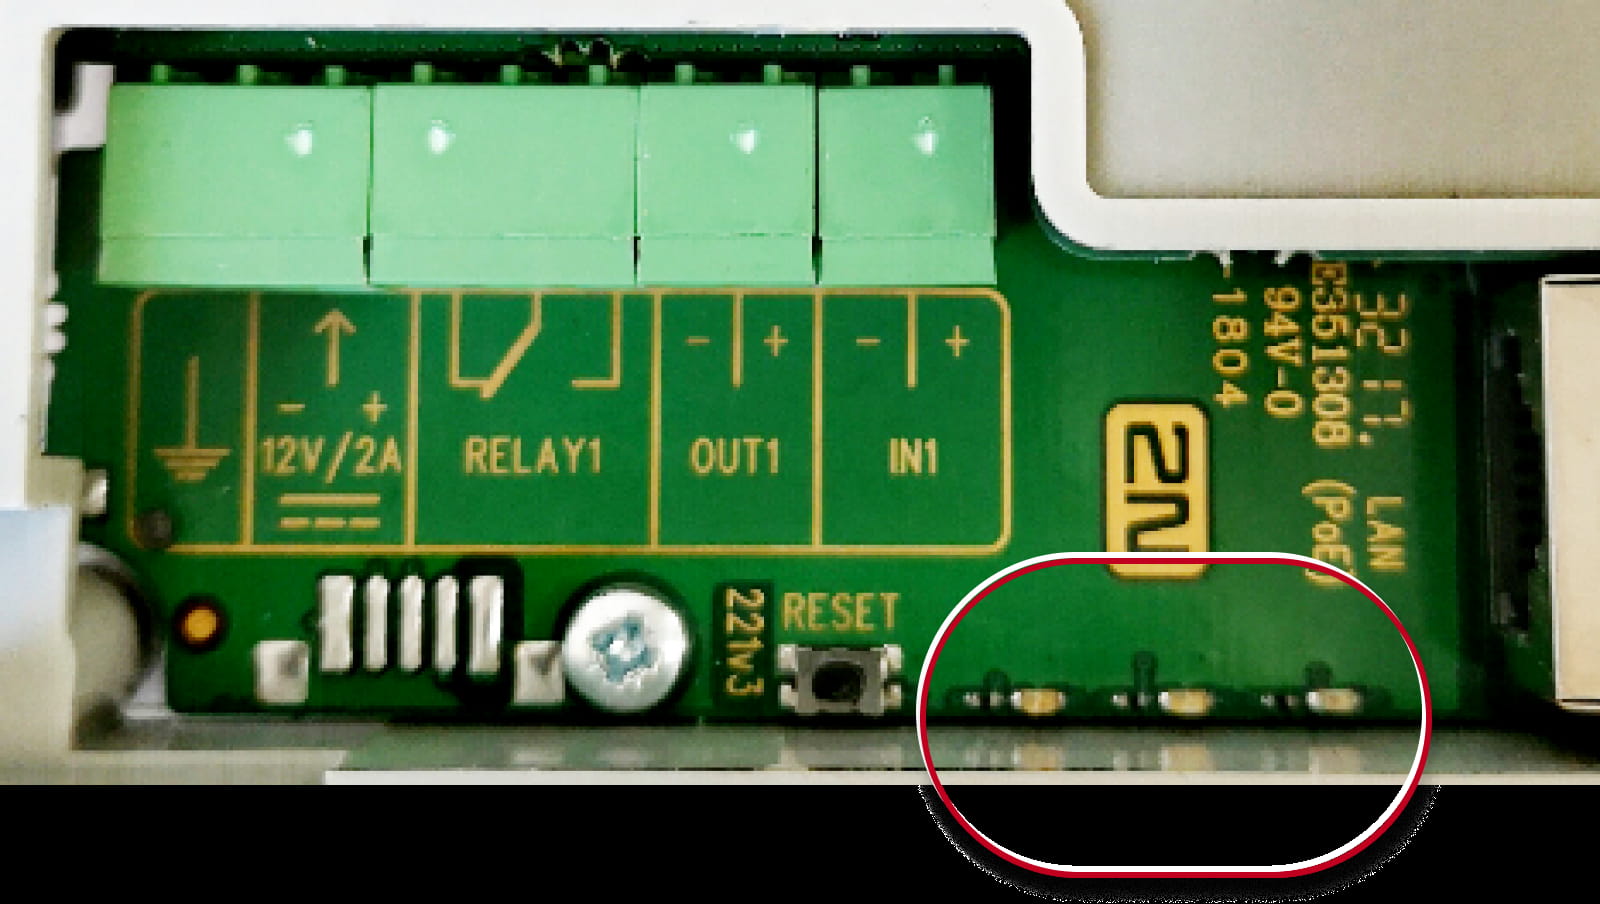
PCB version 555v4 and 555v3
- Press and hold the SW1 button.
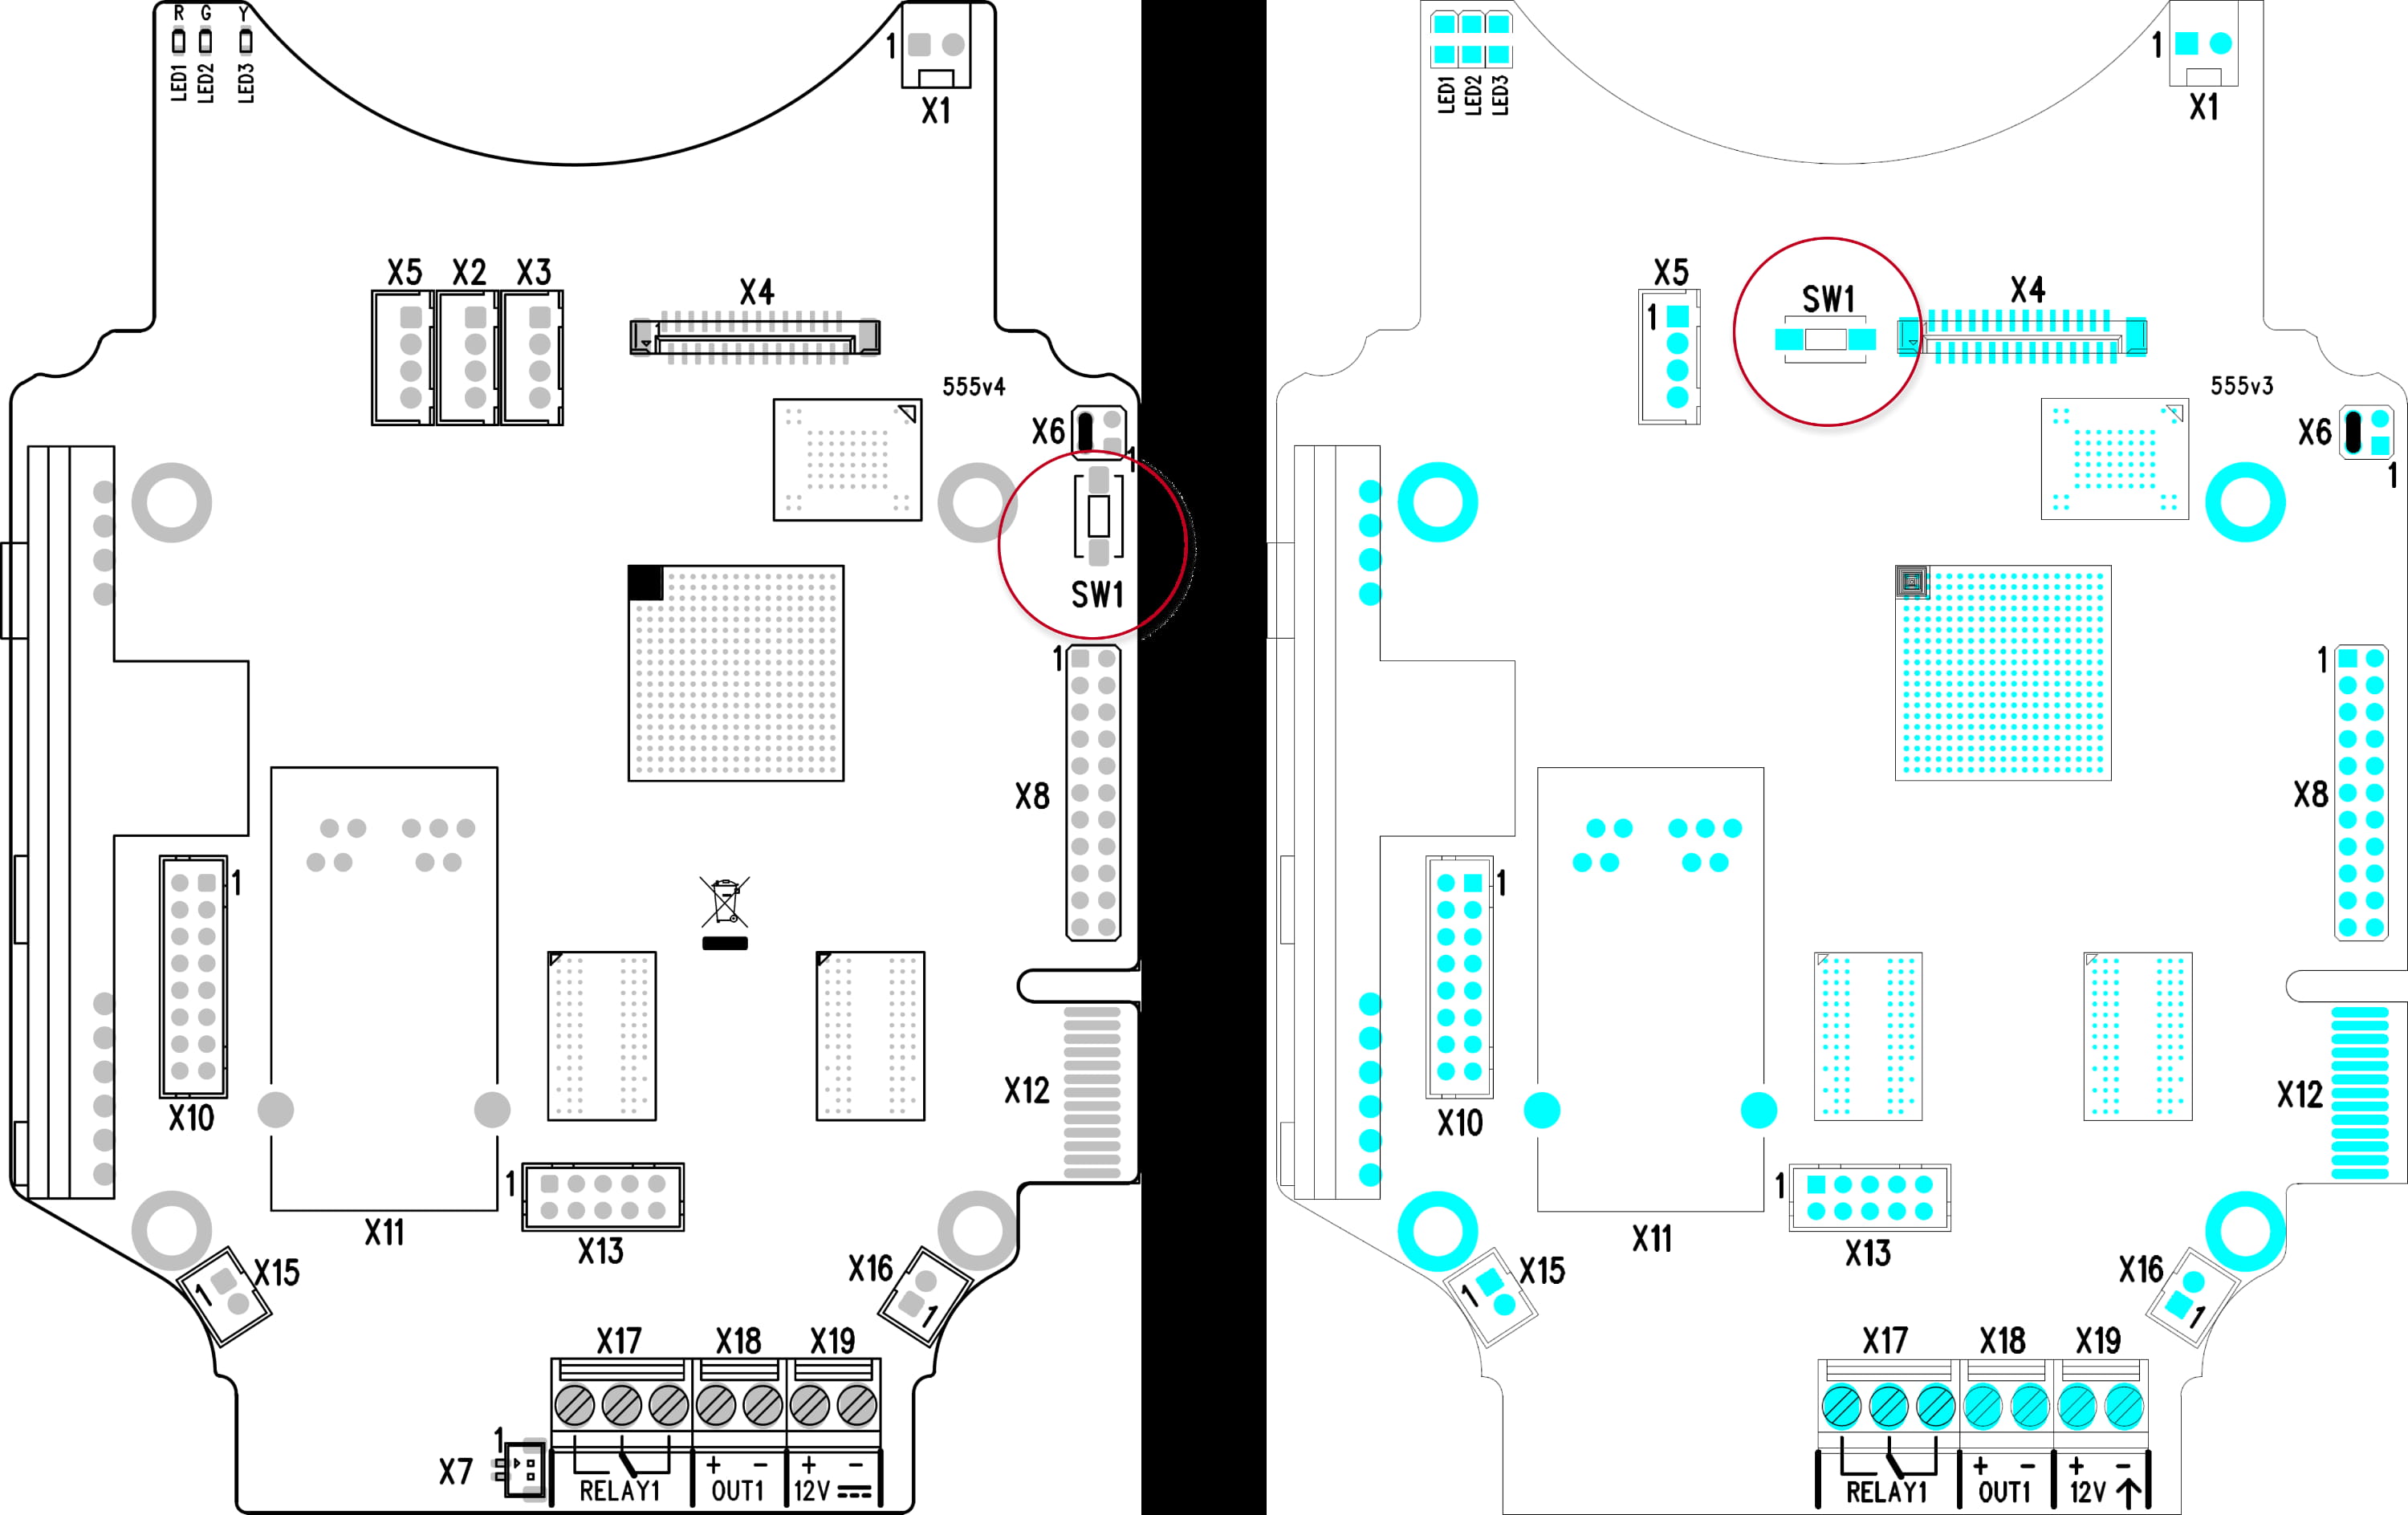
- Wait for the first sound signalization and then release the button.
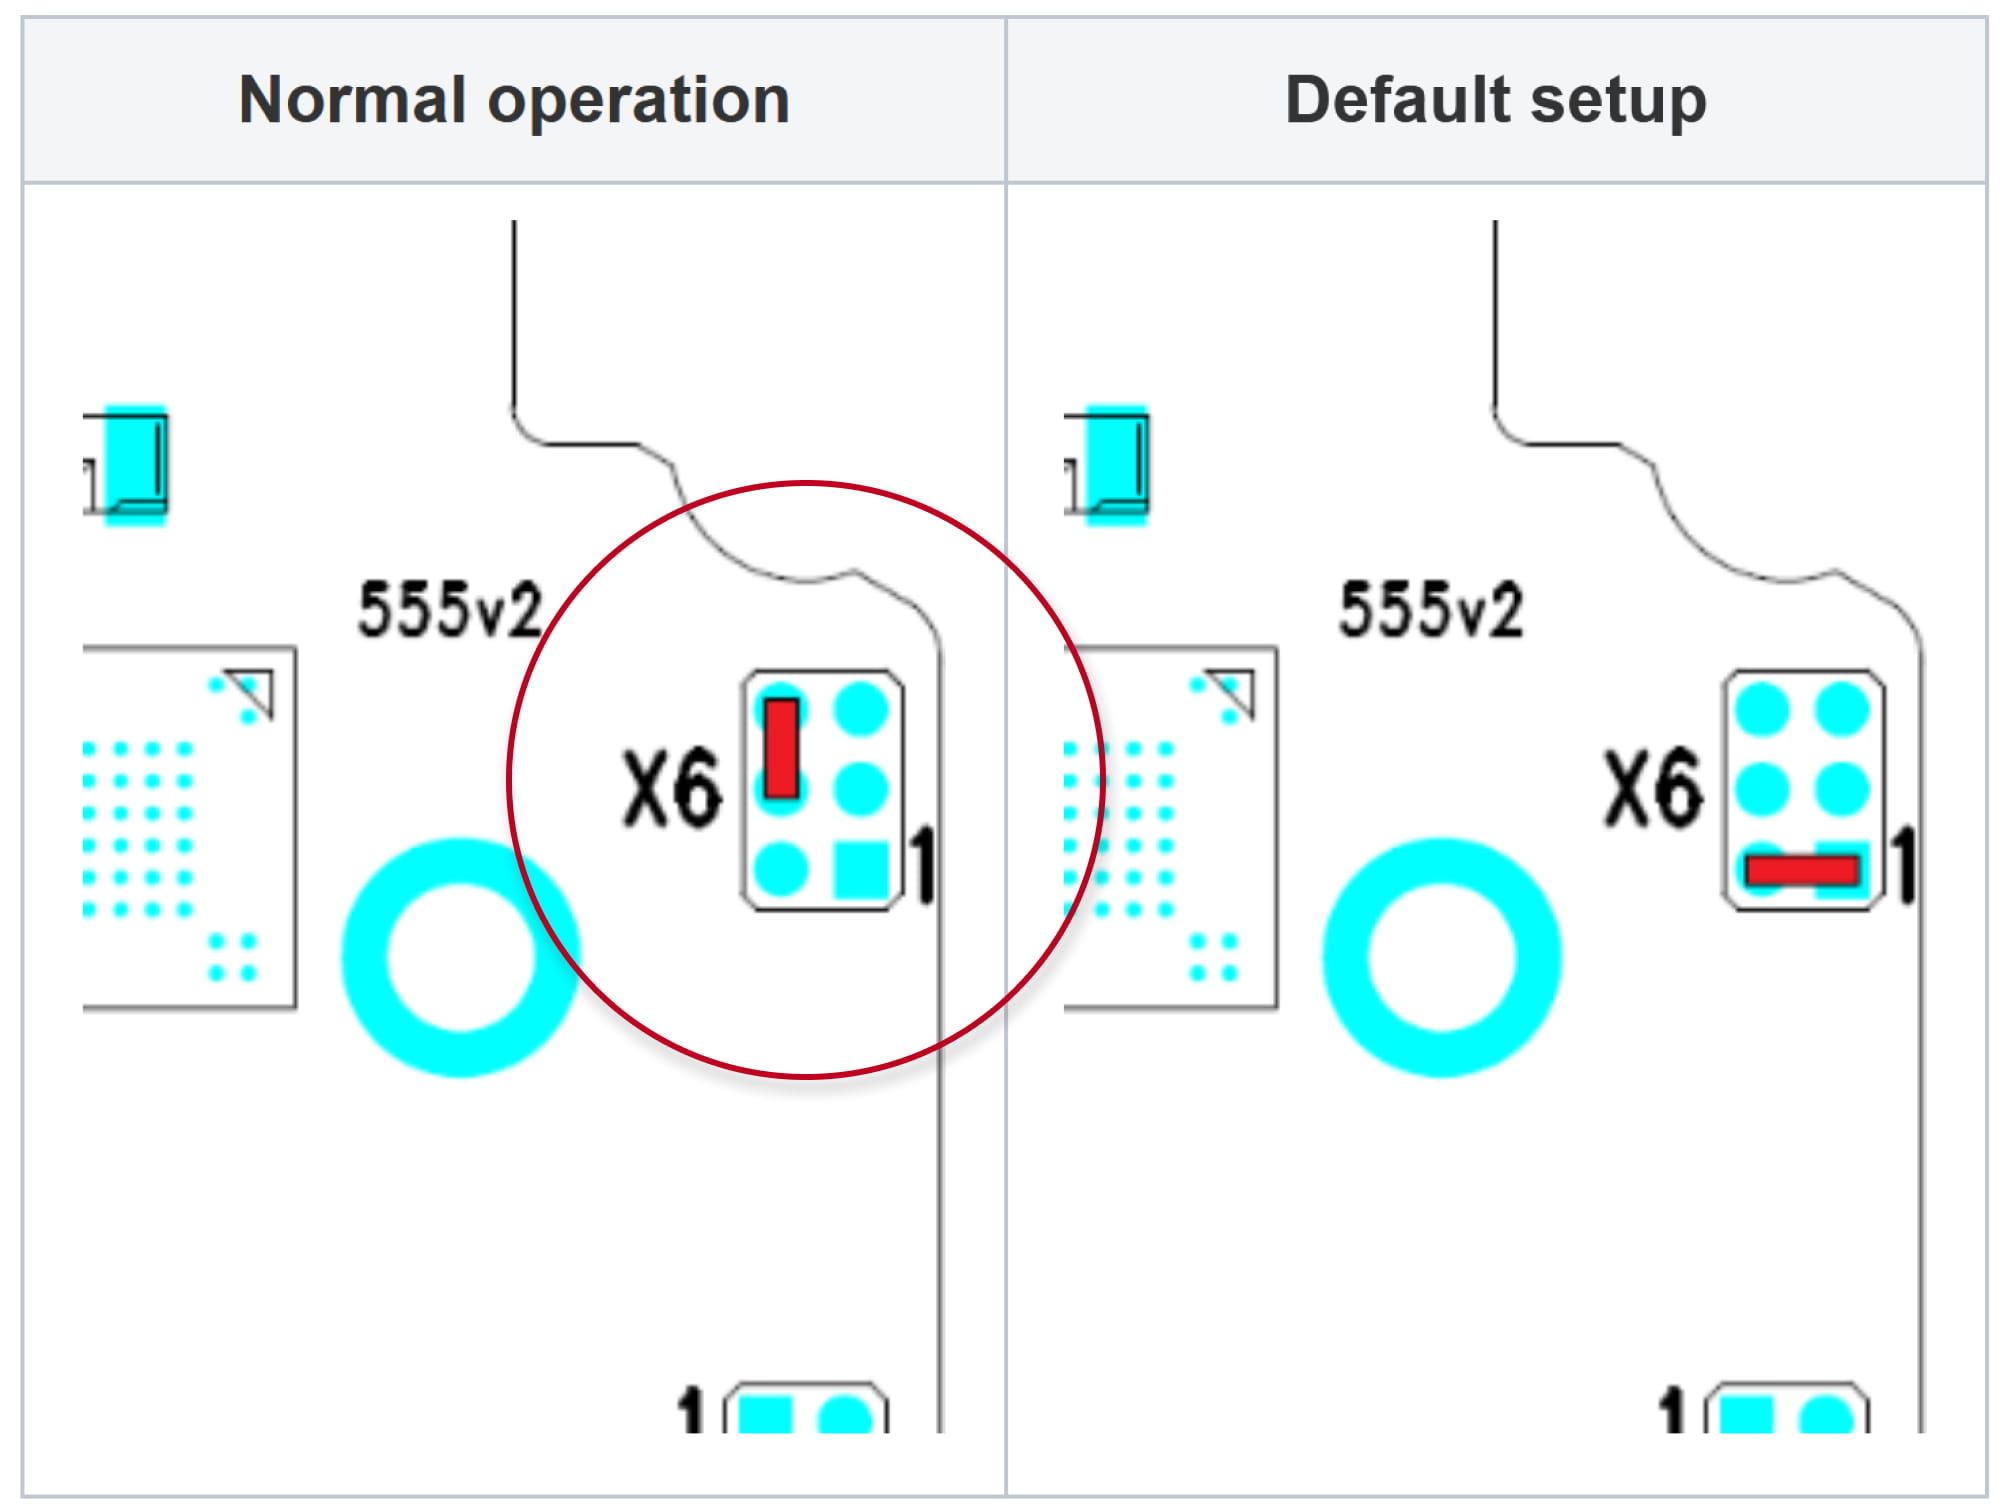
PCB version 555v2
- Disconnect the device from the power supply.
- Move the short-circuit jumper on connector X6 into the Default setup position.
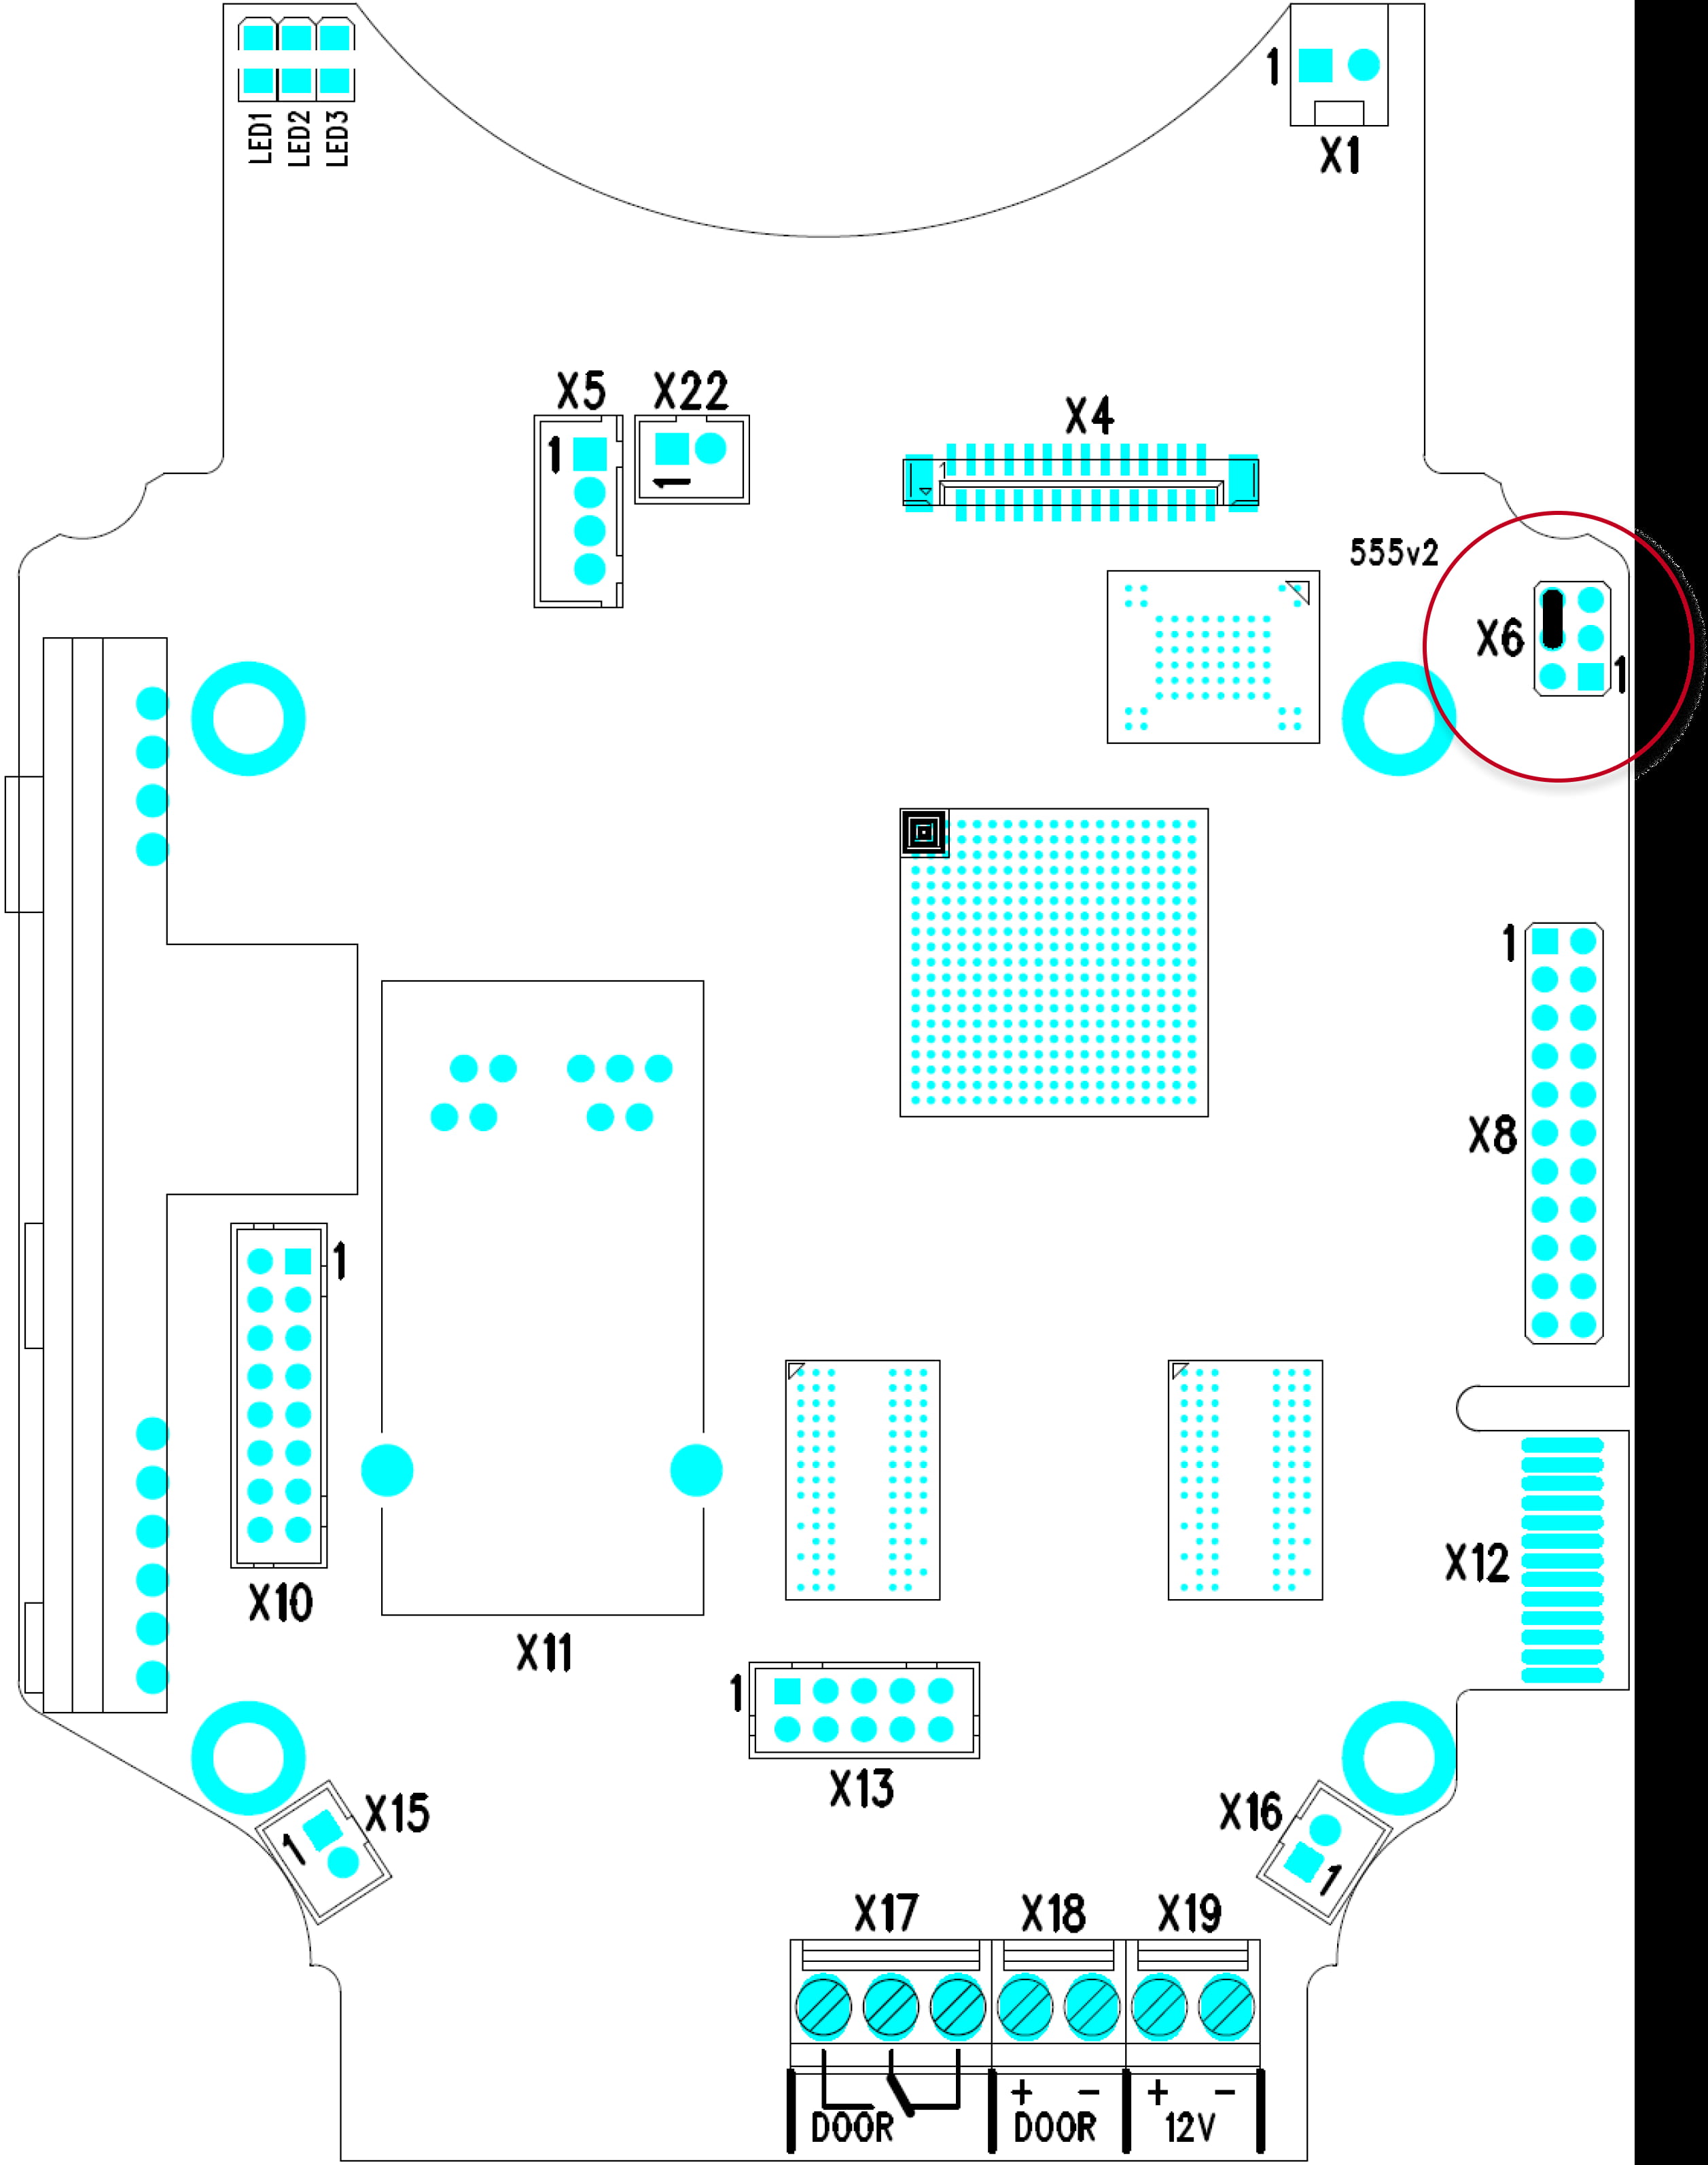

- Reconnect the power supply and wait for the signalling sound.
-
Disconnect the device from the power supply.
-
Move the short-circuit jumper on connector X6 into the Normal operation position.
-
Reconnect the power supply.
2N IP One
-
Disconnect the device from the power supply.
-
Press and hold the CONTROL button.

-
Connect the device to the power supply.
-
Keep holding the button for a few seconds and then release it.
2N IP Solo
- Press and hold the RESET button.
- Watch and hear this LED / beep sequence
approx. 15 seconds approx. 3 seconds approx. 3 seconds approx. 3 seconds approx. 3 seconds __ _ __ _ __ _ __ _ __ _ __ _ __ _ __ _ __ _ __ _ 🔈 ) 🔈 )) 🔈 ))) 🔈 )))) -
Release the RESET button immediately when the last step starts (when you hear 4 beeps).
If pressed longer till finishing boot, then factory reset is not proceeded.
2N IP Style
-
Disconnect the device from the power supply.
-
Press and hold the CONTROL button.

-
Connect the device to the power supply.
-
Keep holding the button for a few seconds and then release it.
2N IP Vario
The procedure depends on version of PCB, you can find this information here:
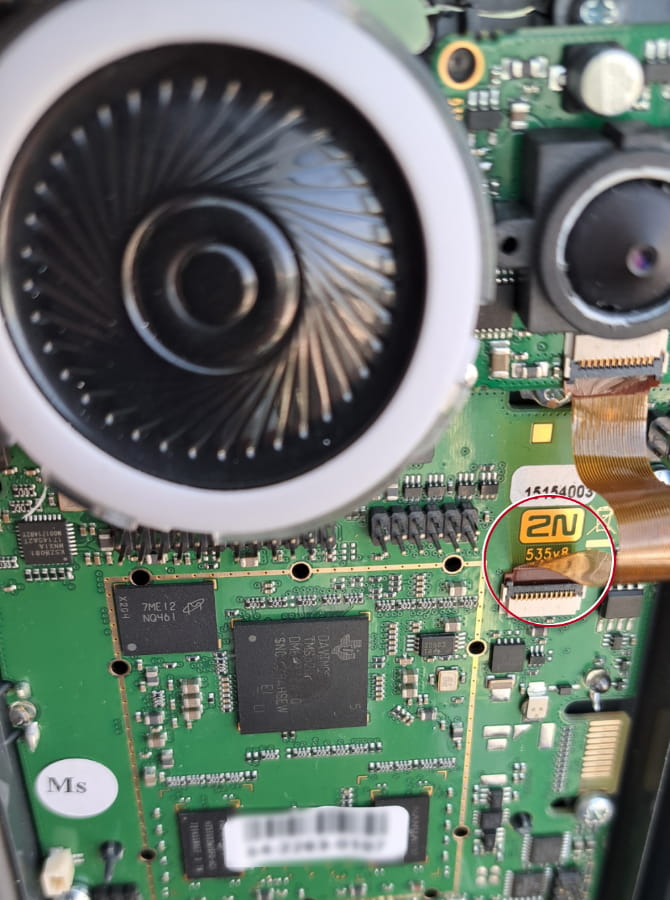
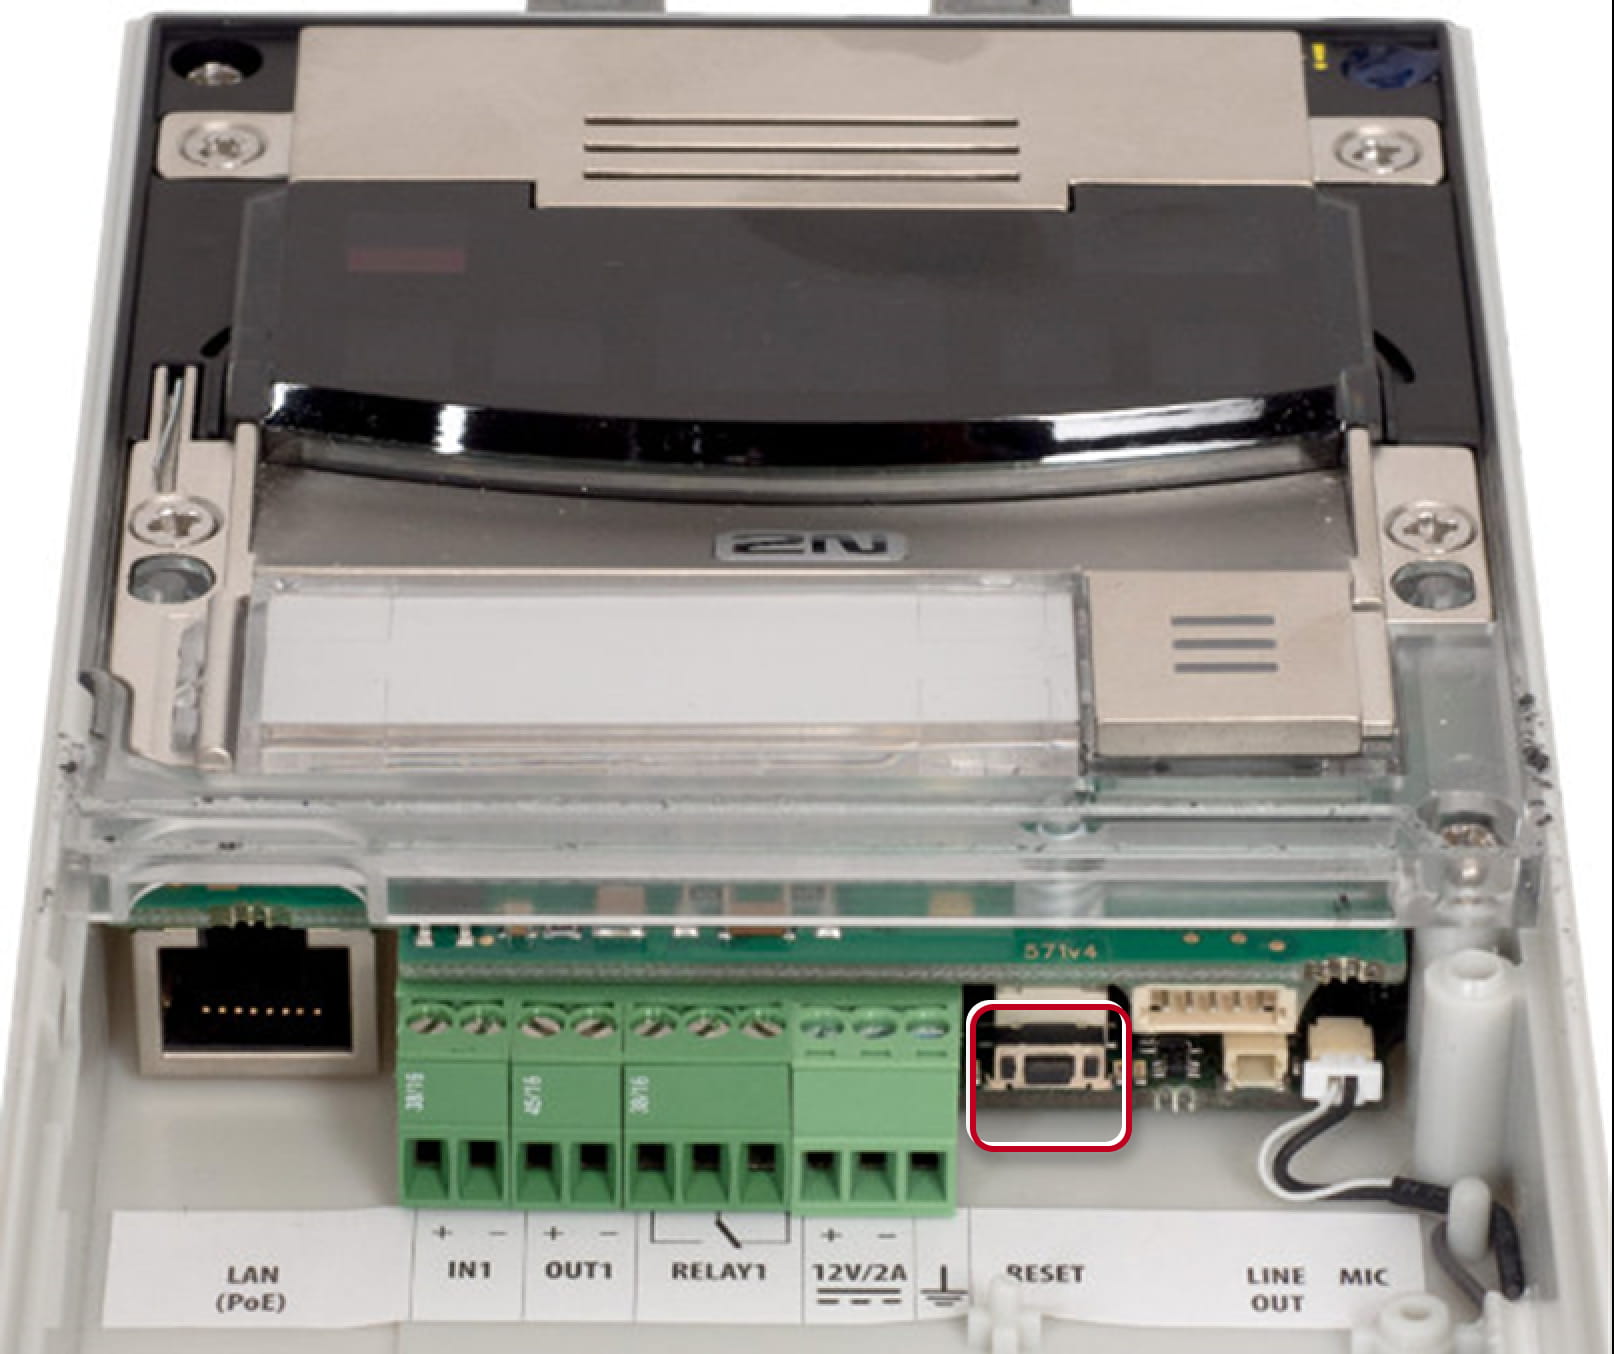
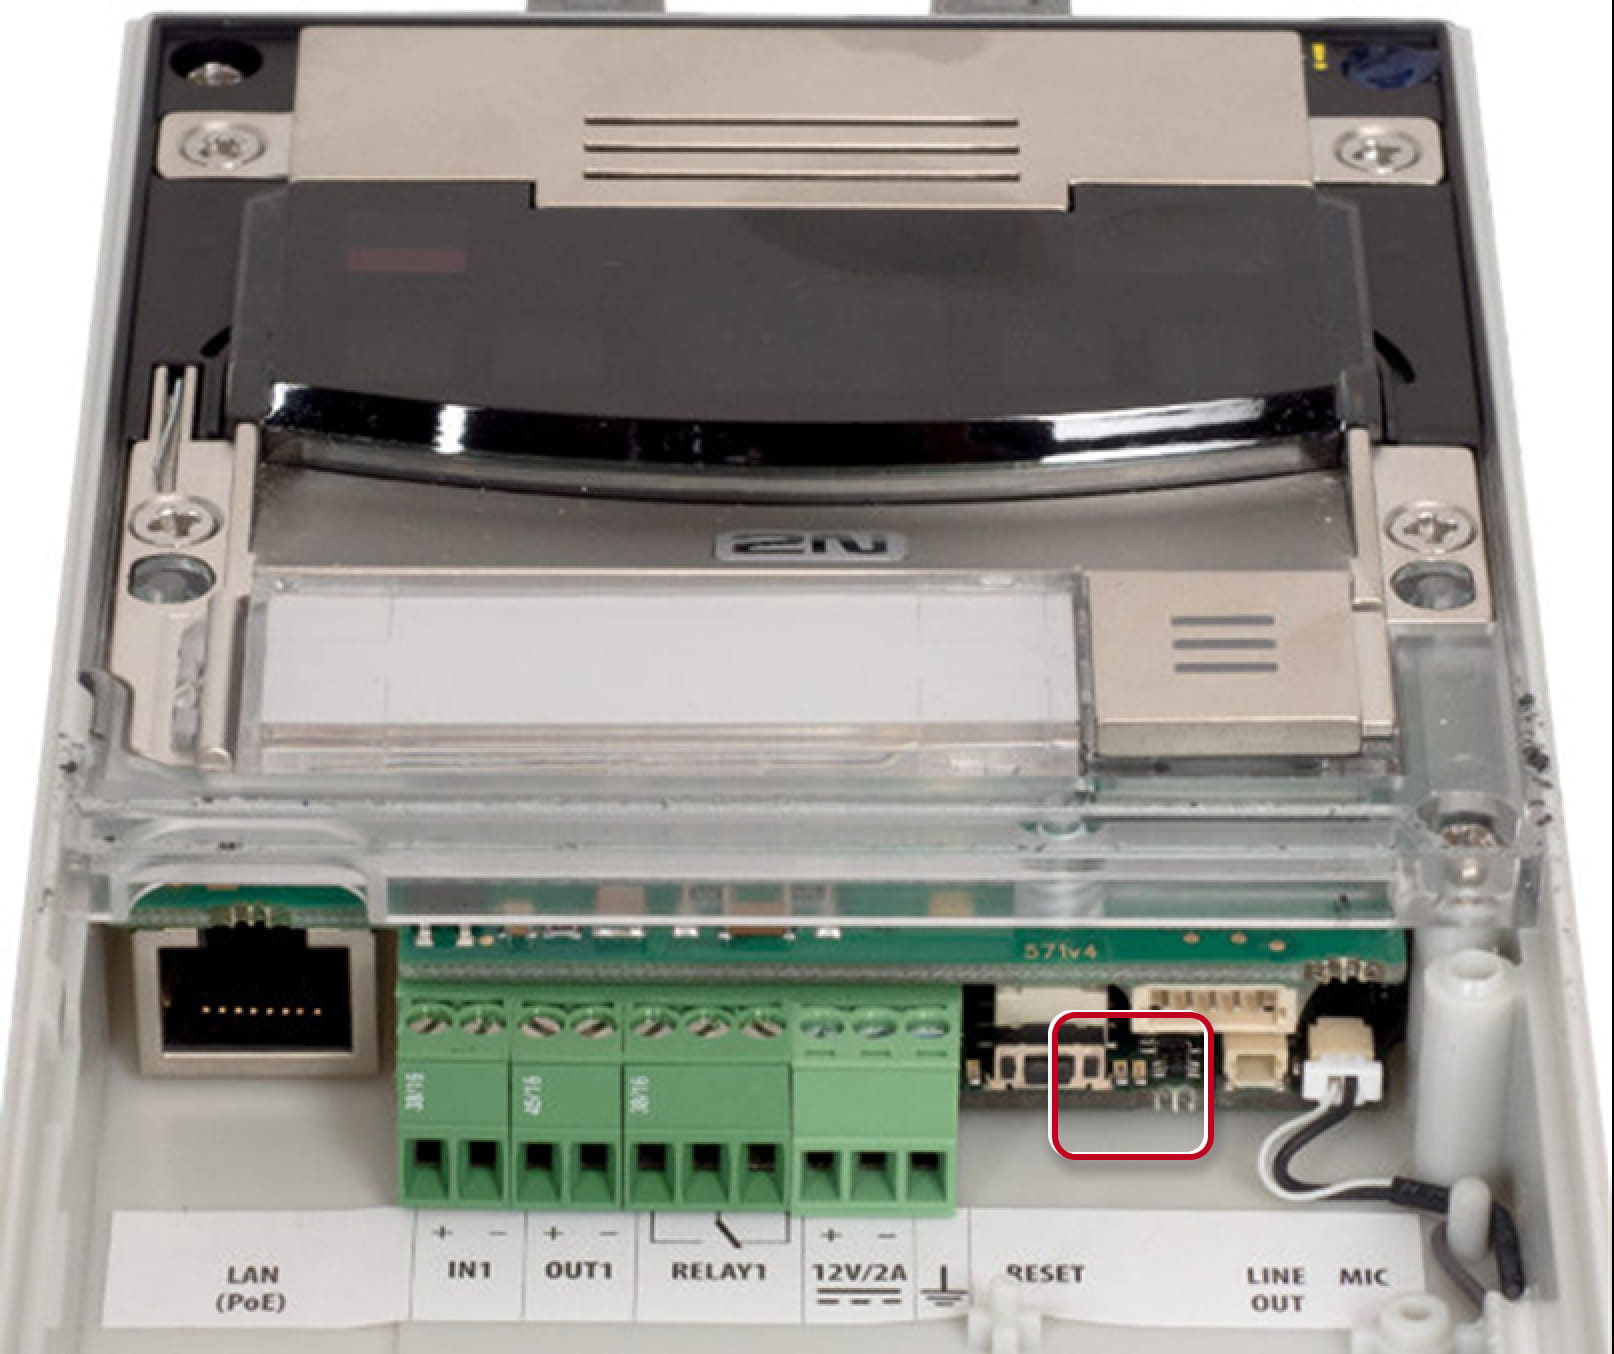
PCB version 535v8 (the actual procedure)
- Press and hold the RESET button.
- Watch and hear this LED / beep sequence

approx. 15 seconds approx. 3 seconds approx. 3 seconds approx. 3 seconds approx. 3 seconds __ _ __ _ __ _ __ _ __ _ __ _ __ _ __ _ __ _ __ _ 🔈 ) 🔈 )) 🔈 ))) 🔈 )))) -
Release the RESET button immediately when the last step starts (when you hear 4 beeps).
If pressed longer till finishing boot, then factory reset is not proceeded.
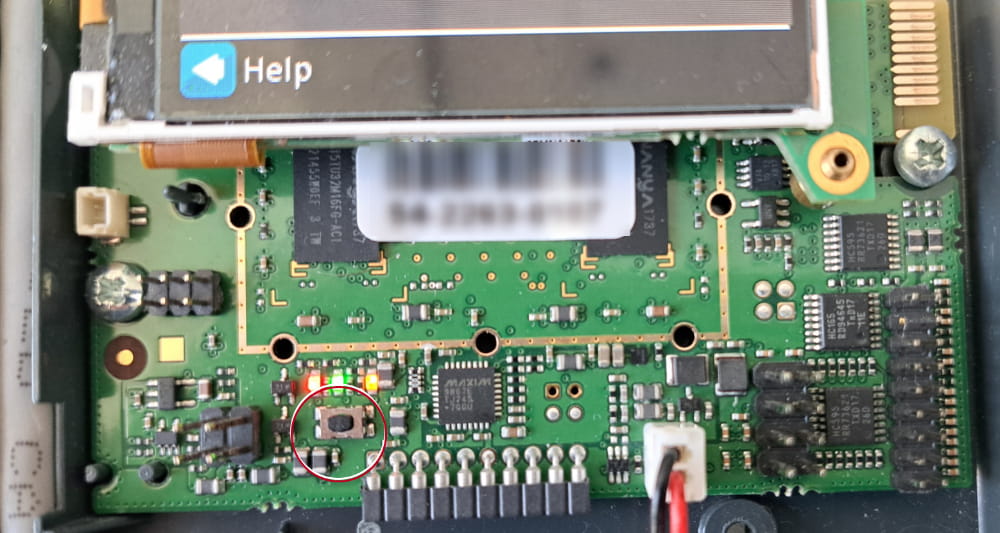
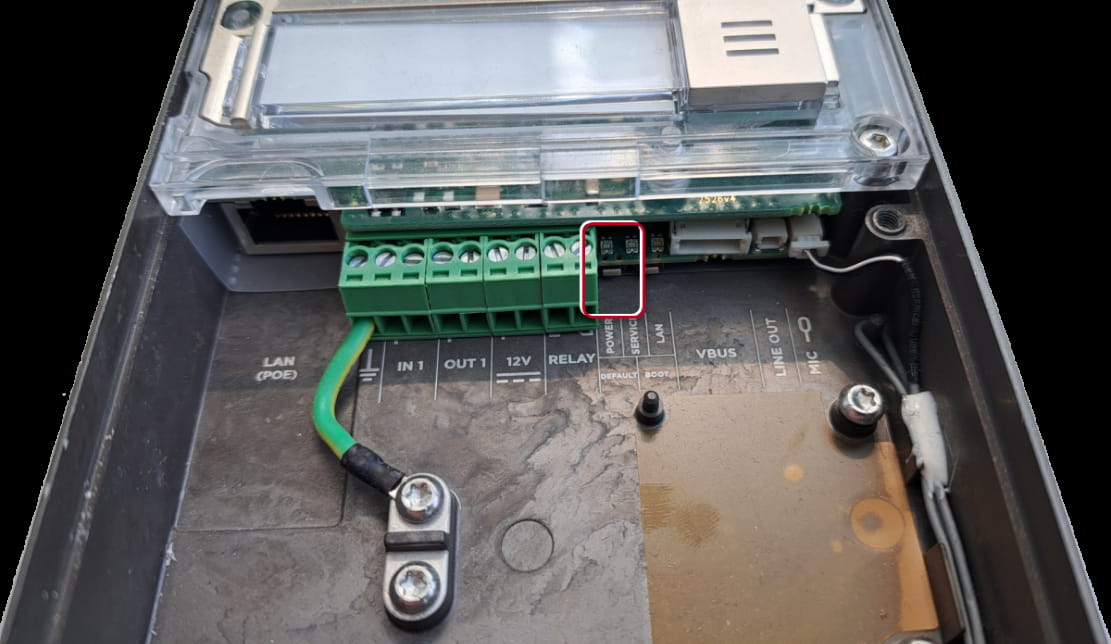
PCB version 535v5, 535v2, 535v1, 530v2
-
Switch 2N IP Vario off.
-
Connect the jumper into the resetting (default setting) position
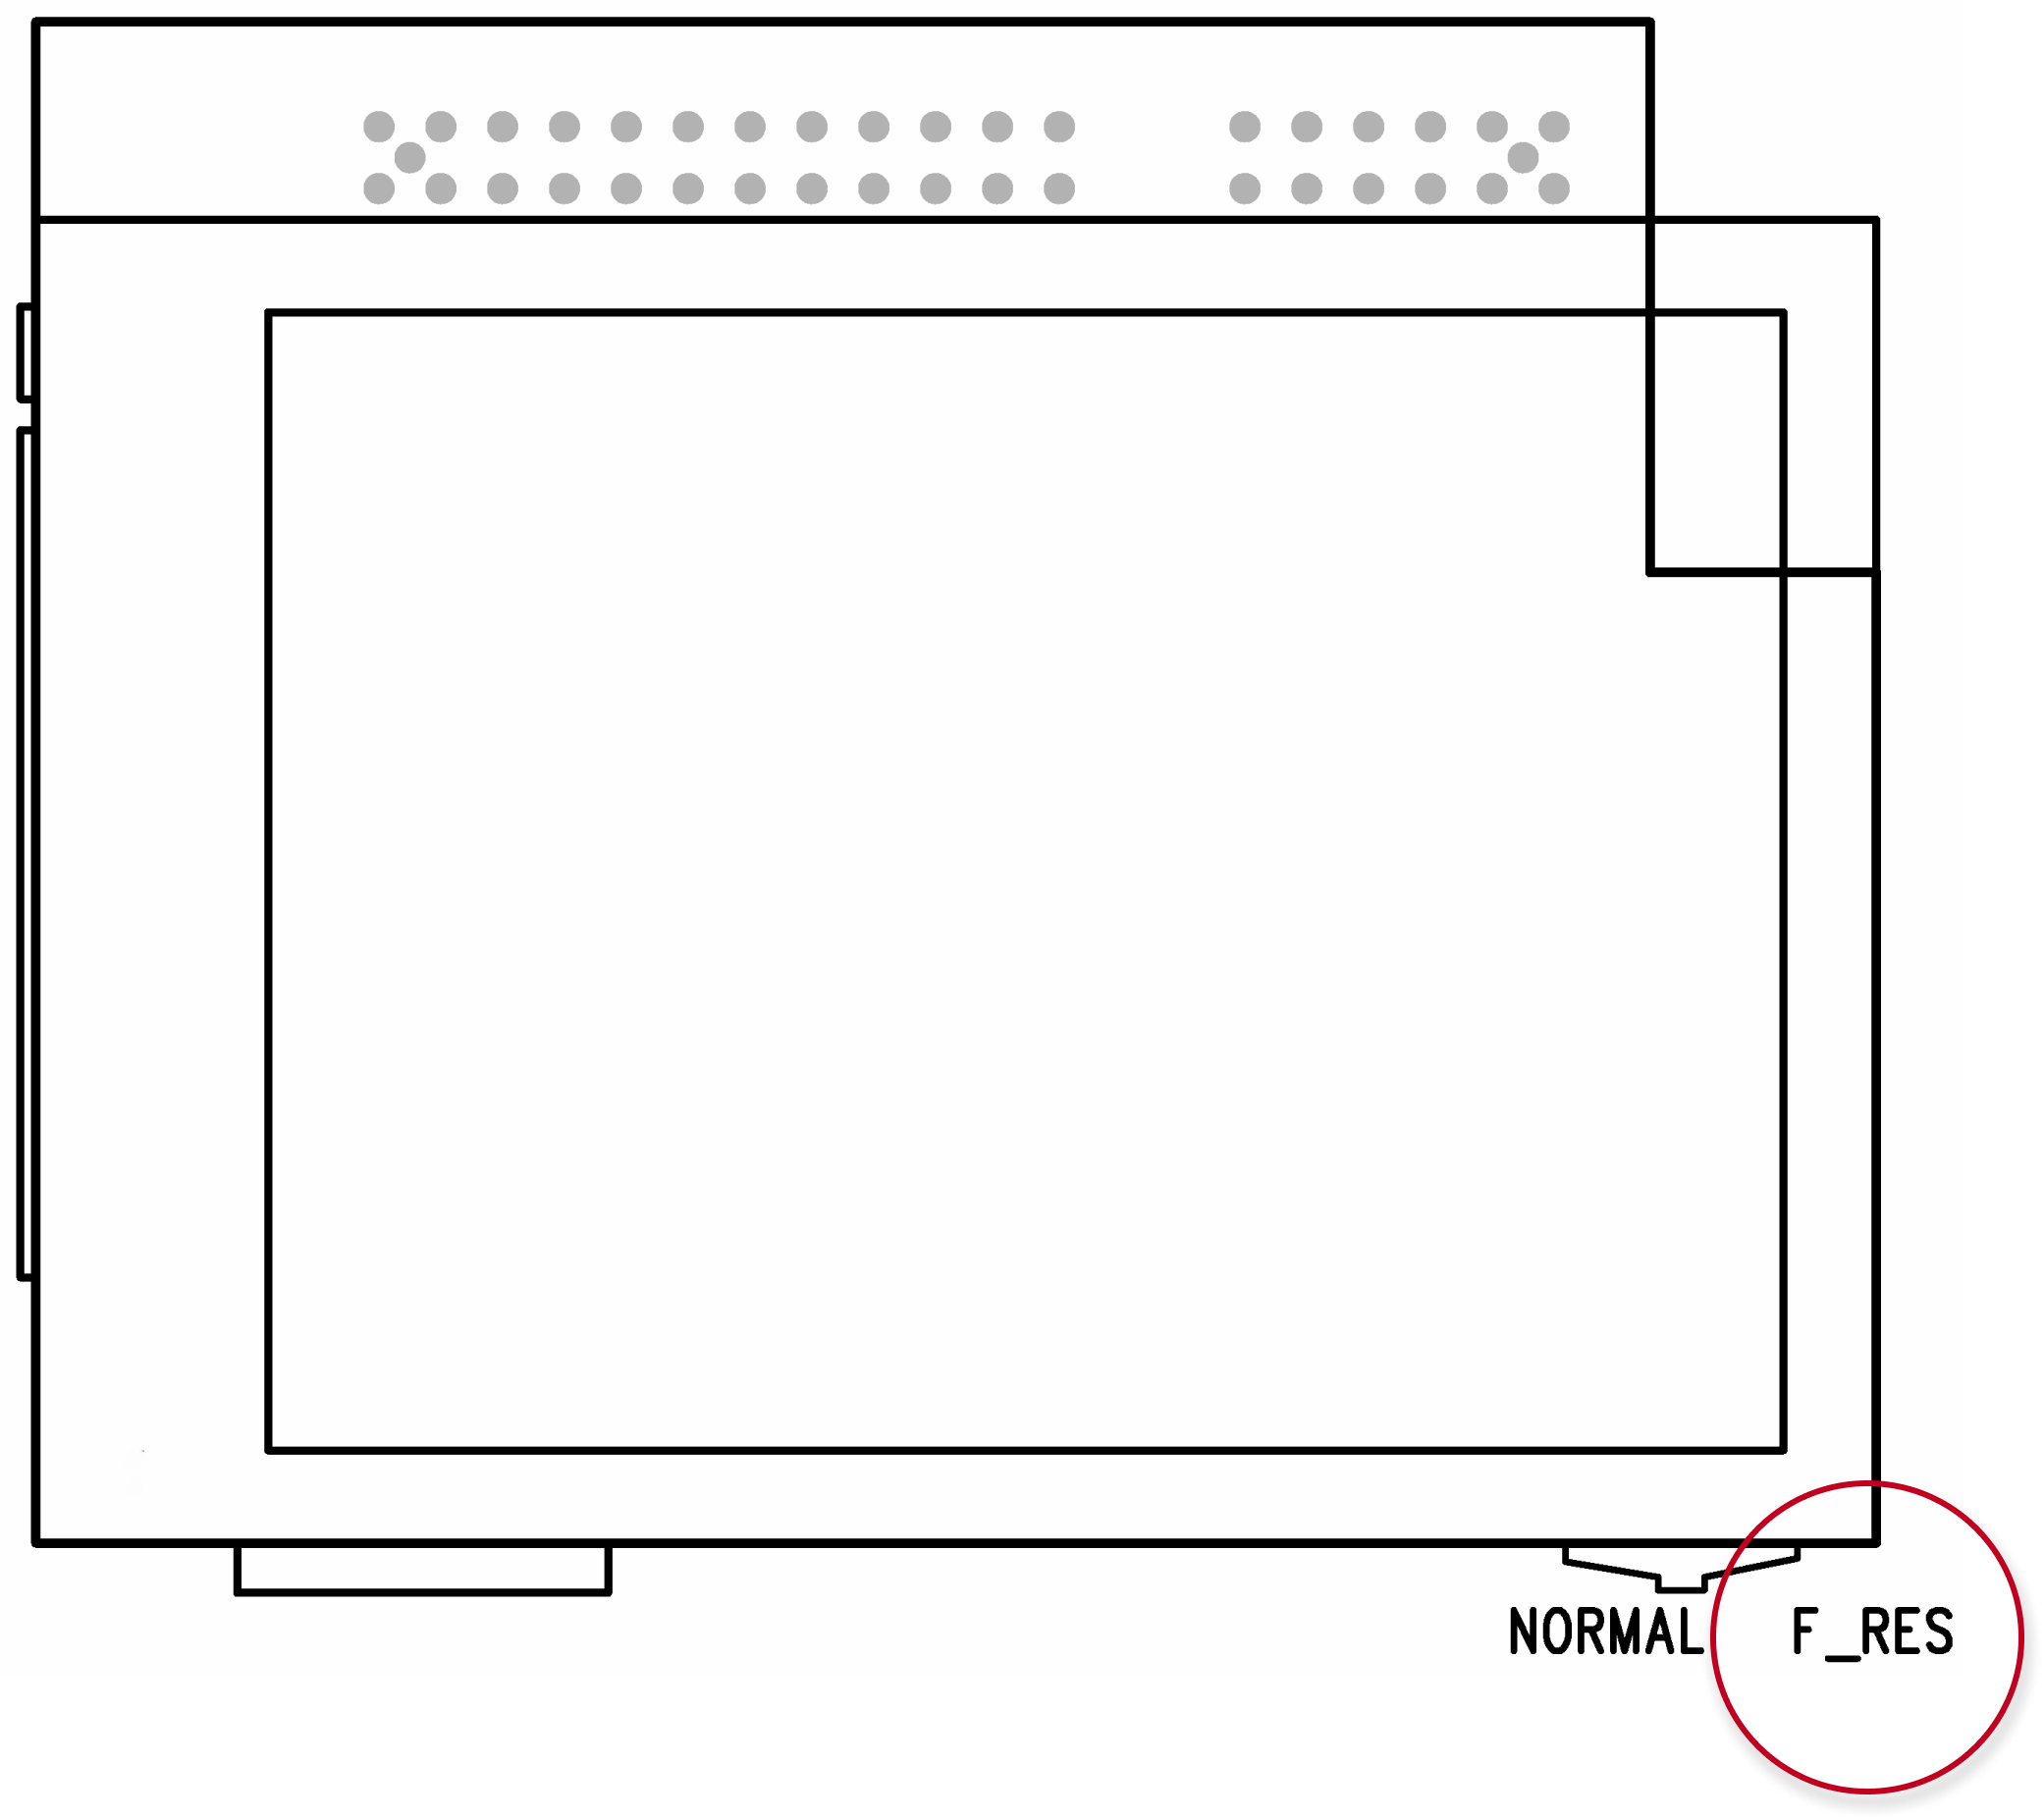
(put the display switch into the F_RES position in the display-equipped models with 535v1 and 535v2 board versions).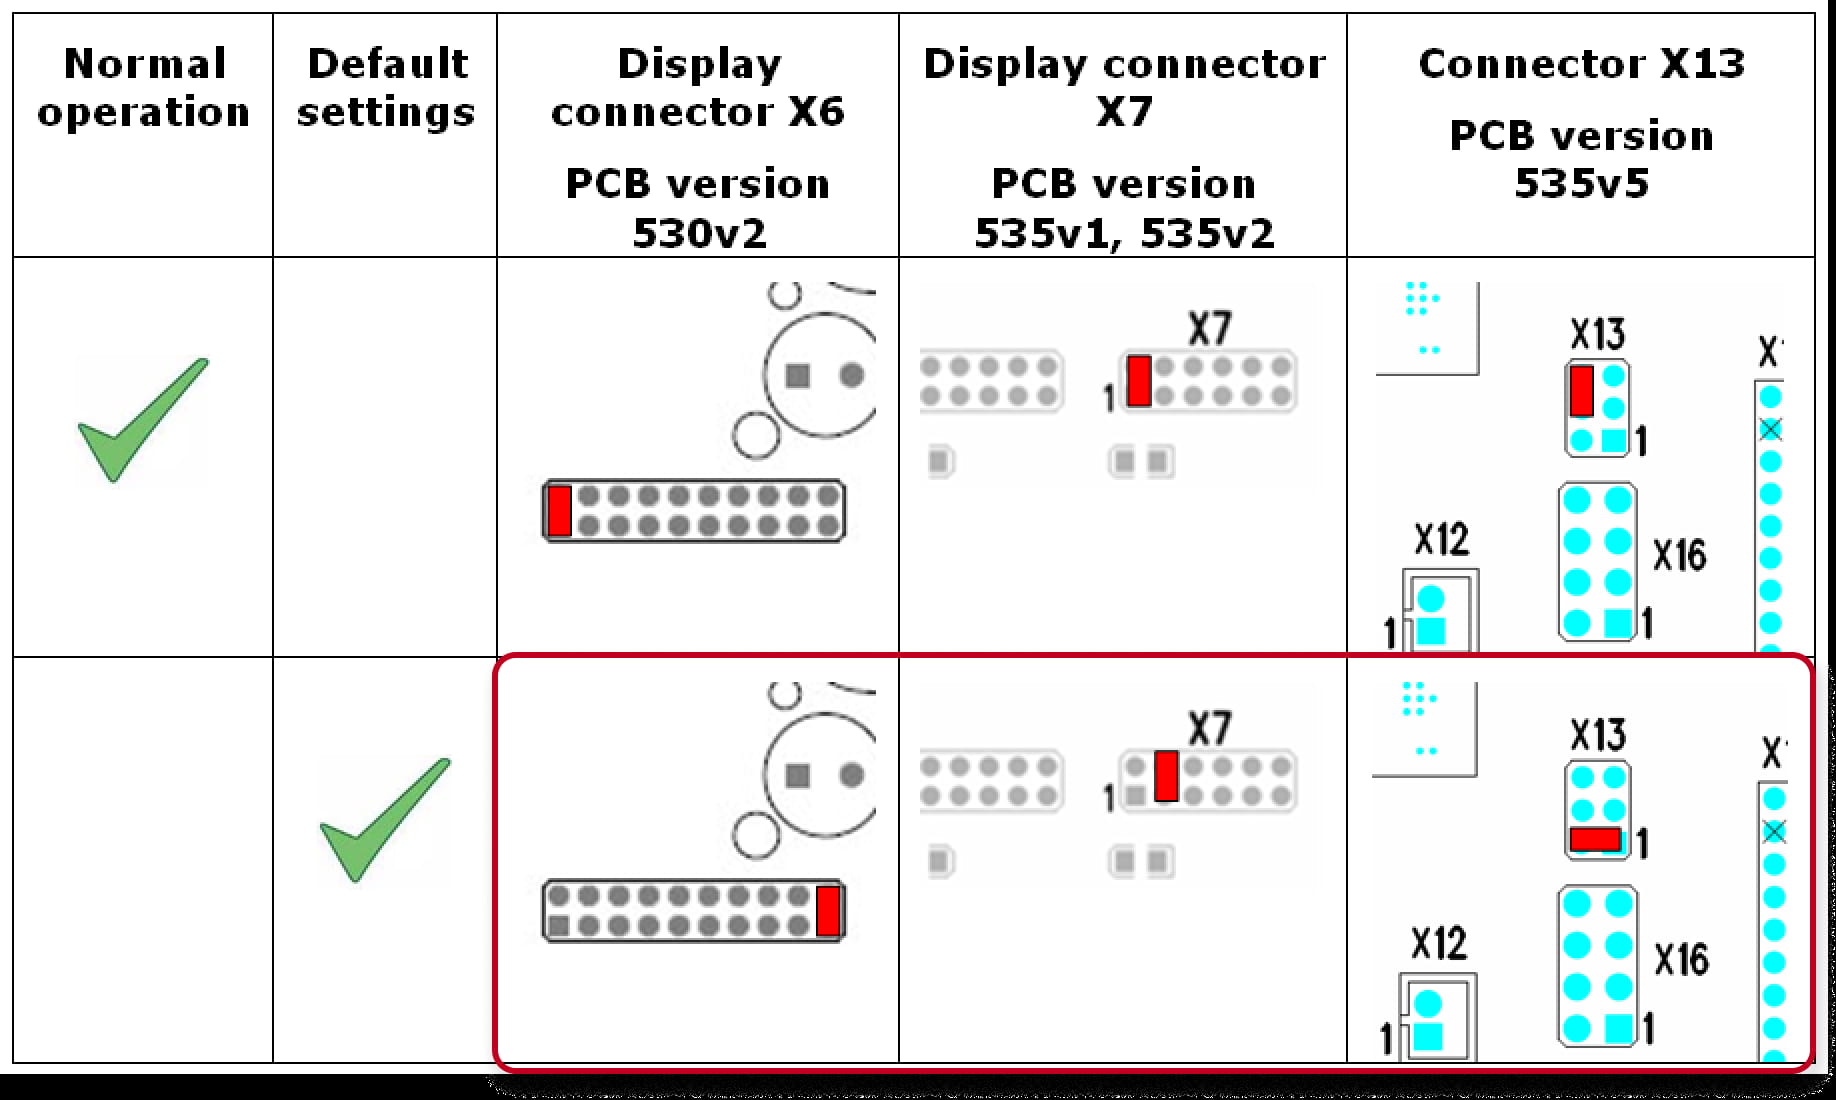
-
Switch 2N IP Vario on and wait for the start signalling sound.
-
Switch 2N IP Vario off.
-
Remove the jumper from the resetting (default setting) position
(put the display switch into the NORMAL position in the display-equipped models with 535v1 and 535v2 board versions).
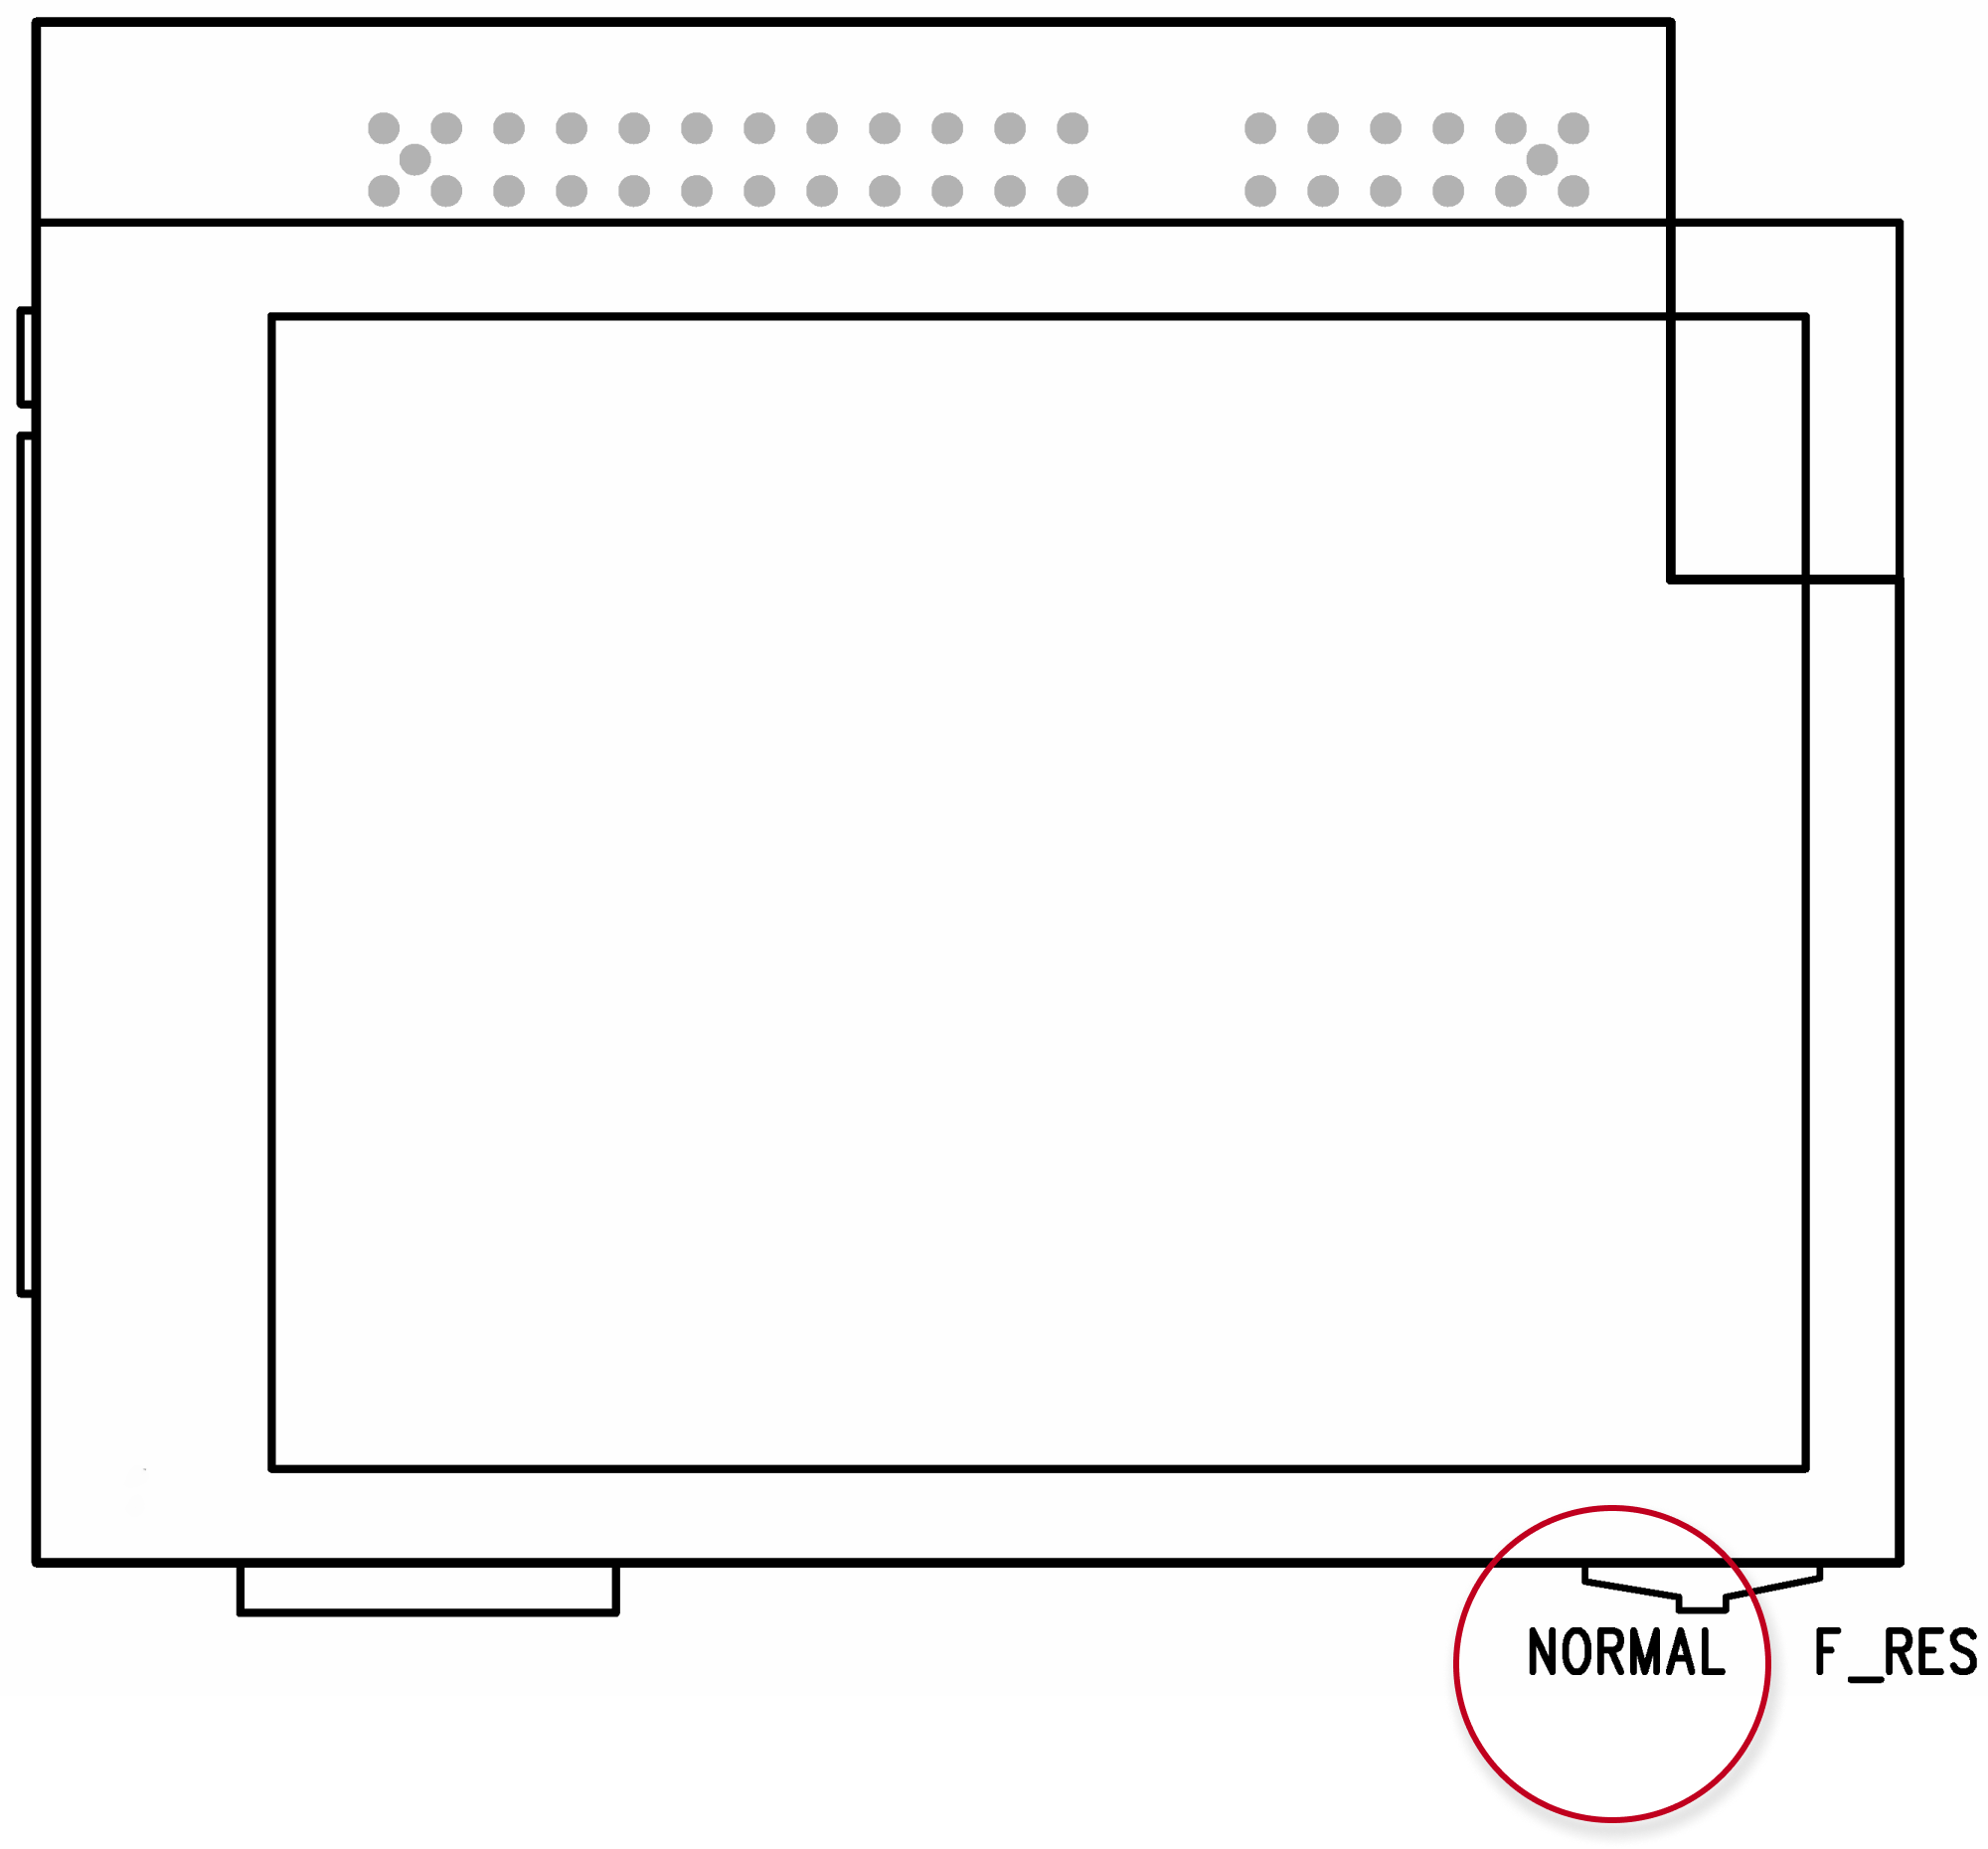
-
Switch 2N IP Vario on.
2N IP Verso
- Press and hold the RESET button.
- Watch and hear this LED / beep sequence
approx. 15 seconds approx. 3 seconds approx. 3 seconds approx. 3 seconds approx. 3 seconds __ _ __ _ __ _ __ _ __ _ __ _ __ _ __ _ __ _ __ _ 🔈 ) 🔈 )) 🔈 ))) 🔈 )))) -
Release the RESET button immediately when the last step starts (when you hear 4 beeps).
If pressed longer till finishing boot, then factory reset is not proceeded.
2N IP Verso 2.0
-
Disconnect the device from the power supply.
-
Press and hold the DEFAULT button.
-
Connect the device to the power supply.
-
Keep holding the button for a few seconds and then release it.
2N IP Uni
- Press and hold the RESET button for more than 20 seconds (eventually for 40 seconds if there is firmware 2.19 and older).