Axis Network I/O Relay - Controlling using HTTP commands Axis (A9210 & A9910)
The steps in this article require using the web interface of a 2N device. Please follow this manual in case this is your first time using the web interface.
Prerequisities
- 2N IP Intercom, 2N Access Unit or 2N Indoor Station with the latest firmware
- Additional GOLD license is neccessary for 2N IP intercom
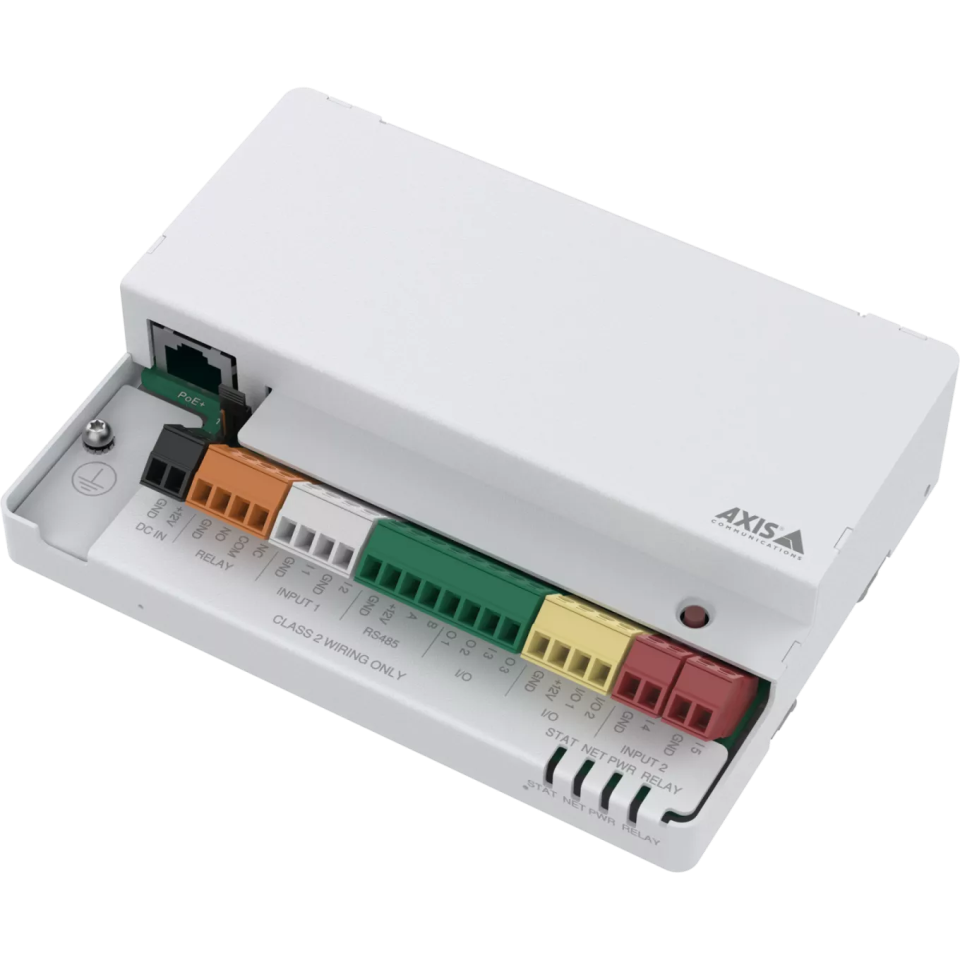
- AXIS A9210 Network I/O Relay Module (Order numbers: 2N - 1120303, Axis - 02861-001) - 1 Relay Output
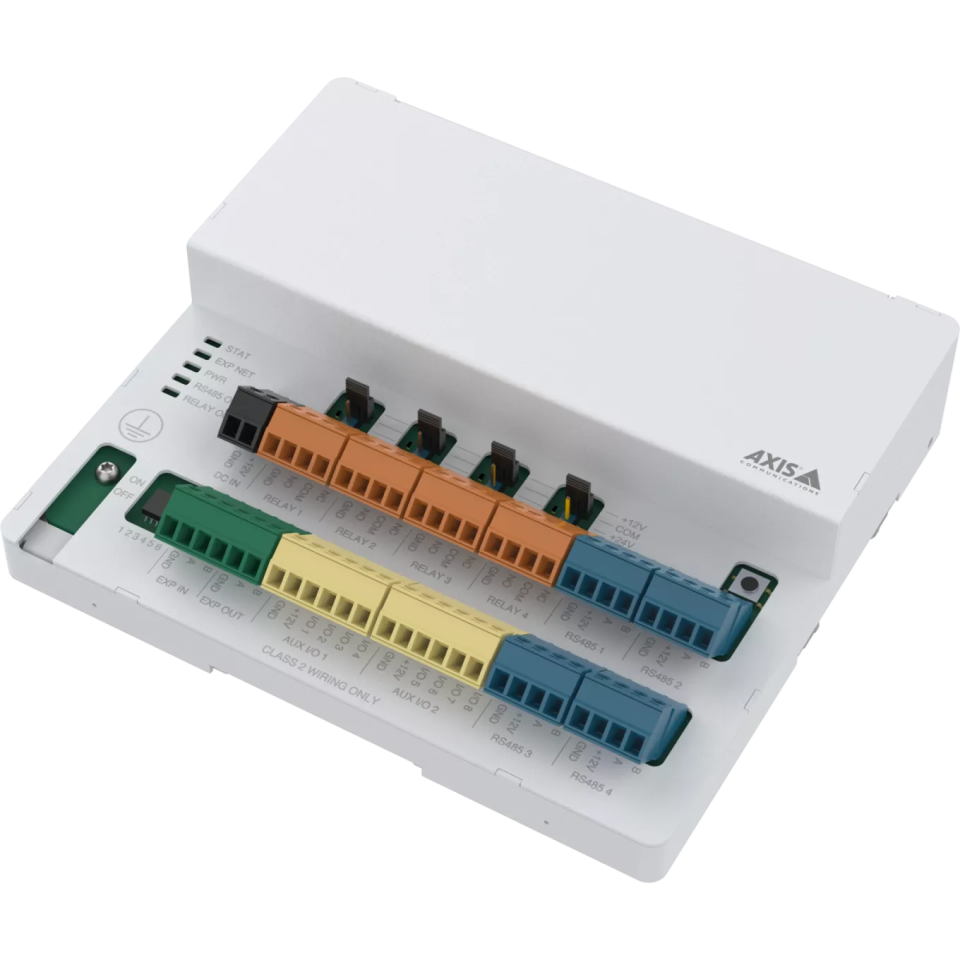
- AXIS A9910 I/O Relay Expansion Module (Order numbers: 2N - 1120304, Axis - 02862-001) - 4 Relay Output
Finding the device in the network
The following steps help you find the Axis device on your network
-
Install and run the 2N IP Utility
-
Make sure that you are on the same network as the Axis I/O Relay Module
-
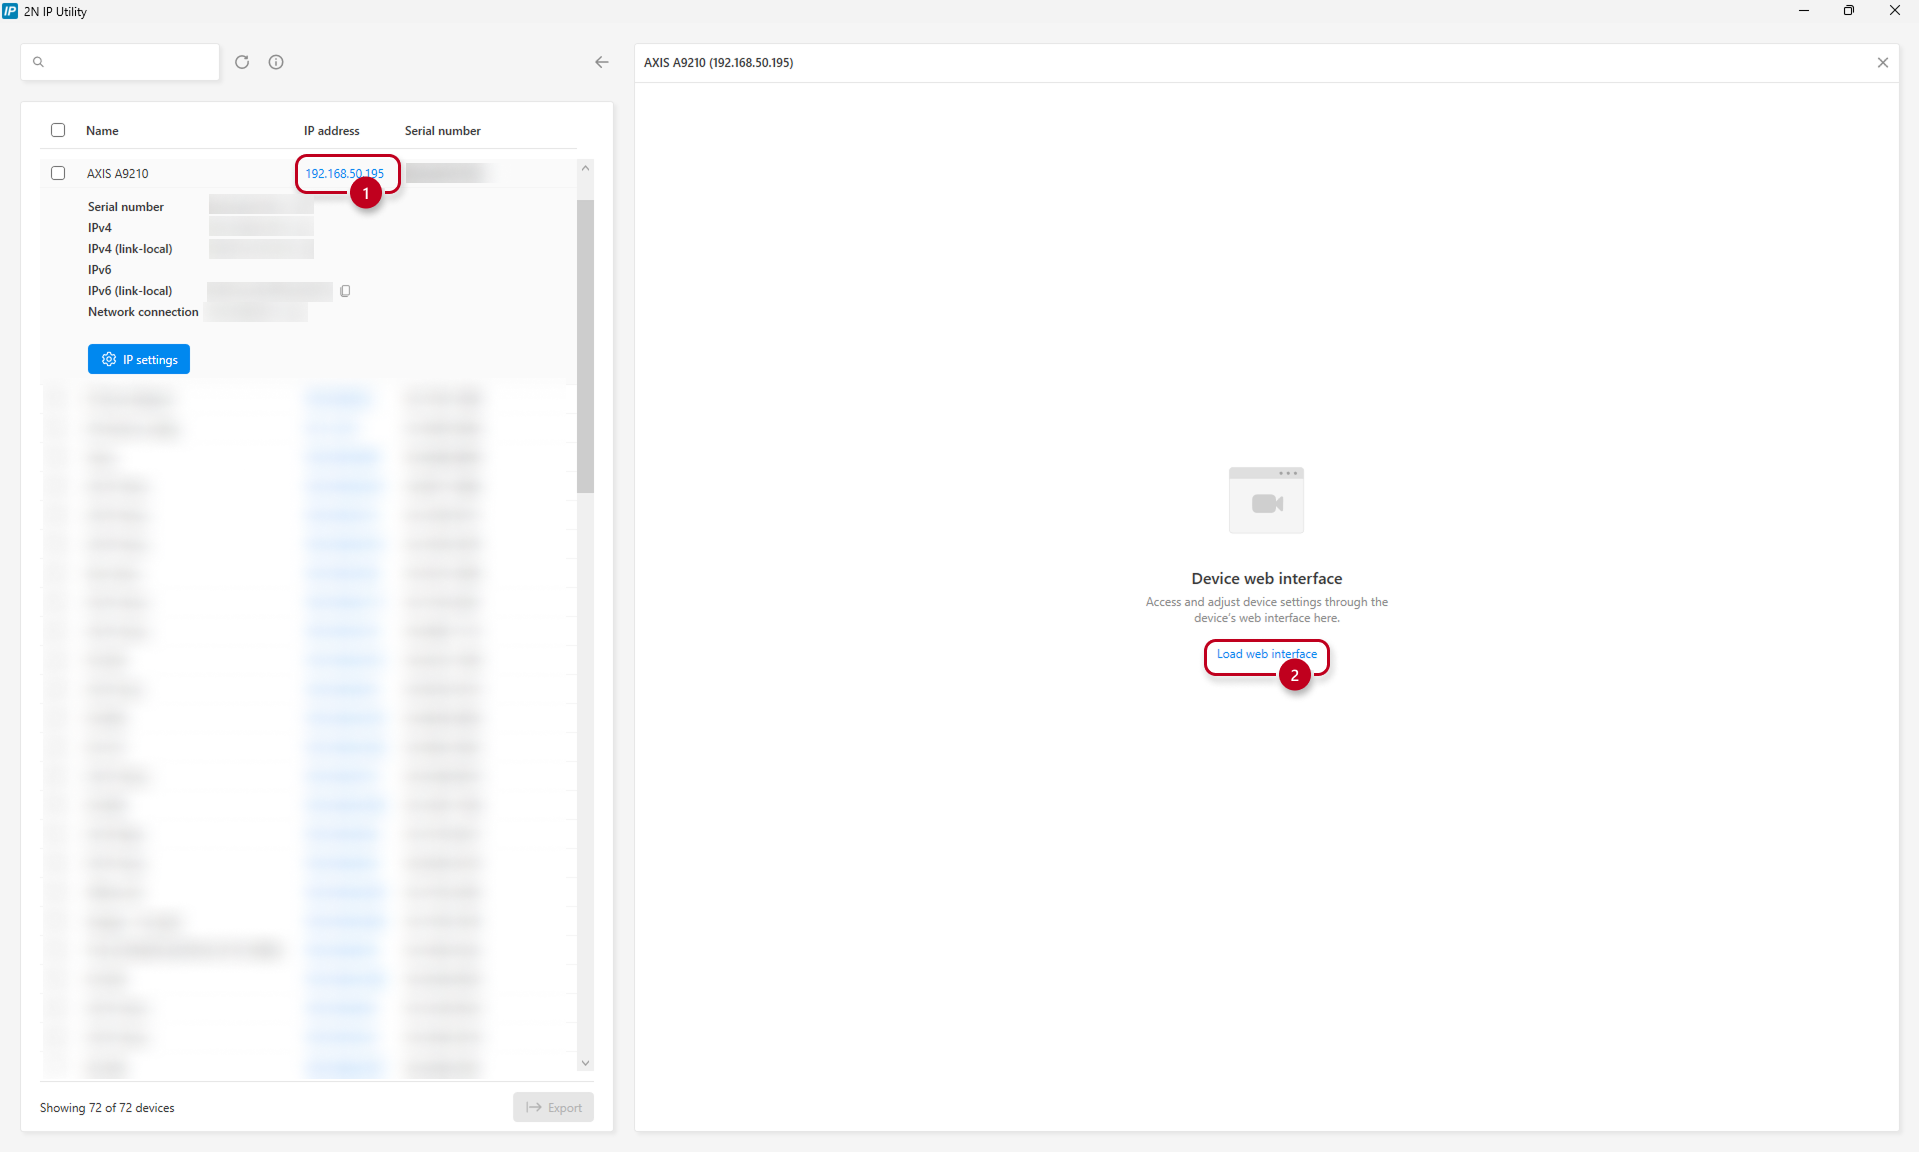
Locate the Axis I/O Relay Module in the device list and click on the IP Address (1)
-
Then, click on the "Load web interface" button (2)
-
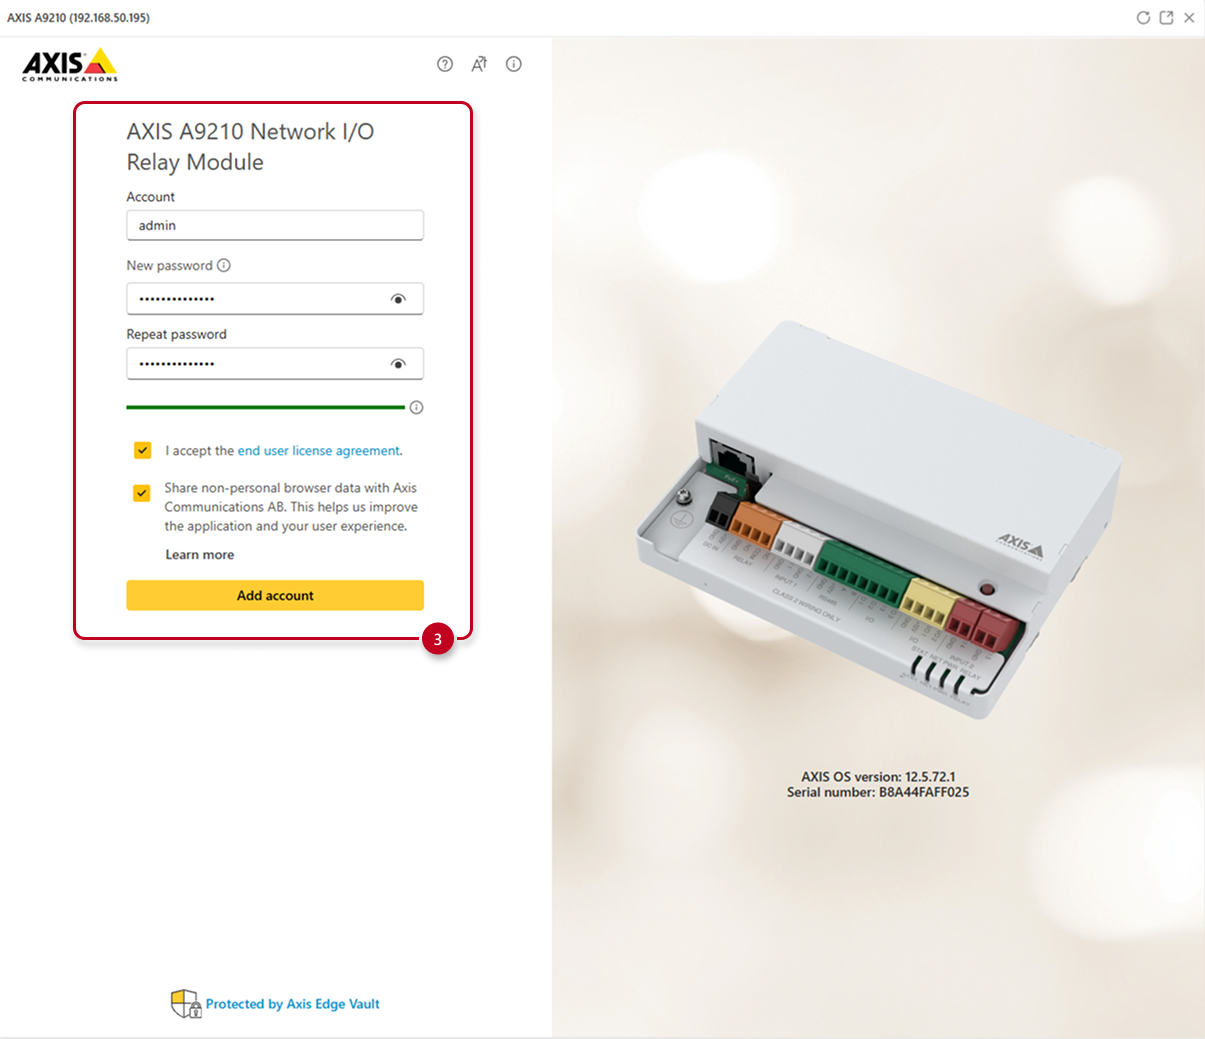
If you are configuring a brand new device or device that has been reset to Factory Defaults, create a new Account and fill out the password (3)
-
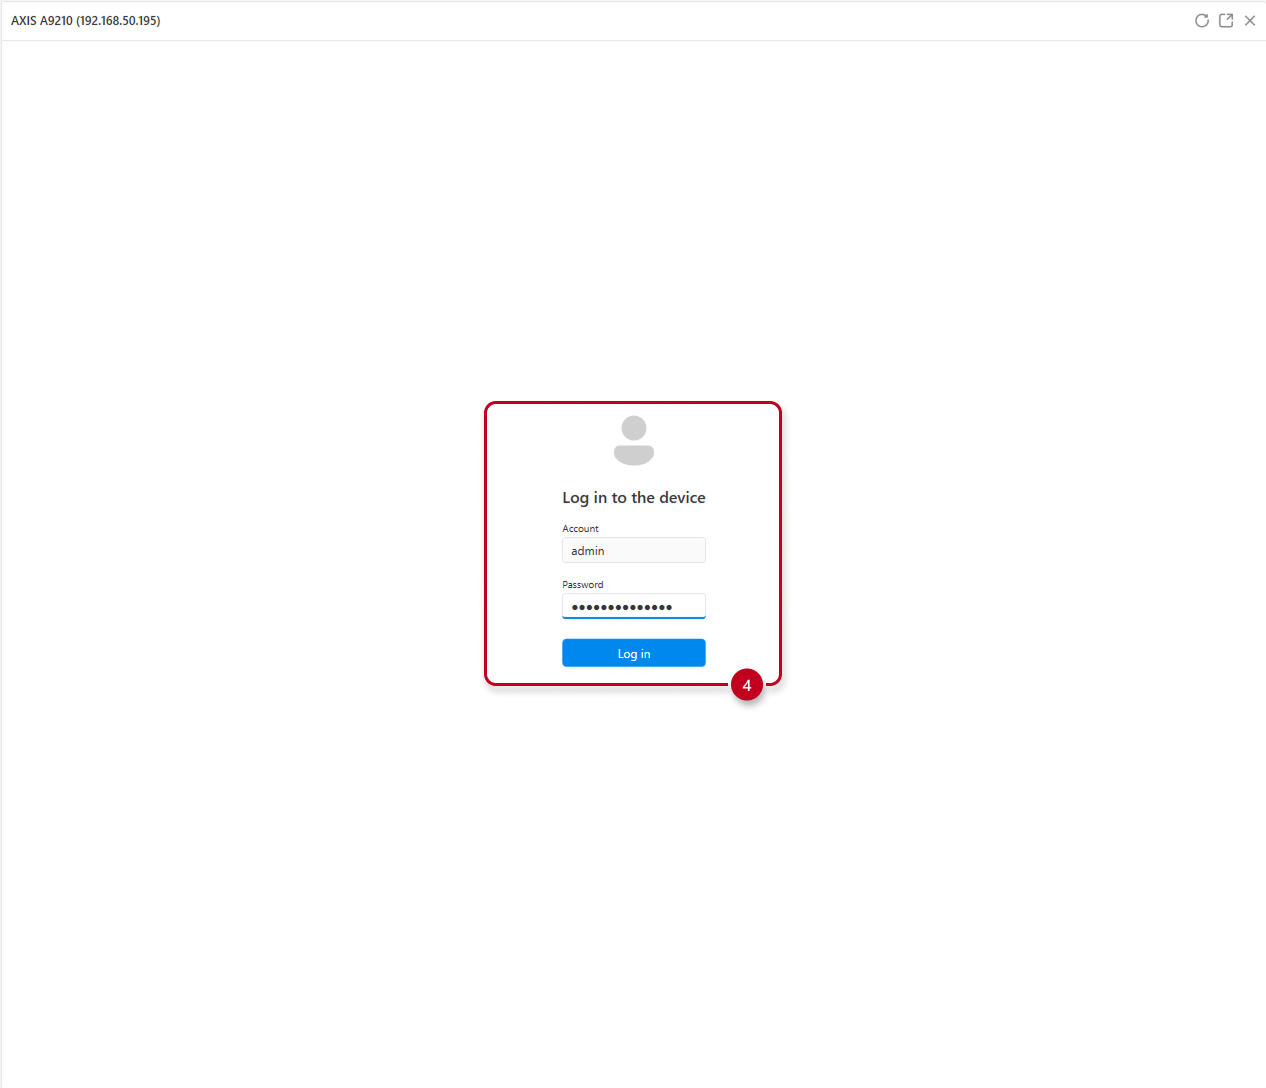
Lastly, log into the unit (4), using the created credentials
Connecting and configuring the Axis I/O Relay Modules
The following article shows details about AXIS Relay configuration, operation and interconnection between the AXIS A9210 and AXIS A9910
A9210
Detailed manual can be found here
-
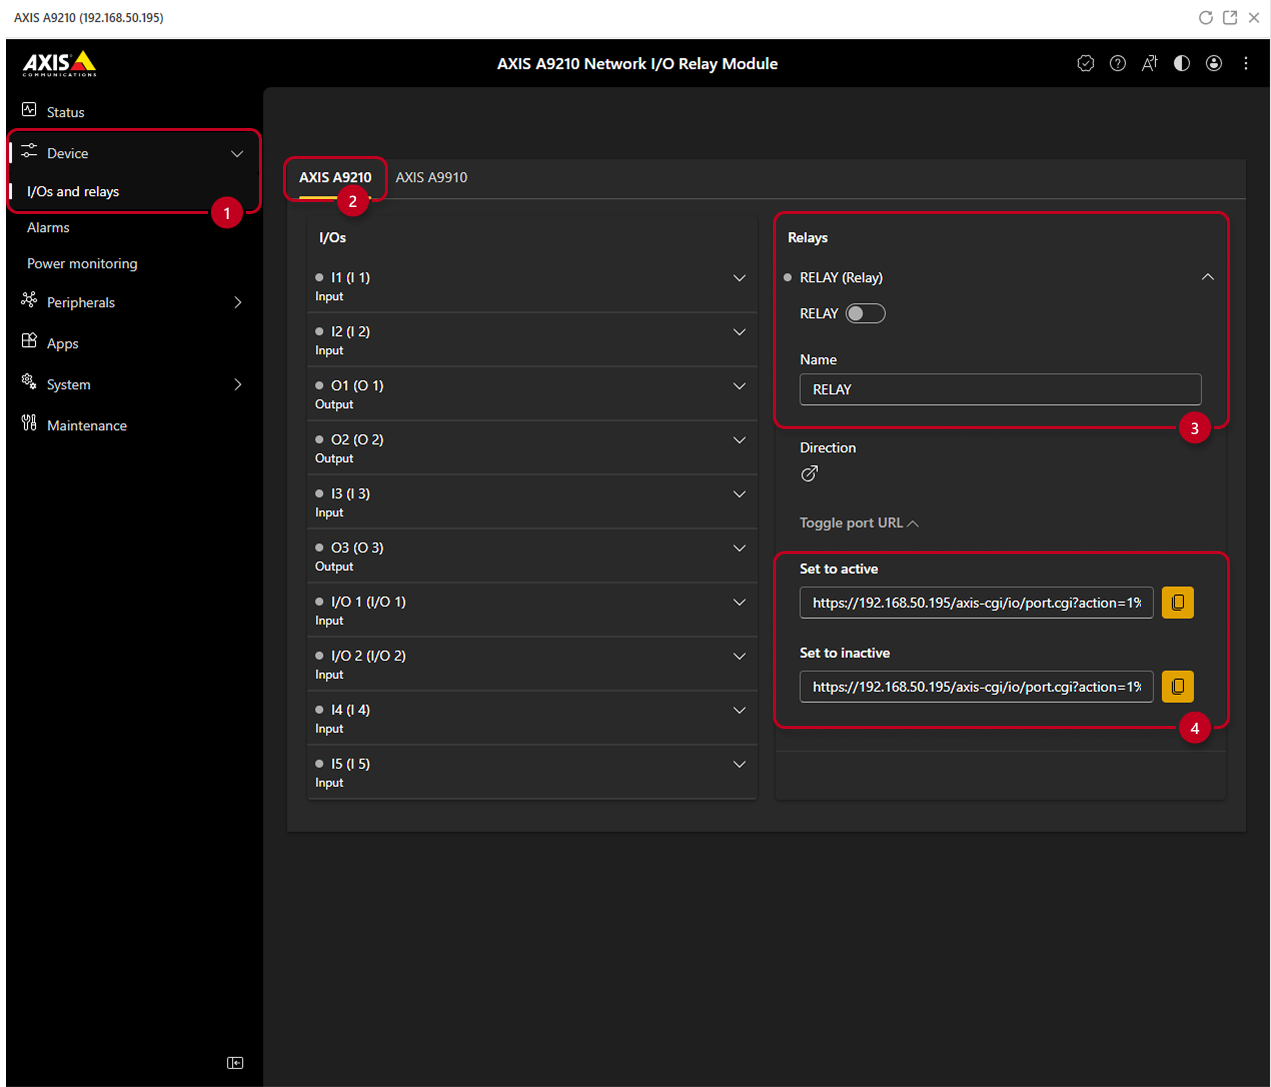
Go under the "Device" tab and "I/Os and relays" (1)
-
You can check the general Relays overview - change it's name, enable or disable it manually (2)
-
Under "Toggle port URL" you can see ON and OFF HTTPS commands (3)
A9910
Detailed manual can be found here
-
First, connect the A9910 Extending Relay Module to the main A9210 Relay Module using the picture below
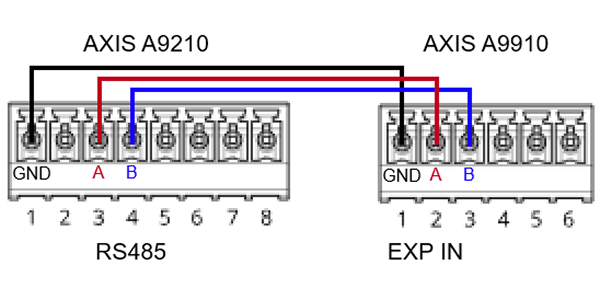
| Follow closely the interconnection shown above (GND -> GND, A -> A, B -> B), use only the shown connectors RS485 (on AXIS A9210) and EXP IN (on AXIS 9910) |
-
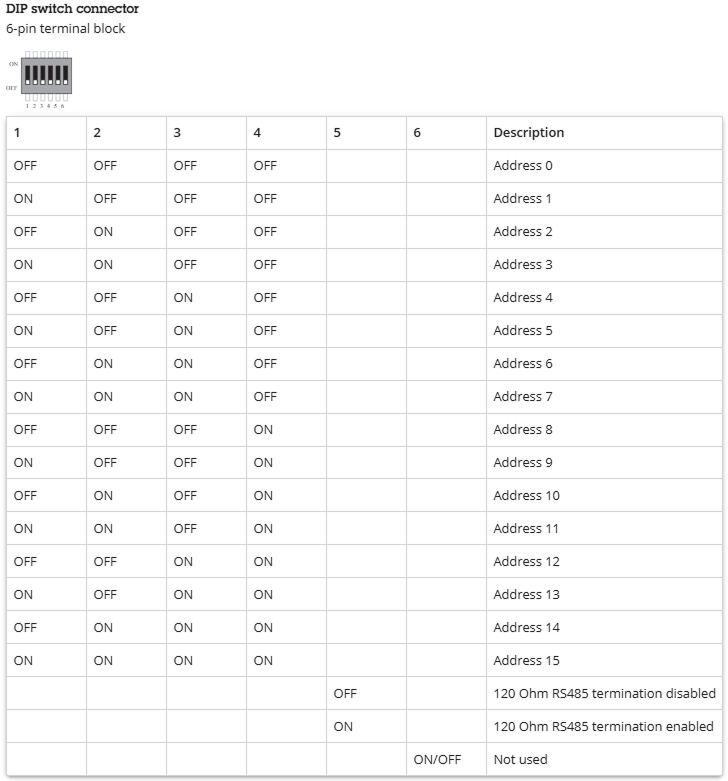
Next, set the desired Address of the A9910 Extending Relay Module on the DIP Switch connector according to this chart:
-
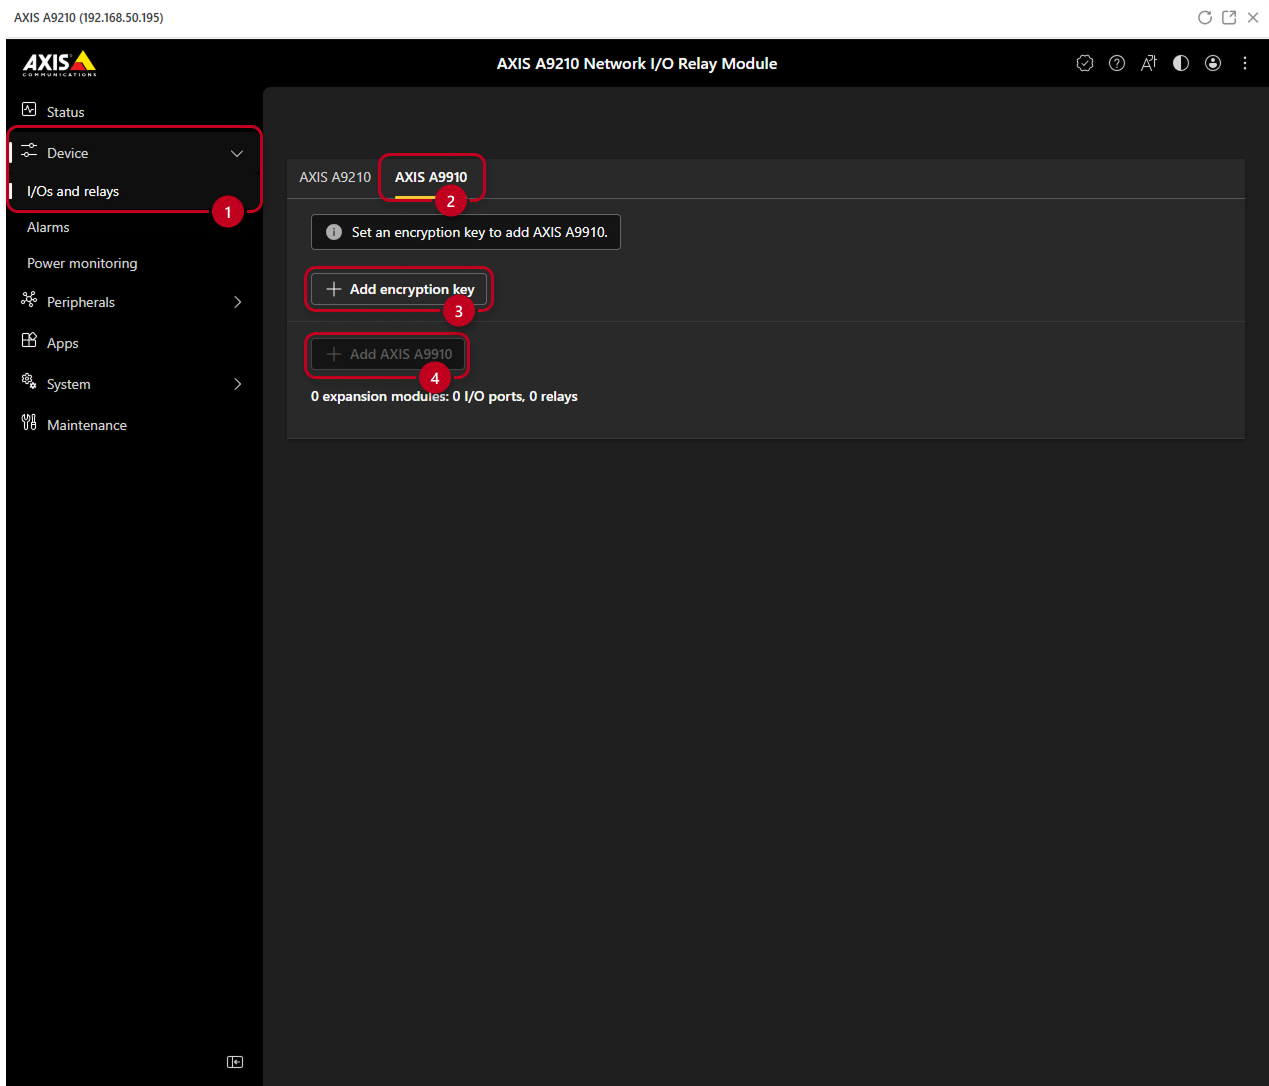
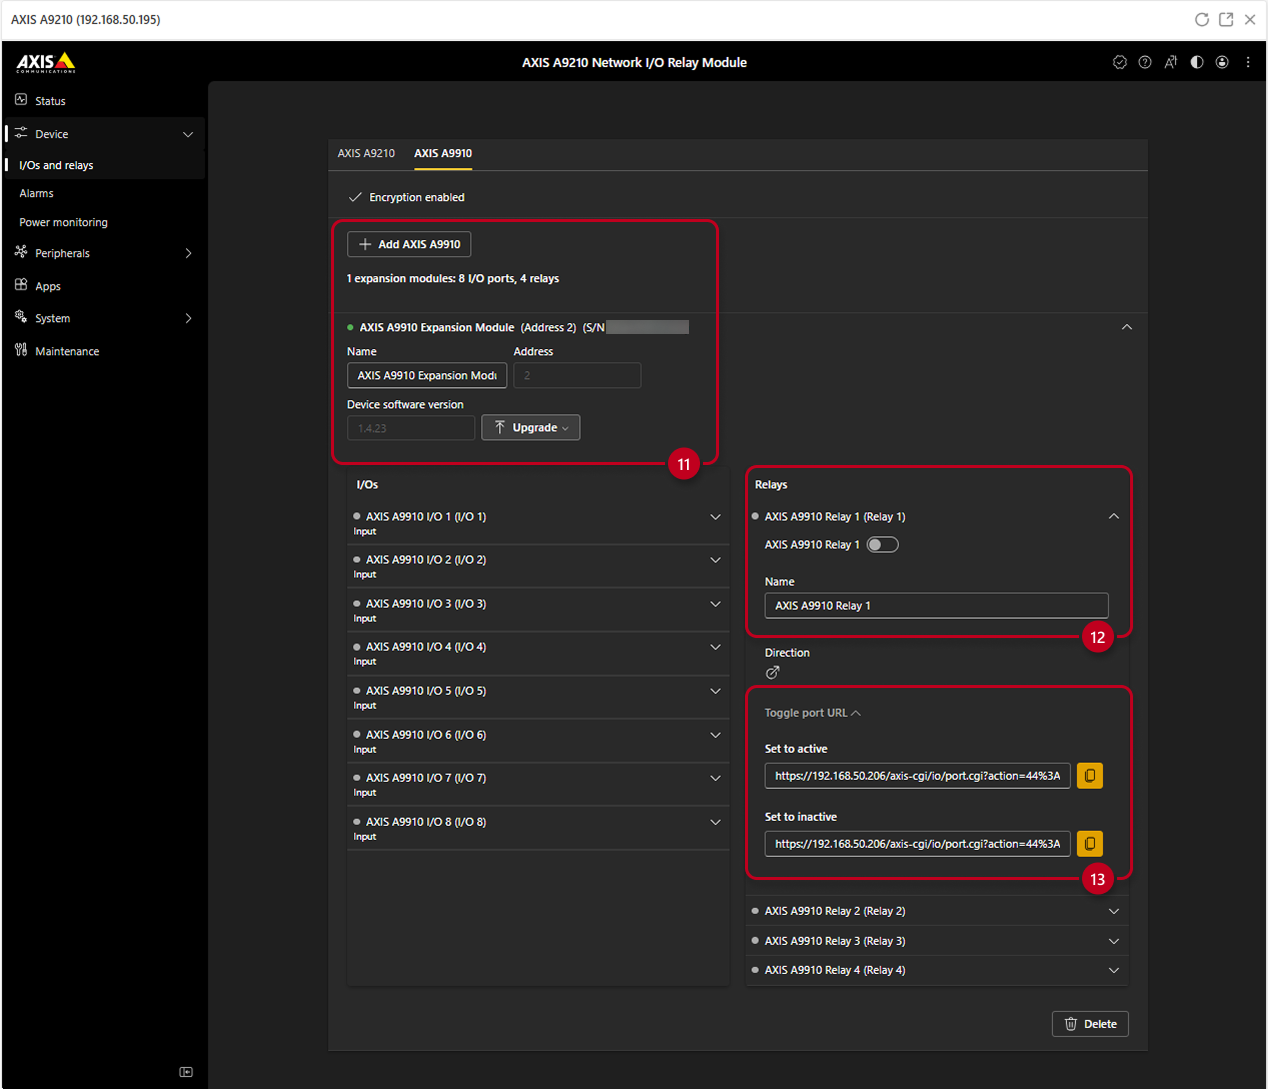
Go under the Device tab and I/Os and relays (1)
-
Select the AXIS A9910 (2)
-
An Encryption Key (3) has to be generated in order to add the AXIS A9910
-
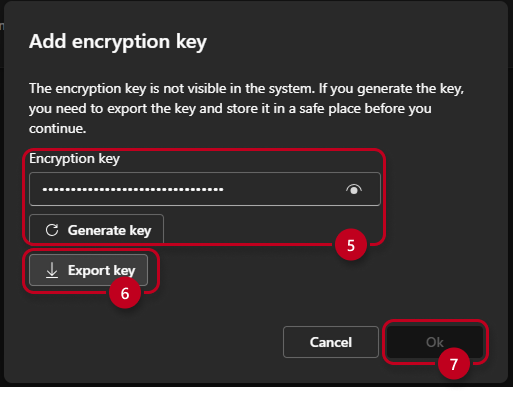
You can generate the Encryption Key by pressing the Generate Key button (5)
-
You can also export the Encryption Key (6)
-
Then click OK (7) and proceed further
-
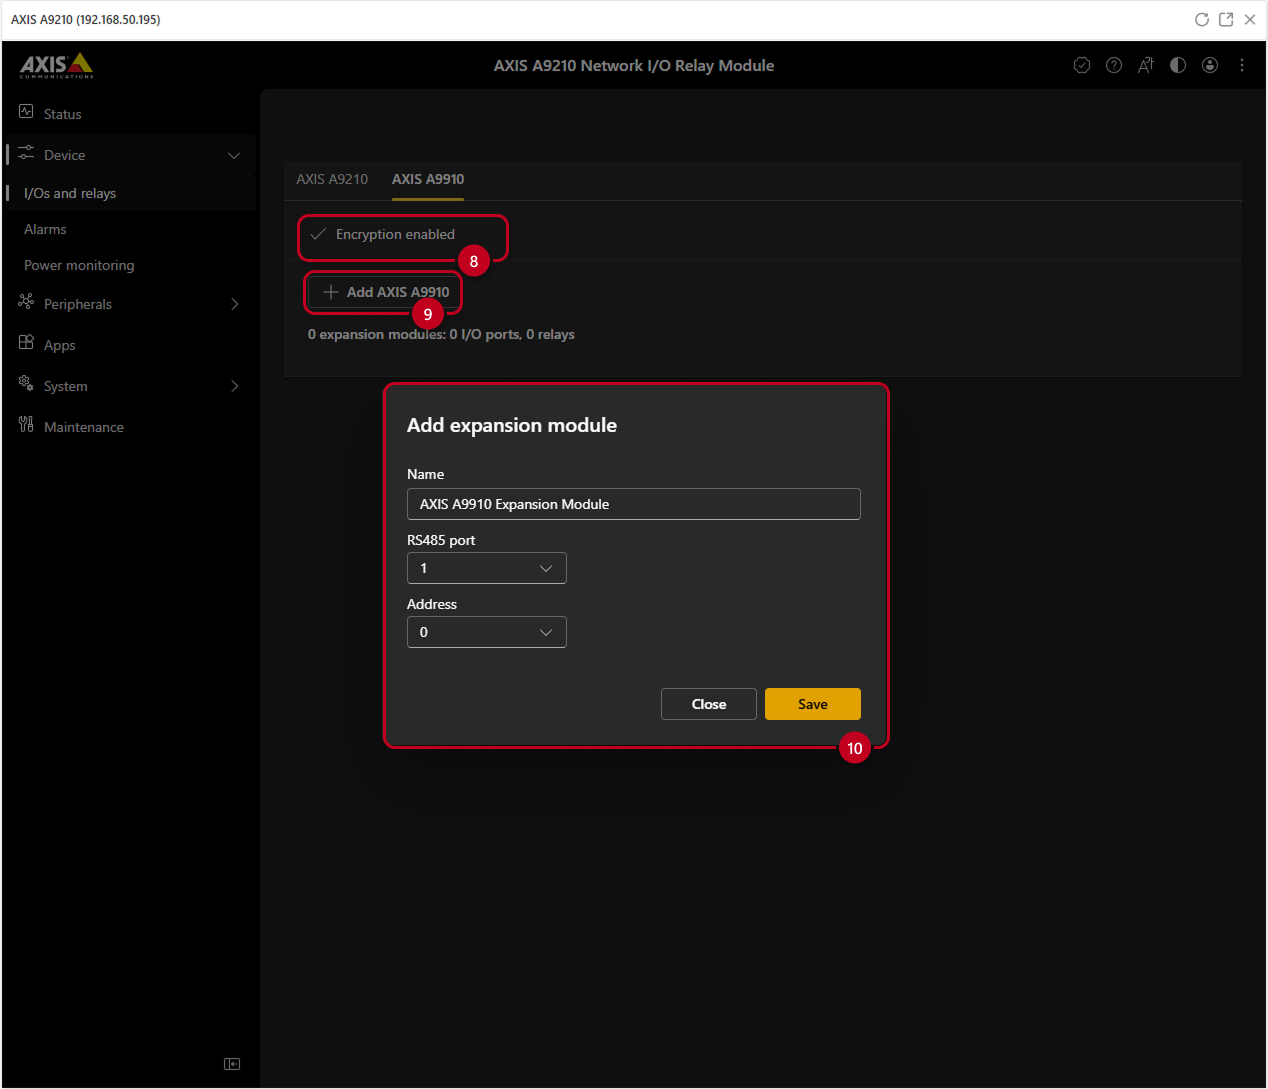
Make sure that the Encryption enabled (8) is showing
-
Then click on the Add AXIS A9910 (9) button
-
Lastly, select a name, used RS485 port, and module Address - as selected on the DIP switch of the device, then hit Save (10)
-
Once added the expansion module will list the available I/O ports, relays, it's name, address, serial number and upgrade button (11)
-
You can check the general Relays overview - change it's name, enable or disable it manually (12)
-
Under Toggle port URL you can see ON and OFF HTTPS commands (13)
Controlling the Axis I/O Relay Module from 2N Units
How to control the Axis device from 2N Units
-
Detailed API Commands can be found in the VAPIX Library - HTTP Commands
-
AXIS A9210 Network I/O Relay (1120303 A)
ON https://192.168.1.2/axis-cgi/io/port.cgi?action=1%3A%2F or https://192.168.1.2/axis-cgi/io/port.cgi?action=1:/ OFF https://192.168.1.2/axis-cgi/io/port.cgi?action=1%3A%5C or https://192.168.1.2/axis-cgi/io/port.cgi?action=1:\ ON for 2 Seconds http://192.168.1.2/axis-cgi/io/port.cgi?action=1%3A%2F2000%5C or http://192.168.1.2/axis-cgi/io/port.cgi?action=1:/2000\
Sending HTTP commands to AXIS Network I/O Relay by 2N IP intercom or 2N Access Unit
Firmware 3.0+
-
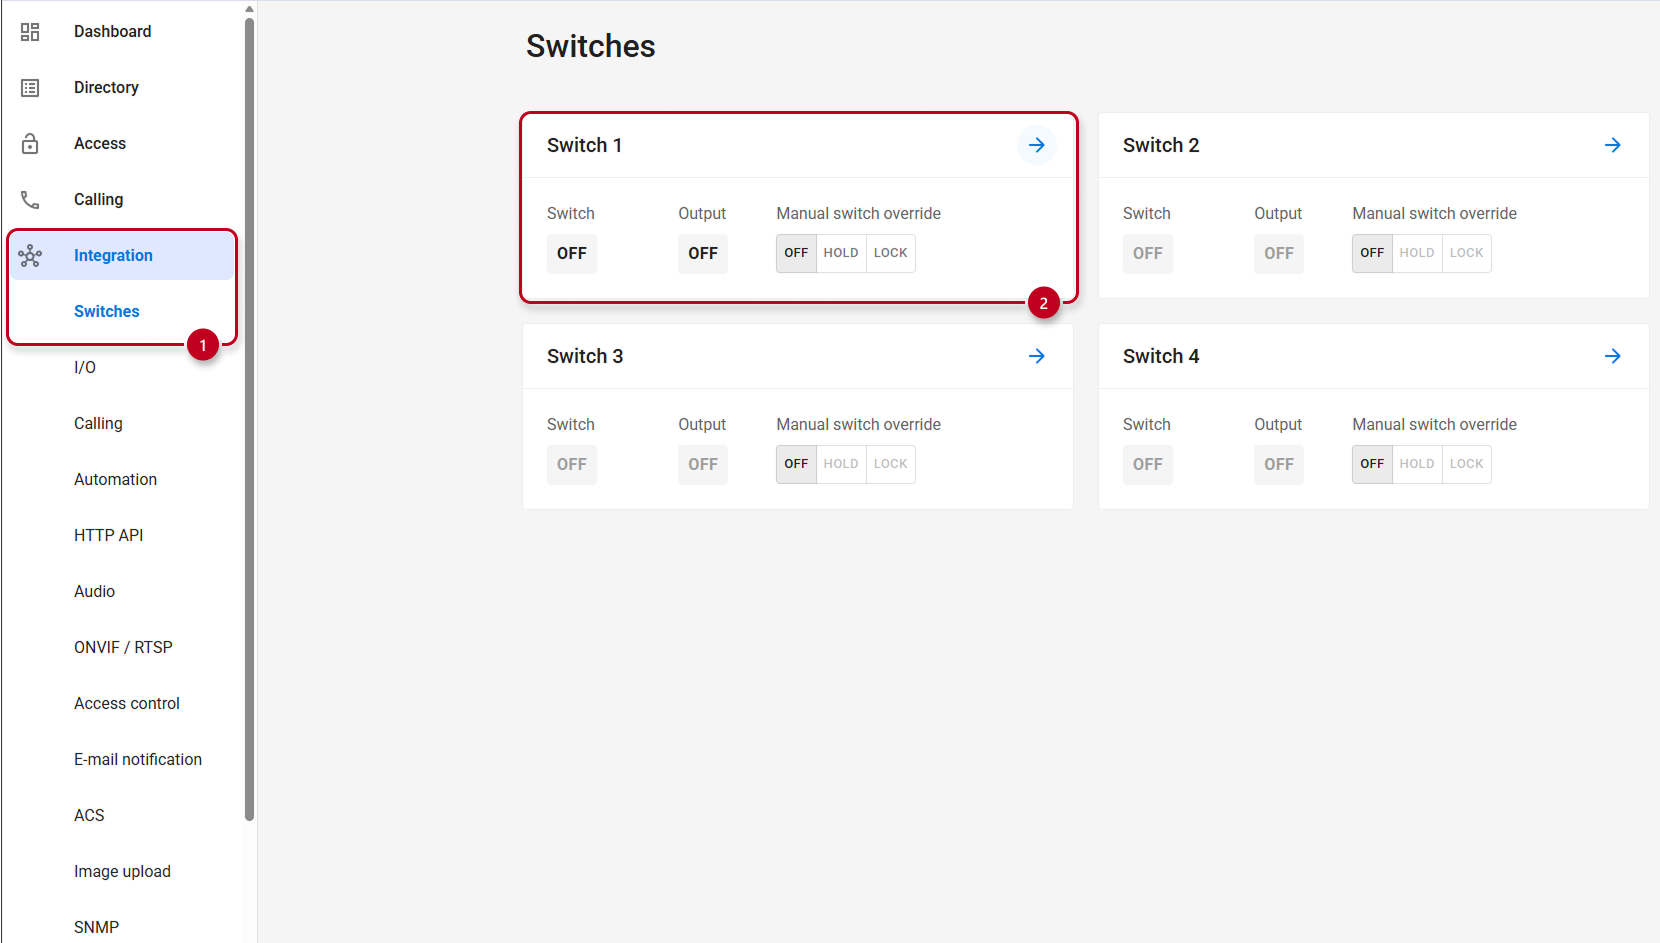
Login to 2N IP Intercom web interface, section Integration and Switches (1) and select the desired Switch 1-4 (2)
-
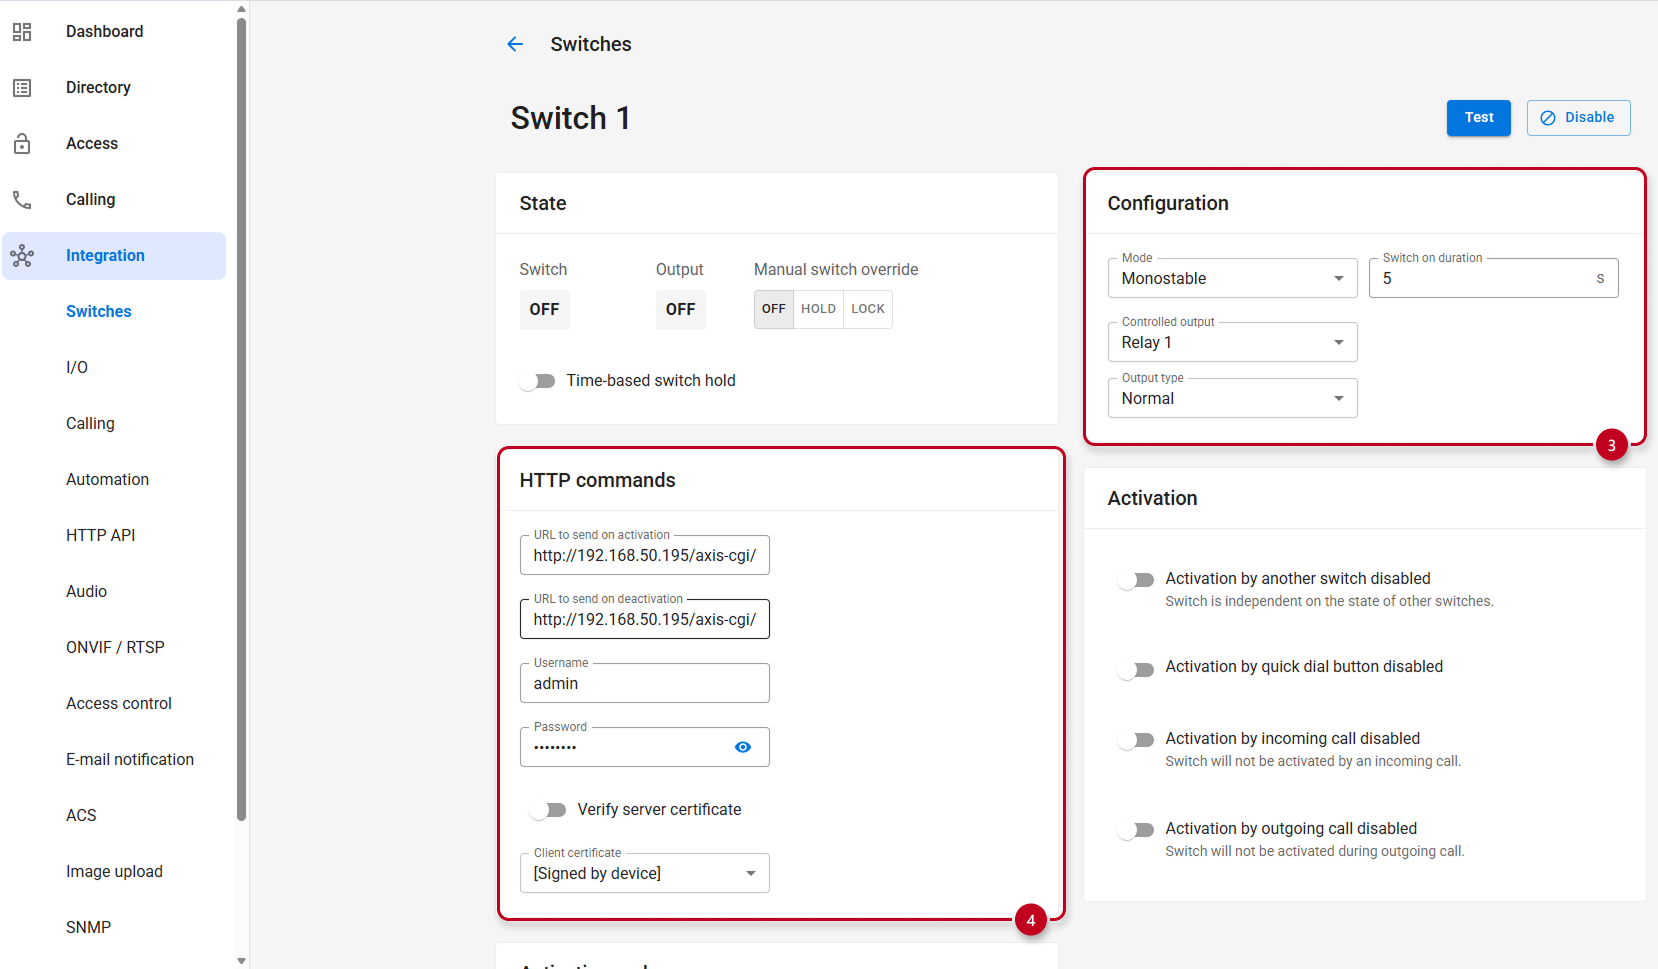
Set up the time limit for the switch to activate by adjusting the Switch-On Duration, under the Configuration (3)
-
Then under the HTTP Commands set up the Switch-On / Switch-Off HTTP Commands and enter the Login credentials of the AXIS Network I/O Relay, then use the commands from the previous table (4) and save
Firmware 2.50 (LTS):
-
Login to 2N IP Intercom web interface, section Hardware (1), then select the Switches (2) and lastly select the desired Switch 1-4 (3)
-
Set up the time limit for the switch to activate by adjusting the Switch-On Duration (4)
-
Then under the HTTP Commands set up the Switch-On / Switch-Off HTTP Commands and enter the Login credentials of the AXIS Network I/O Relay, then use the commands from the previous table (5) and save.

- Now every time when the 2N IP Intercom's switch is activated, the AXIS Network I/O Relay is triggered on and after 1 second triggered off.
More information about Switch settings in our manual: 2N IP Intercom - Configuration manual
Sending a HTTPS Command to the 2N Units from AXIS Relay Module when Input is triggered
The following article shows how to set up the AXIS Relay Module to send a HTTPS command to 2N Units
Please refer to the 2N HTTP API guide here
-
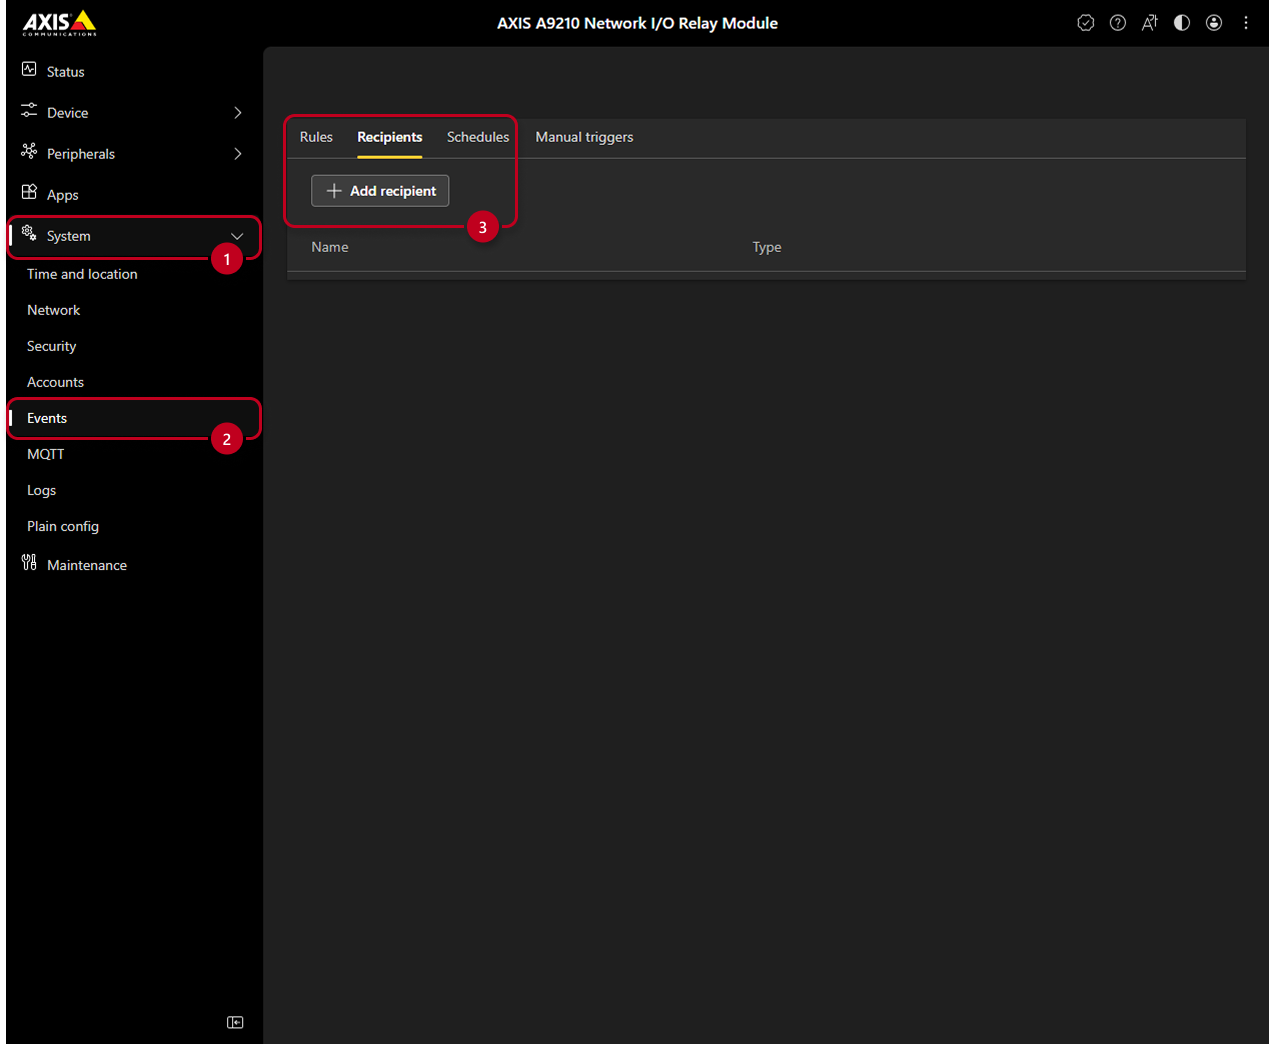
First, select the System (1) tab, then Events (2) tab
-
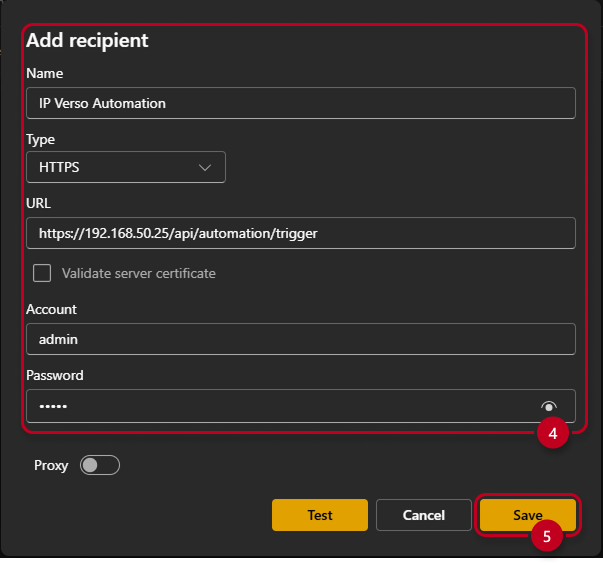
Next select the Recipients tab and click on Add recipient (3)
-
Fill out the window accordingly with the corresponding name, connection type, URL and HTTP API account credentials (4) of the 2N Unit - see manual here
-
Lastly confirm with Save (5)
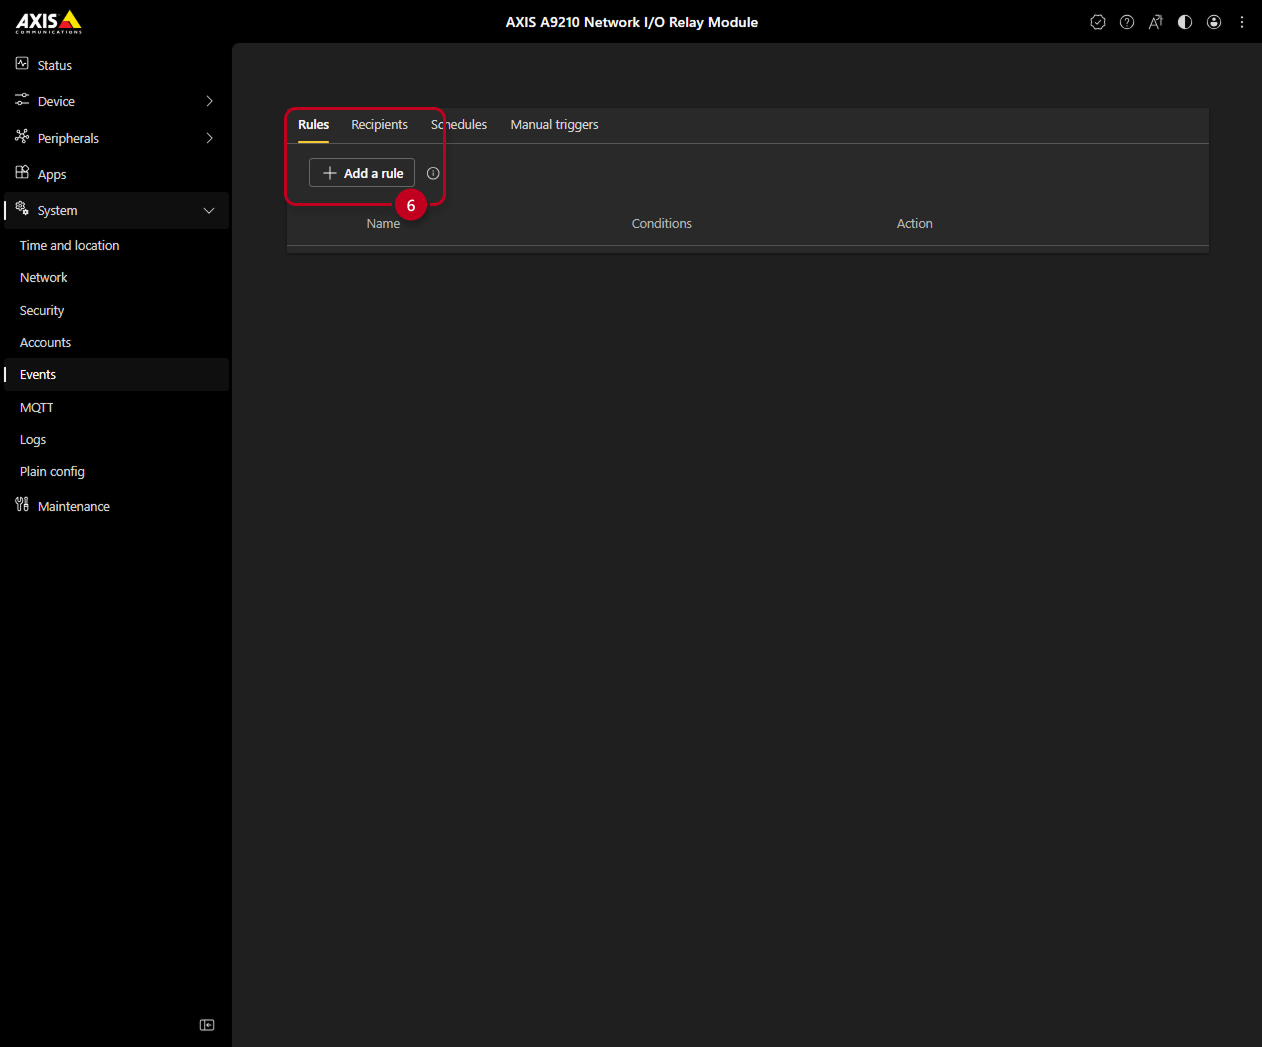
- Next, select the previous window under System and Events - Rules and click on the Add a rule (6)
-
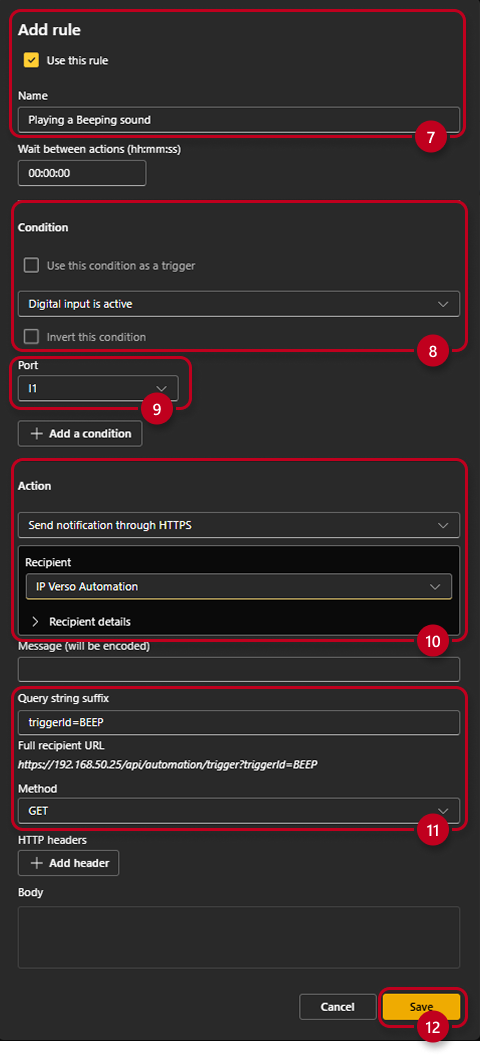
Select a name (7)
-
Choose a condition (8) from the list, you wish to send the HTTPS command to the 2N Unit when it is fulfilled
-
Select a port on the AXIS A9210 (ports from connected AXIS A9910 can be selected as well) (9)
-
Choose an action and recipient (10) from the list
-
Next select the corresponding query string suffix (for 2N Units available here) and a method (11)
-
Lastly confirm with Save (12)
-
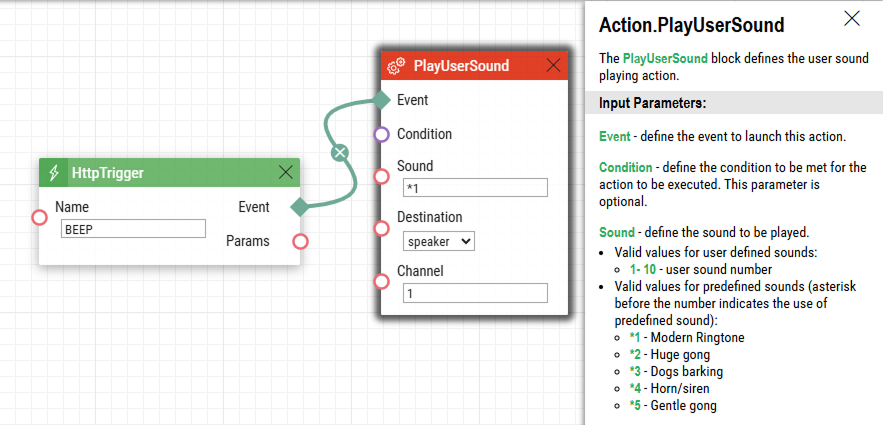
Now, when the corresponding condition is met, the action will be performed - Input activated -> 2N Unit receives into it's Automation HTTP Trigger with ID "BEEP" - it will play a sound *1 - "Modern Ringtone"