HTTP REST API
The nerve centre of our access control solution is 2N Access Commander. Use it for managing access to the building and monitoring the status of 2N access devices in real time.
There is available HTTP REST API which gives the opportunity to completely control 2N Access Commander, including read, modify, create or delete data from it for integration purposes with any possible 3rd party systems in real-time, since no direct access to Access Commander's database is provided.
Prerequisities
- 2N Access Commander the latest version (for actual API endpoints v3);
no additional license is required, available in every Access Commander installation.
Technical information
- HTTP REST API documentation including release changes can be found on the following link:
https://wiki.2n.com/acc/2.7/en/6-http-api/6-1-http-api-verze-3 (it takes a while to be fully loaded)
You can also use the inbuilt endpoint list in your 2N Access Commander:
https://ip_or_name_address/support/api/
- API endpoints are available on the address:
https://ip_or_name_address/api/v3/
- Using HTTPS protocol with TLS 1.2 for communication on default port 443
- In default, uses self-signed certificate, SSL certificate verification needs to be disabled in order to start communication with API in this case.
Optionally, CA signed certificate can be installed to 2N Access Commander as described in the following article: SSL - CA signed user certificate. Then Access Commander needs to be accessible on name address which matches name address in the certificate instead of an IP address.
- Communication with API is secured by username and password authentication. After initial authentication, every other command to API is authenticated by cookies which Access Commander send as a response to successful login.
- The supported commands format is JSON only.
- Supported methods are GET, POST, PUT, DELETE, PATCH.
- It is possible to create user with all details included in one command or send data in certain commands in bulk, please refer to the HTTP REST API documentation.
Login methods
- Username and password
It is not possible to use it together with 2FA - API tokens
Can be set in Access Commander by System admin.
It is possible to set access rights mode Read Only / Read + Write; with possible expiration.
Copying the created key is possible only until you reload the page or navigate away after creating.

Finding out which command to send
Let’s say we would like to login to Access Commander using an API in order to be able to use other commands. We can easily see how it can be done on the web of 2N Access Commander itself because the web interface is using the same HTTP REST API to access all data. The following procedure will show how you can see which commands and parameters are used for each operation with data:
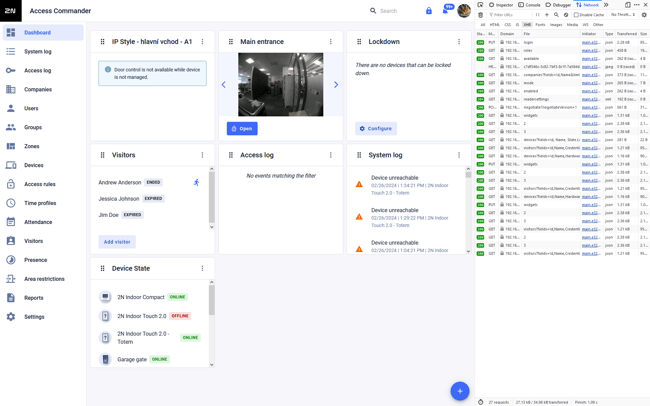
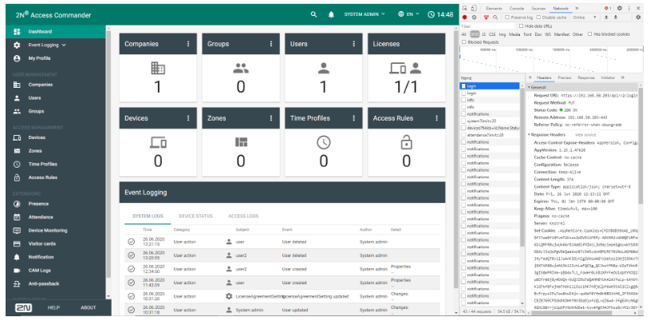
- Load the Access Commander web interface in your web browser and open the web browser debug console by pressing F12 -> Network -> XHR (Chromium based browsers). This will show a console in your web browser where we can see all the commands as you can see on the image below:

- In order to see which command with which parameters is sent to API for login request, fill in login name and password in your web browser with enabled debugging console from previous step and press LOGIN button.
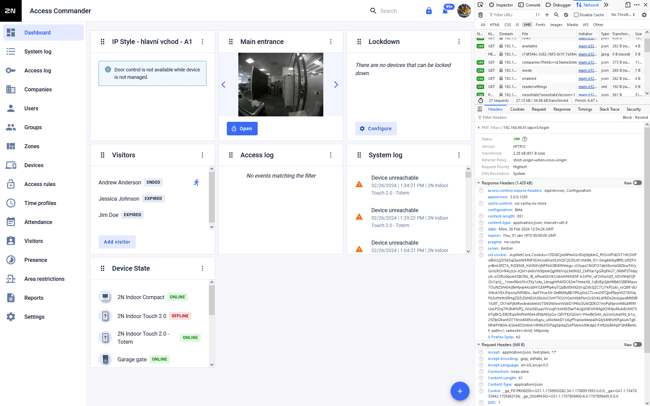
- Access Commander will login in and in the web browser debug console you can see multiple requests and one of them is the login request we are looking for, select it by clicking on it.

-
- In its Header you can see it uses PUT method and which endpoint it calls (/login)
- In its Request you can see which in which syntax data are sent.
- Using those data from web browser you can easily replicate this command in your application.
- After successful login, you will be also able to see in Response cookie required for commands which will follow.
- In its Header you can see it uses PUT method and which endpoint it calls (/login)
How to use commands from your application
To demonstrate this example we will use an application known as Postman, which is able to send HTTPS commands and read responses to its requests.
-
For the first time using the Access Commander after importing the appliance, it is needed to use the web interface to login as the administrator ("Admin") to change the default password ("2n")
-
In Postman settings, please disable the SSL certificate verification first. There is no domain that can sign the certificate and a self-signed is not considered as trusted automatically by default.

-
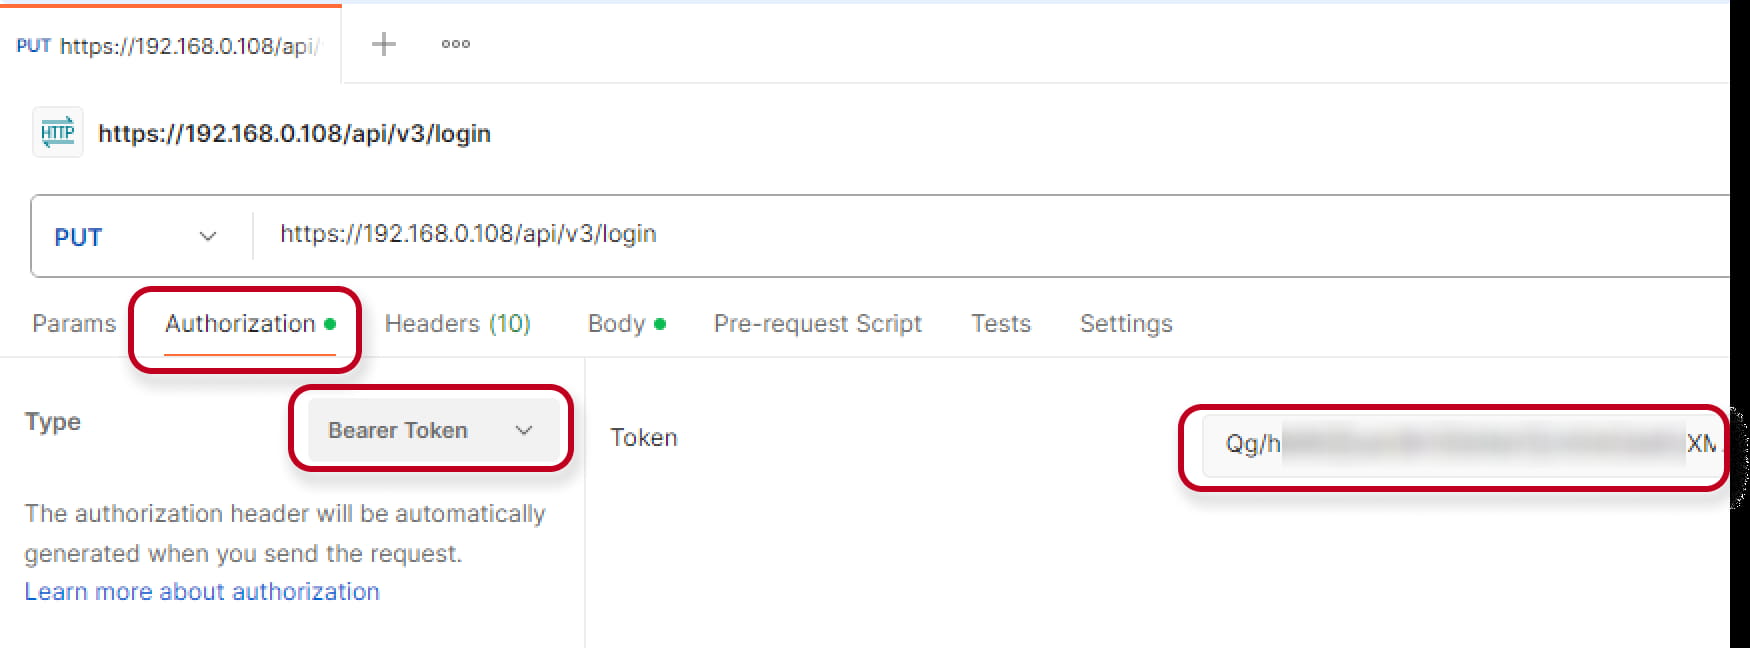
In Postman, fill in the header as you saw in the previous example from your web browser debug console. Fill in also Body with request data you could see in the previous example.
Don’t forget to set the right method and Body as JSON.
Once you send the data to Access Commander API, when login is successful you will receive 200 OK a response along with other data and authentication cookies.

- If you have created the API token, you can fill in it here:
Examples of commands and operations using HTTP REST API
In this section, we are ready to post the commands. First of all, we use the valid credentials to login:
(Let's consider we have an Access Commander using an IP 192.168.0.108, username: Admin, password: Admin1234)
-
Login with username
Command PUT https://192.168.0.108/api/v3/login Body (data to be sent) { "login":"Admin","password":"Admin1234","longTimeLogin":true }

- Authenticate commands using API Token
If there is generated API token in Access Commander, it must be present in every command sent.
-
List of current users
Now we want to receive a list of users with all the parameters.Command GET https://192.168.0.108/api/v3/users Body (data to be sent) { }
-
Getting information about a specific user
Each user has a unique ID called UUID. It is possible to get it by the command "List of current users".
(Lets say our user has a UUID: 6de07172-b17b-4fb3-a42e-385ac786bb29)Command GET https://192.168.0.108/api/v3/users/6de07172-b17b-4fb3-a42e-385ac786bb29 Body (data to be sent) { }
-
Adding an existing user to a group
We need to know first the Id of the group we want to add the user to.Command GET https://192.168.0.108/api/v3/groups Body (data to be sent) { } Answer {"items": [{"Members": [ ],"Name": "Technical support","Id": "f5425bc3-7697-4b91-9b1b-c607d28f0196","Company": {"Id": 1,"Name": "My Company"},"MemberCount": 0,"Type": "Group","Revision": 0}],"count": 1}
Now we will include the group Id in the command. In the body we will define UUID of the user, get by the command "List of current users".Command PUT https://192.168.0.108/api/v3/groups/f5425bc3-7697-4b91-9b1b-c607d28f0196/members Body (data to be sent) [{"Id": "e4a5857d-a3c1-4514-8c19-3a5c80359d52",}]
-
Adding new RFID card to existing user
For the body of the command we need to know UUID of the user, here presented as "Id" parameter. (You can get UUID by the command "List of current users".)Command PATCH https://192.168.0.108/api/v3/users Body (data to be sent) [{"Id": "e4a5857d-a3c1-4514-8c19-3a5c80359d52","Operations": [{"value": "ABCDE12345","path": "/AccessCredentials/Cards/-","op": "add",}]}]
-
Updating RFID card of existing user
We will use the same command as for adding, but we will change the operation ("op") parameter to "replace" and in the "path" define order of the card, beginning from zero.
We need to know UUID of the user, here presented as "Id" parameter. (You can get UUID by the command "List of current users".)Command PATCH https://192.168.0.108/api/v3/users Body (data to be sent) [{"Id": "e4a5857d-a3c1-4514-8c19-3a5c80359d52","Operations": [{"value": "123456789","path": "/AccessCredentials/Cards/0","op": "replace",}]}]
-
Creating new PIN code for existing user
The procedure is similar as for cards, just the path is changed for Pin usage.
We need to know UUID of the user, here presented as "Id" parameter. (You can get UUID by the command "List of current users".)Command PATCH https://192.168.0.108/api/v3/users Body (data to be sent) [{"Id": "e4a5857d-a3c1-4514-8c19-3a5c80359d52","Operations": [{"value": "5678","path": "/AccessCredentials/Pin","op": "add",}]}]
-
Deleting the PIN code
Now we will change the operation ("op") parameter to "remove".
We need to know UUID of the user, here presented as "Id" parameter. (You can get UUID by the command "List of current users".)Command PATCH https://192.168.0.108/api/v3/users Body (data to be sent) { } Answer [{"Id": "e4a5857d-a3c1-4514-8c19-3a5c80359d52","Operations": [{"path": "/AccessCredentials/Pin","op": "remove",}]}]
In case of using not supported API v2 which is unavailable in actual versions of 2N Access Commander, click here.
Technical information
-
HTTP REST API documentation including release changes can be found on the following link:
https://wiki.2n.com/acc/2.7/en/6-http-api/6-2-http-api-verze-2 (it takes a while to be fully loaded) -
API endpoints are available on the address:
https://ip_or_name_address/api/v2/ - Using HTTPS protocol with TLS 1.2 for communication on default port 443
-
In default, uses self-signed certificate, SSL certificate verification needs to be disabled in order to start communication with API in this case.
Optionally, CA signed certificate can be installed to 2N Access Commander as described in the following article: SSL - CA signed user certificate. Then Access Commander needs to be accessible on name address which matches name address in the certificate instead of an IP address. - Communication with API is secured by username and password authentication. After initial authentication, every other command to API is authenticated by cookies which Access Commander send as a response to successful login.
- The supported commands format is JSON only.
- Supported methods are GET, POST, PUT, DELETE, PATCH.
Finding out which command to send
Let’s say we would like to login to Access Commander using an API in order to be able to use other commands. We can easily see how it can be done on the web of 2N Access Commander itself because the web interface is using the same HTTP REST API to access all data. The following procedure will show how you can see which commands and parameters are used for each operation with data:
-
Load the Access Commander web interface in your web browser and open the web browser debug console by pressing F12 -> Network -> XHR (Chromium based browsers). This will show a console in your web browser where we can see all the commands as you can see on the image below:


- In order to see which command with which parameters is sent to API for login request, fill in login name and password in your web browser with enabled debugging console from previous step and press LOGIN button.
- Access Commander will login in and in the web browser debug console you can see multiple requests and one of them is the login request we are looking for:
- Select mentioned login request by clicking on it.
-
In its Header you can see it uses PUT method and which endpoint it calls (/login)
-
In its Request you can see which in which syntax data are sent.
-
Using those data from web browser you can easily replicate this command in your application.
-
After successful login, you will be also able to see in Response cookie required for commands which will follow.
-
How to use commands from your application
To demonstrate this example we will use an application known as POSTMAN which is able to send HTTPS commands and read responses to its requests.
-
For the first time using the Access Commander after importing the appliance, it is needed to use the web interface to login as the administrator ("Admin") to change the default password ("2n")
-
While accessing the Access Commander using the REST API and using for example the app Postman, please, disable the SSL certificate verification first. There is no domain that can sign the certificate and a self-signed is not considered as trusted automatically by default.
-
Open the Postman and fill in the header as you saw in the previous example from your web browser debug console. Fill in also Body with request data you could see in the previous example. Don’t forget to set Method as PUT and Body as JSON.
-
Once you send the data to Access Commander API, when login is successful you will receive 200 OK a response along with other data and authentication cookies.
Examples of commands and operations using HTTP REST API
In this section, we are ready to post the commands. First of all, we use the valid credentials to login:
(Let's consider we have an Access Commander using an IP 192.168.0.250, username: Admin, password: Admin1234)
-
Login
Command PUT https://192.168.0.250/api/v2/login Body (data to be sent) { "login":"Admin","password":"Admin1234","longTimeLogin":true }
-
List of current users
Now we want to receive a list of users with all the parameters.Command GET https://192.168.0.250/api/v2/users Body (data to be sent) { }
-
Getting information about a specific user
Each user has a unique ID called UUID. It is possible to get from the previous command.
(Lets say our user has a UUID: e7207ded-b864-424b-ad0f-e06b9d8f7527)Command GET https://192.168.0.250/api/v2/users/e7207ded-b864-424b-ad0f-e06b9d8f7527 Body (data to be sent) { }
-
Creating a new user
Now we want to create a new user with the name UserAPI. This user will belong to the company with the ID=1.Command POST https://192.168.0.250/api/v2/users Body (data to be sent) { "Name":"UserAPI","Company":{"Id":1} }
In the answer, there will be a parameter e.g..: "Id": "09e7eab1-7b80-4071-89c9-4969a61354e1"
-
Adding existing user to a group
We need to know first the Id of the group we want to add the user to.Command GET https://192.168.0.250/api/v2/groups Body (data to be sent) { } Answer {
"count" : 1 ,
"data" : [
{
"Name" : "Home" ,
"Id" : "511720dc-ef0b-4e7c-b63a-4a54b350792d" ,
"ModifiedGuid" : 0 ,
"Company" : {
"Id" : 1 ,
"Name" : "My Company"
},
"Users" : [ ],
"VisitorCards" : [ ]
} ] }
After that, we can use the answer for adding the user to the specific group:
We need to know UUID of the user. (You can get UUID by the command "List of current users".)Command PUT https://192.168.0.250/api/v2/users/09e7eab1-7b80-4071-89c9-4969a61354e1/groups Body (data to be sent) { "Id" : "511720dc-ef0b-4e7c-b63a-4a54b350792d" }
-
Adding new RFID card to existing user
If there is no card added yet, first you need to read user GUID first and then use it in command to add the card for that user. ModifiedGUID is not needed when user has no card added yet on that position.Command POST https://192.168.0.250/api/v2/users/09e7eab1-7b80-4071-89c9-4969a61354e1/cards Body (data to be sent) { "Identification":"12345678" }
-
Updating RFID card of existing user
First you need to get the user UUID by the command "List of current users" and then use it in command to modify the card for that user. For maintaining database consistency, we need to use a specific ID for each parameter to prevent multiple processes from modifying data at the same time. This is called ModifiedGUID and we need to get this information from the parameter before we change it. Let's say another process changed the RFID card number 3 times already to the number 12342622. We are going to find out this now.Command GET https://192.168.0.250/api/v2/users/09e7eab1-7b80-4071-89c9-4969a61354e1 Body (data to be sent) { } Answer "Cards" : [
{
"Identification" : "12342622" ,
"Description" : "" ,
"Id" : "25d79b1f-8612-4c44-859b-e04f89e19bb5" ,
"ModifiedGuid" : 3
}
Now we know the ModifiedGUID=3 and we can change the card number to 12121212 (note: we are adding the ID of the card position to the URL):Command PUT https://192.168.0.250/api/v2/users/09e7eab1-7b80-4071-89c9-4969a61354e1/cards/25d79b1f-8612-4c44-859b-e04f89e19bb5 Body (data to be sent) { "Identification" : "12121212" , "ModifiedGuid" : 3 }
-
Creating 2 codes (1234, 9876) for existing user
"Ordinal" is ID of a code.
We need to know UUID of the user. (You can get UUID by the command "List of current users".)Command POST https://192.168.0.250/api/v2/users/09e7eab1-7b80-4071-89c9-4969a61354e1/codes Body (data to be sent) { "SwitchCode" : "1234" , "User" :{ "Id" : "e7207ded-b864-424b-ad0f-e06b9d8f7527" }, "Ordinal" : 0 } Command POST https://192.168.0.250/api/v2/users/09e7eab1-7b80-4071-89c9-4969a61354e1/codes Body (data to be sent) { "SwitchCode" : "9876" , "User" :{ "Id" : "e7207ded-b864-424b-ad0f-e06b9d8f7527" }, "Ordinal" : 1 }
-
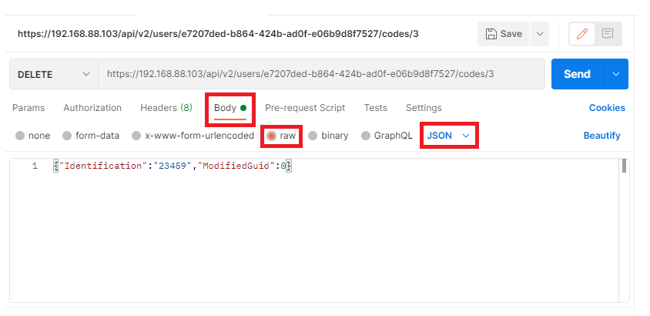
Deleting the 2nd code from existing user
We need to know the code ID and the ModifiedGuid first as well as UUID of the user. (You can get UUID by the command "List of current users".)Command GET https://192.168.0.250/api/v2/users/09e7eab1-7b80-4071-89c9-4969a61354e1 Body (data to be sent) { } Answer "Codes" : [
{
"Ordinal" : 0 ,
"SwitchCode" : "1234" ,
"Id" : 4 ,
"ModifiedGuid" : 0 ,
"Collisions" : [ ]
},
{
"Ordinal" : 1 ,
"SwitchCode" : "9876" ,
"Id" : 5 ,
"ModifiedGuid" : 0 ,
"Collisions" : [ ]
} ],
To the URL we need to put the ID of the code we want to delete.Command DELETE https://192.168.0.250/api/v2/users/09e7eab1-7b80-4071-89c9-4969a61354e1/codes/5 Body (data to be sent) { "Identification" : "12121212" , "ModifiedGuid" : 3 }