2N devices can use recognized license plates as another credential for entry or exit. License plates may be assigned to a user and their validity is controlled by the same access rules as their other credentials.
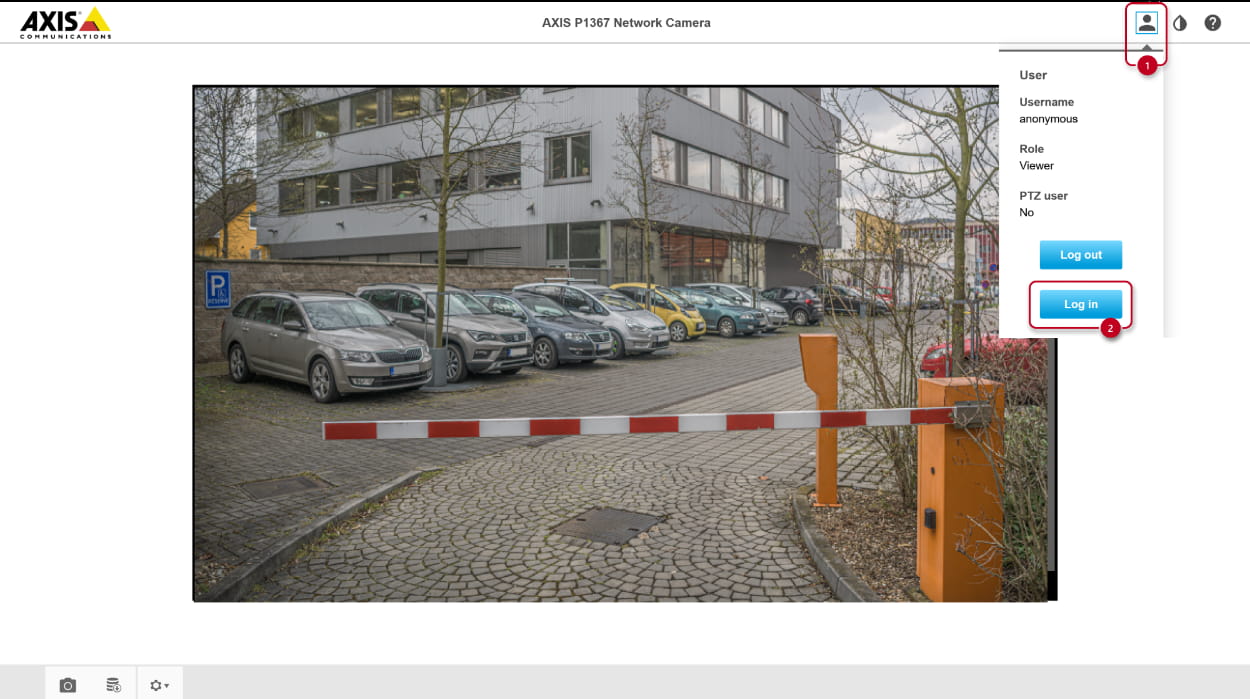
Prerequisites
- 2N IP Intercom (except 2N IP Uni) or 2N Access Unit with the latest firmware
- no additional license is required
- optionally 2N Access Commander (latest version)
- no additional license is required
- Axis network camera with ARTPEC-6 / ARTPEC-7 / ARTPEC-8 chip
(verify the suitable camera with Axis according to chosen LPR app below)- additional license from Axis can be required according to selected LPR app
- License Plate Recognition app
- Vaxtor VaxALPR On Camera (version 2.2.15+) - for license, please contact Vaxtor https://www.vaxtor.com/contact/
or - Axis License Plate Verifier (version 2.1+)
- Vaxtor VaxALPR On Camera (version 2.2.15+) - for license, please contact Vaxtor https://www.vaxtor.com/contact/
Feature properties
- License plate recognition (LPR) works outside of Access Profiles set in Services - Access Control - Entry or Exit Rules, and as such can’t be combined with other credentials for combined authentication.
Version 3.0 or later
- If the feature is enabled and a valid HTTP request is received, this event is recorded into the event log of the 2N device as LicensePlateRecognized with the following parameters:
-
- ap ... access control direction, entry (0) or exit (1)
-
session ... ID of the authentication session
-
licensePlate ... the license plate recognized by the camera
-
- valid ... whether the licensePlate has the right to enter (true) or not (false)
-
uuid ... linking to a specific user ID, if licensePlate isn’t assigned to any users, the uuid parameter will be left out

- Optionally, a snapshot containing a recognized license plate may be attached to the LPR HTTP request. The device receiving these requests can then store up to 5 most recent snapshots, downloadable by 2N Access Commander via access log.
- One license plate should always be assigned to one user, otherwise its access rules may not be applied correctly if different users have different access rules. The first match found in the directory will be used for authentication.
Version 2.50 (LTS) or earlier
- If the feature is enabled and a valid HTTP request is received, this event is recorded into the event log of the 2N device as LicensePlateRecognized with the following parameters:
-
- ap ... access control direction, entry (0) or exit (1)
-
session ... ID of the authentication session
-
licensePlate ... the license plate recognized by the camera
-
- valid ... whether the licensePlate has the right to enter (true) or not (false)
-
uuid ... linking to a specific user ID, if licensePlate isn’t assigned to any users, the uuid parameter will be left out
- Optionally, a snapshot containing a recognized license plate may be attached to the LPR HTTP request. The device receiving these requests can then store up to 5 most recent snapshots, downloadable by 2N Access Commander via access log.
- One license plate should always be assigned to one user, otherwise its access rules may not be applied correctly if different users have different access rules. The first match found in the directory will be used for authentication.
2N device configuration
Let’s configure the intercom or access unit first to have everything prepared for the integration.
If you use Access Commander to manage your device, you only need to set up HTTP API access in this section, and then please continue to the next section: 2N Access Commander configuration
Version 3.0 or later
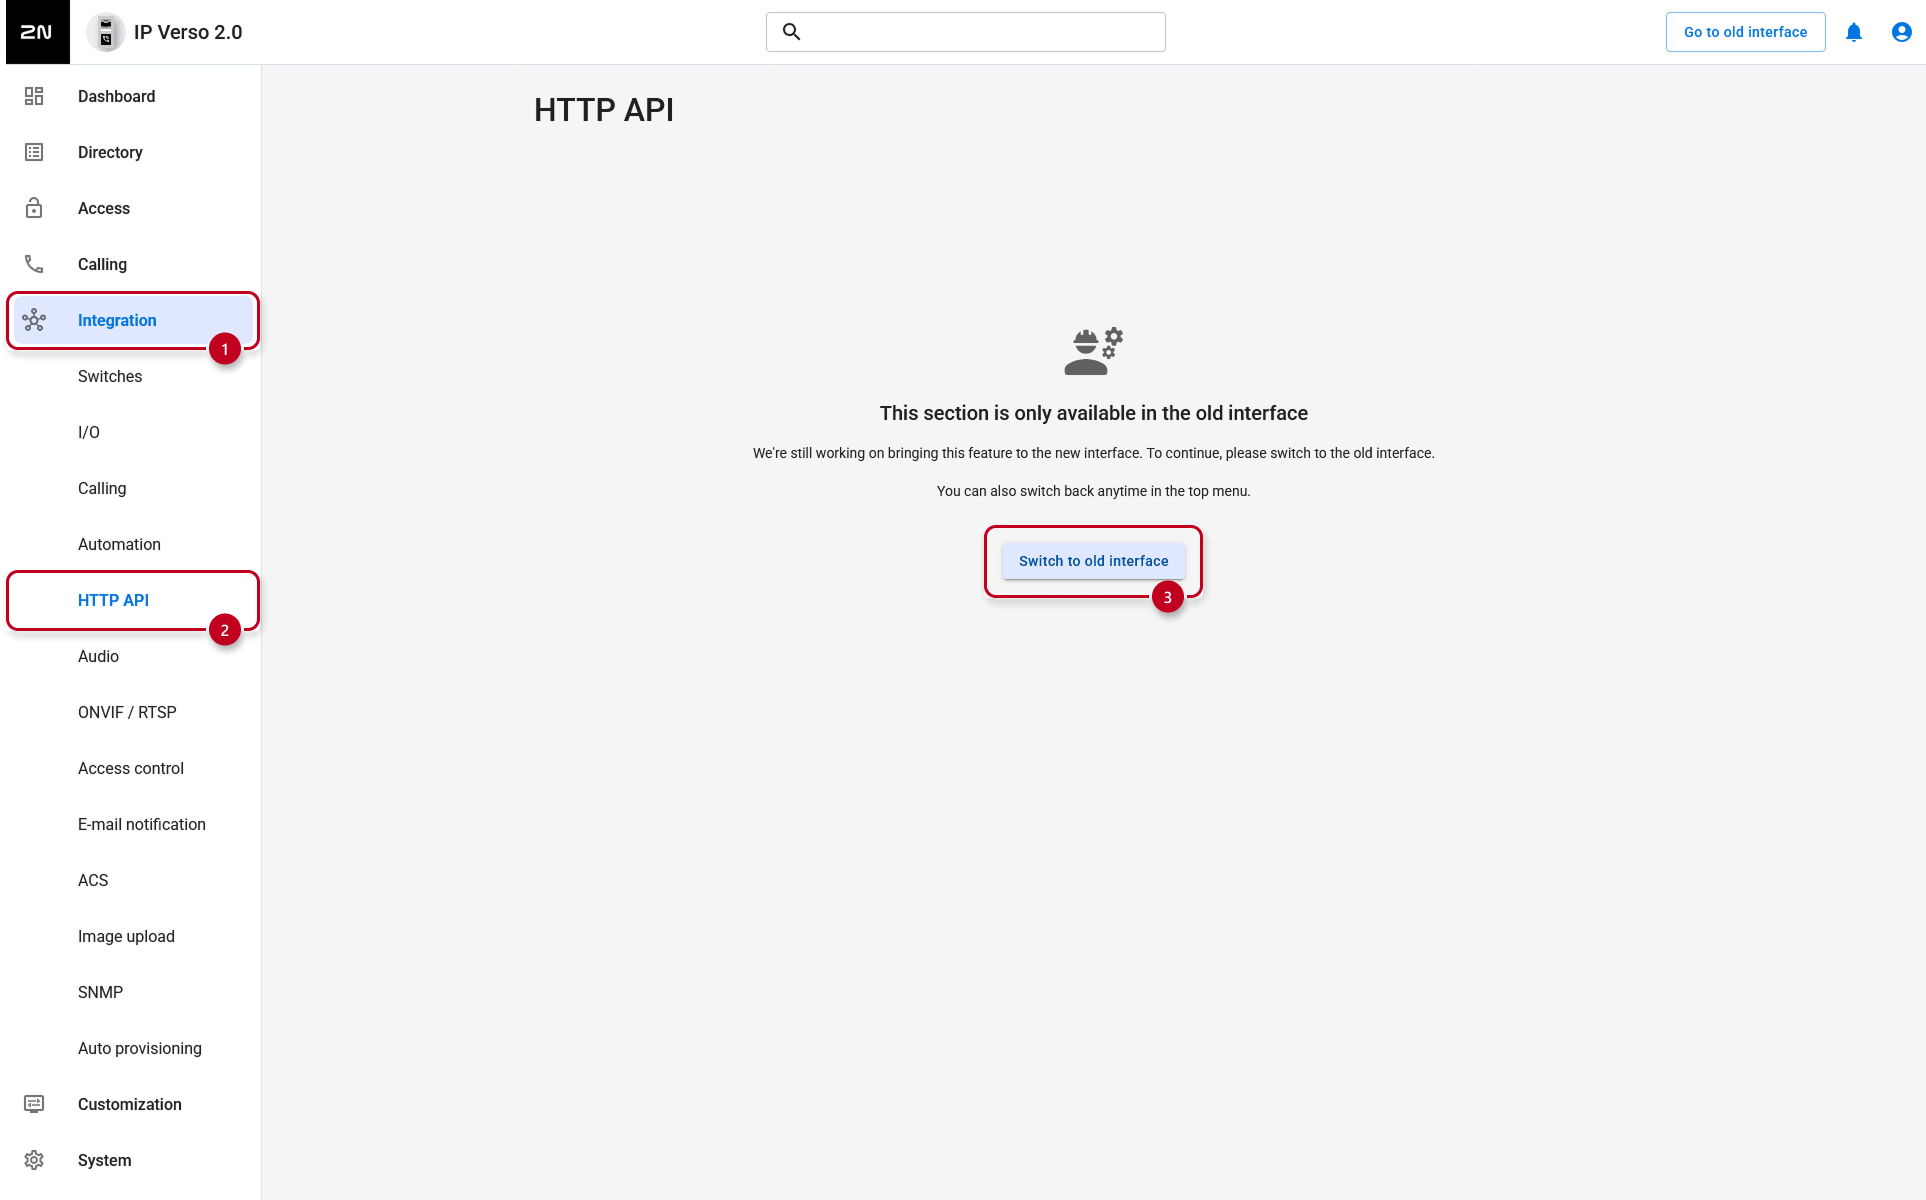
- Go to Integration - HTTP API section.
- Now click on the "Switch to the old interface" button to continue setup in the old interface (switch to the 2.50 (LTS) section for this setup)
- Go to Access - Access Rules section.
- Enable Entry, Exit, or both, depending on whether the device your camera is connected to functions as an entry point, an exit point, or both.
If the 2N device is connected to 2N Access Commander, then the following settings are managed by it.
- Enable Entry, Exit, or both, depending on whether the device your camera is connected to functions as an entry point, an exit point, or both.
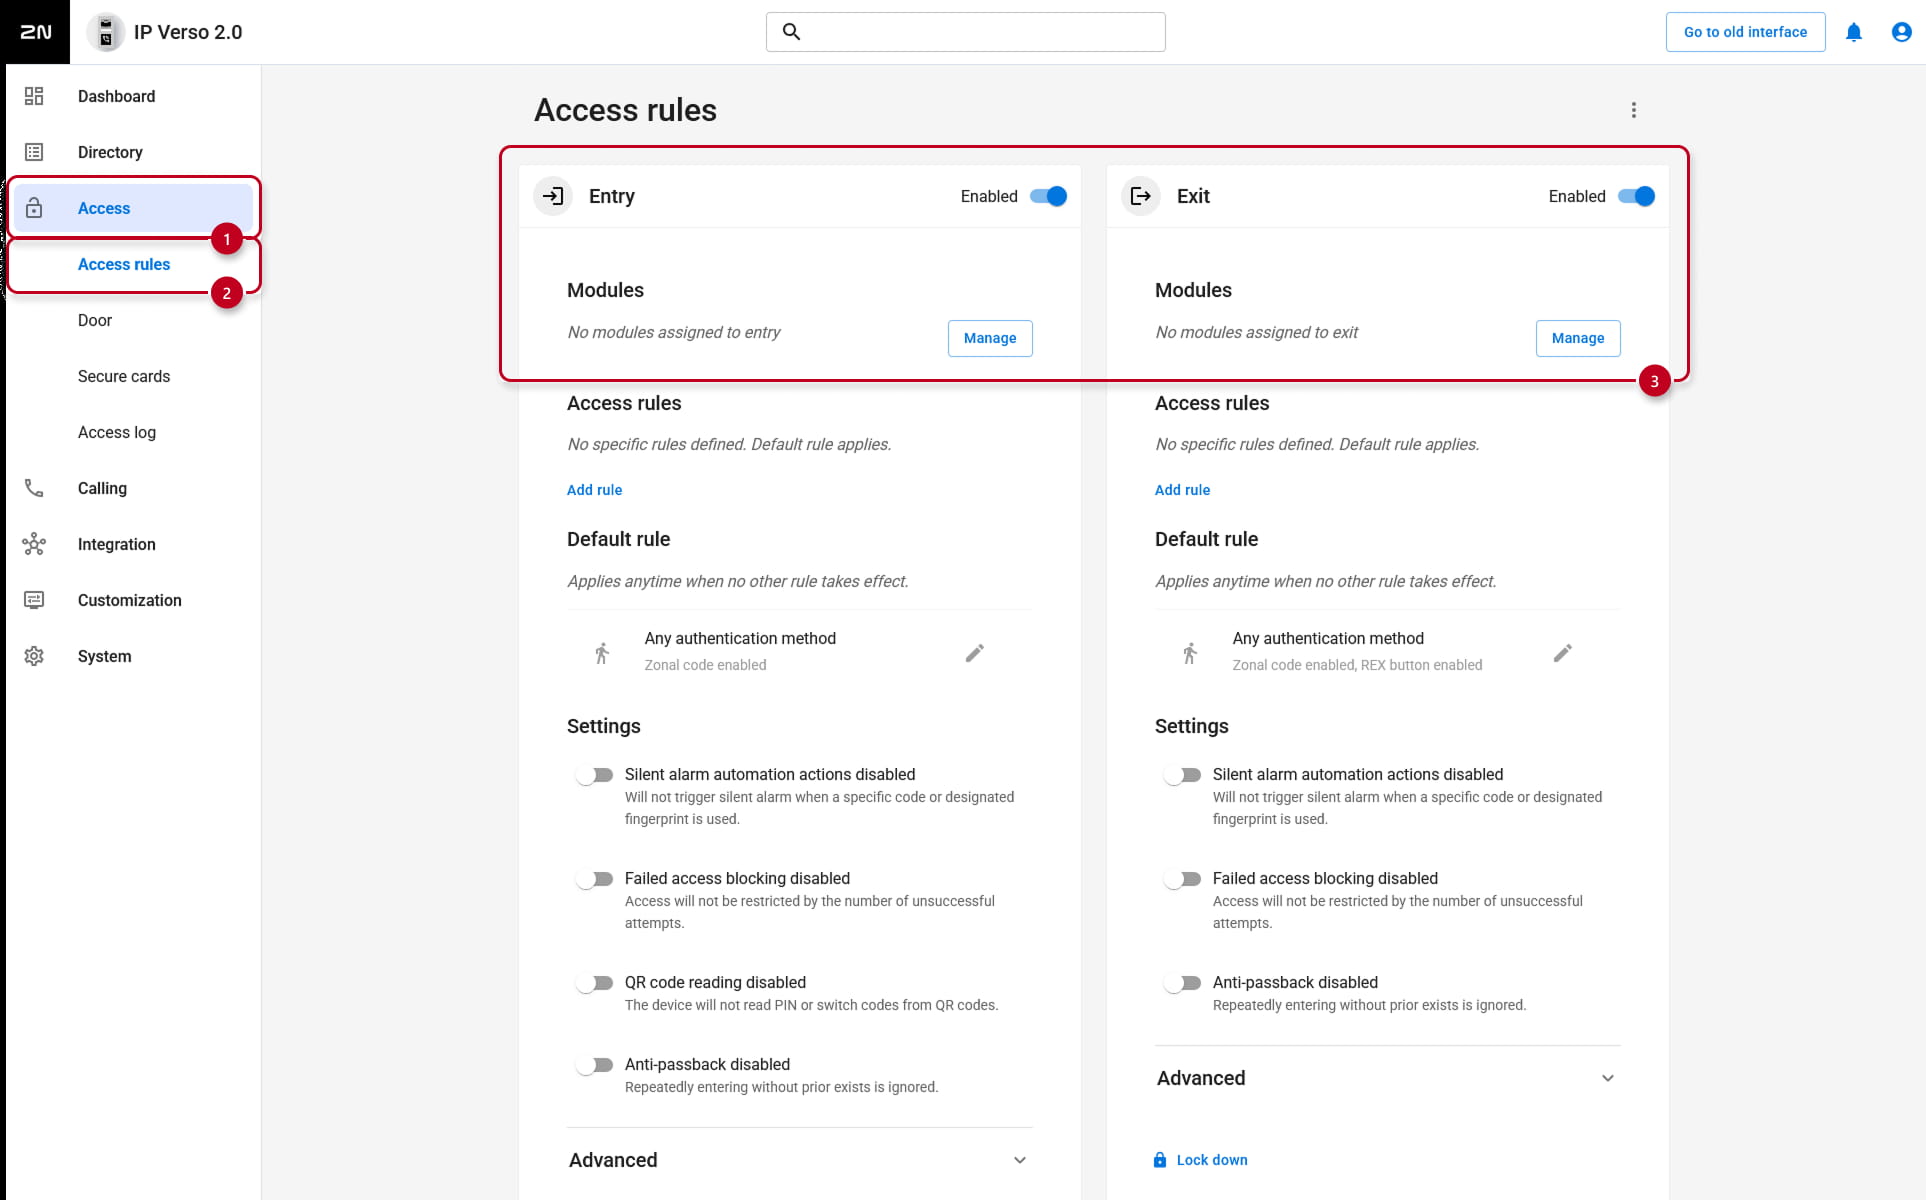
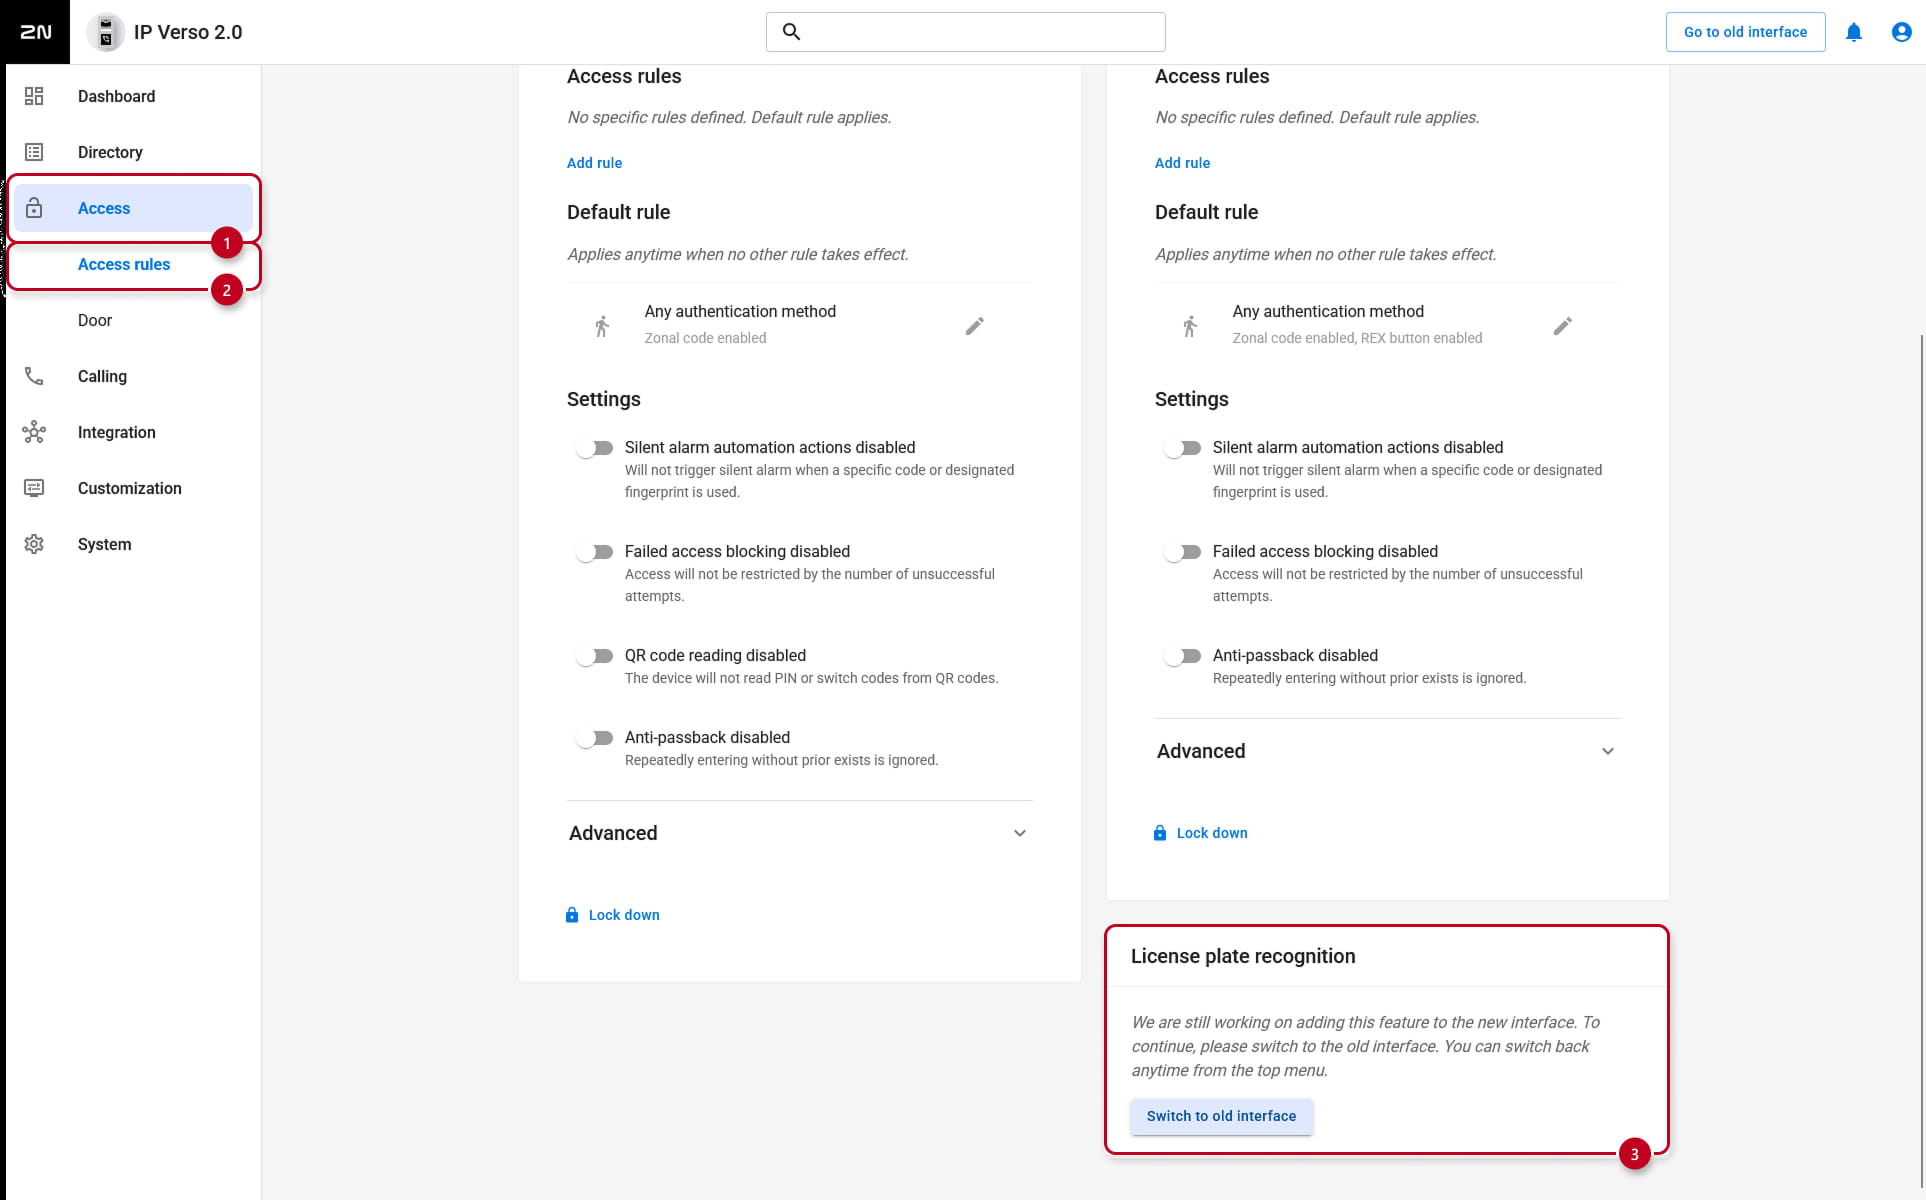
- After you enable either Access, Exit or both, go to the License plate recognition section on the same page click on the "Switch to the old interface" button to continue setup in the old interface (switch to the 2.50 (LTS) section for this setup)
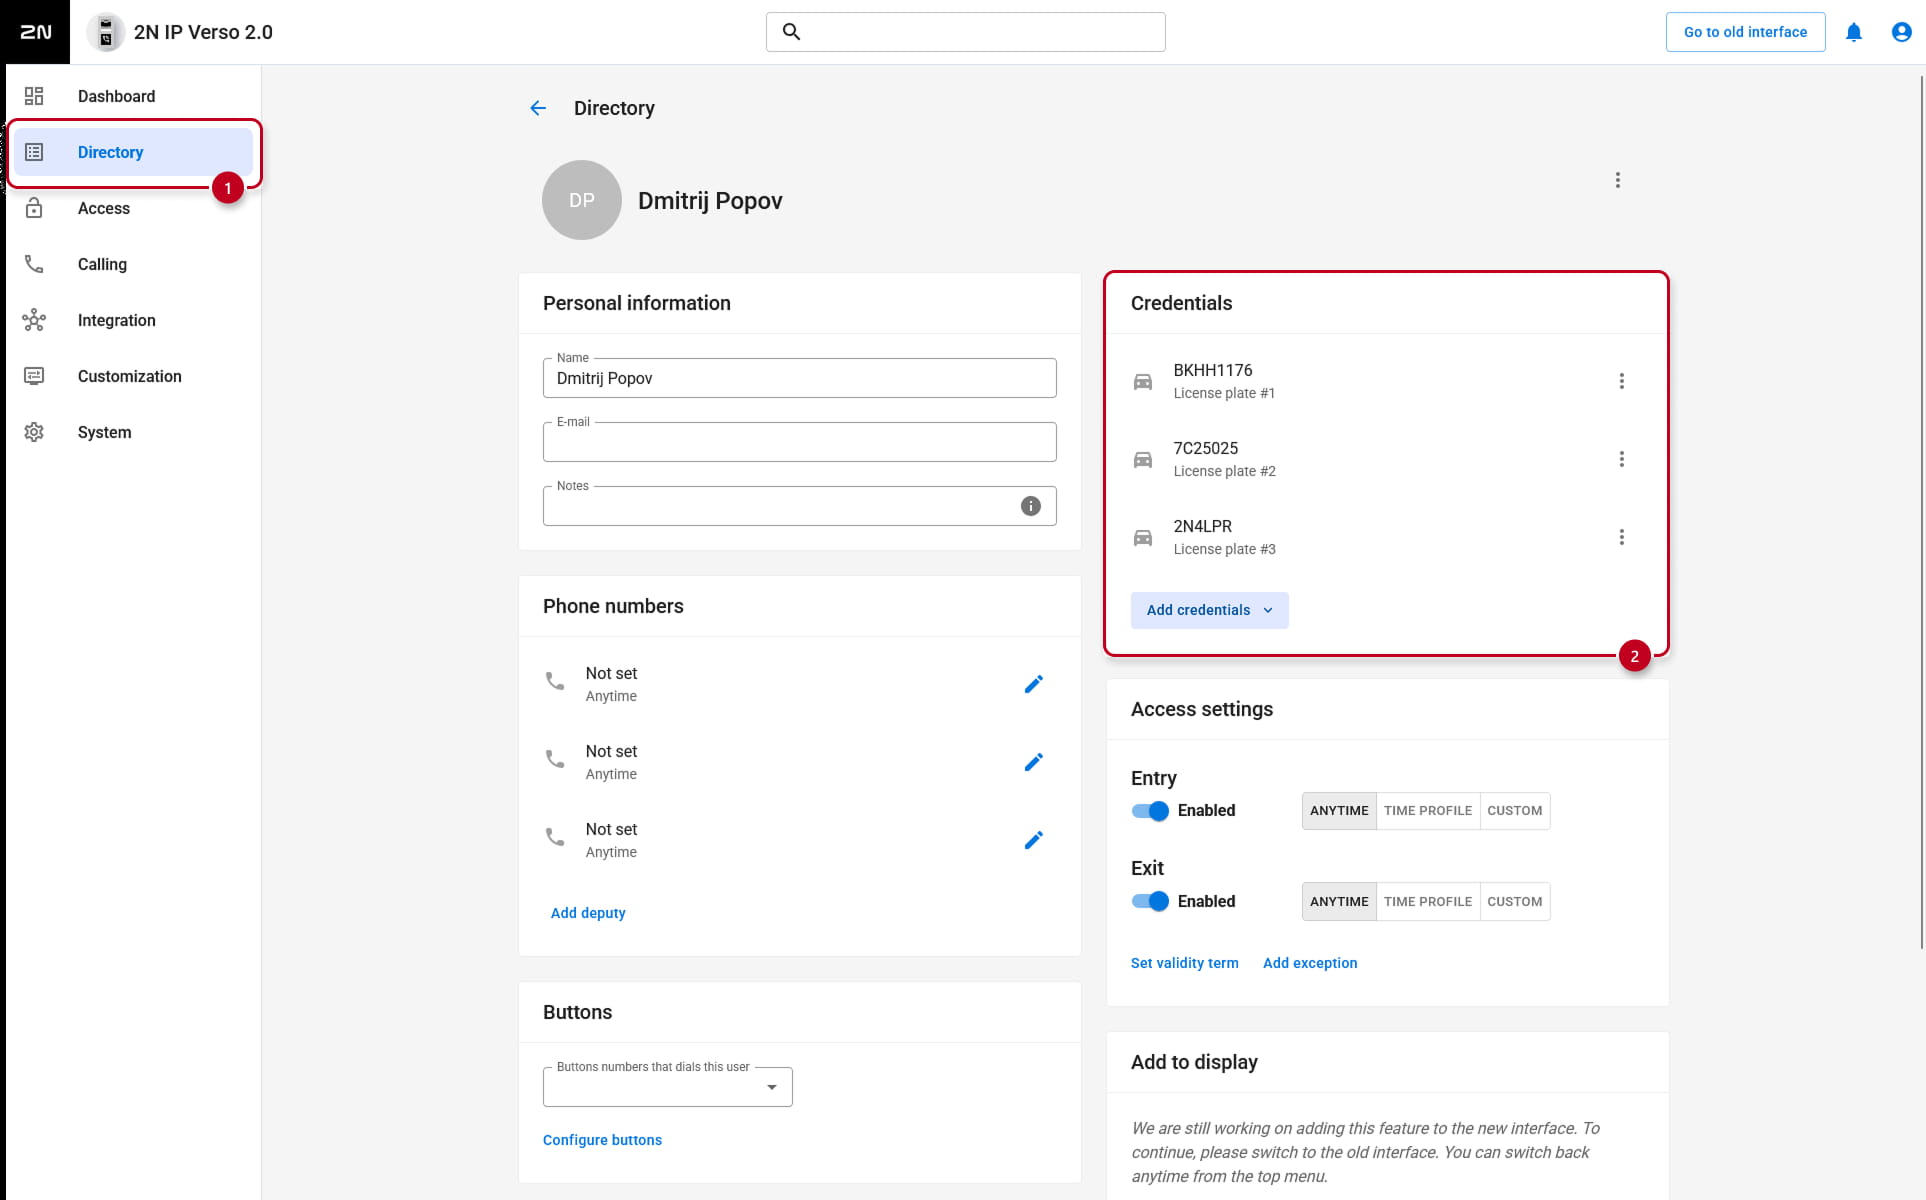
- Go to Directory section.
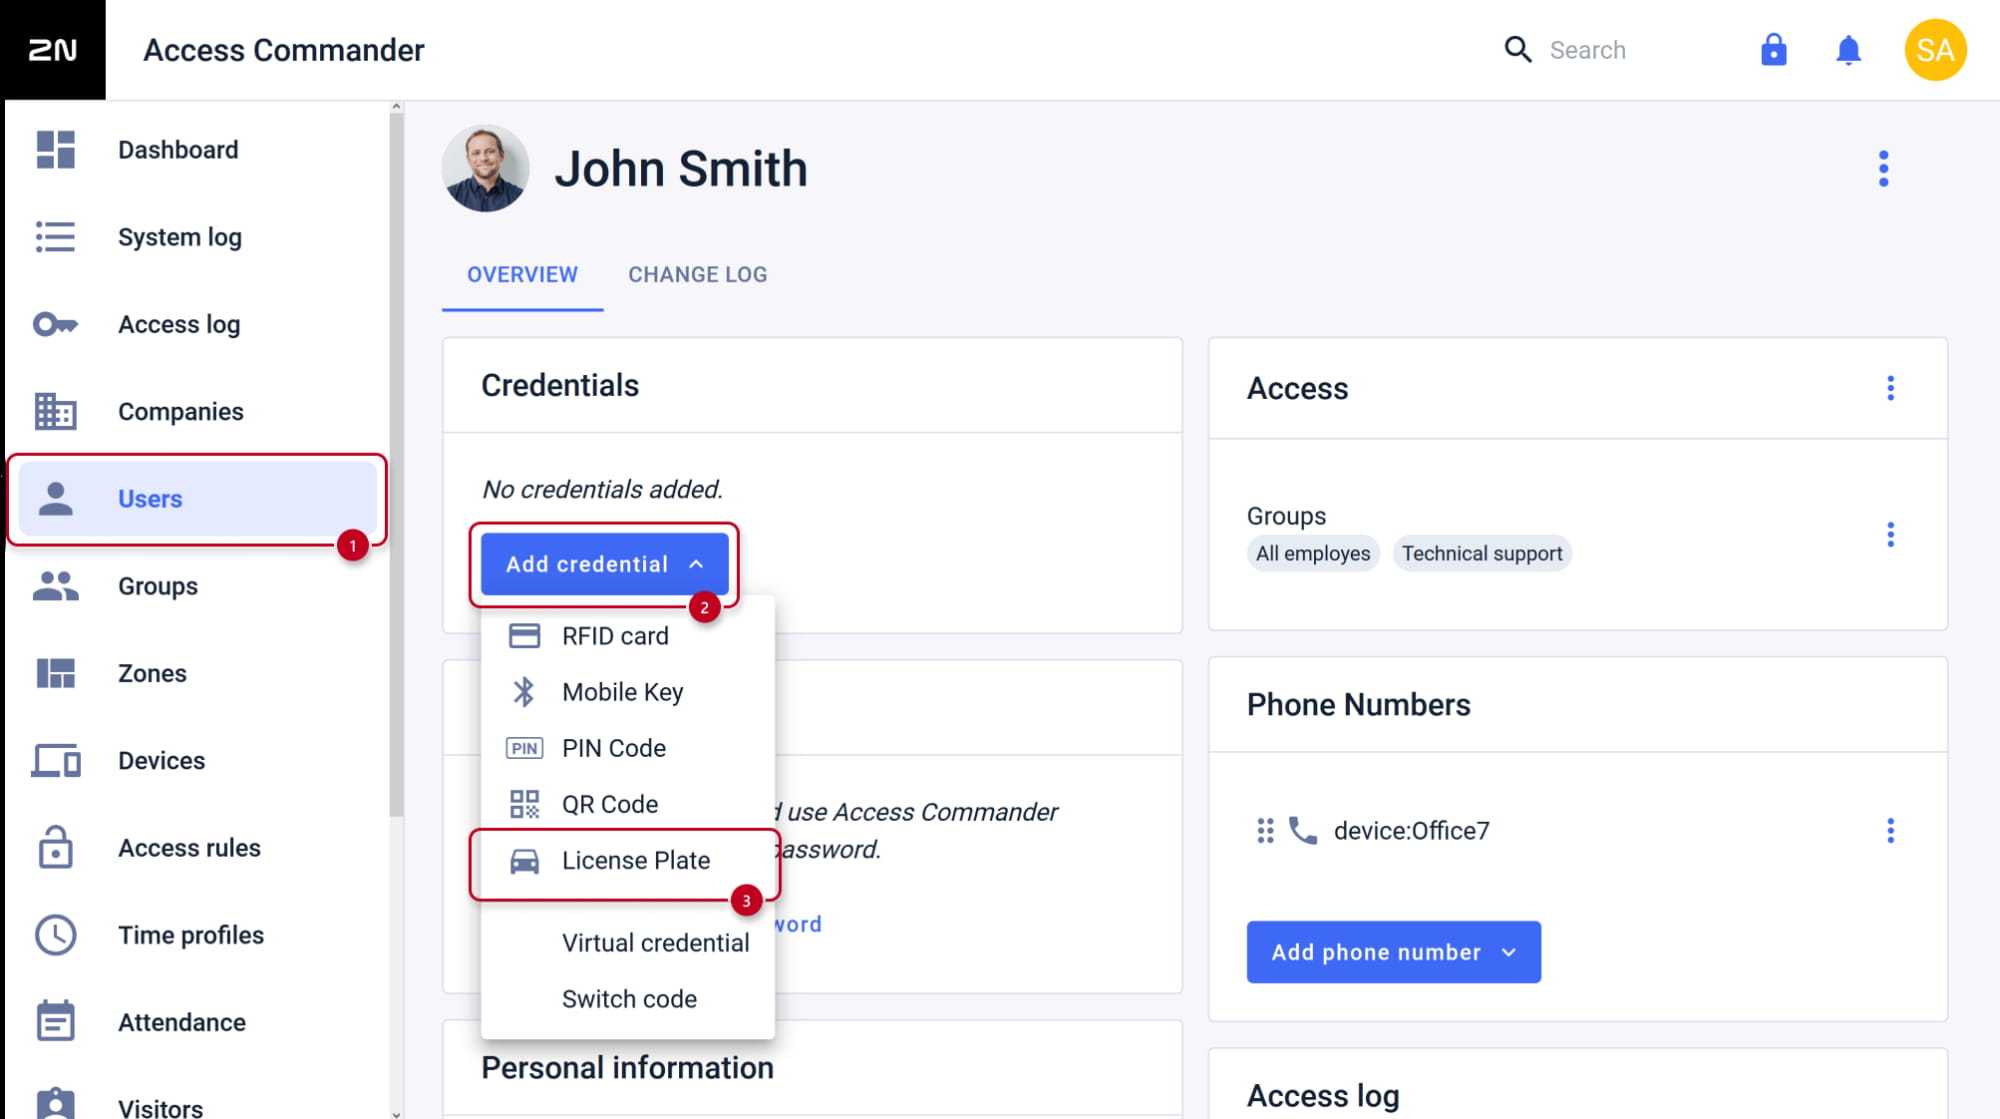
If the 2N device is connected to 2N Access Commander, then the following settings are managed by it.- Here, create a user and add their license plates in Credentials > Add credentials > License plate
You can enter up to 20 license plates, each license plate can contain up to 10 characters – spaces are ignored.
- Here, create a user and add their license plates in Credentials > Add credentials > License plate
Version 2.50 (LTS) or earlier
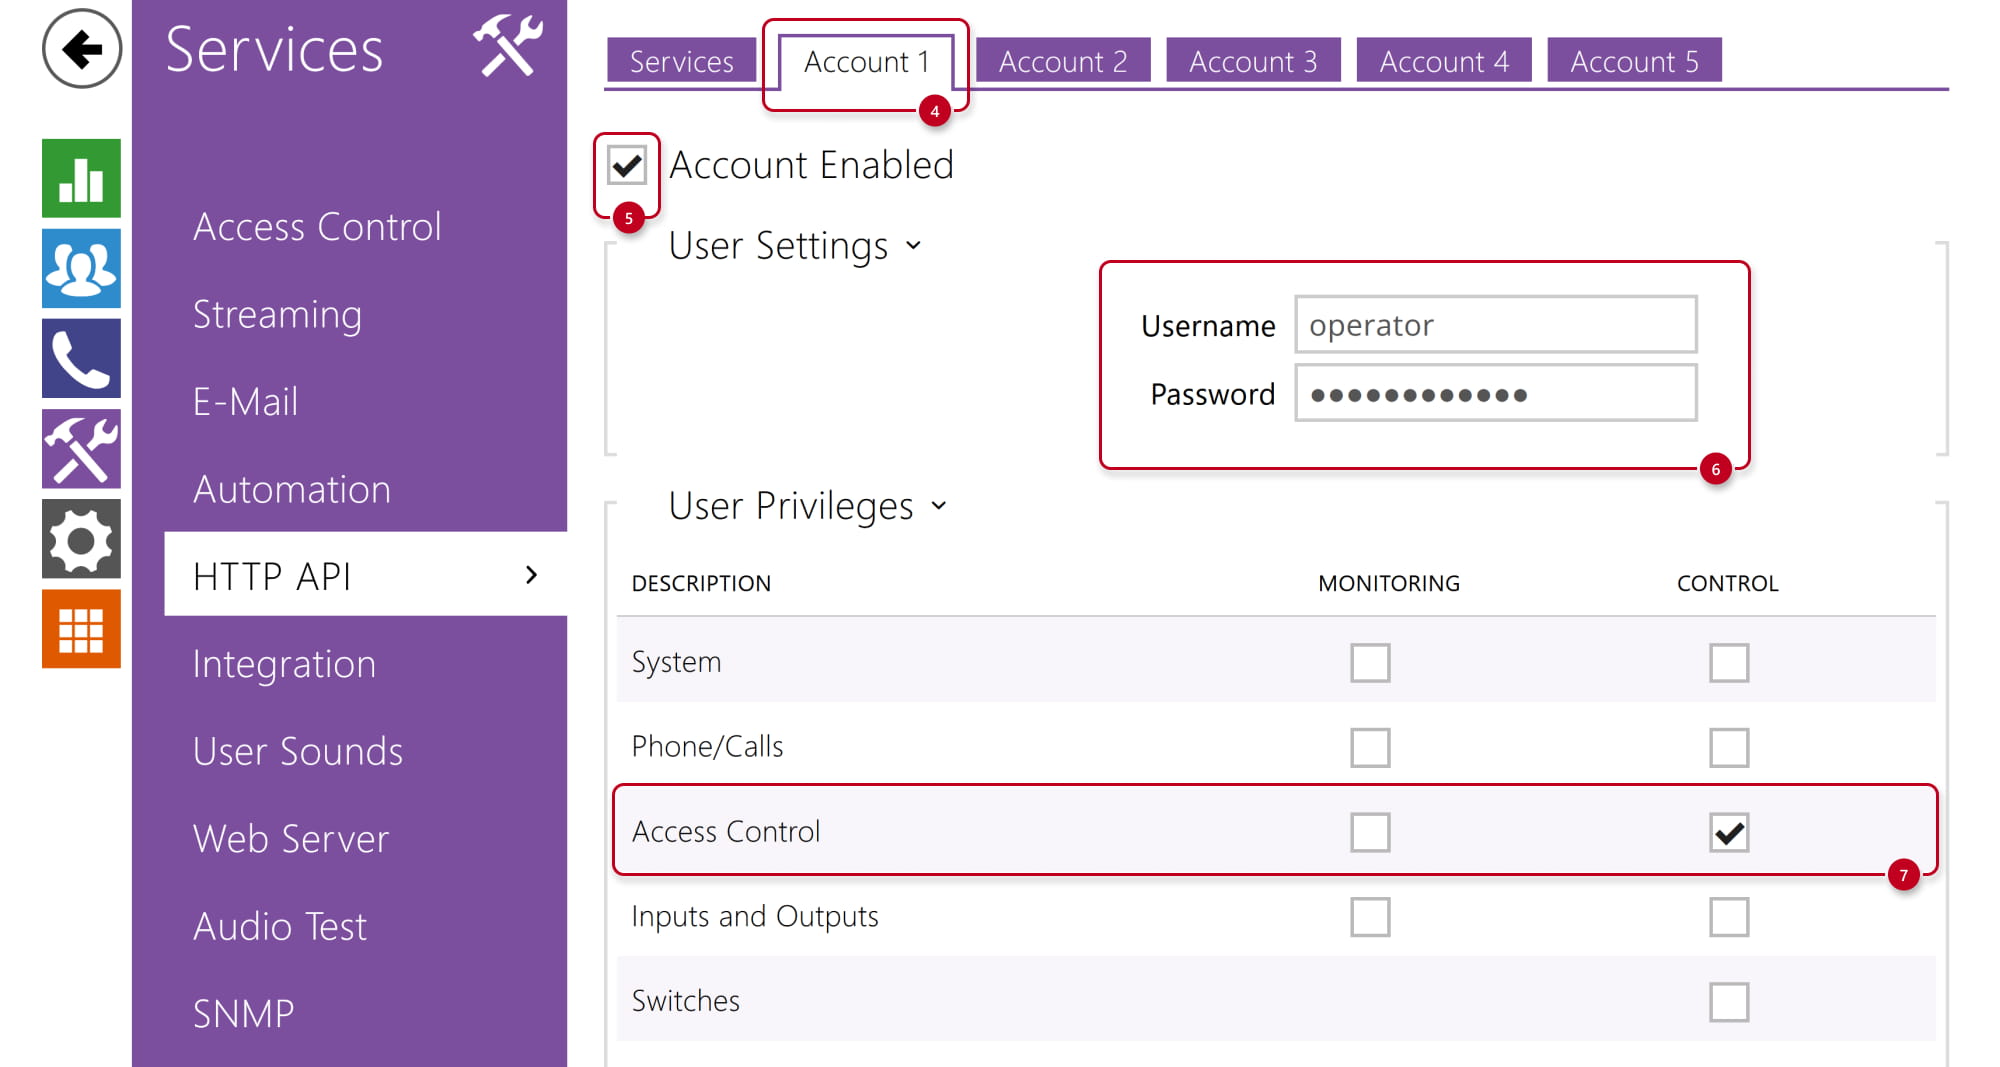
- Go to Services > HTTP API section.
-
In the Services tab, make sure Access Control API is enabled.
We recommend using Secure (TLS) / Digest as connection / authentication type.
-

-
-
Then continue to Account # tab, enable it, enter credentials you’d like to use, and tick the Access Control privilege for CONTROL.
-
- Go to Services - Access Control section.
If the 2N device is connected to 2N Access Commander, then the following settings are managed by it.
- In the Entry Rules or Exit Rules tab, Advanced Settings part, select Opening by License Plate from the License Plate Recognition dropdown menu.

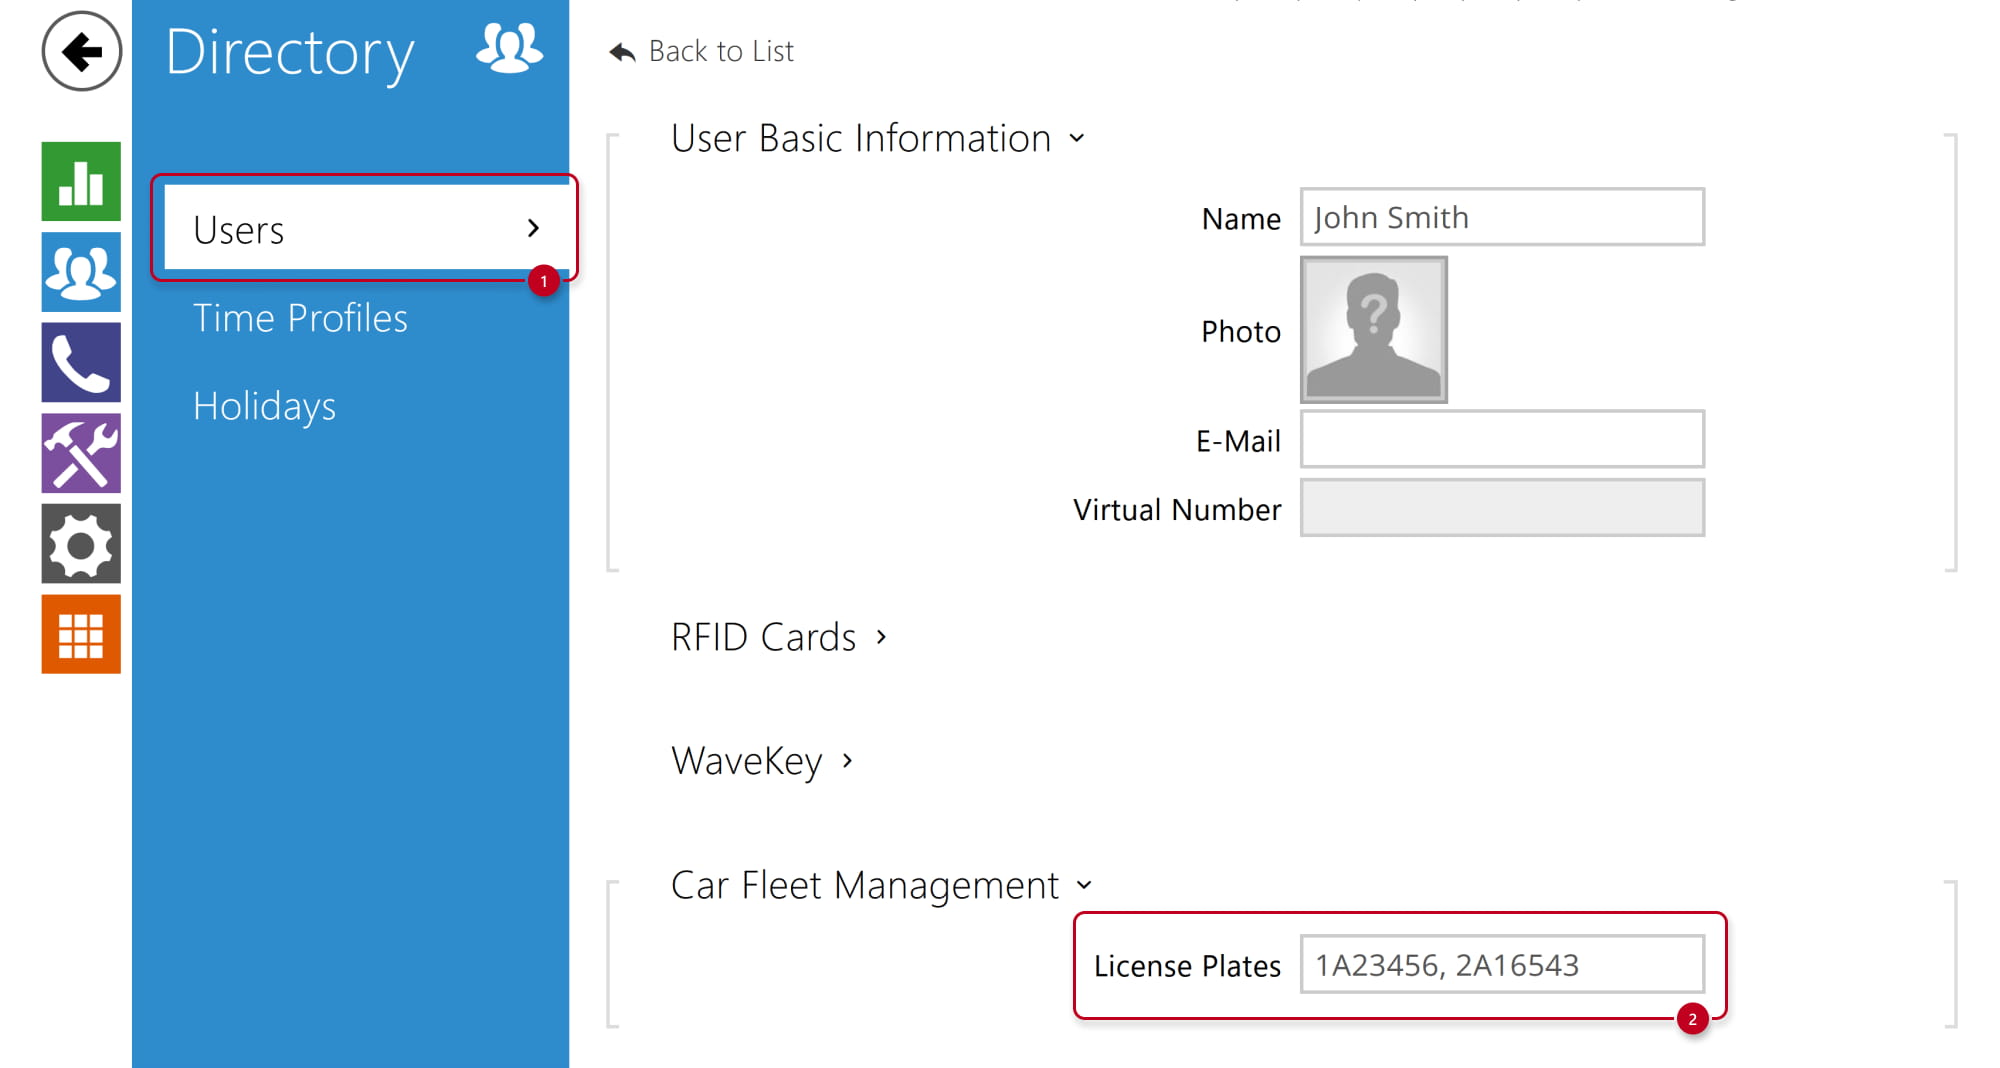
- Go to Directory - Users section.
If the 2N device is connected to 2N Access Commander, then the following settings are managed by it.
- Here, create a user and add their license plates under Car Fleet Management.
You can enter up to 20 license plates separated by commas, each license plate can contain up to 10 characters – spaces are ignored.
- Here, create a user and add their license plates under Car Fleet Management.
2N Access Commander configuration (optional)
If the 2N device is connected to 2N Access Commander, then most of settings, incl. LPR, are managed by it.
But still you have to configure the device’s HTTP API credentials directly in the device configuration as described in the previous section.
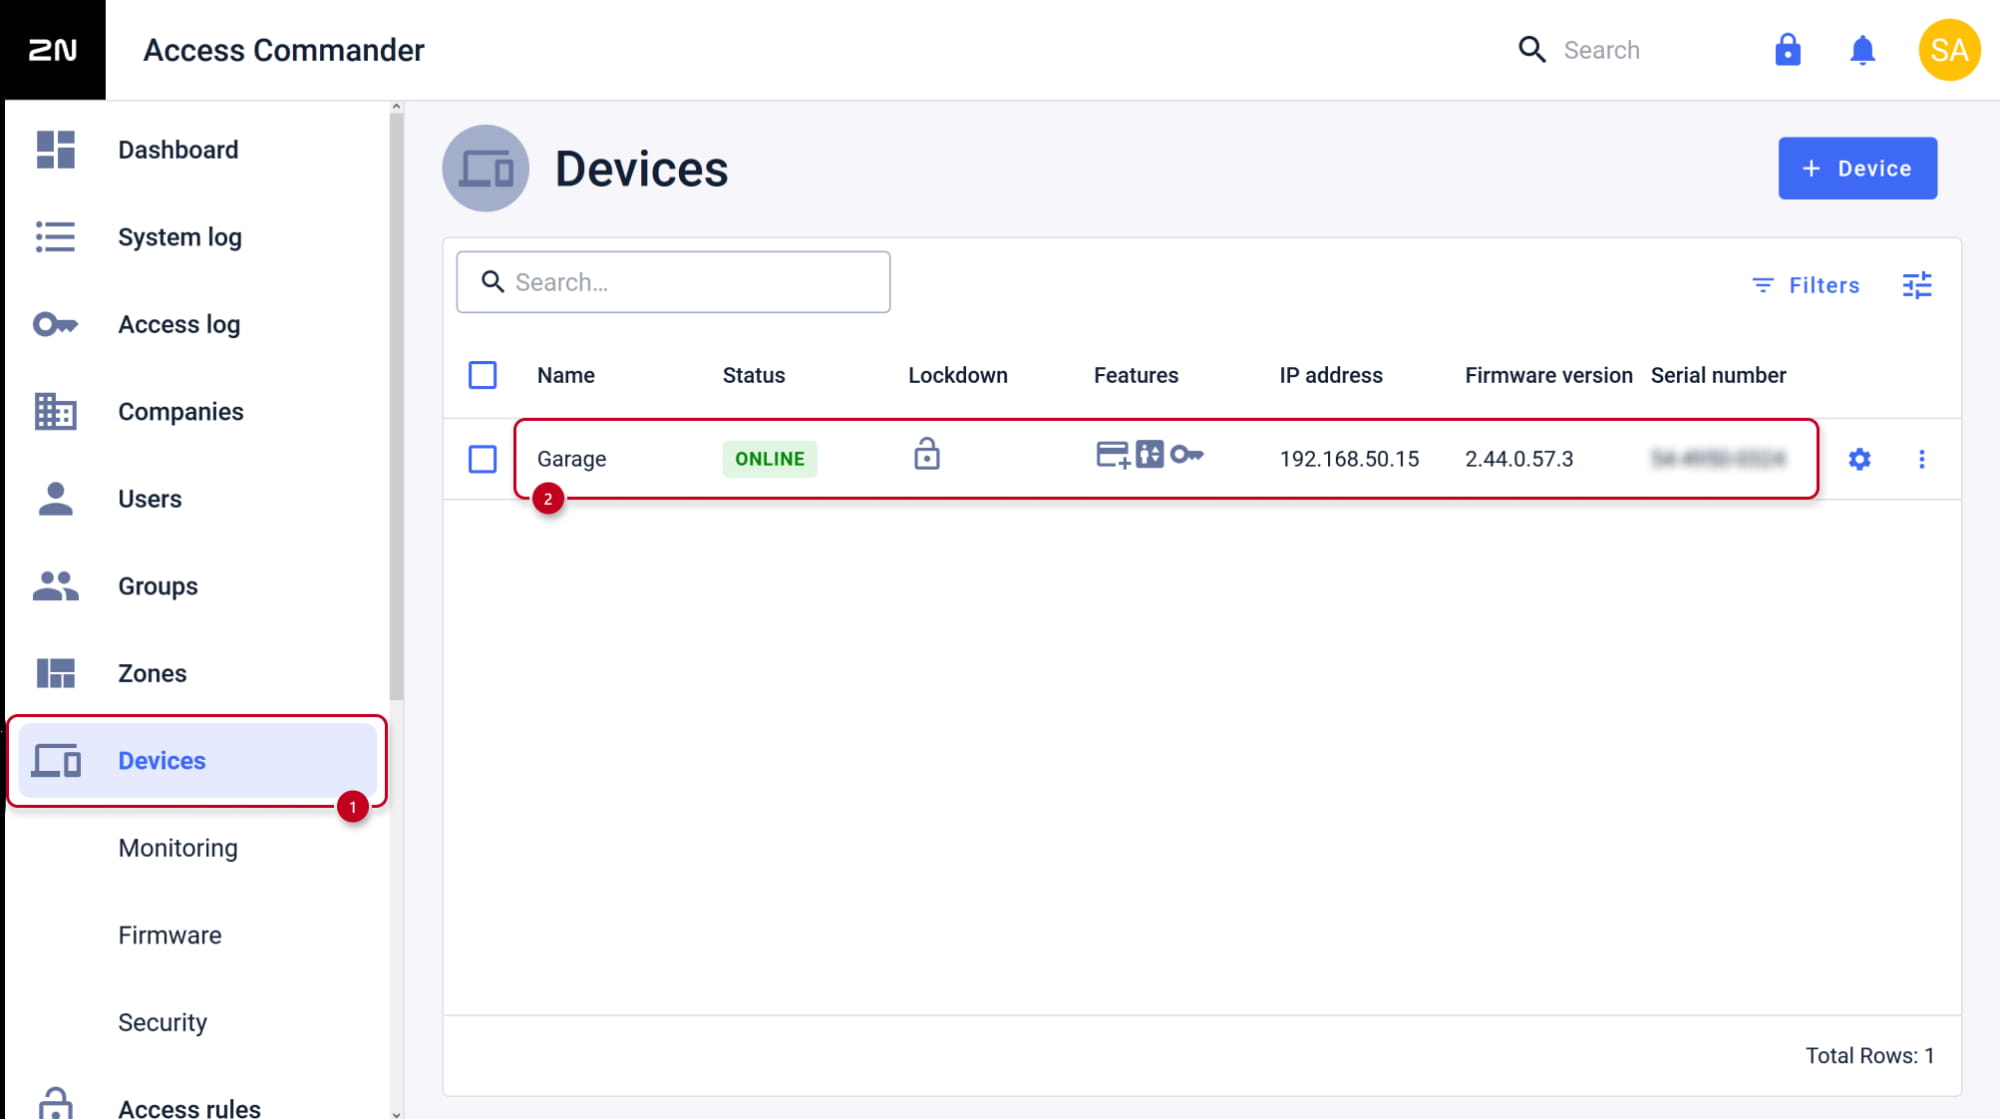
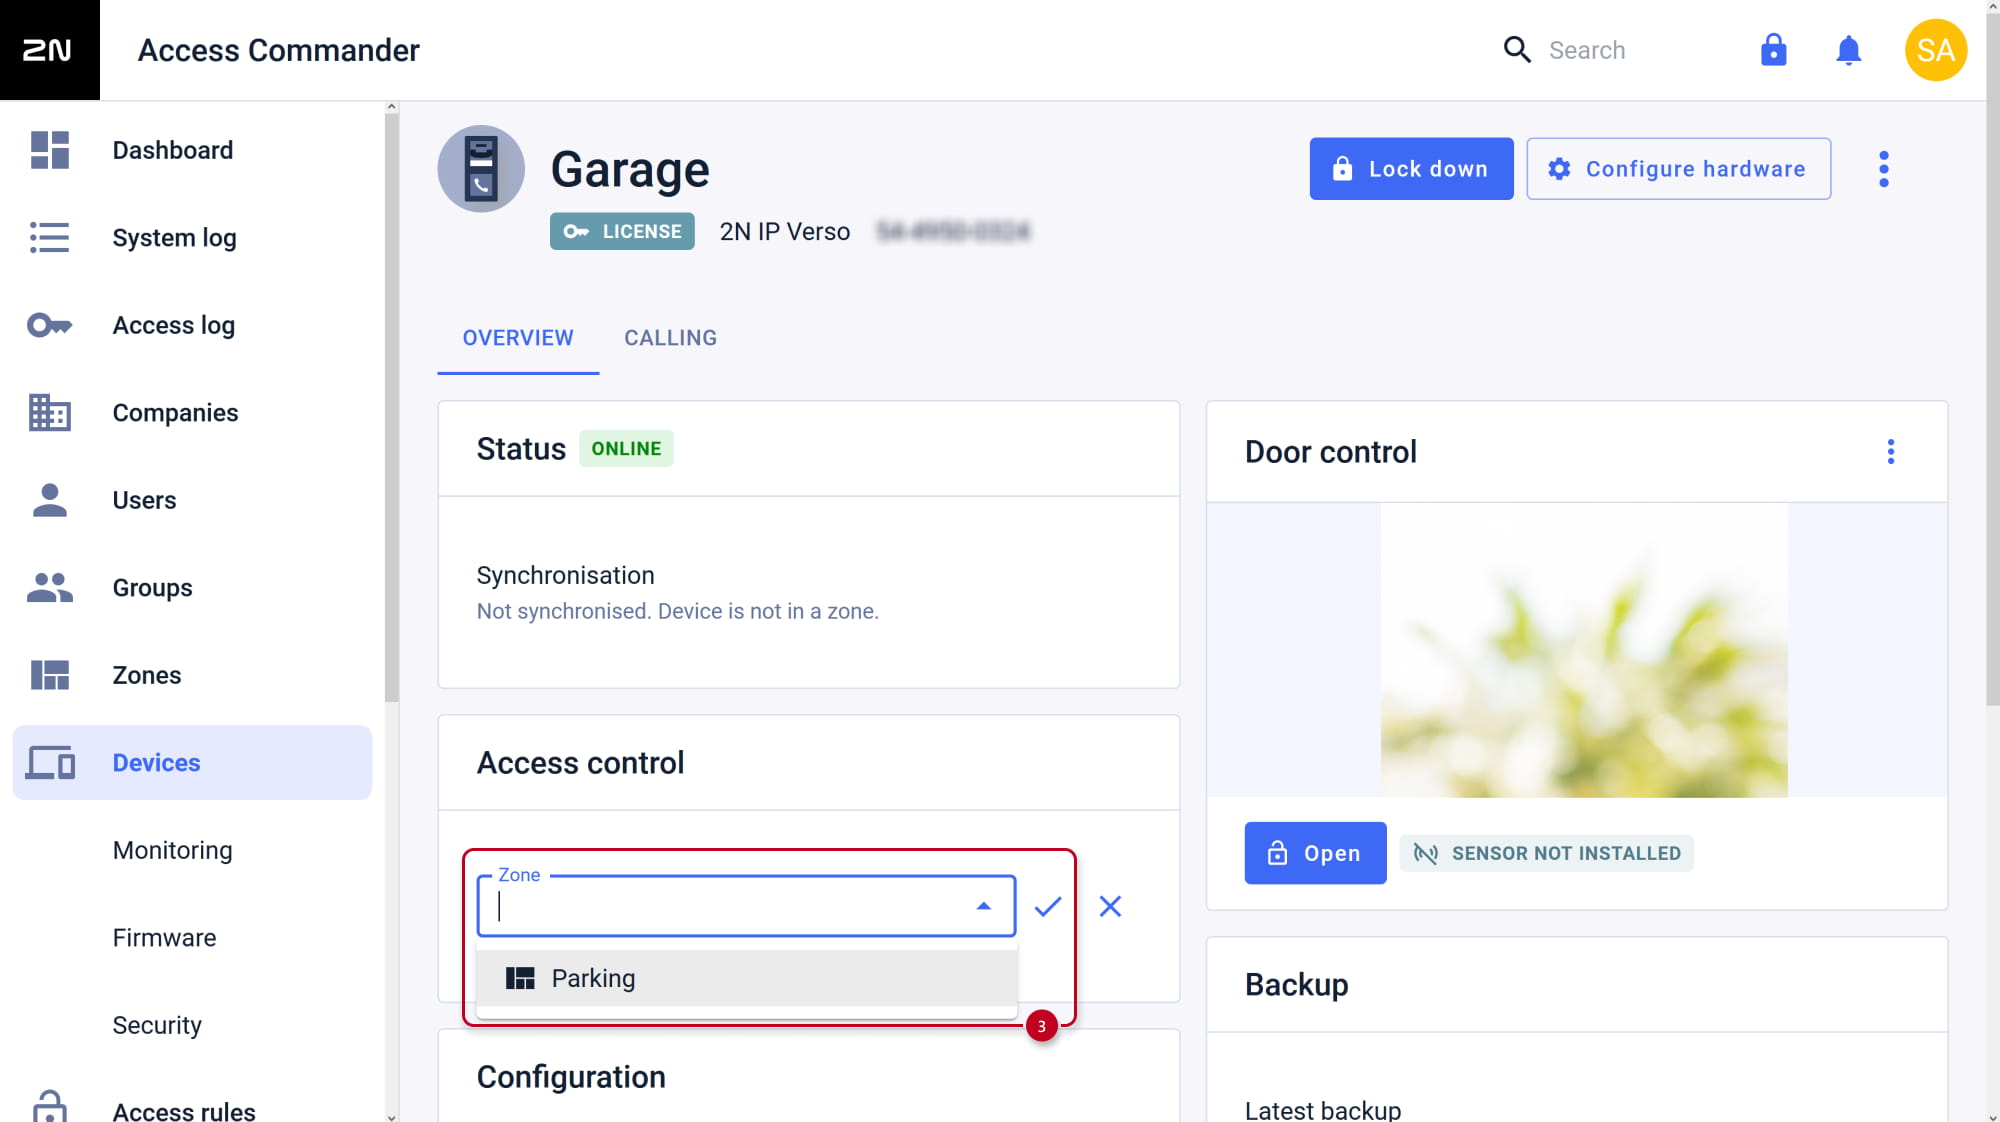
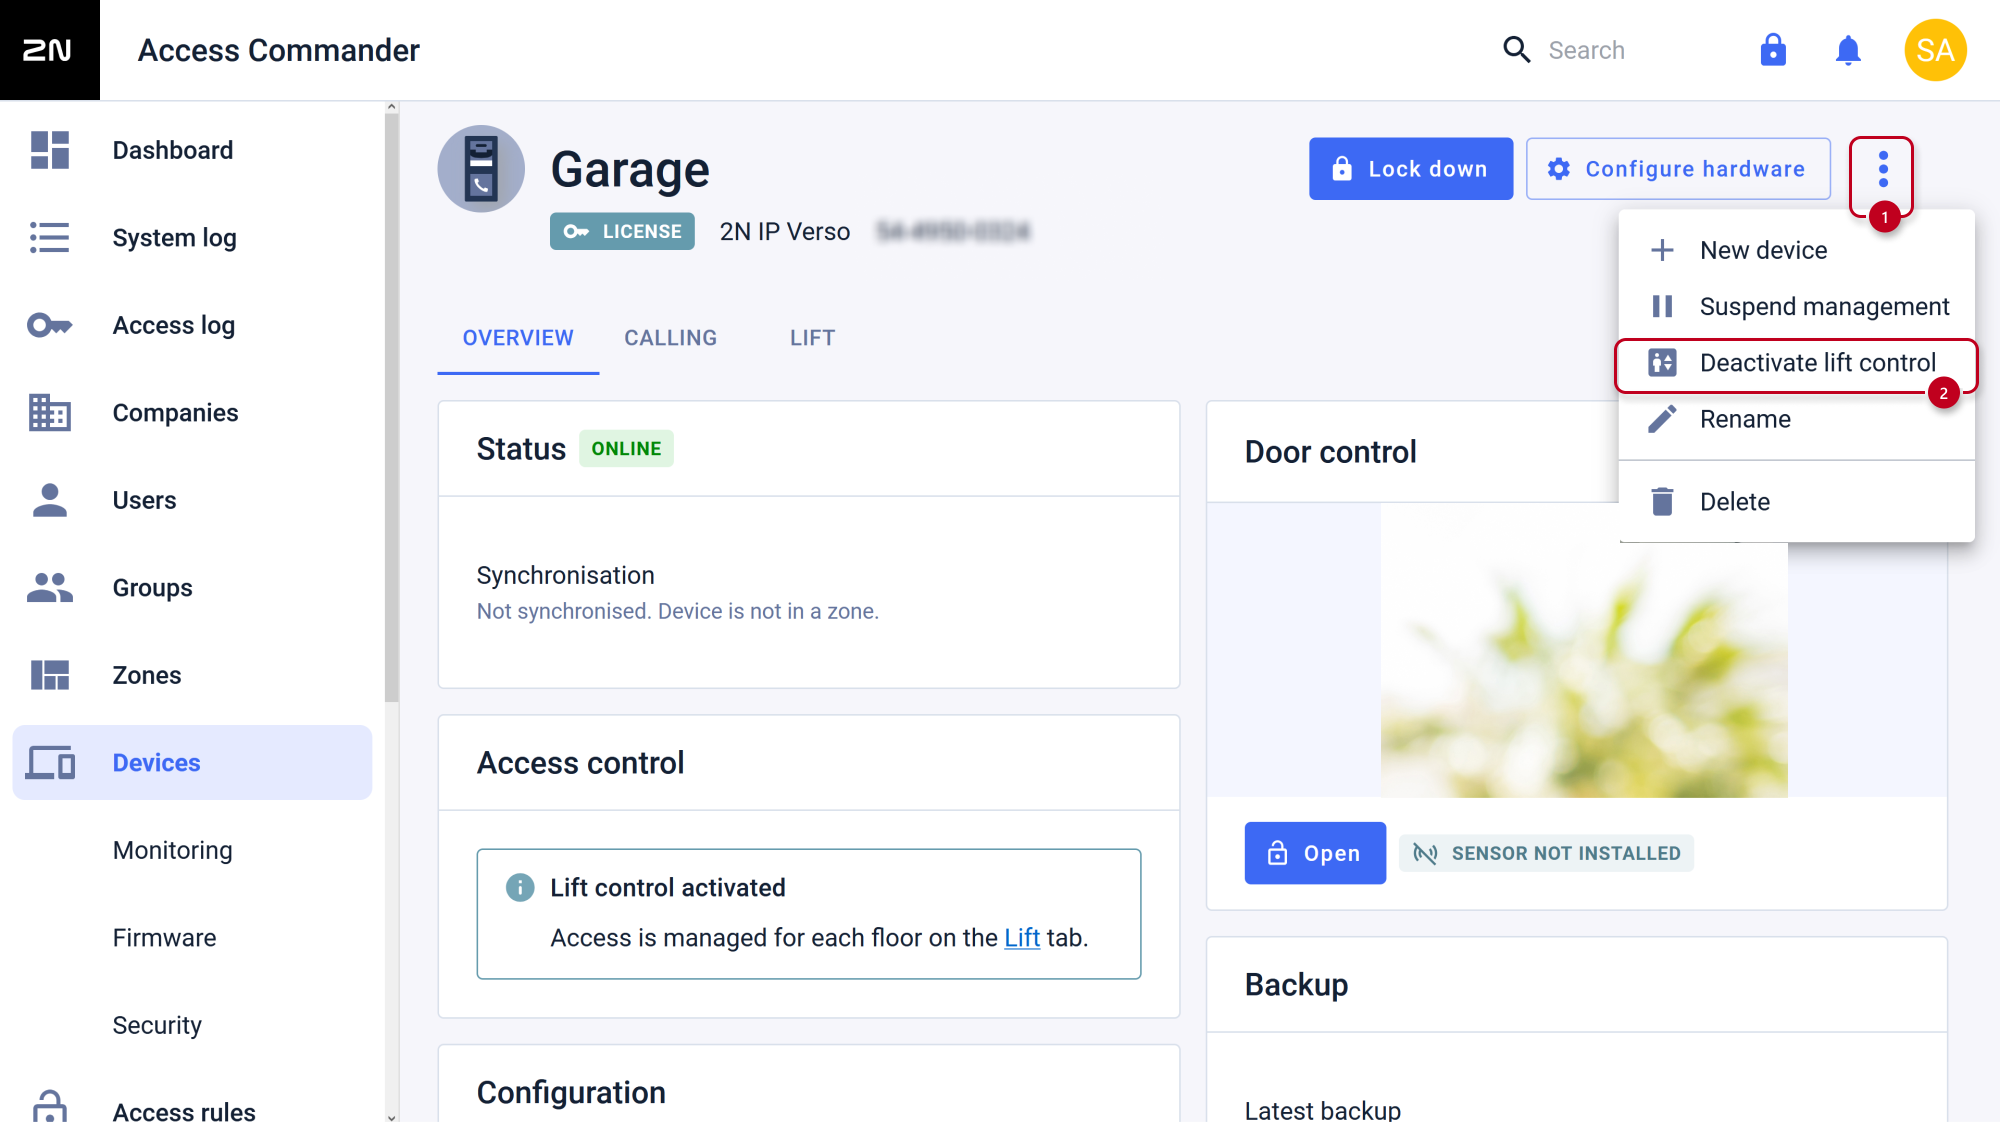
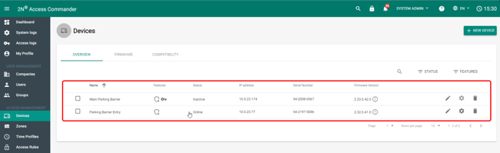
- Go to Devices section.
- Open details of the device you already prepared for LPR.
-
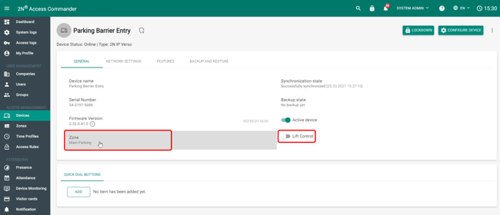
- Assign the device to the proper zone.
-
- If you see there "Lift control activated" message, please deactivate this feature first.

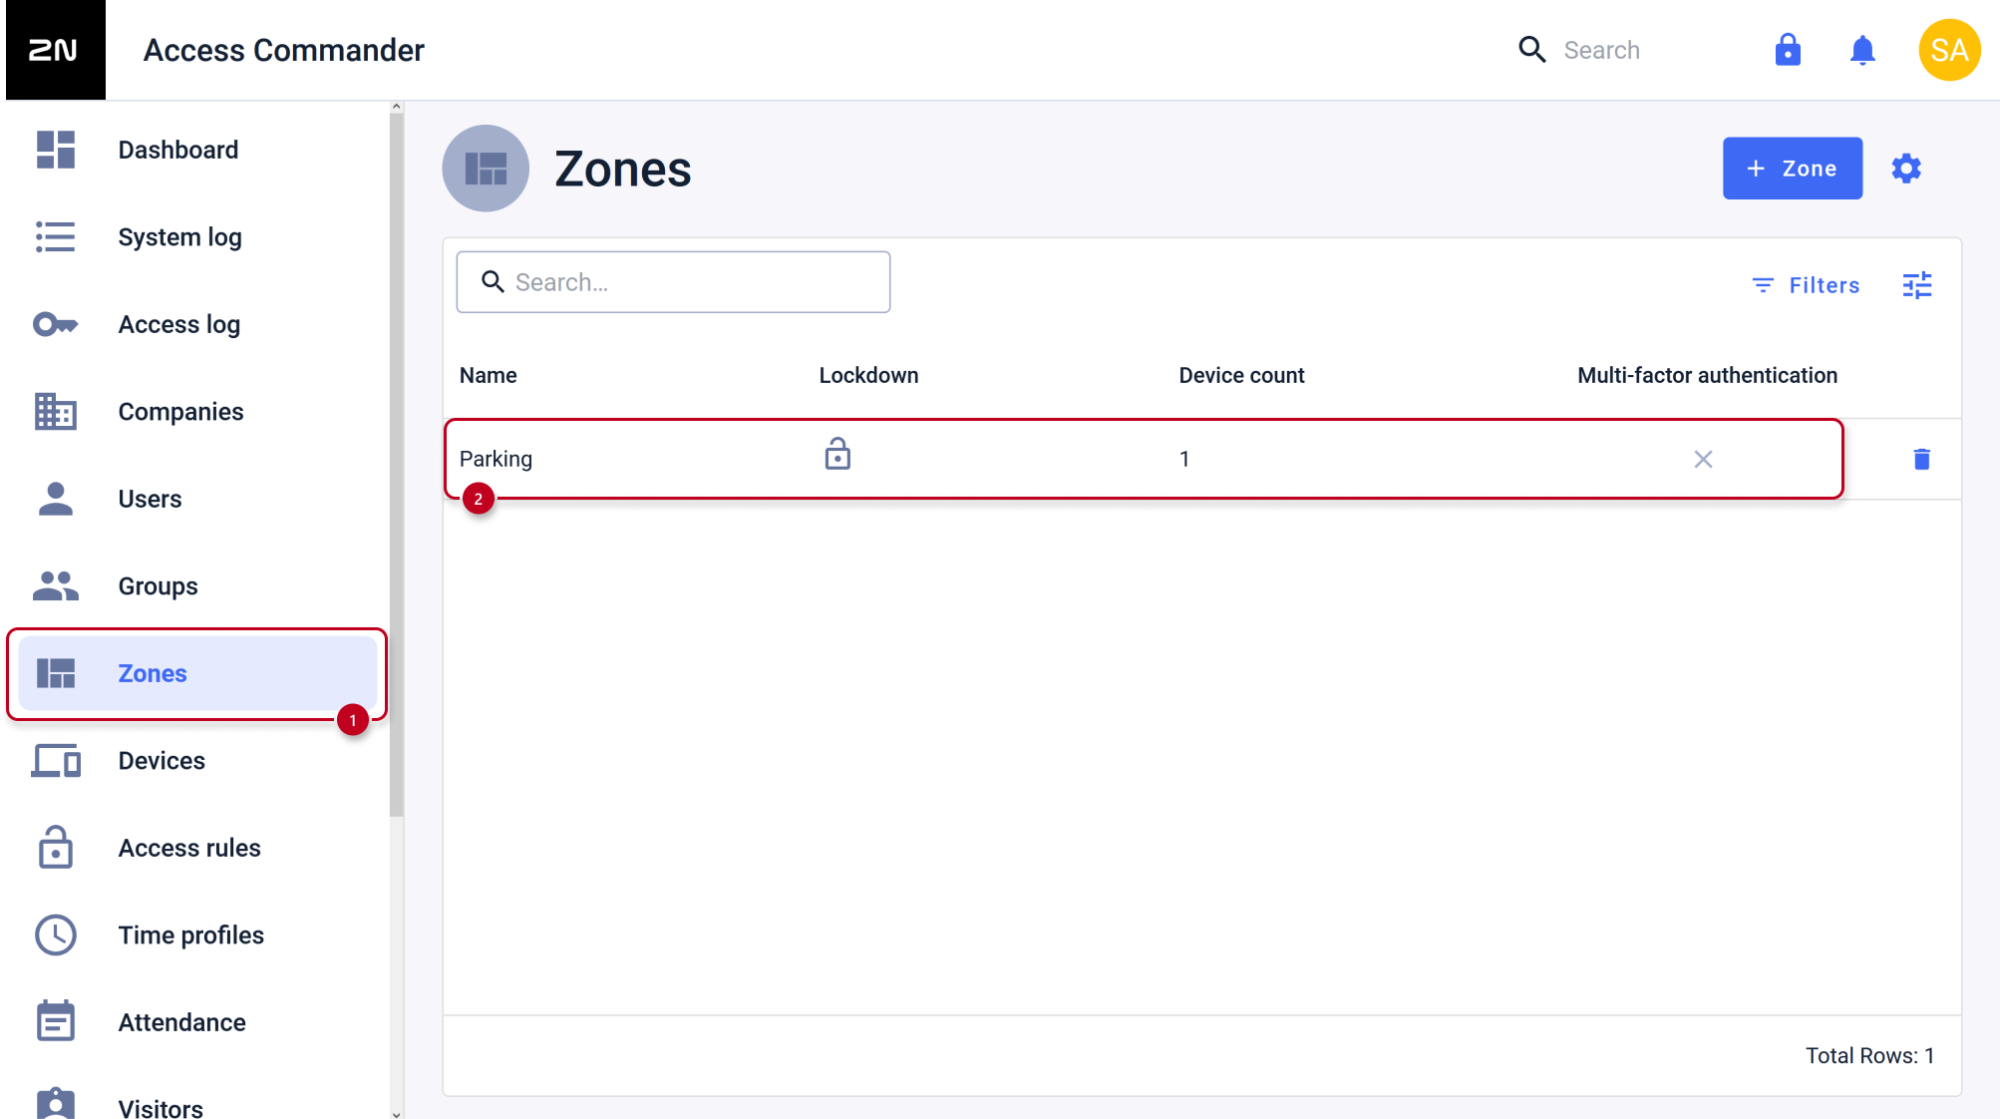
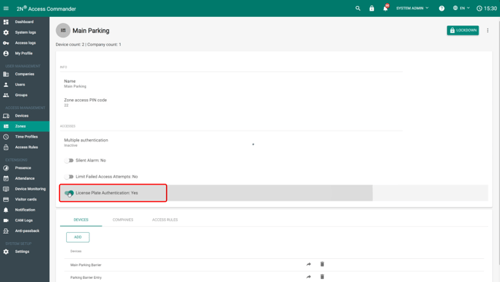
- Go to Zones section.
- Open used zone details.
- Open used zone details.
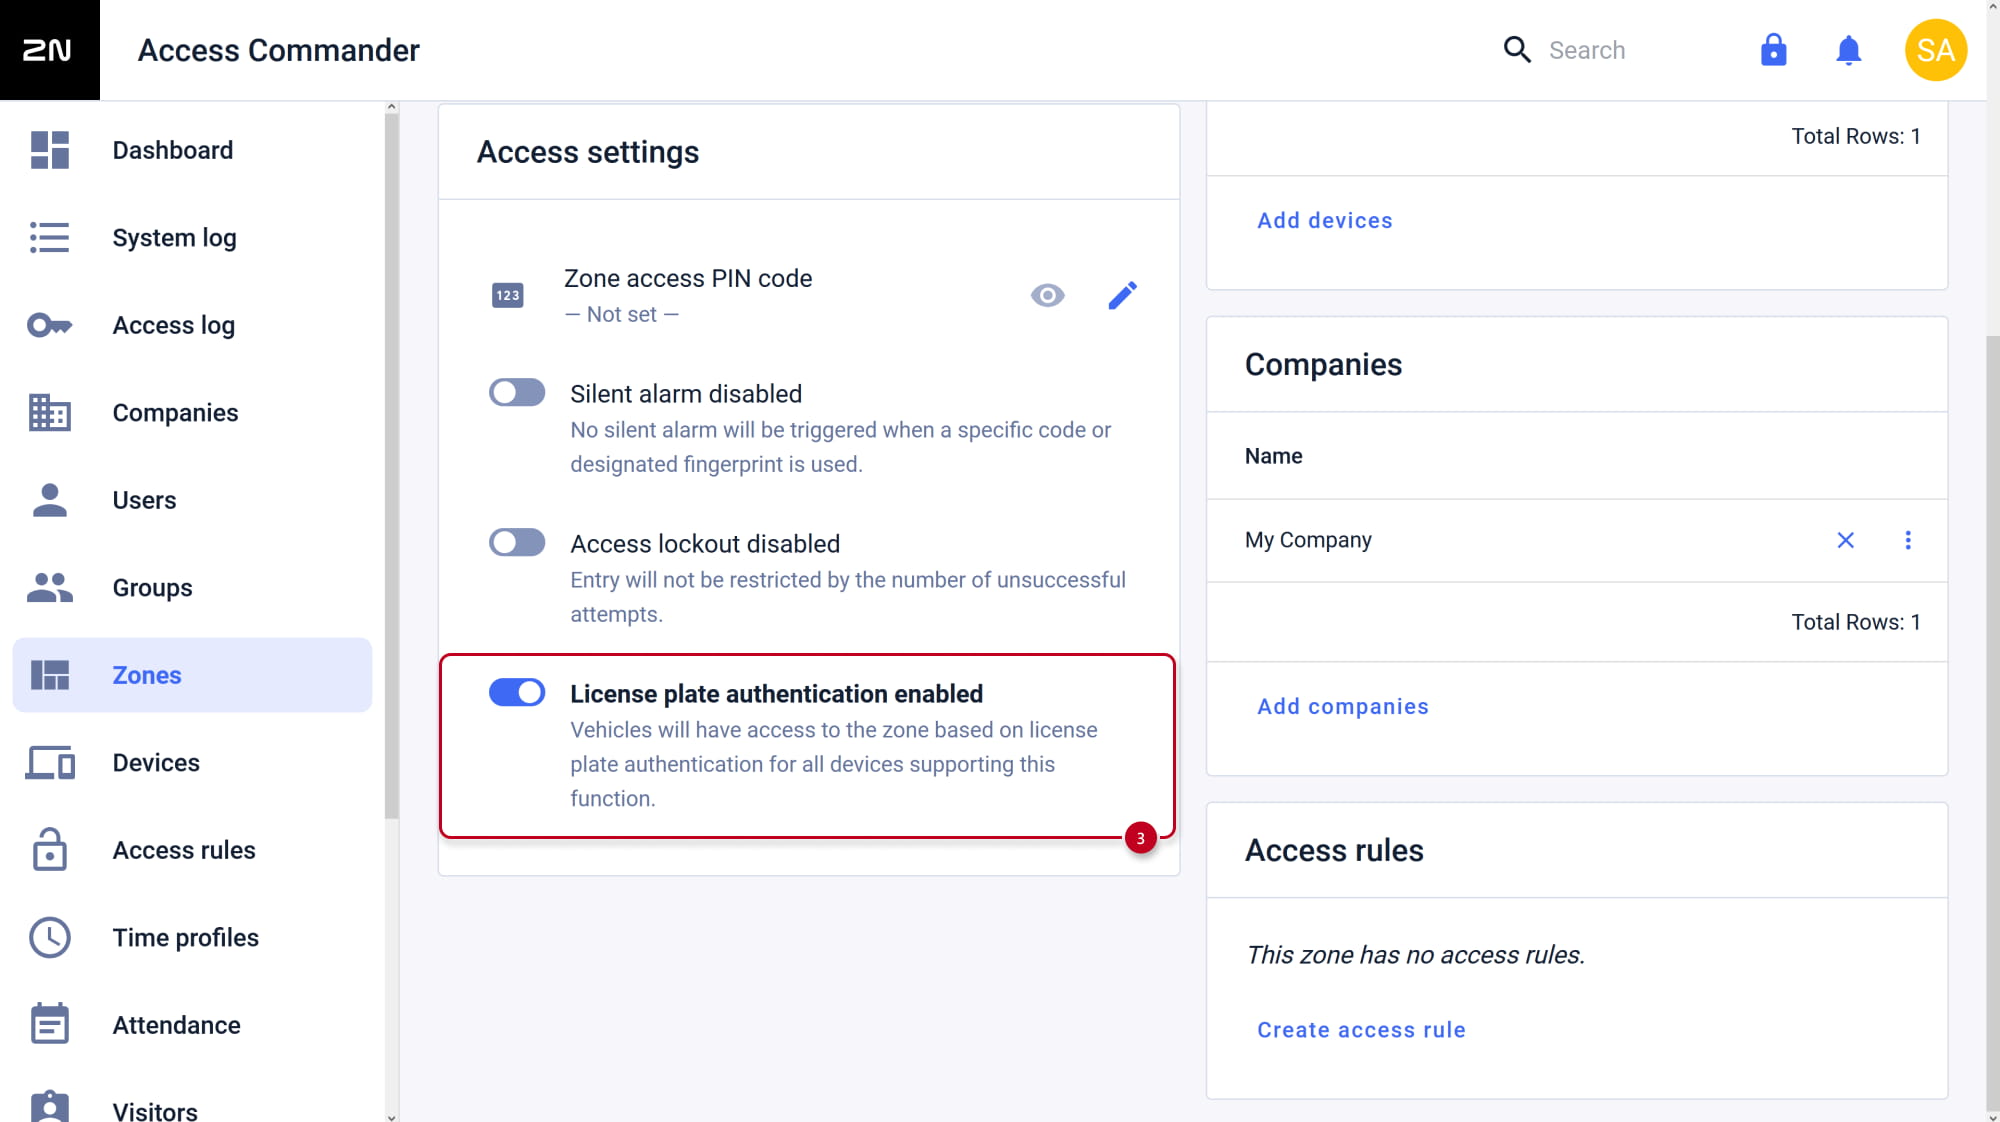
-
- Enable License Plate Authentication.
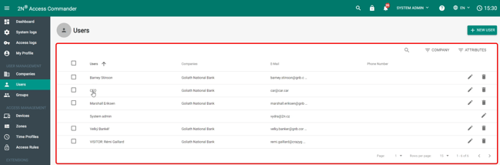
- Go to Users section.
- Assign one ore more license plates to the user.
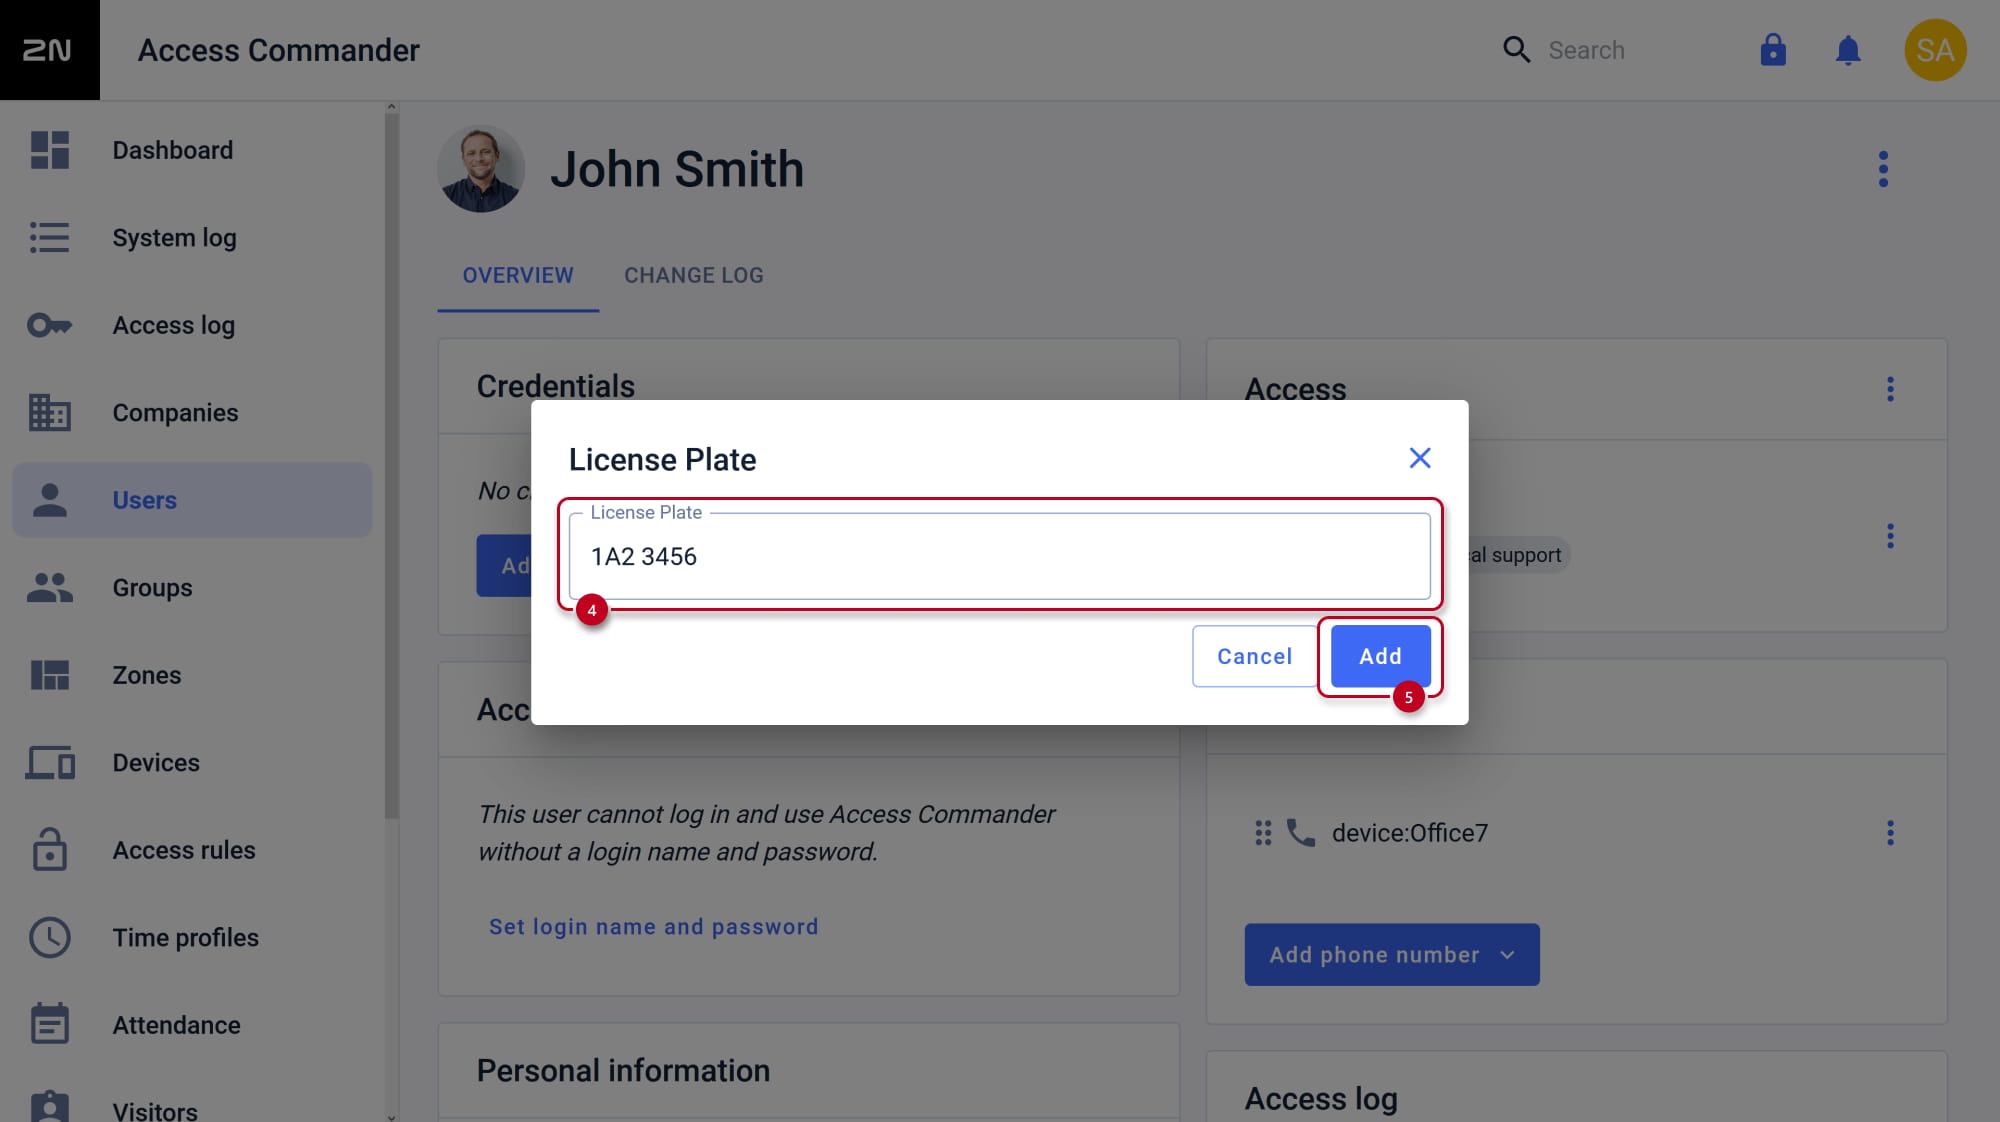
-
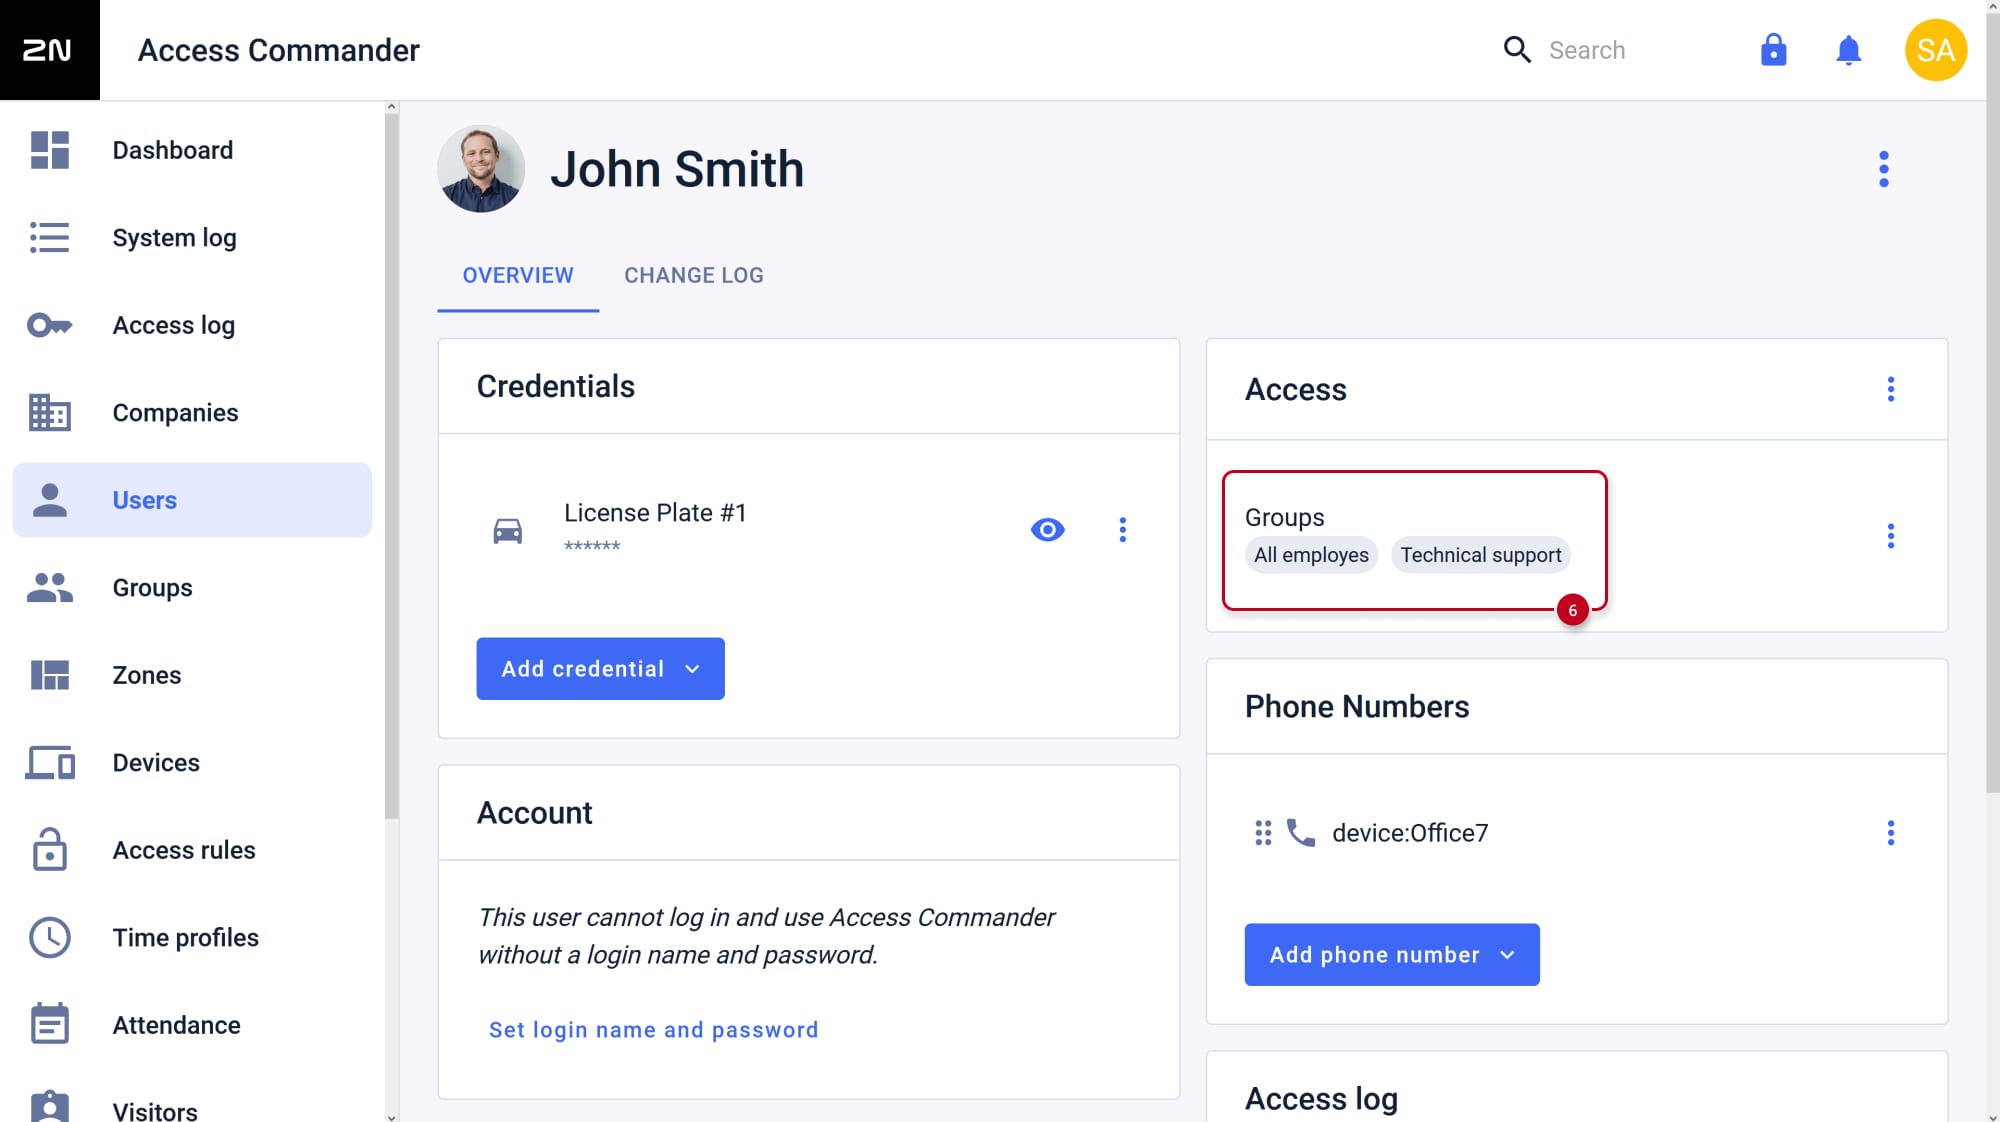
- Verify that this user is assigned to the correct group.
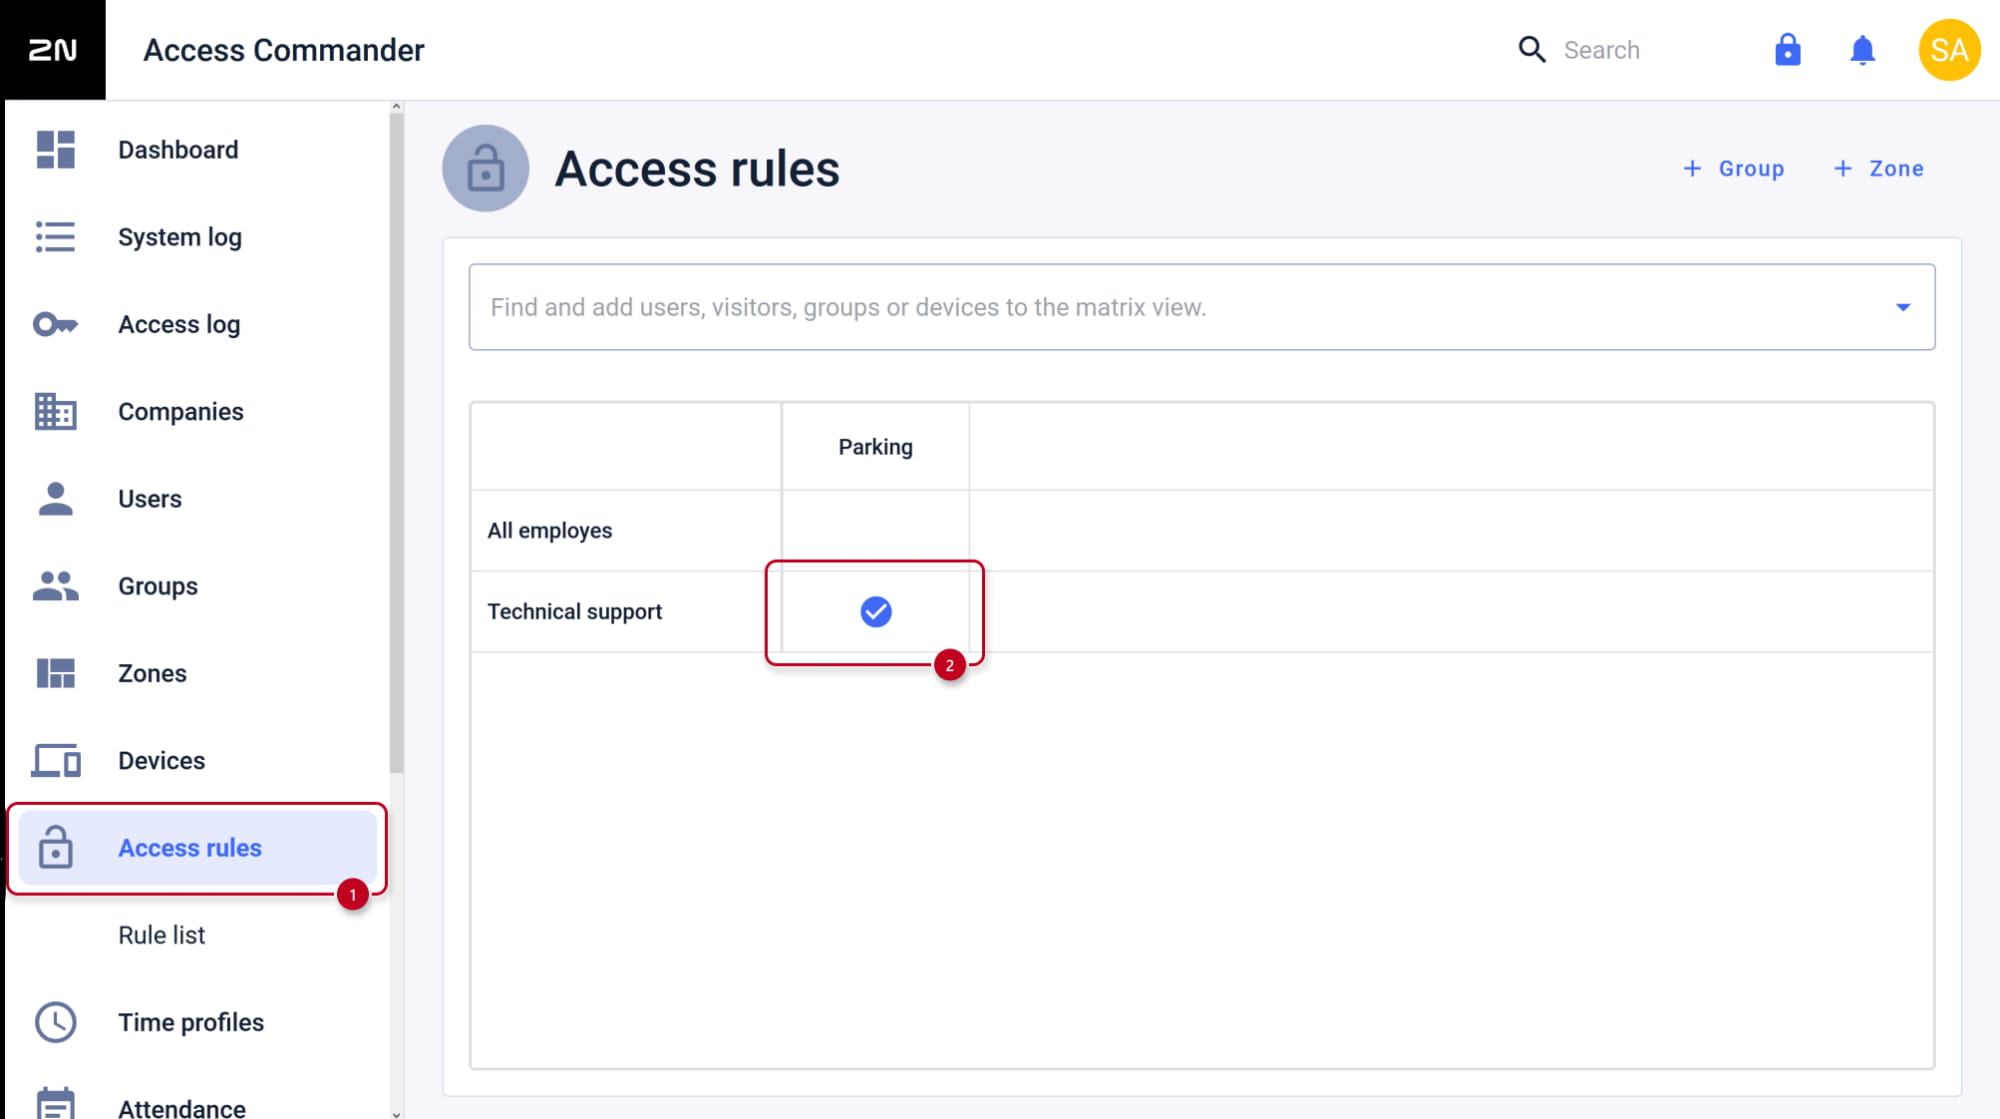
- Go to Access rules section.
- Create an access rule matching the target group and zone.
- Create an access rule matching the target group and zone.
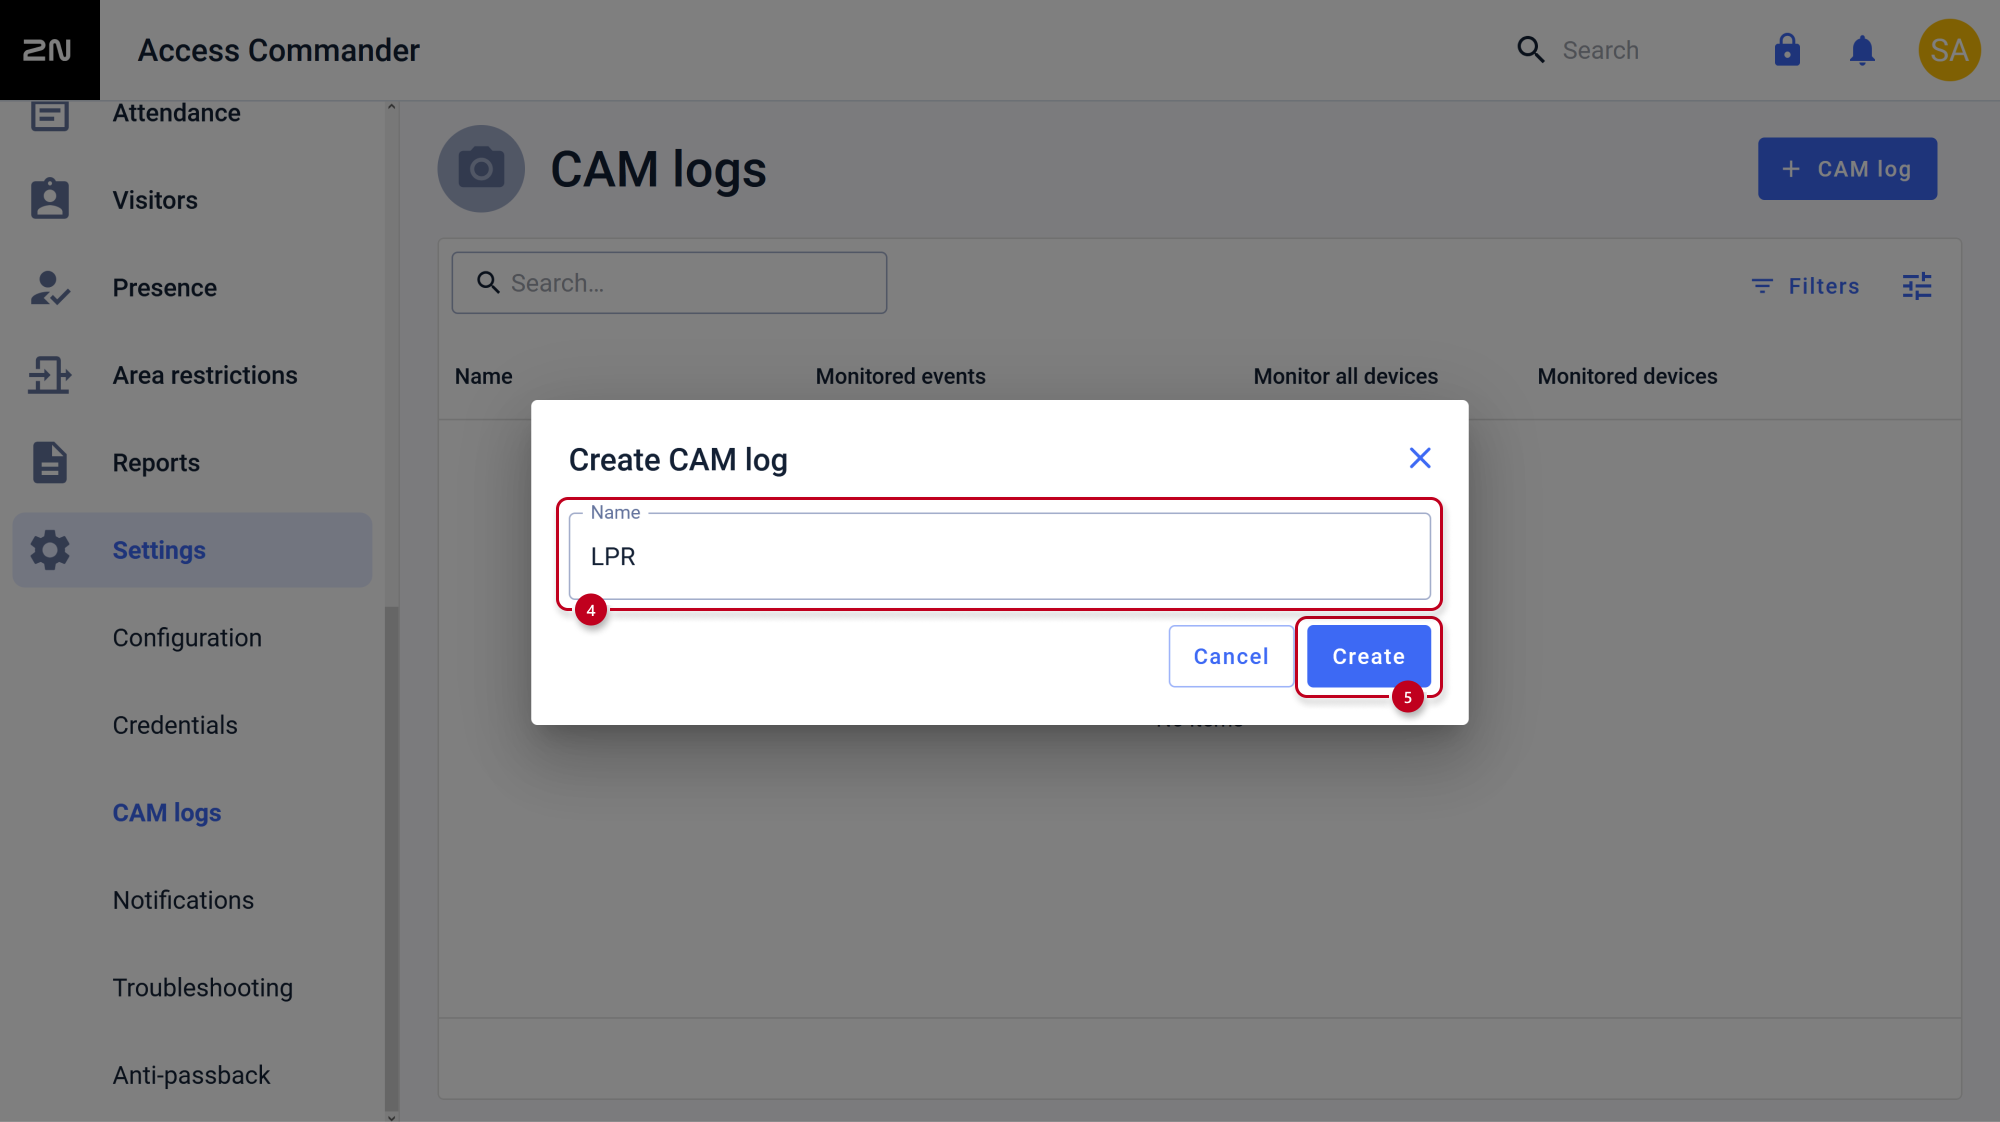
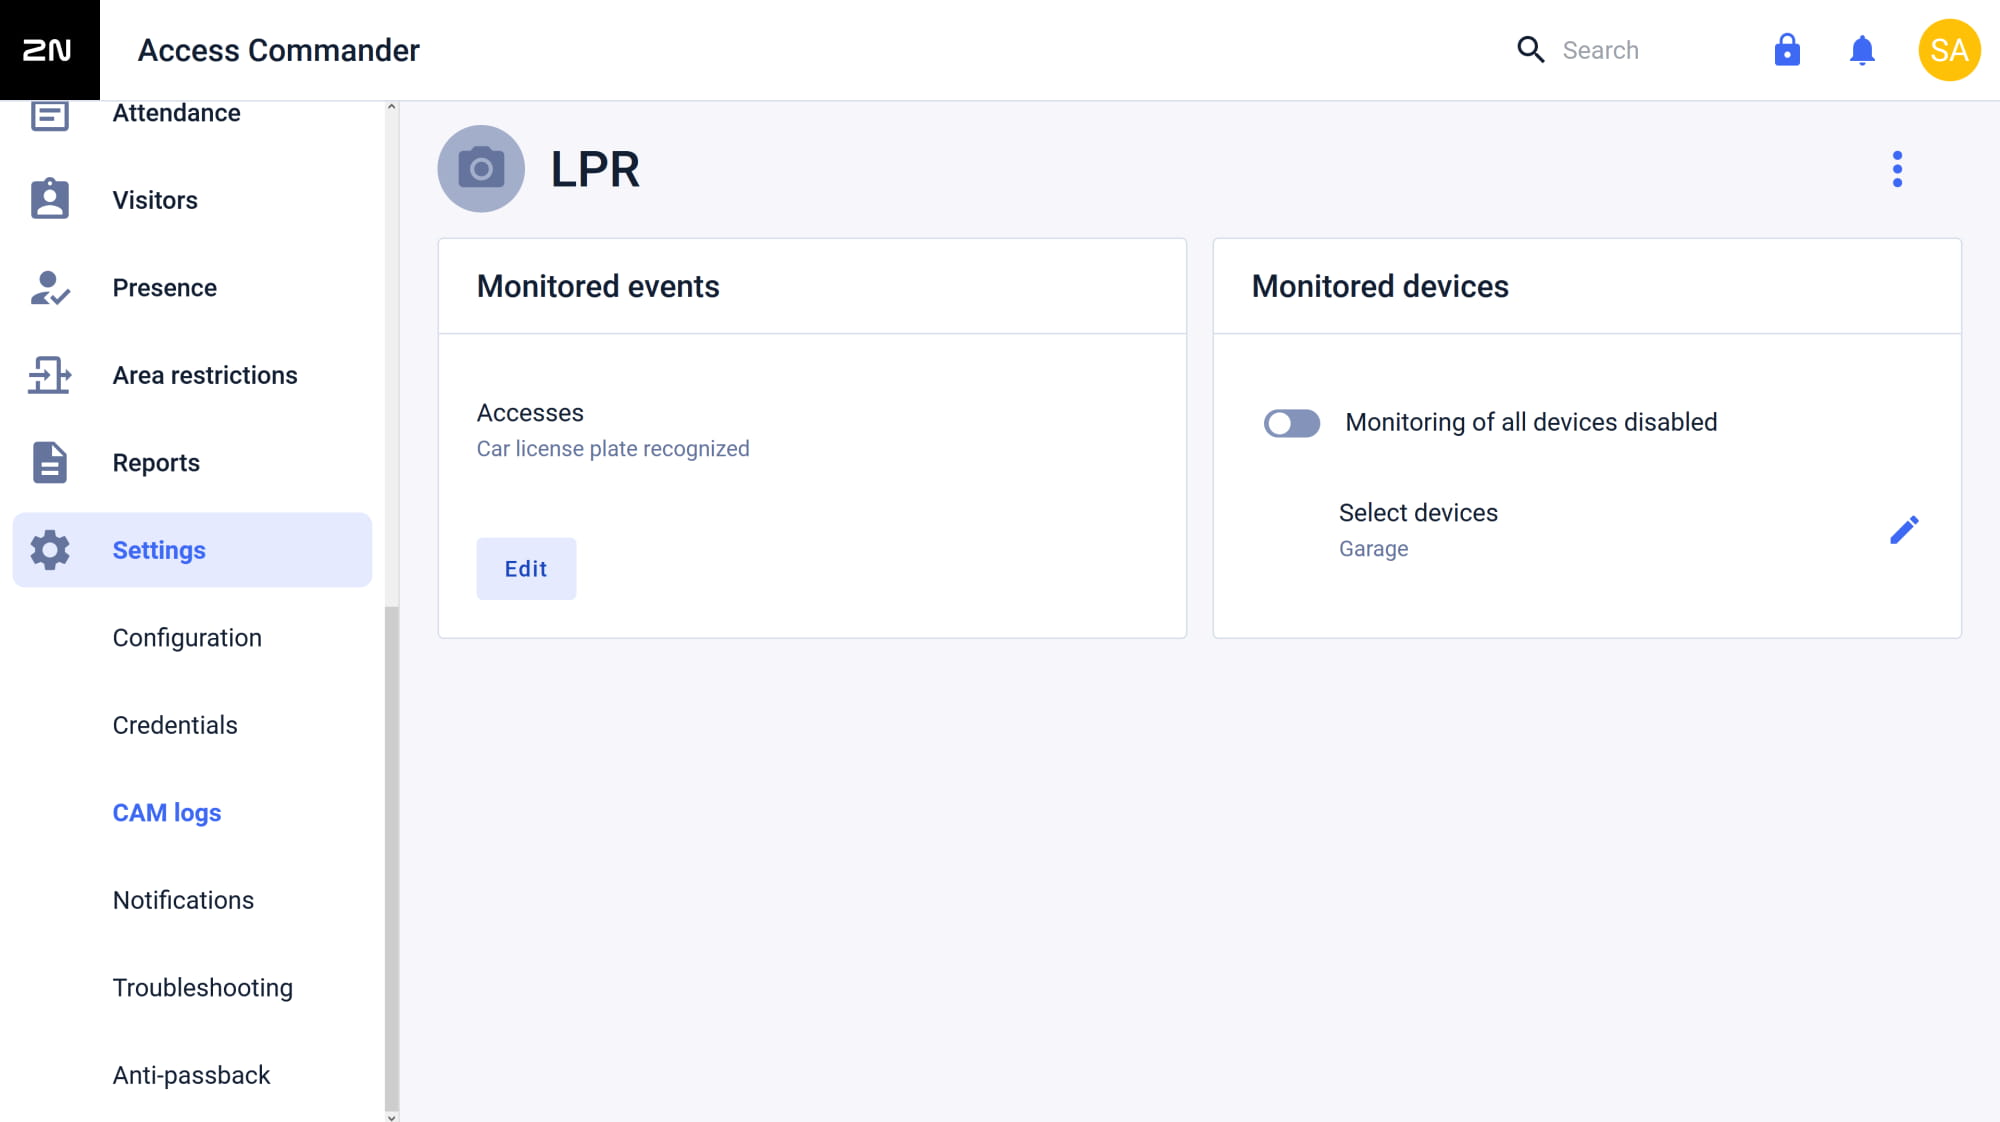
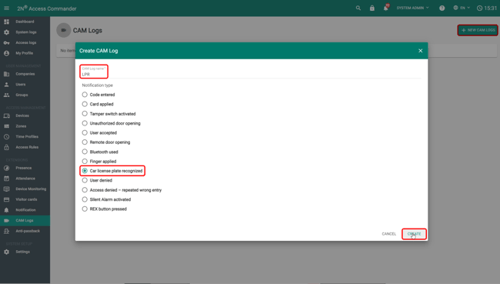
- Go to Settings - CAM logs section.
Optionally, here you can configure getting photos of recognized license plates.- Create a new CAM log.
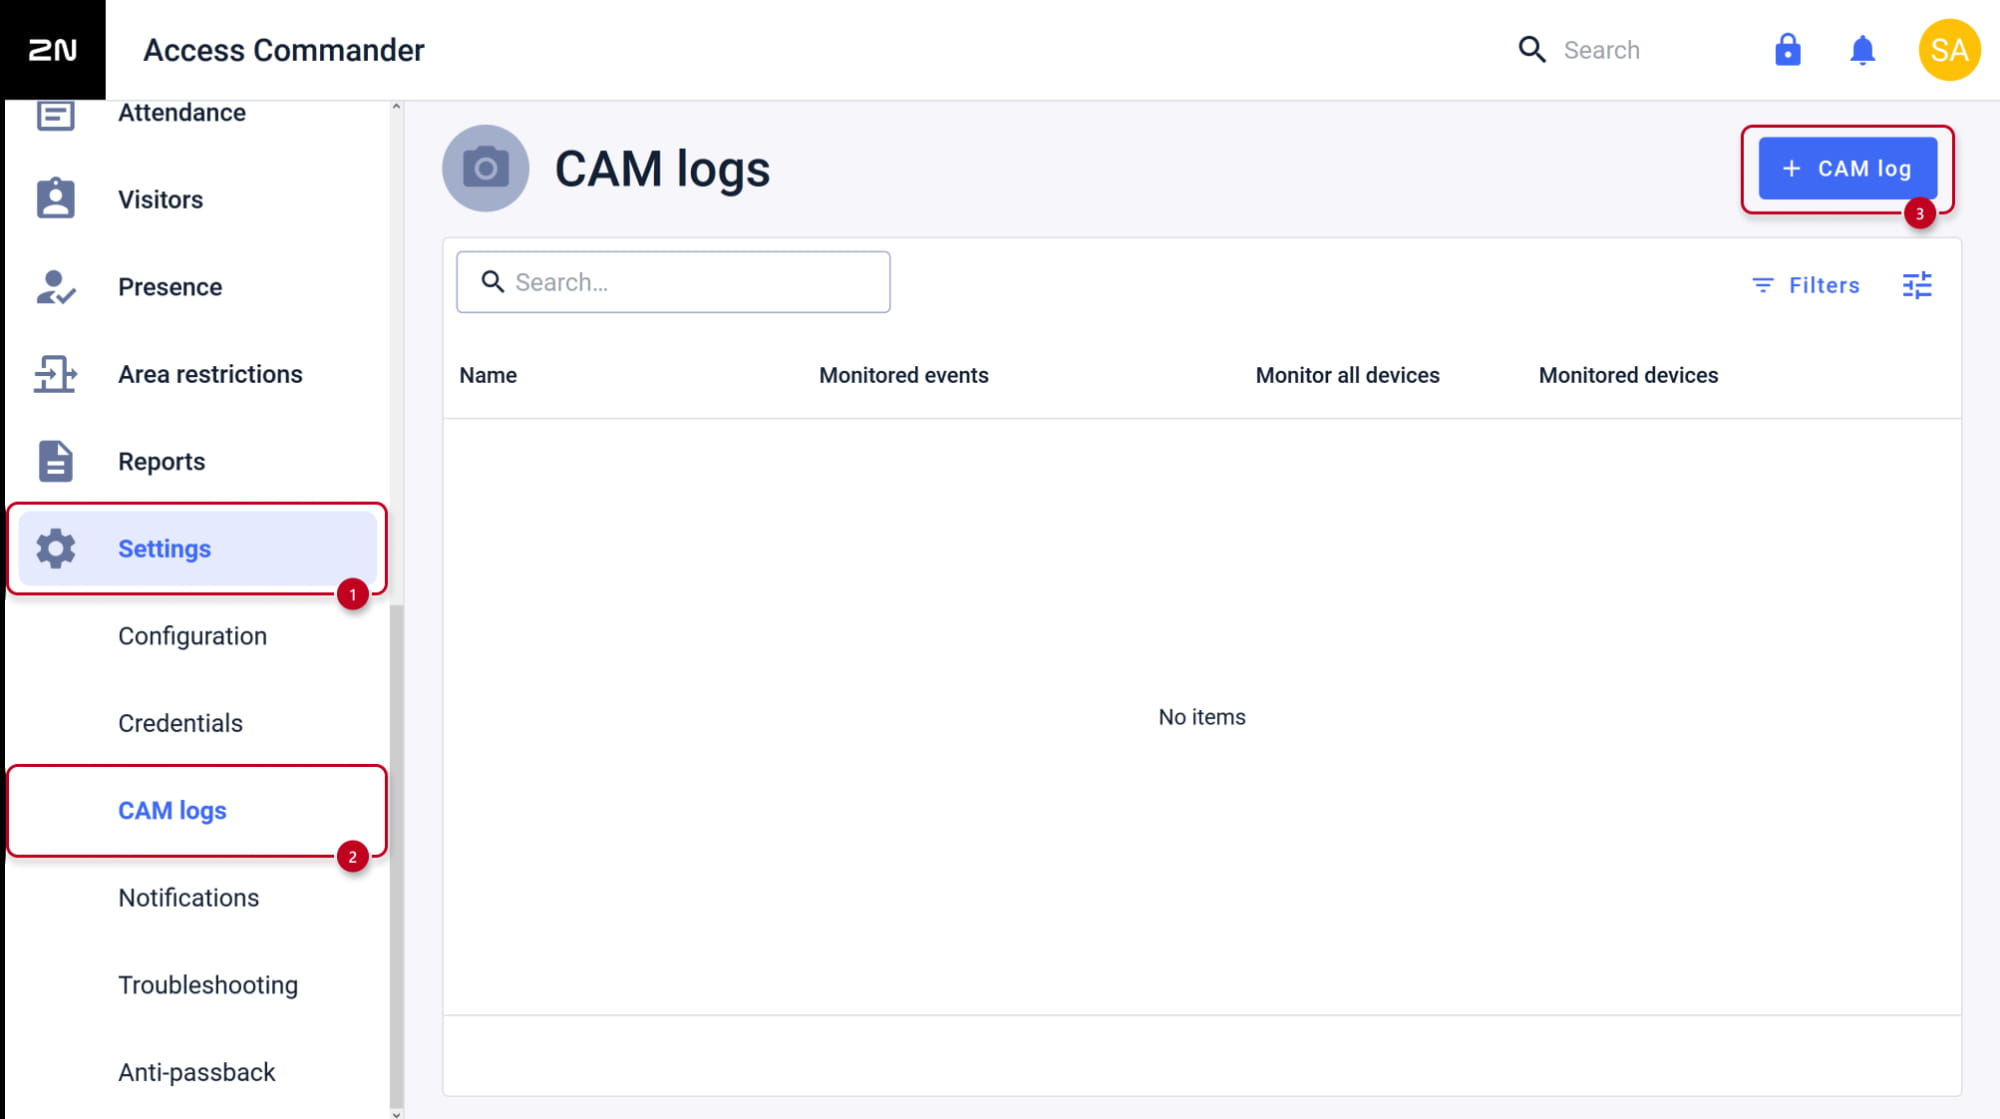
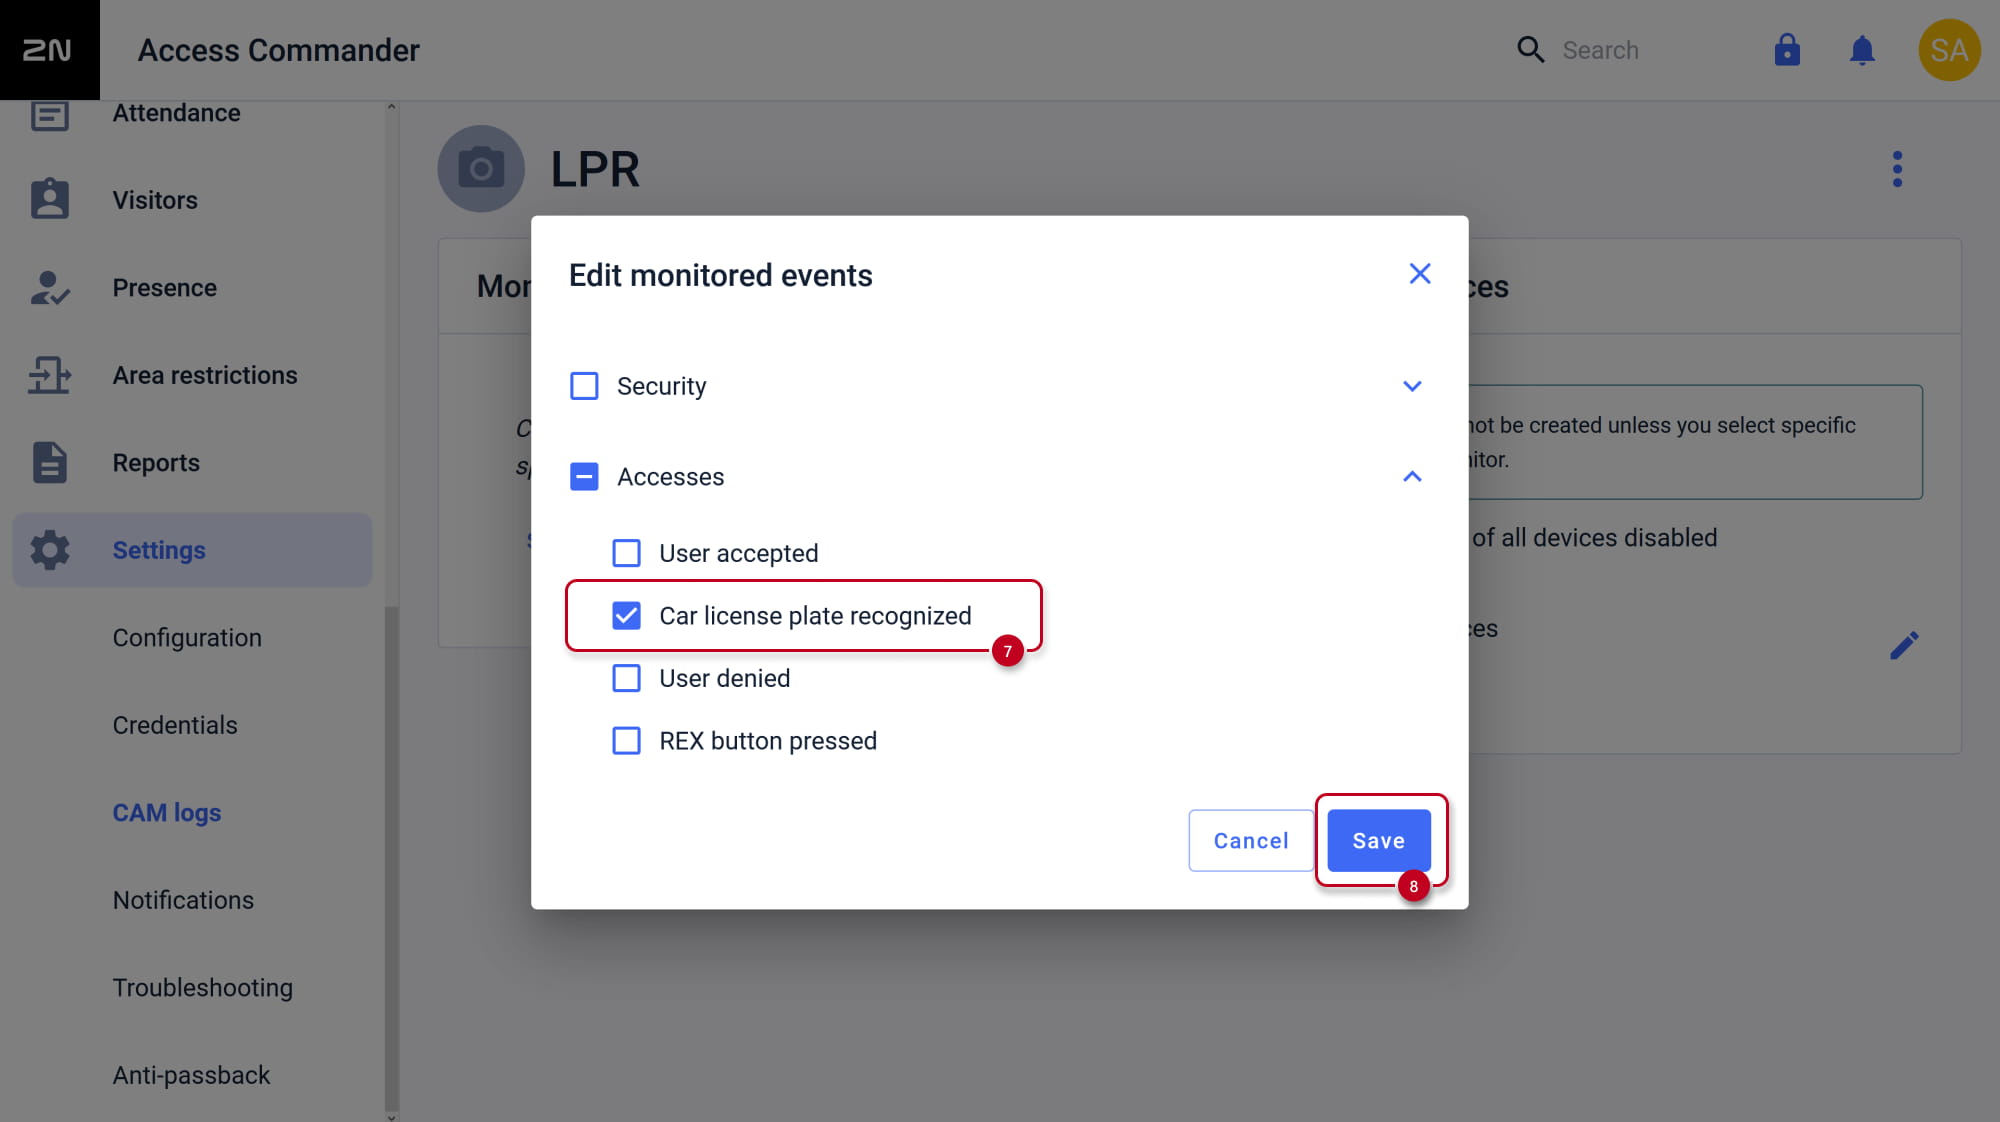
- Select the Car license plate recognized as monitored event.
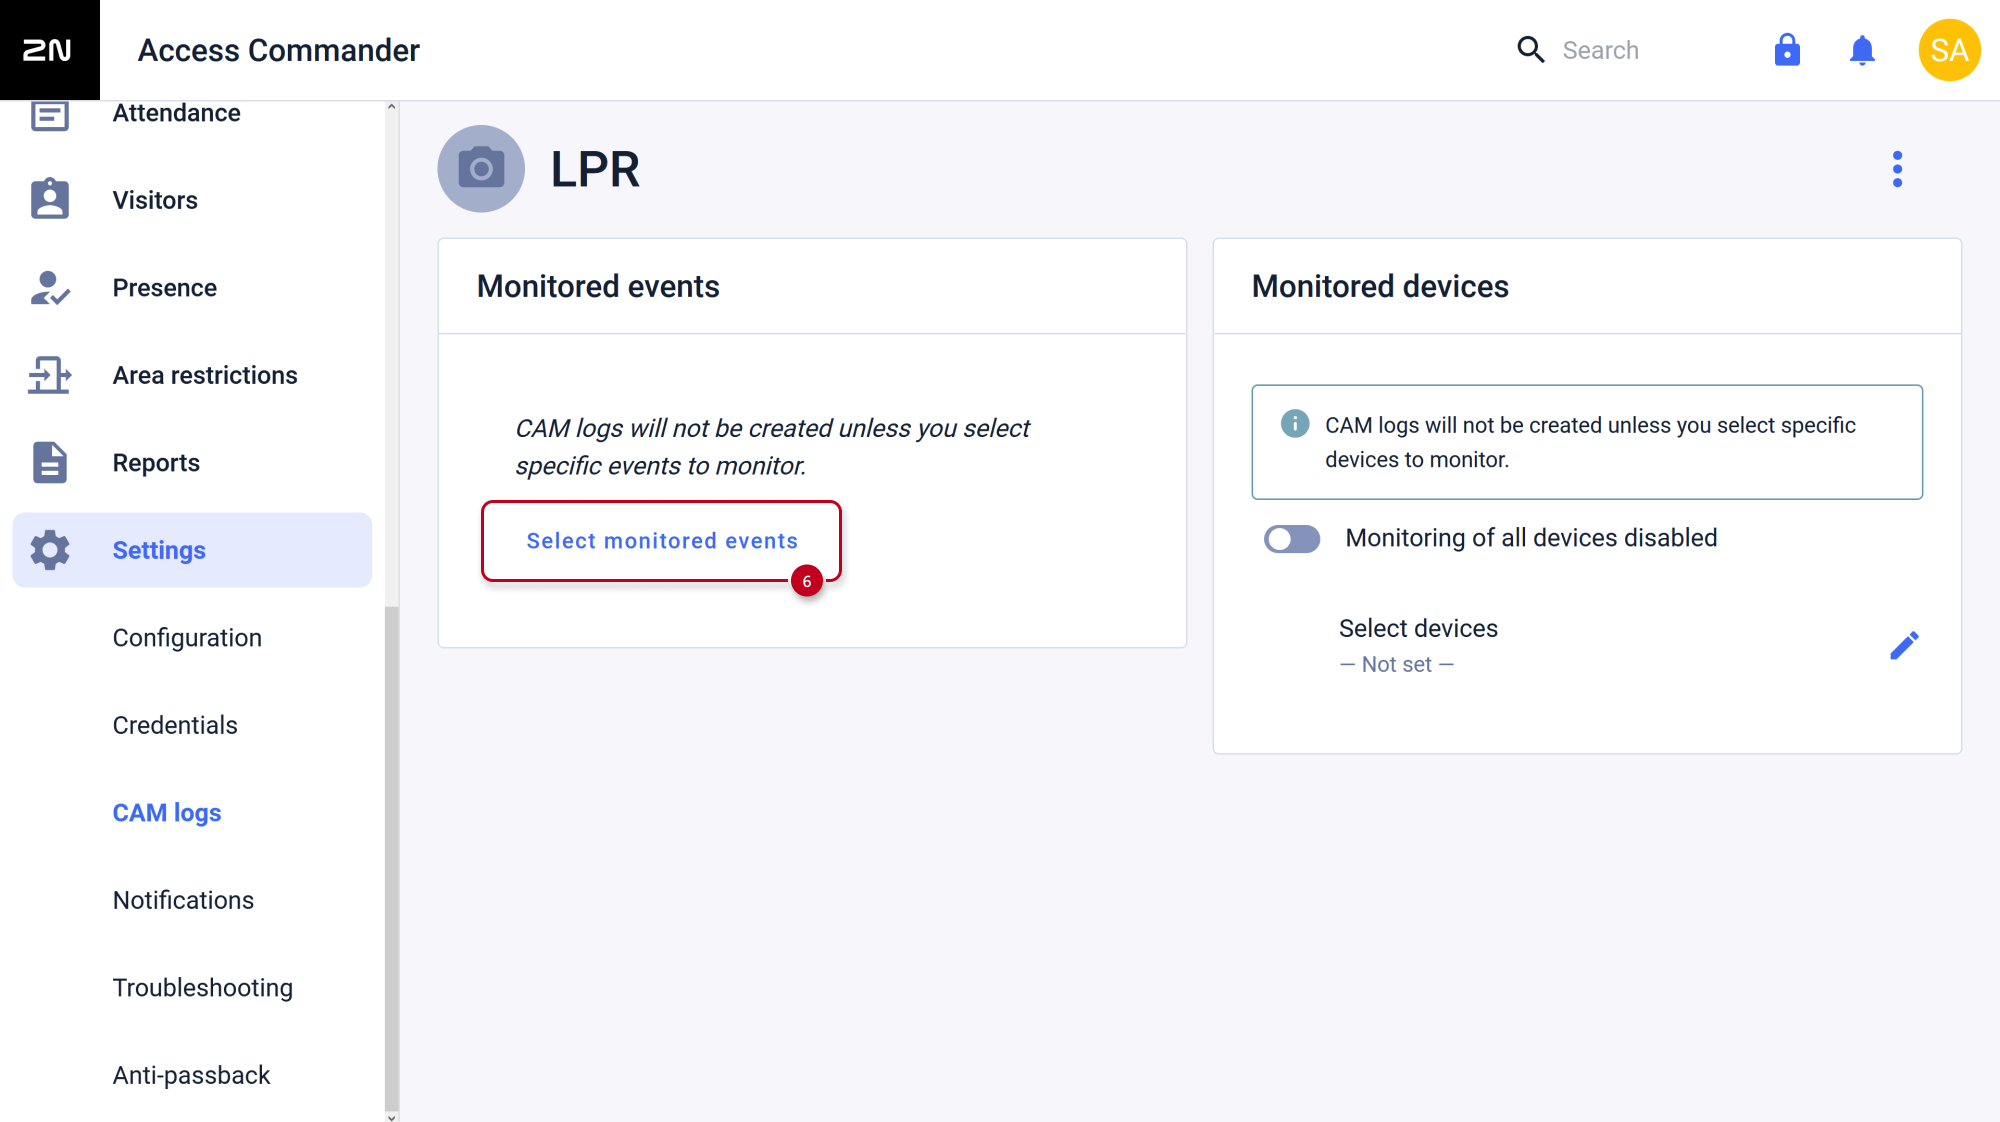
-
- Then select devices you want to receive photos from.
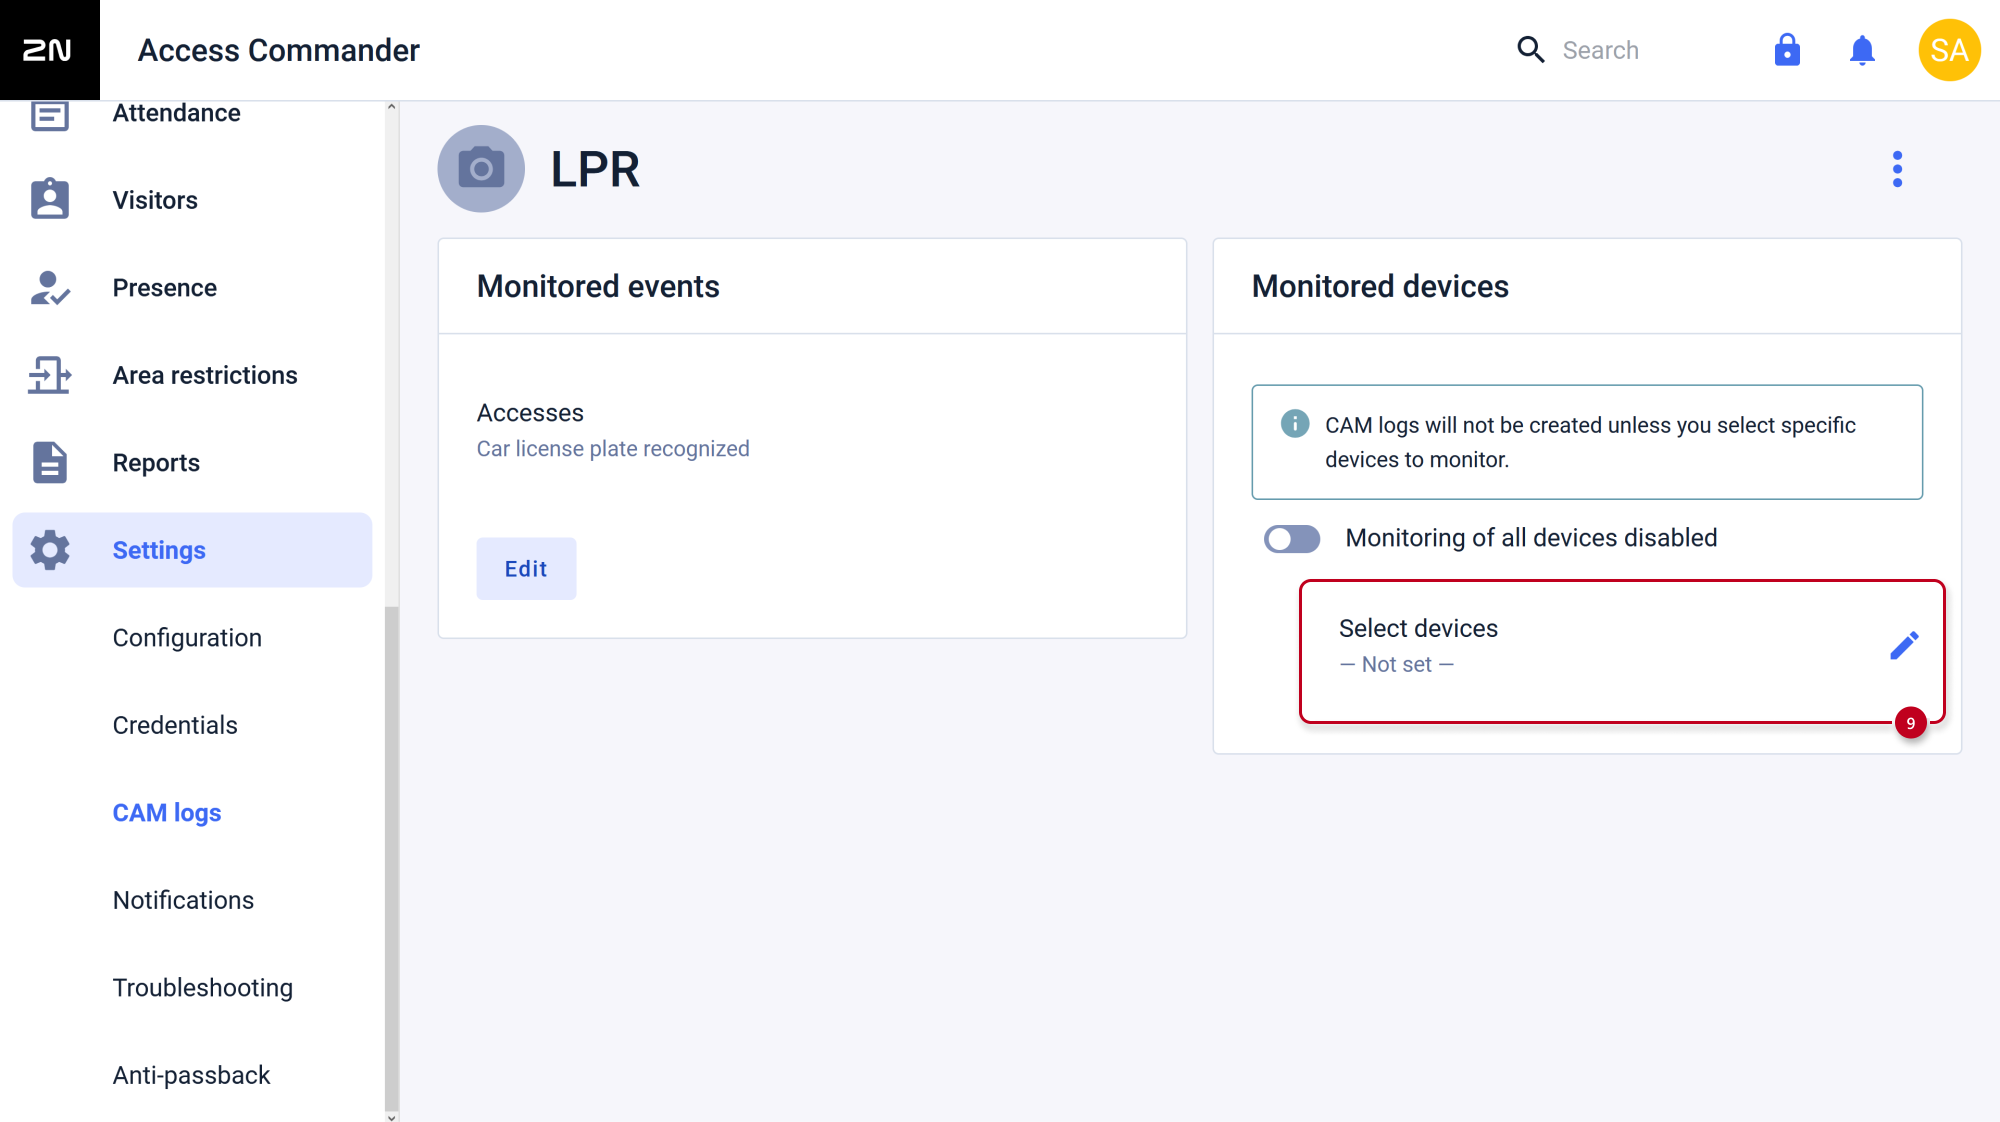
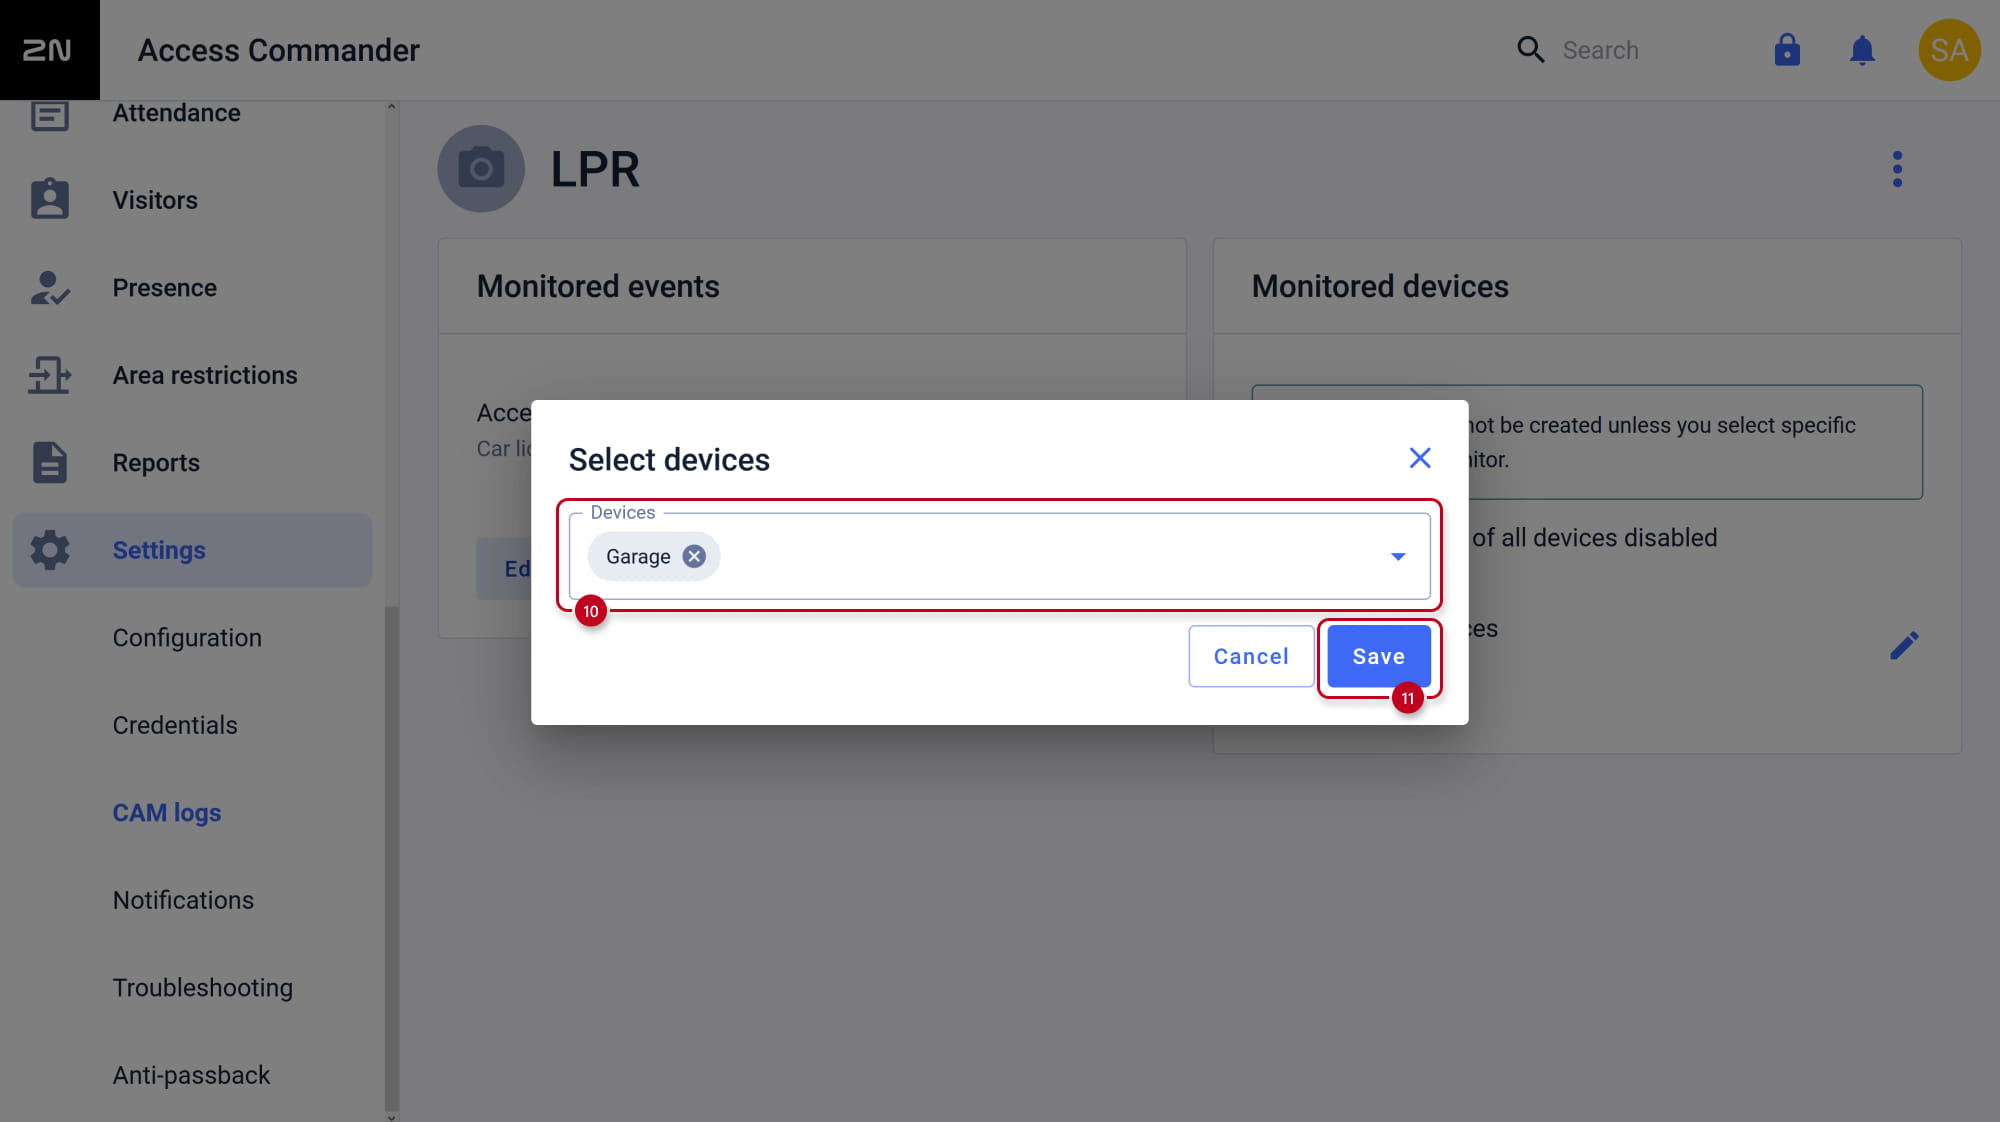
-
- The function is ready to use.
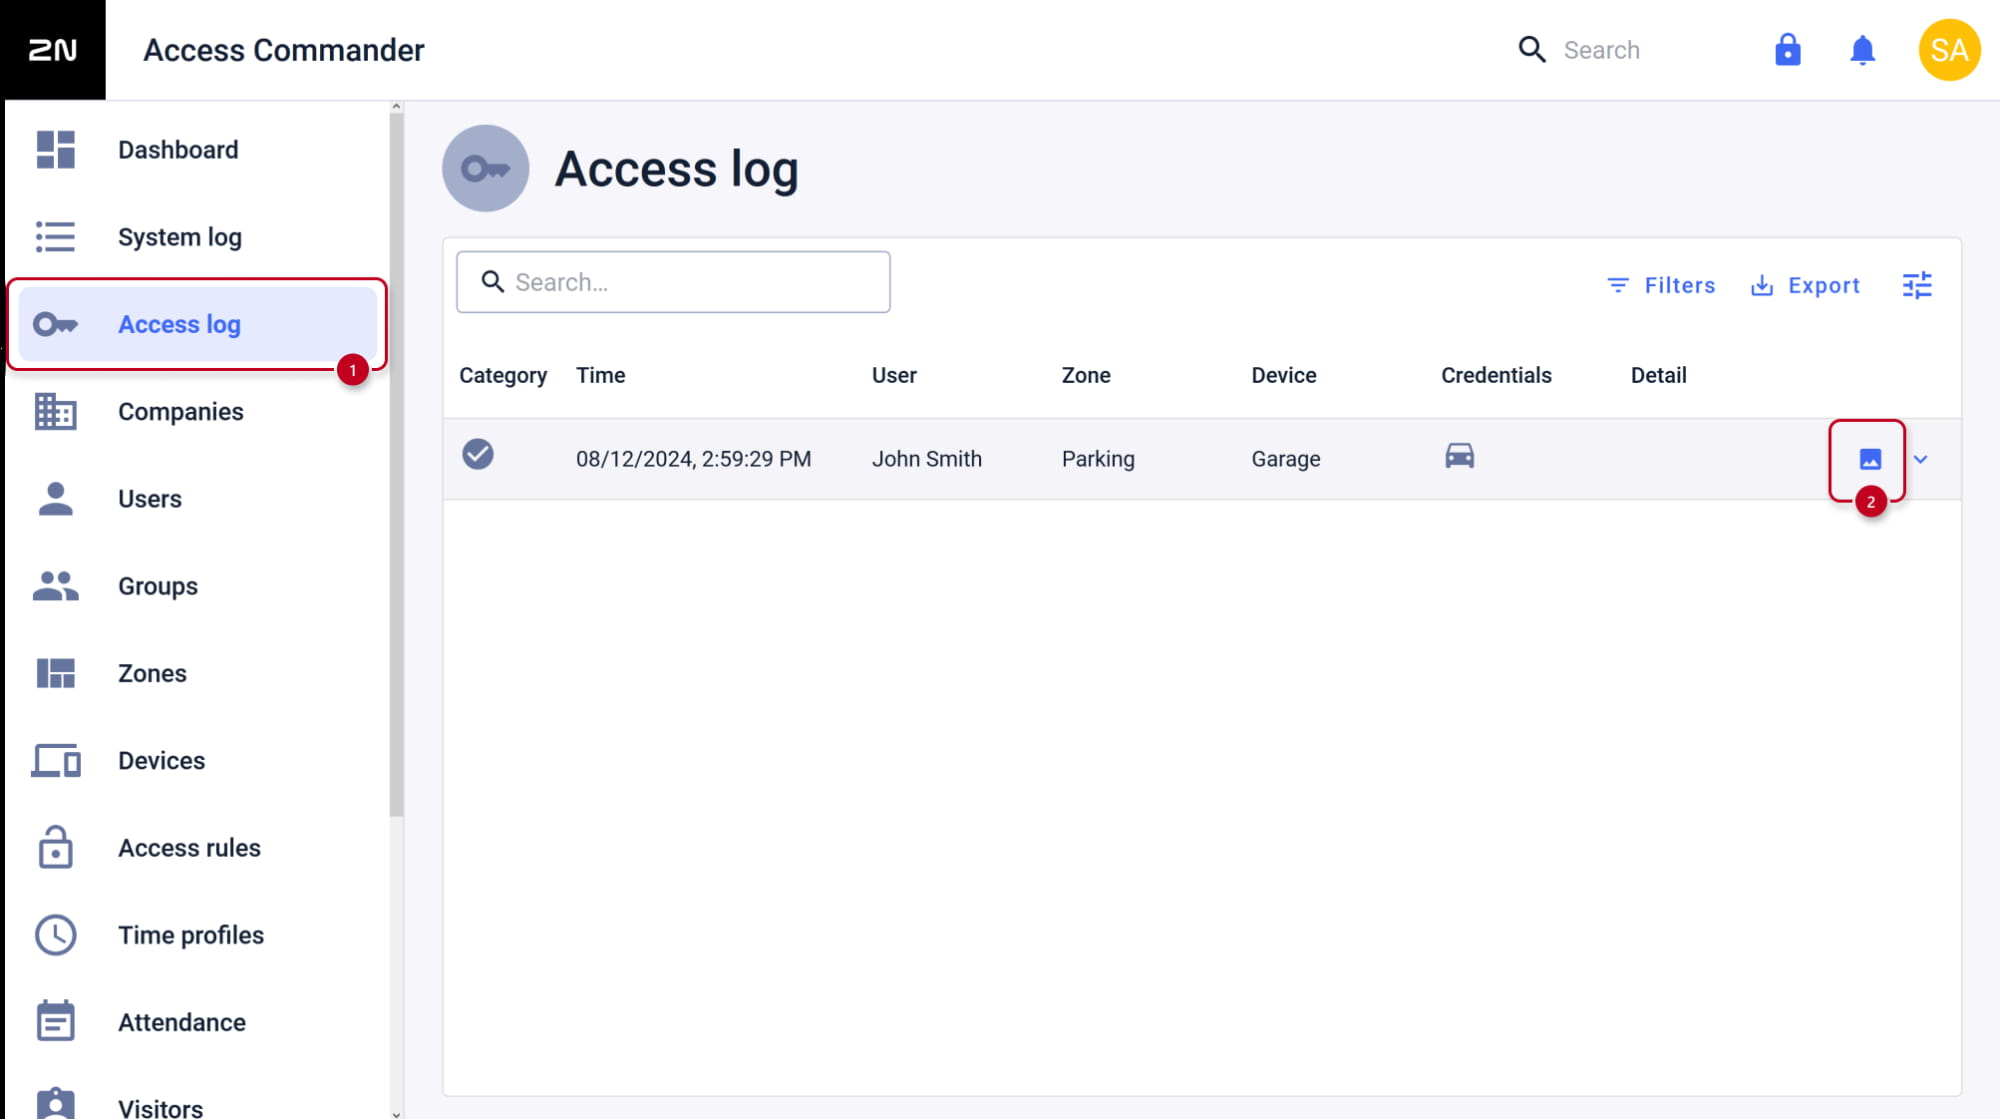
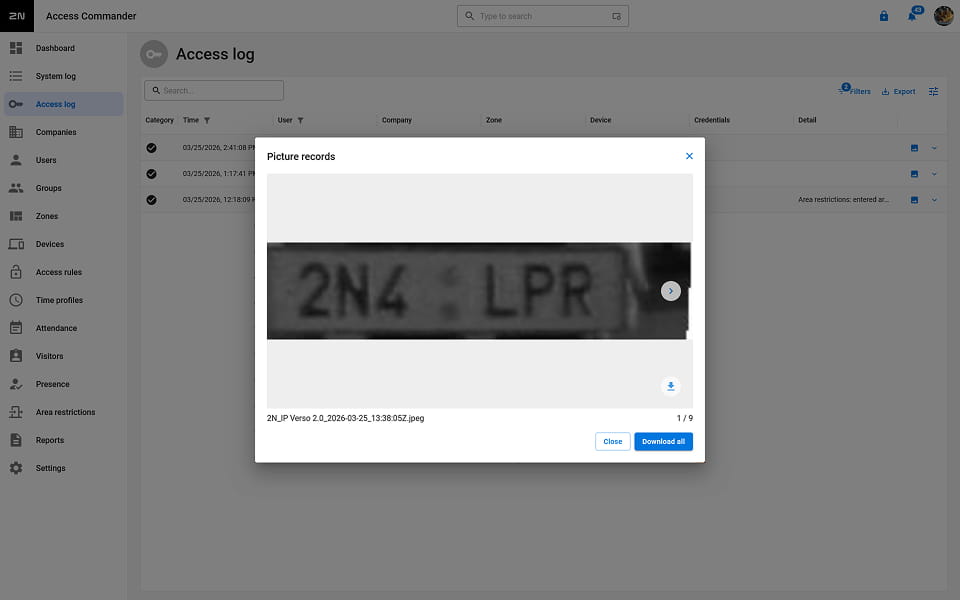
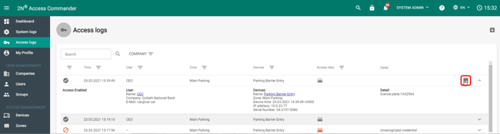
- Go to Access log section.
-
You will see a record once a license plate is recognized. You can expand its details and if there are CAM Logs available, you will see this small icon. Once you click it, you should see an overview of all attached photos.
If you have older version of the system with different look of the web interface, please click here.
When a 2N device is connected to 2N Access Commander, then most of its settings are managed by it. Thus, LPR settings will be managed by 2N Access Commander, but still you have to configure the device’s HTTP API credentials as those are device dependent.
-
Configure your 2N Access Commander as you normally would. Then open details of the device you already prepared for LPR
and make sure it has Lift Control turned off and that it’s assigned to the proper zone.
-
Then go to this Zone’s detail and enable License Plate Authentication.
-
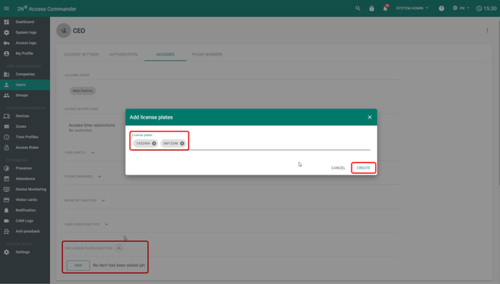
Users can have their license plates assigned
under Accesses>Car License Plates, click ADD, enter one or more license plates, and confirm by clicking create.
-
Verify that this user is assigned to the correct group
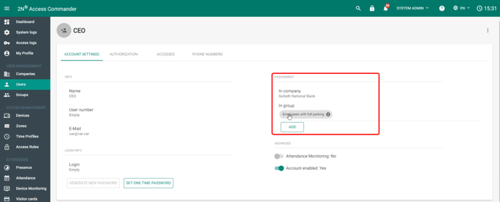
and create an Access Rule for it.
-
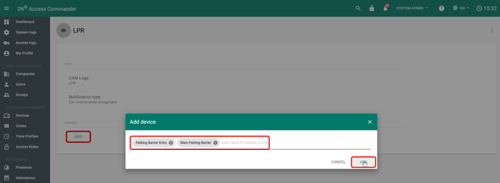
Optionally, if you’d like to get photos of recognized license plates, you can create + NEW CAM LOGS. Name the log accordingly, select “Car license plate recognized” and click create.
Then ADD all devices you want to receive photos from to this CAM Log.
-
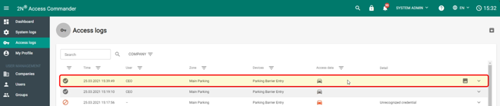
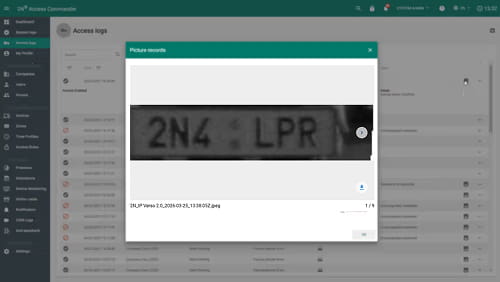
Once everything is configured, Access Logs will show up once a license plate is recognized.
You can expand its details and if there are CAM Logs available, you will see this small icon.
Once you click it, you should see an overview of all attached photos.
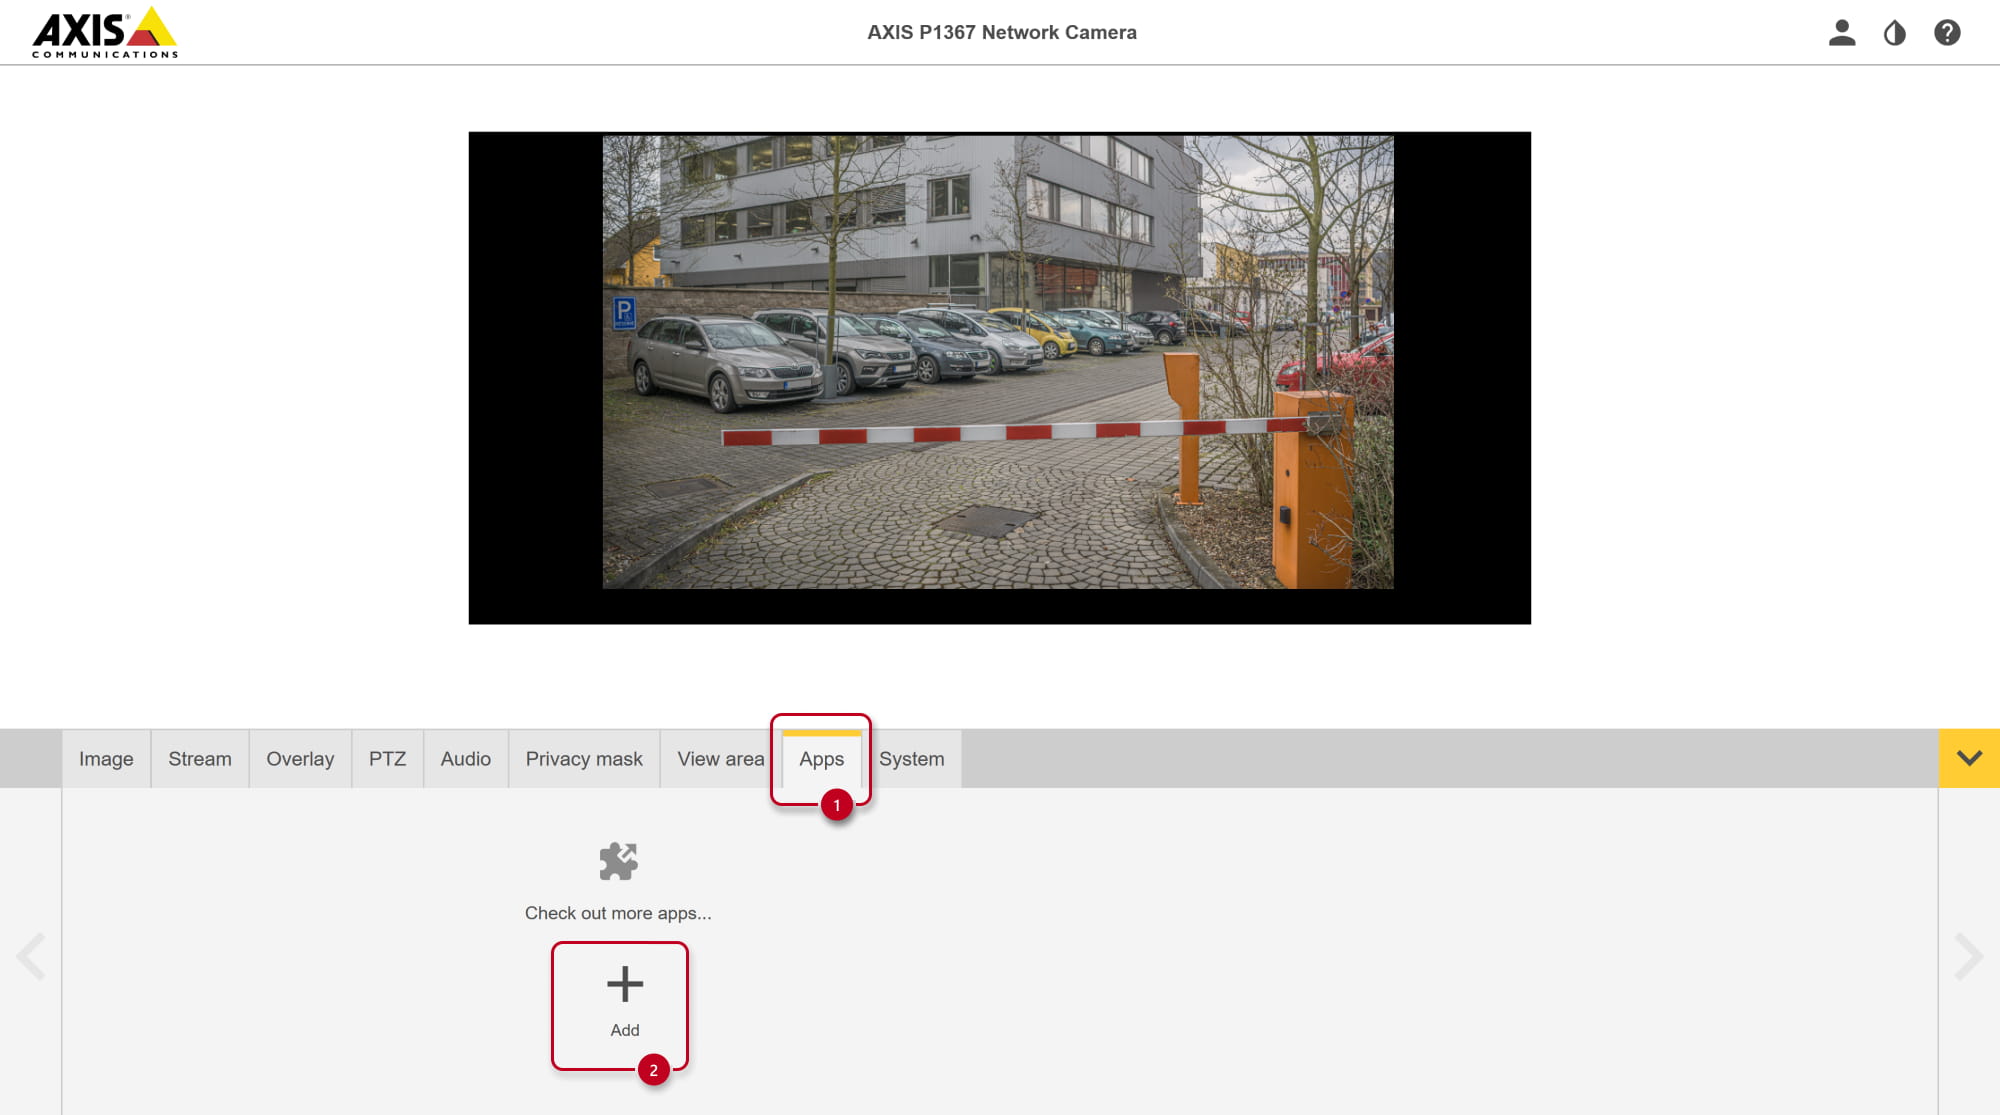
LPR app installation into Axis network camera and configuration
There are two options to choose from, click on the selected option to view the guide.
Vaxtor VaxALPR On Camera
We’ll only configure the most important settings, for detailed information please see the VaxALPR user manual:
https://vaxtor.com/wp-content/uploads/2021/01/VaxALPR-On-Camera-Axis-Camera-Integration-EN_2.0-May-2020.pdf
-
Log in to suitable Axis network camera with ARTPEC-6 / ARTPEC-7 / ARTPEC-8 chip
and enter Settings.
-
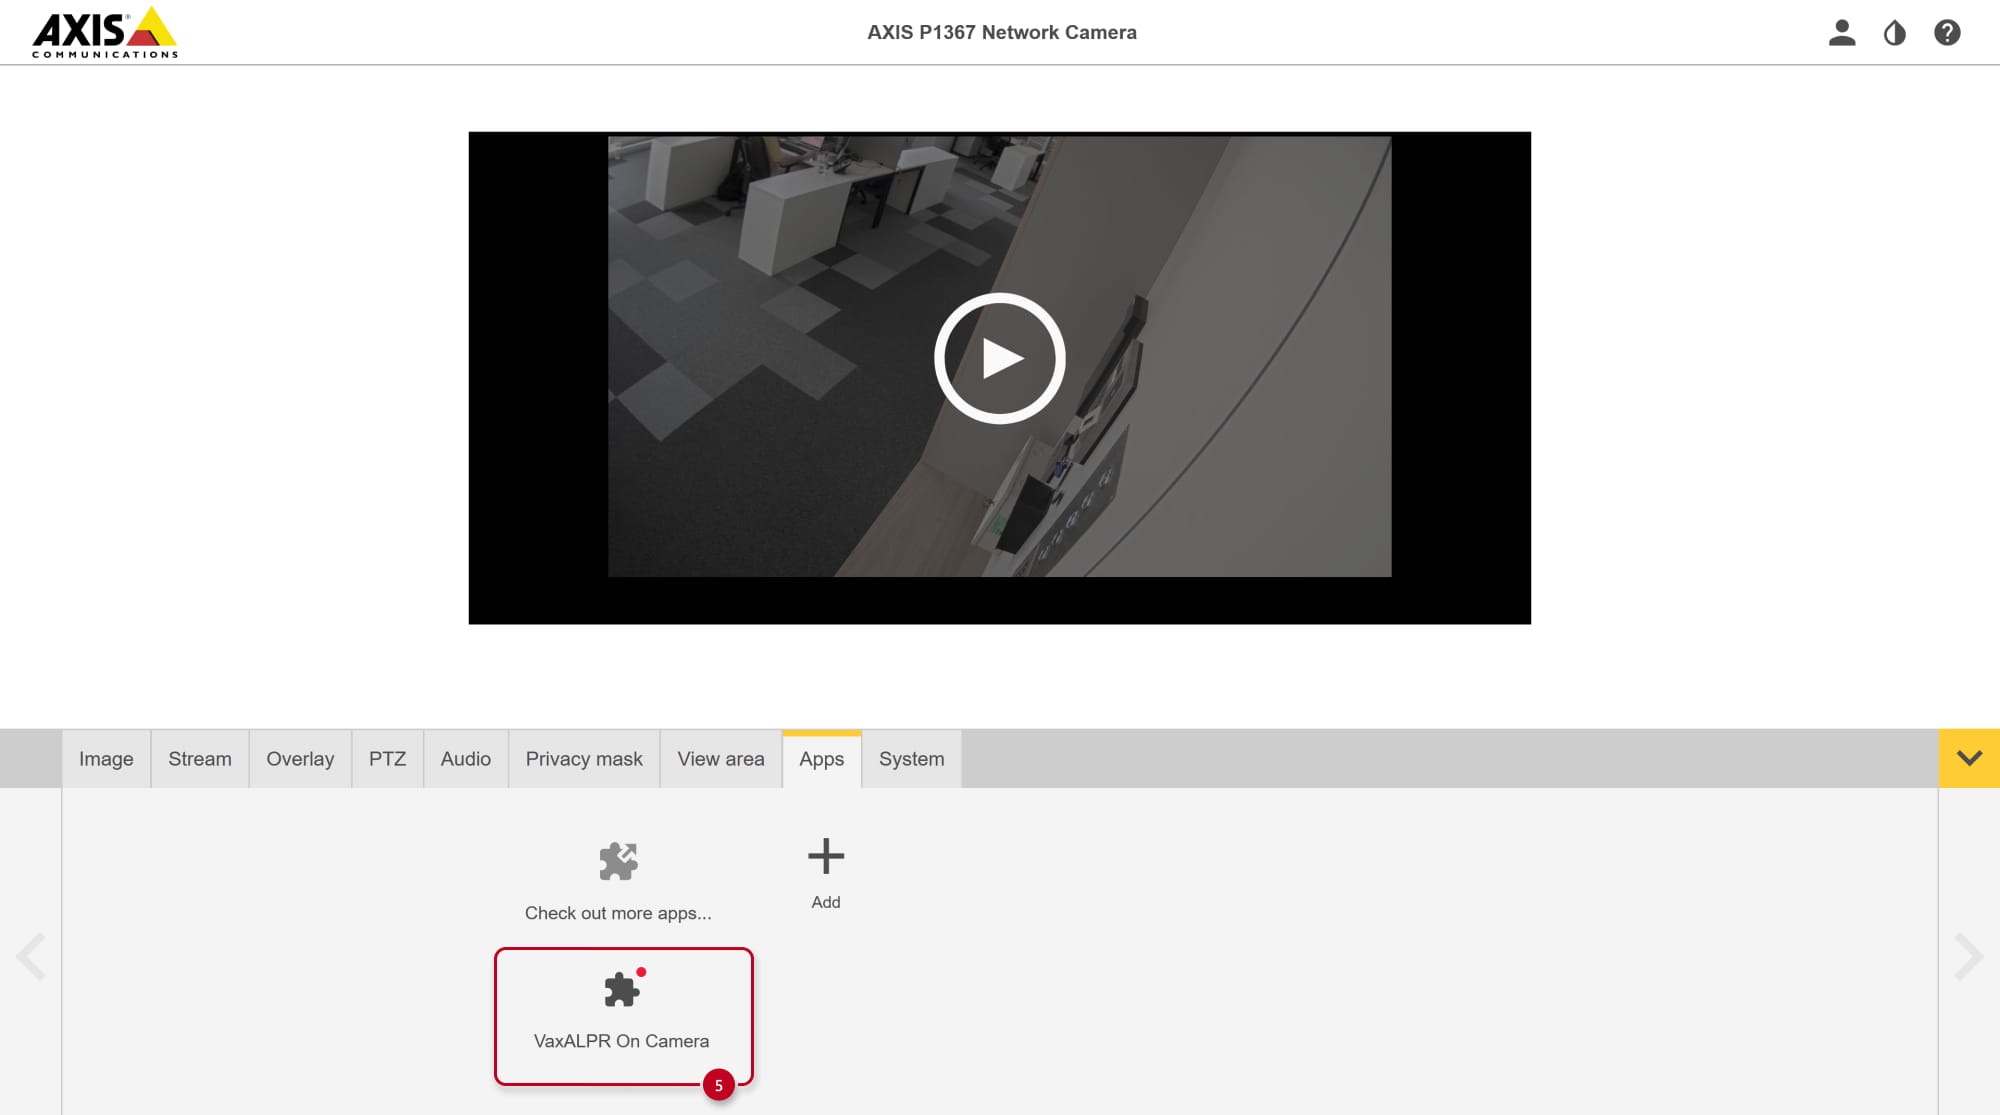
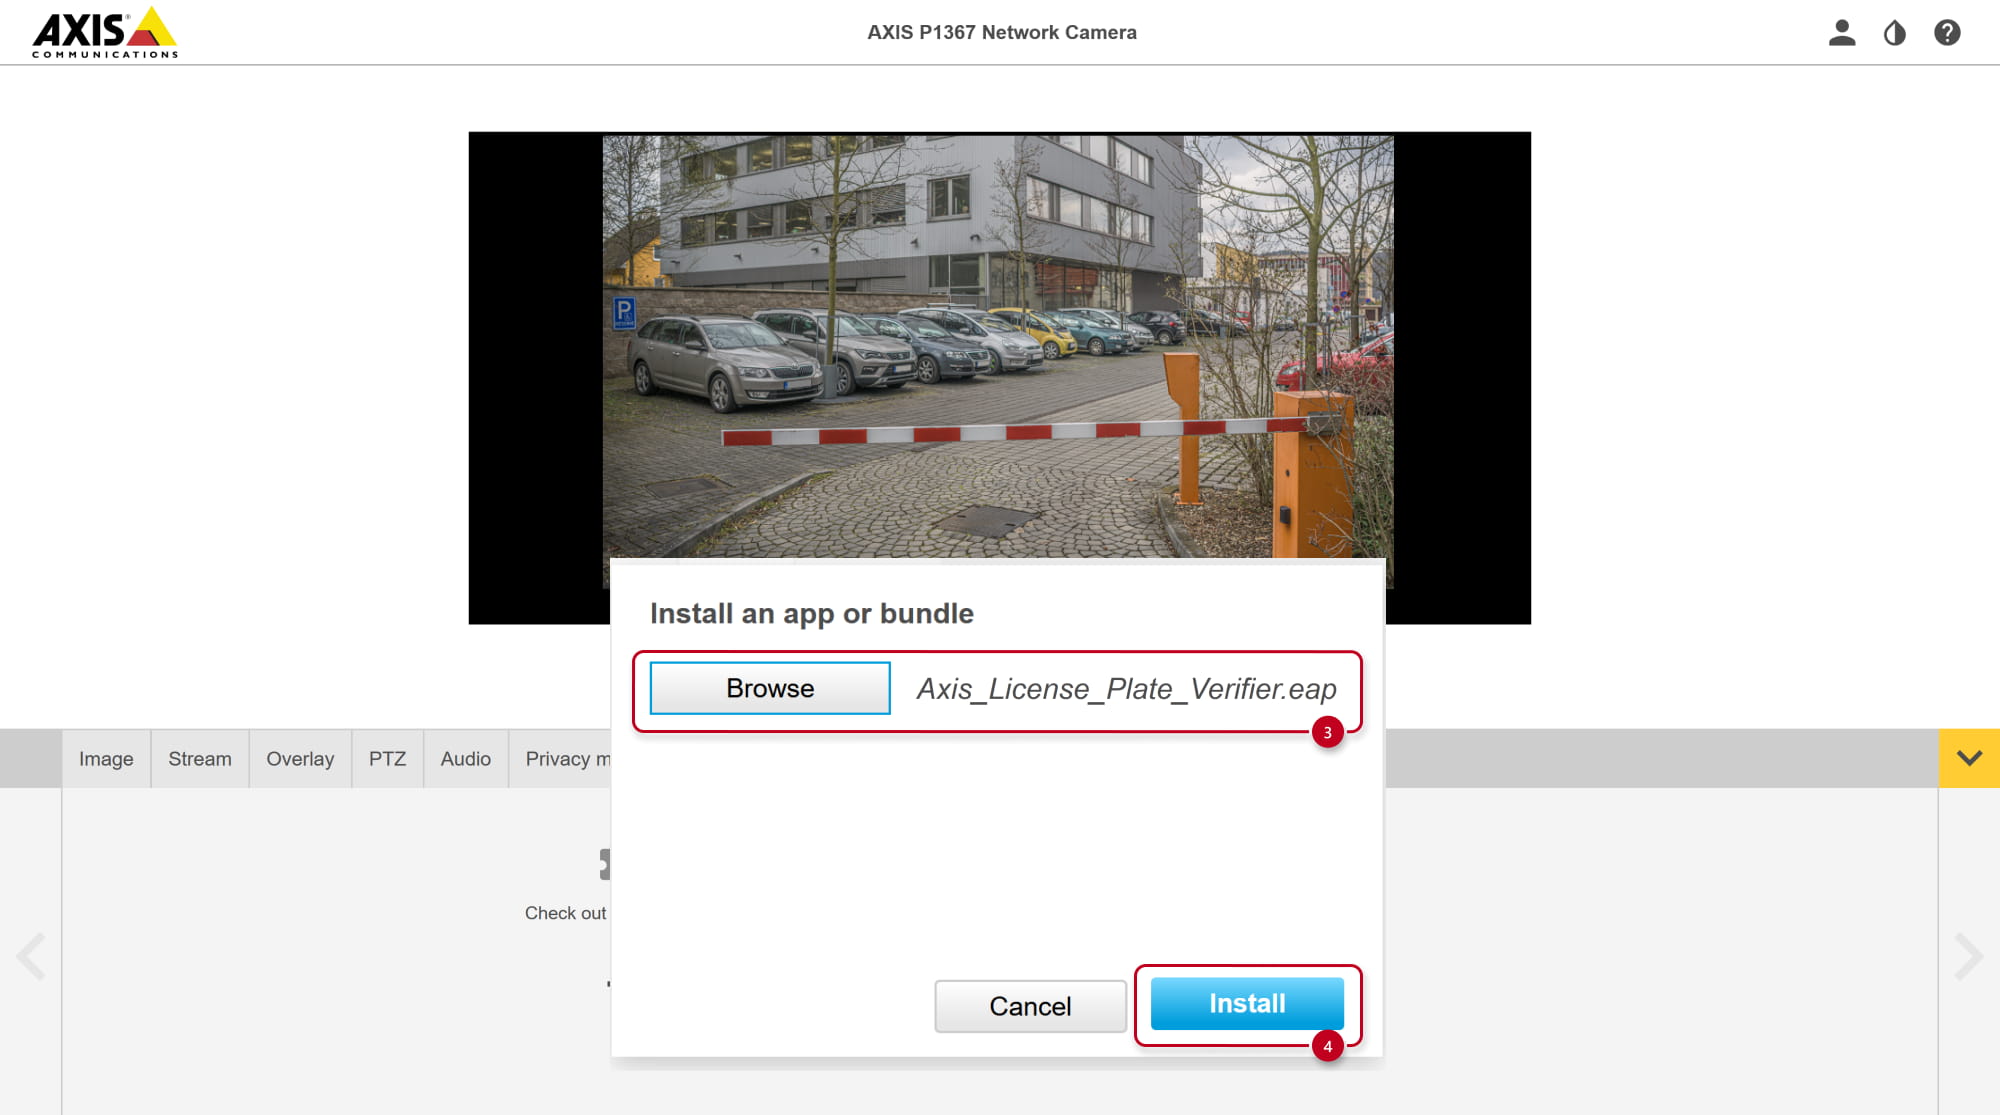
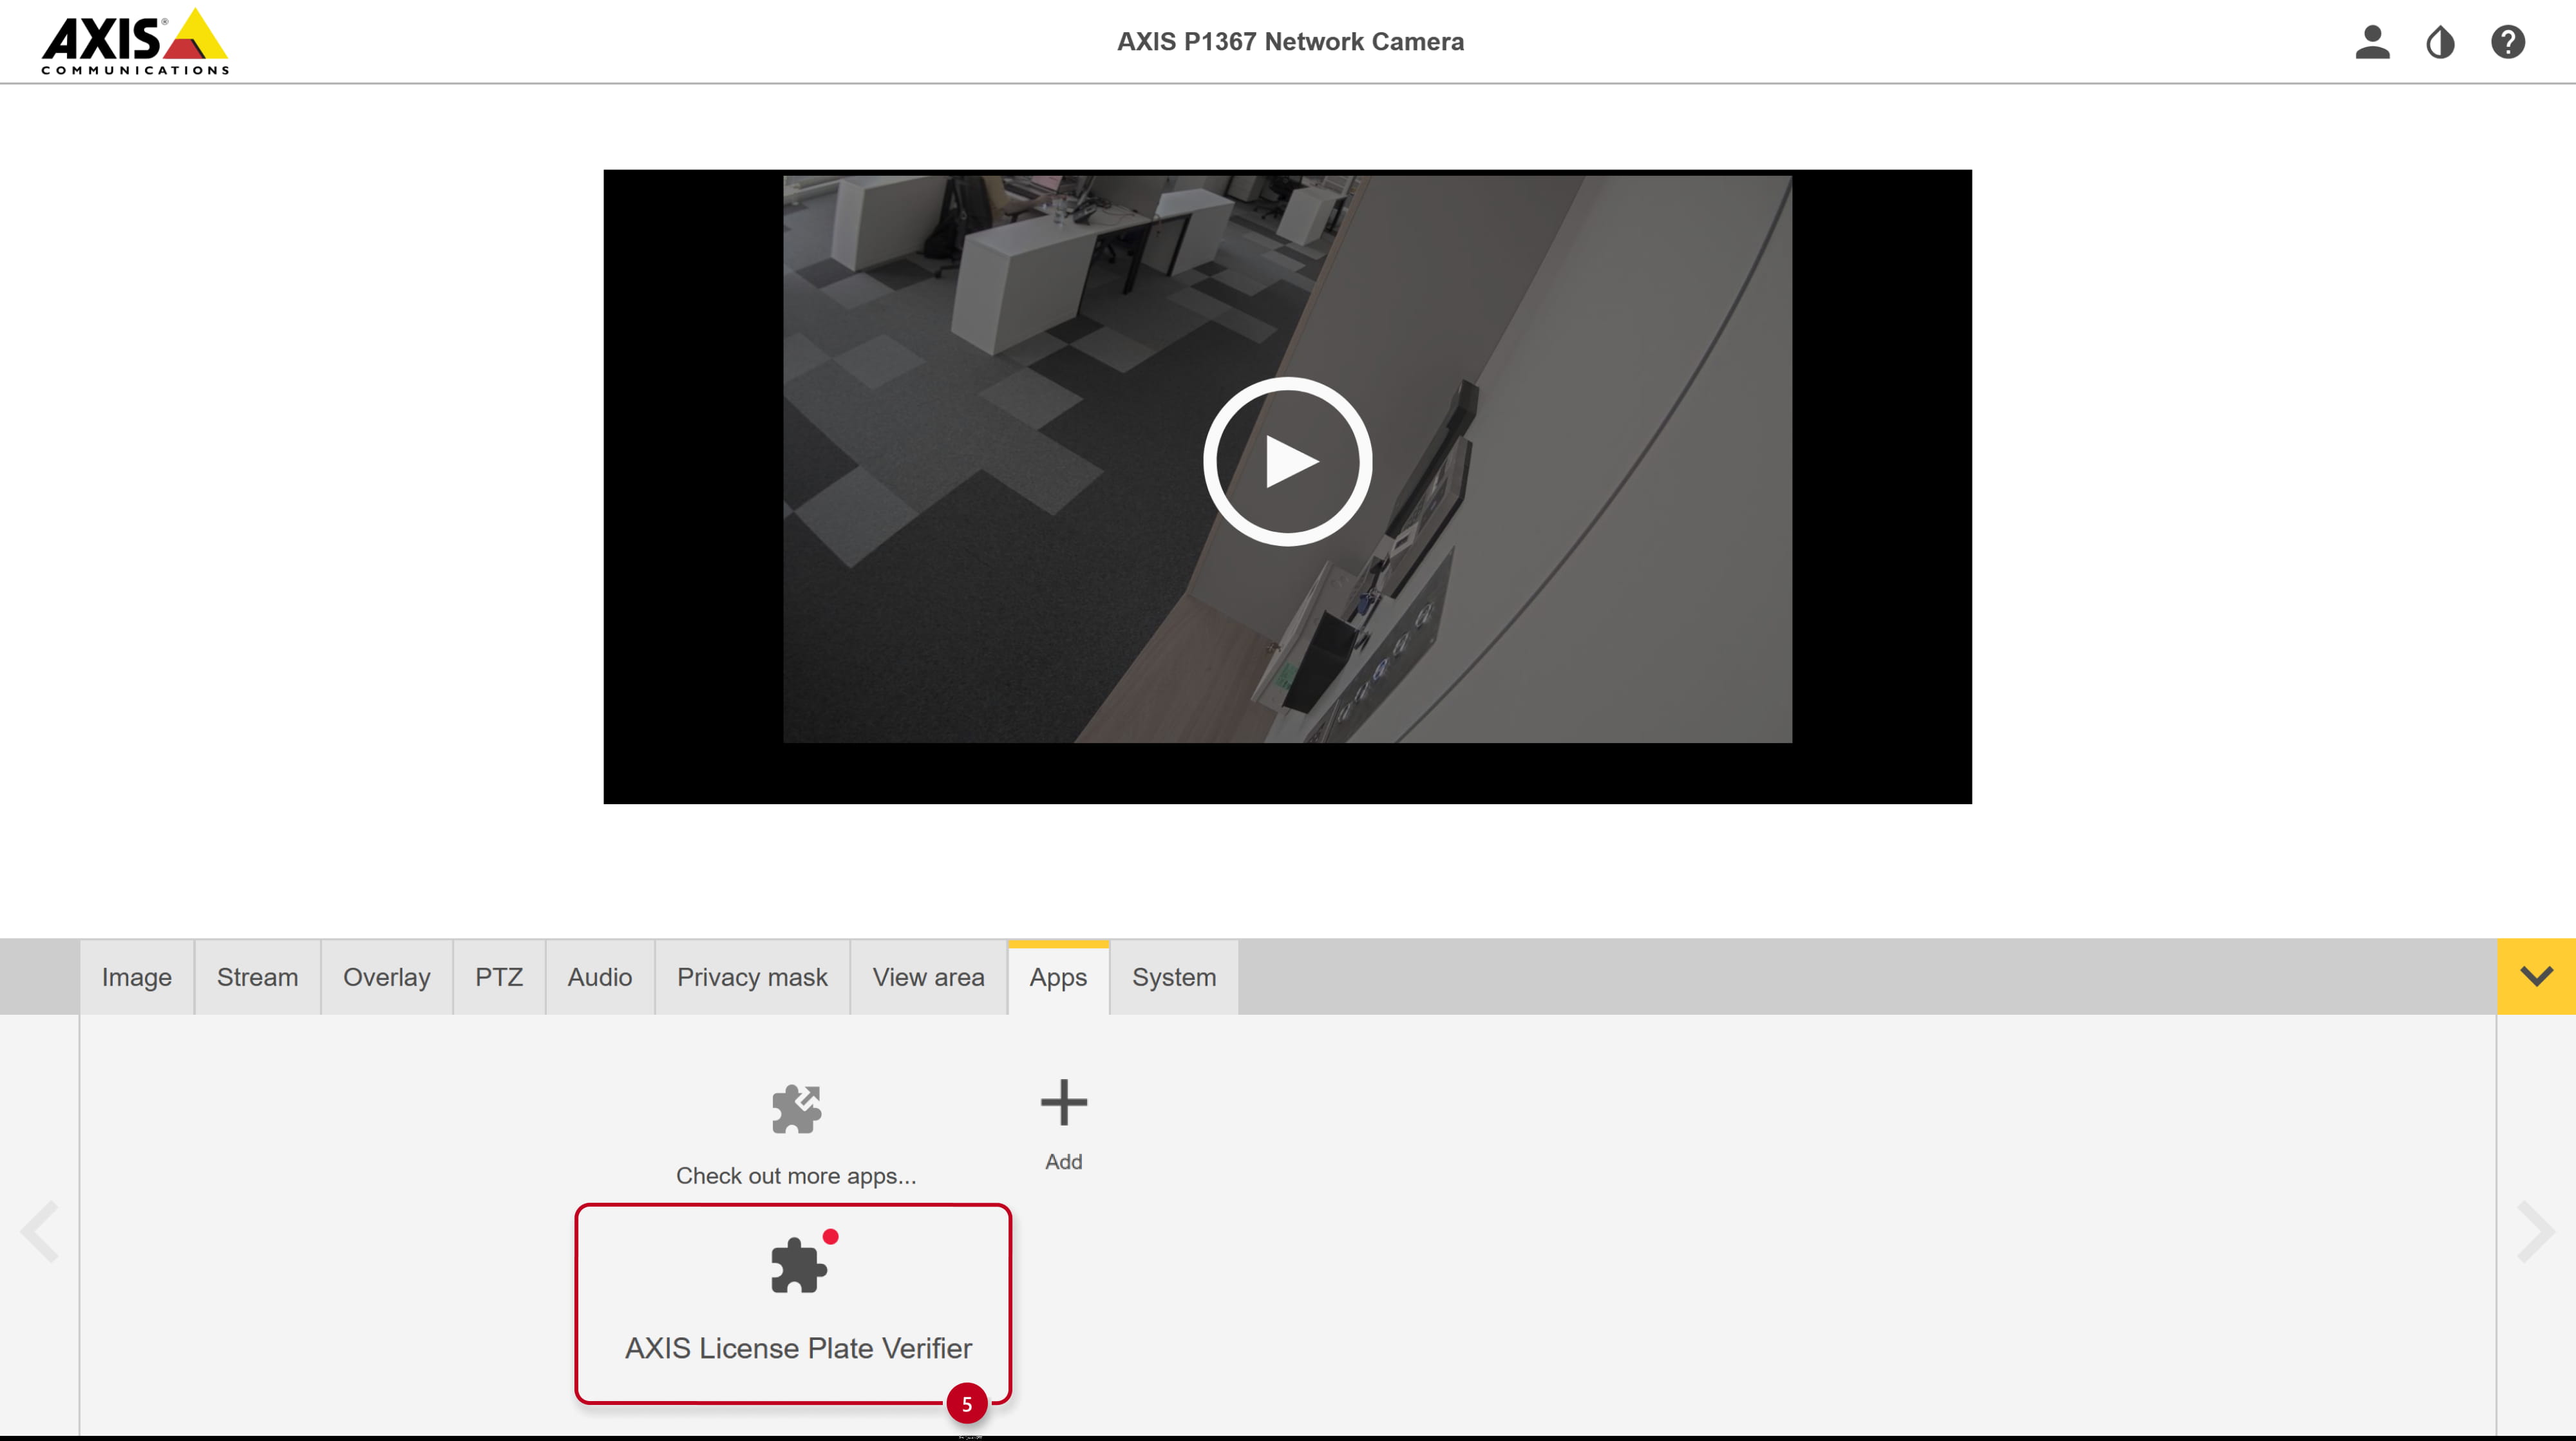
Go to the Apps tab and add the new one. Locate the .eap file from Vaxtor.
Once appeared in the list of installed apps, click on it.

-
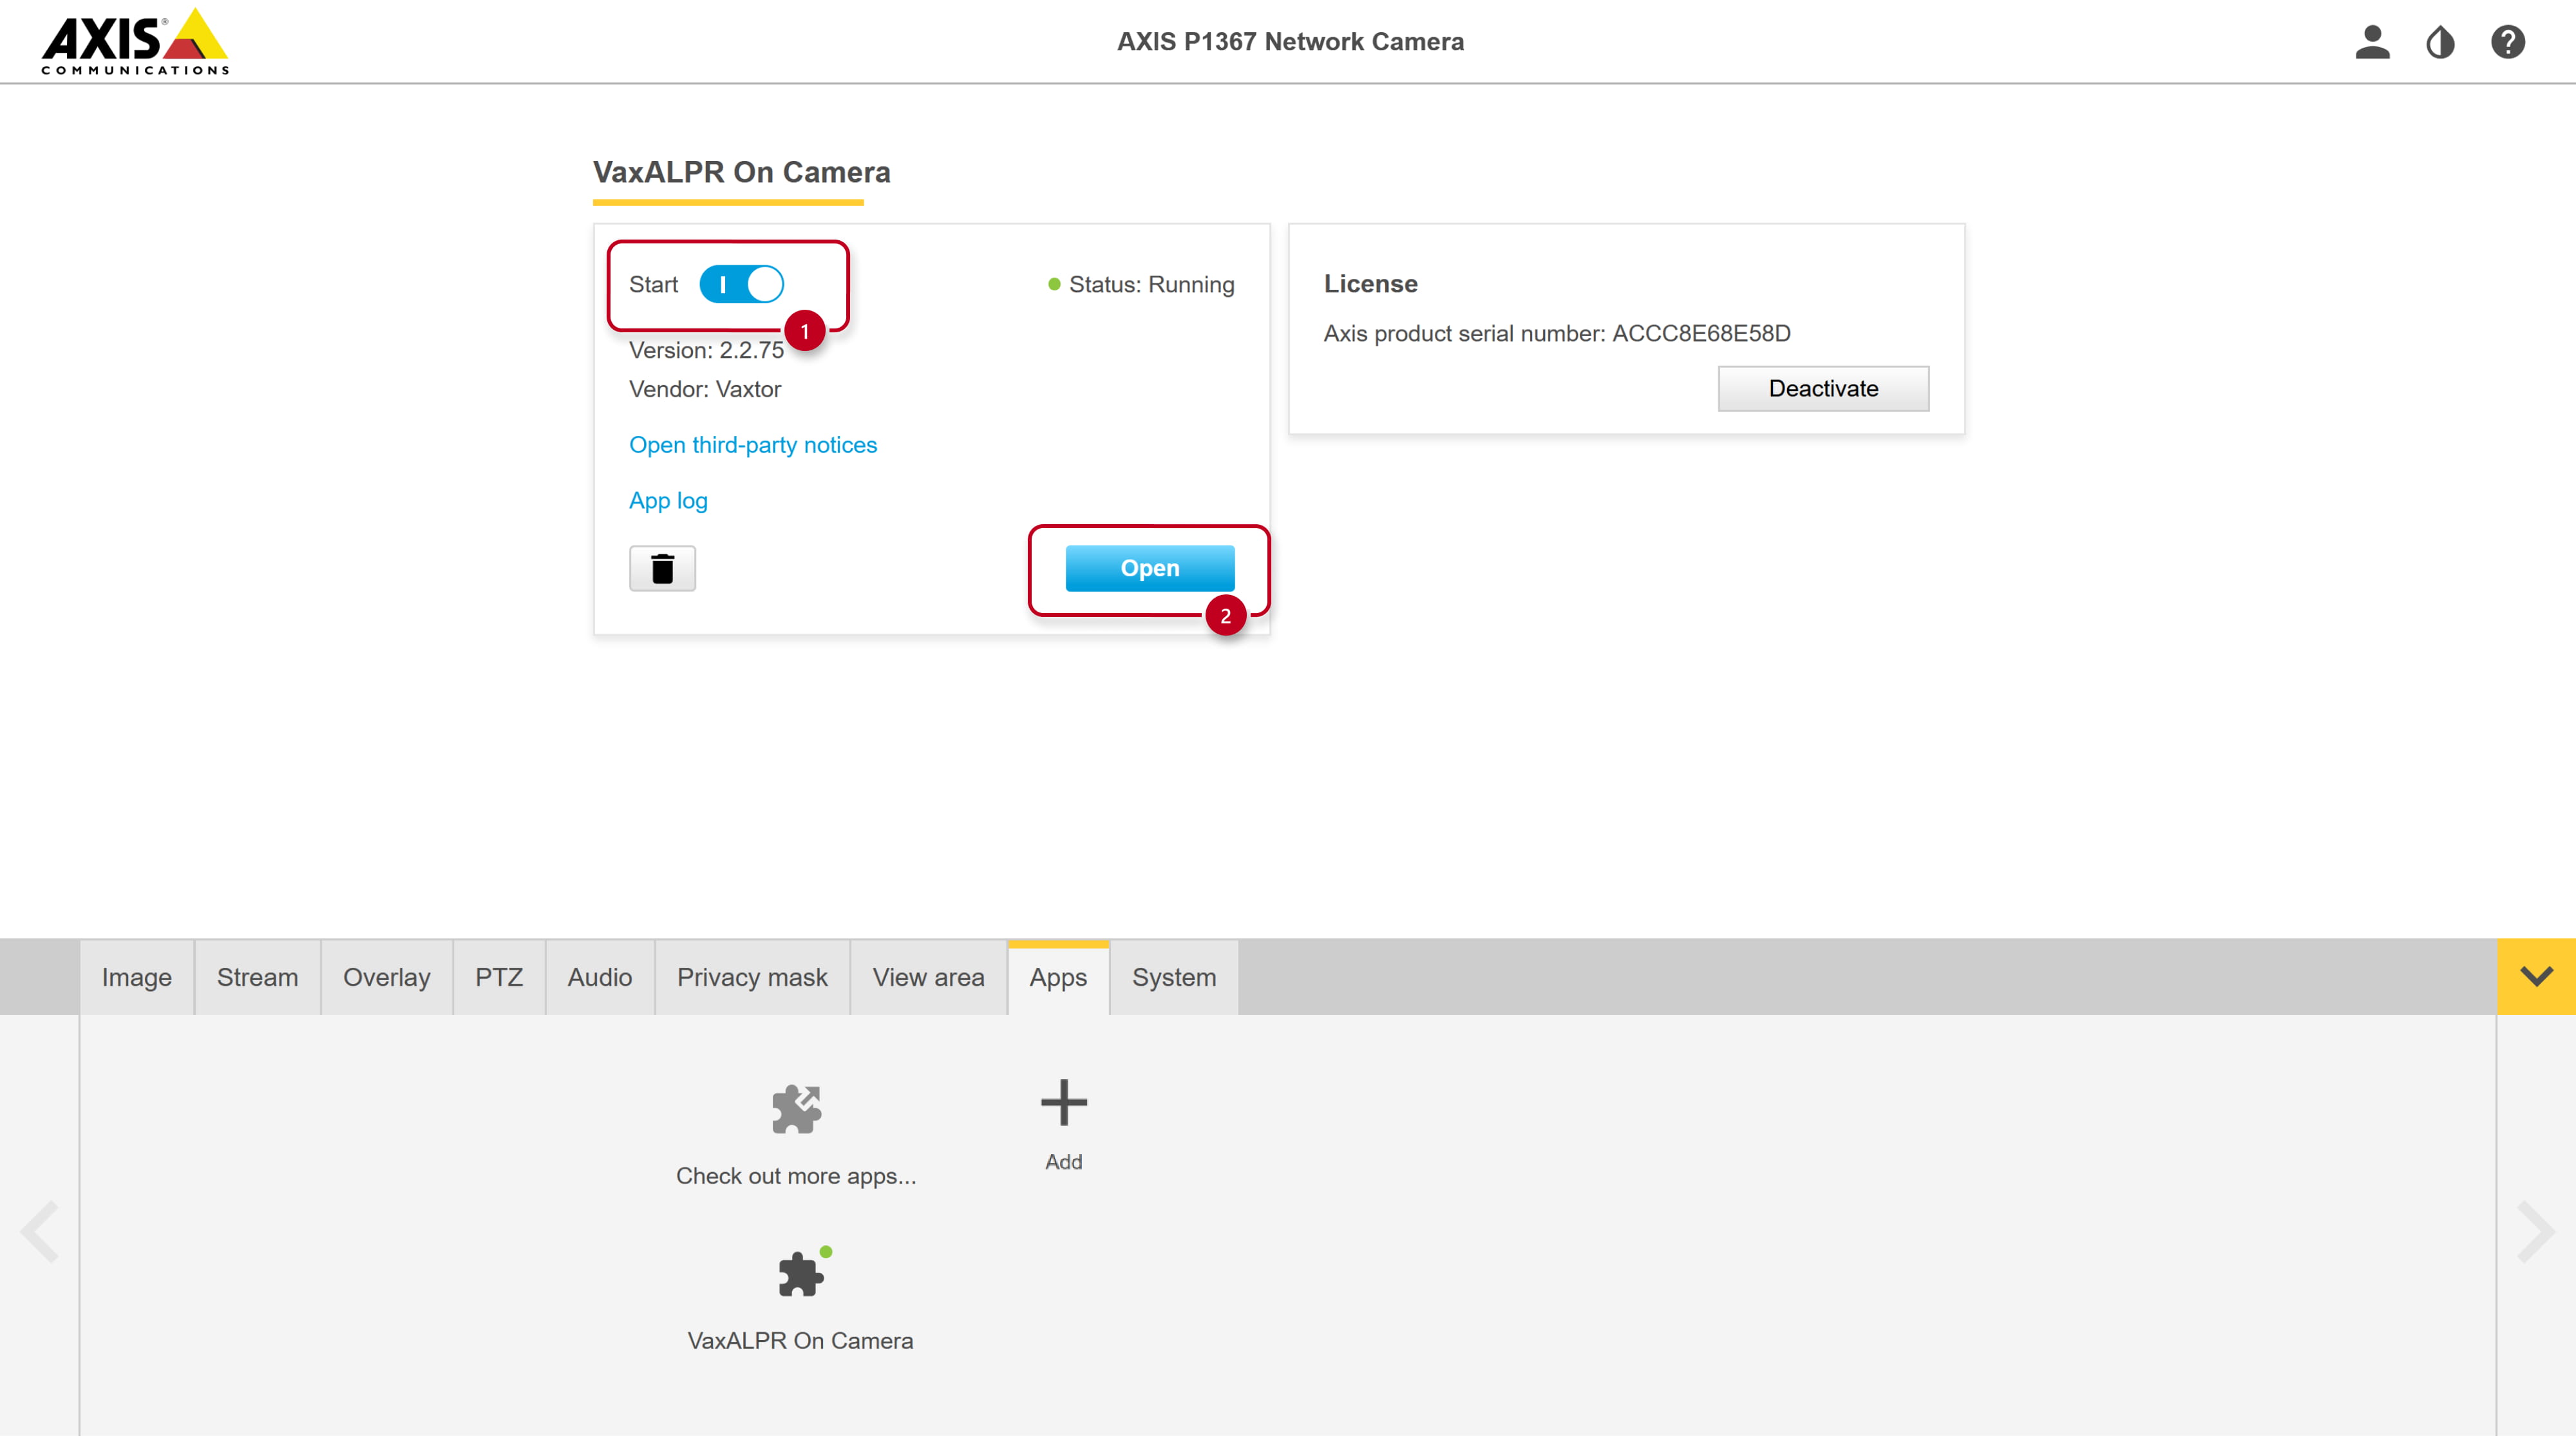
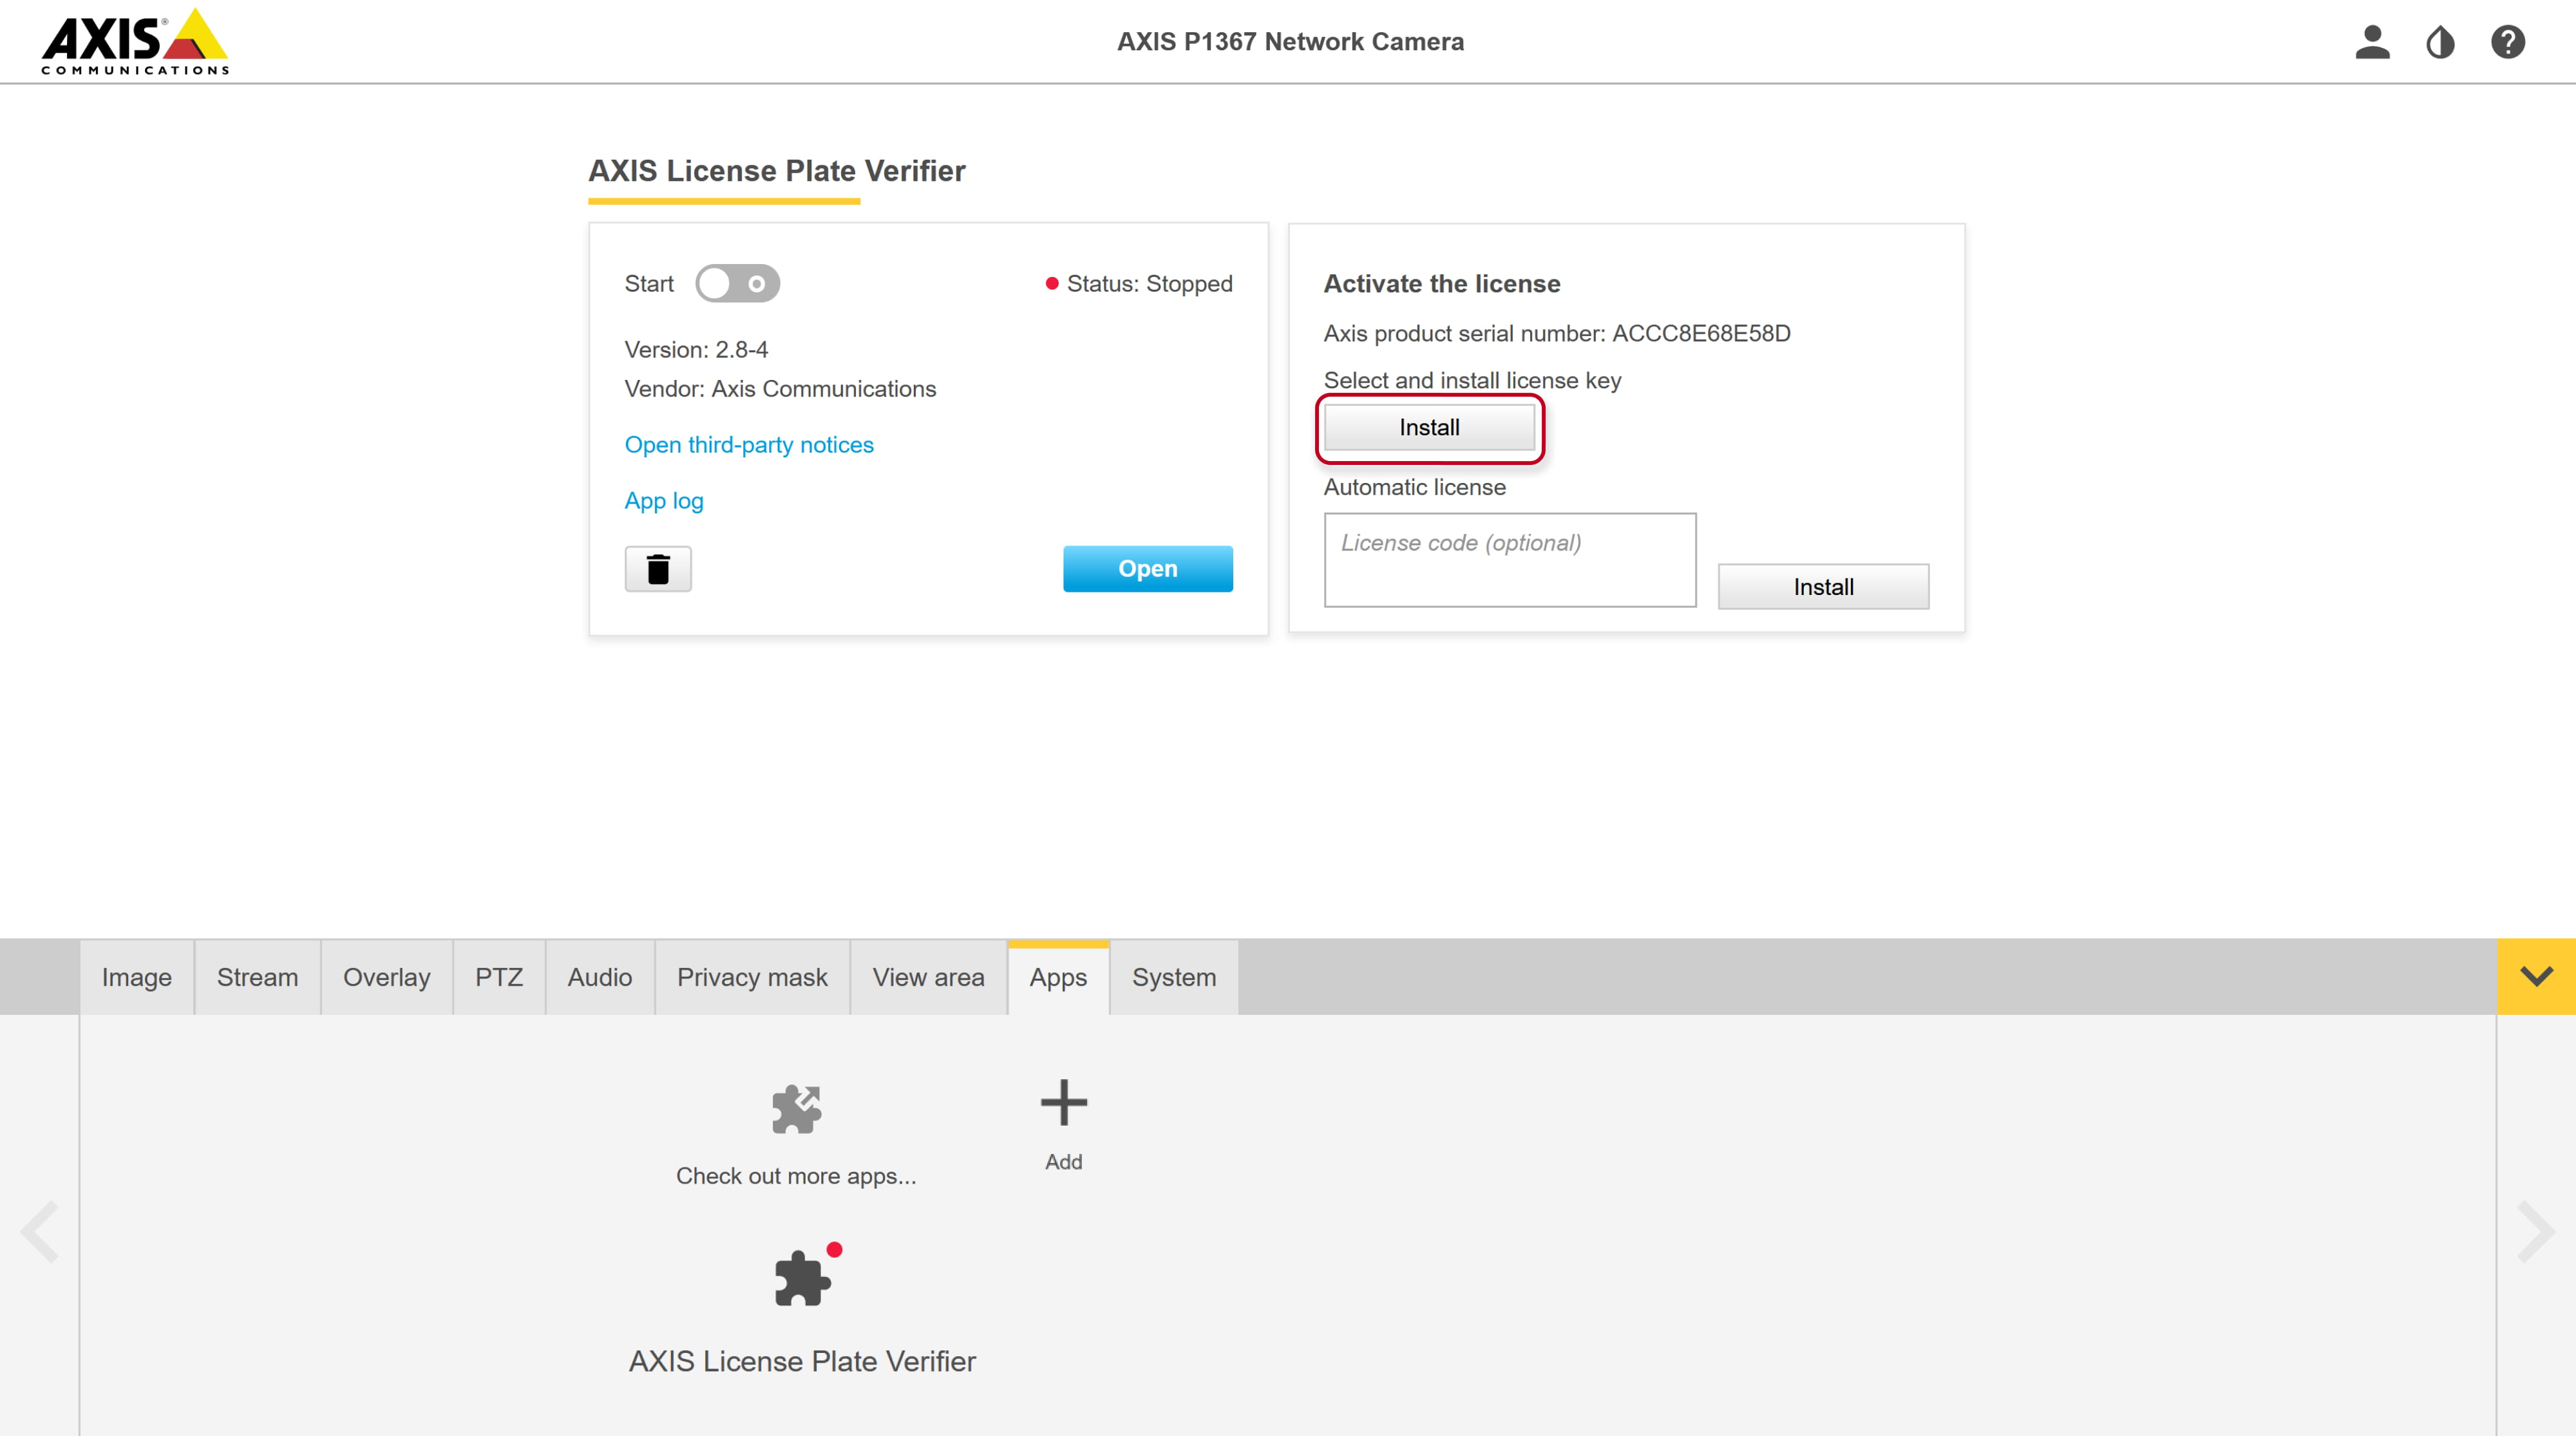
Activate your license key you have got from Axis for this scenario.
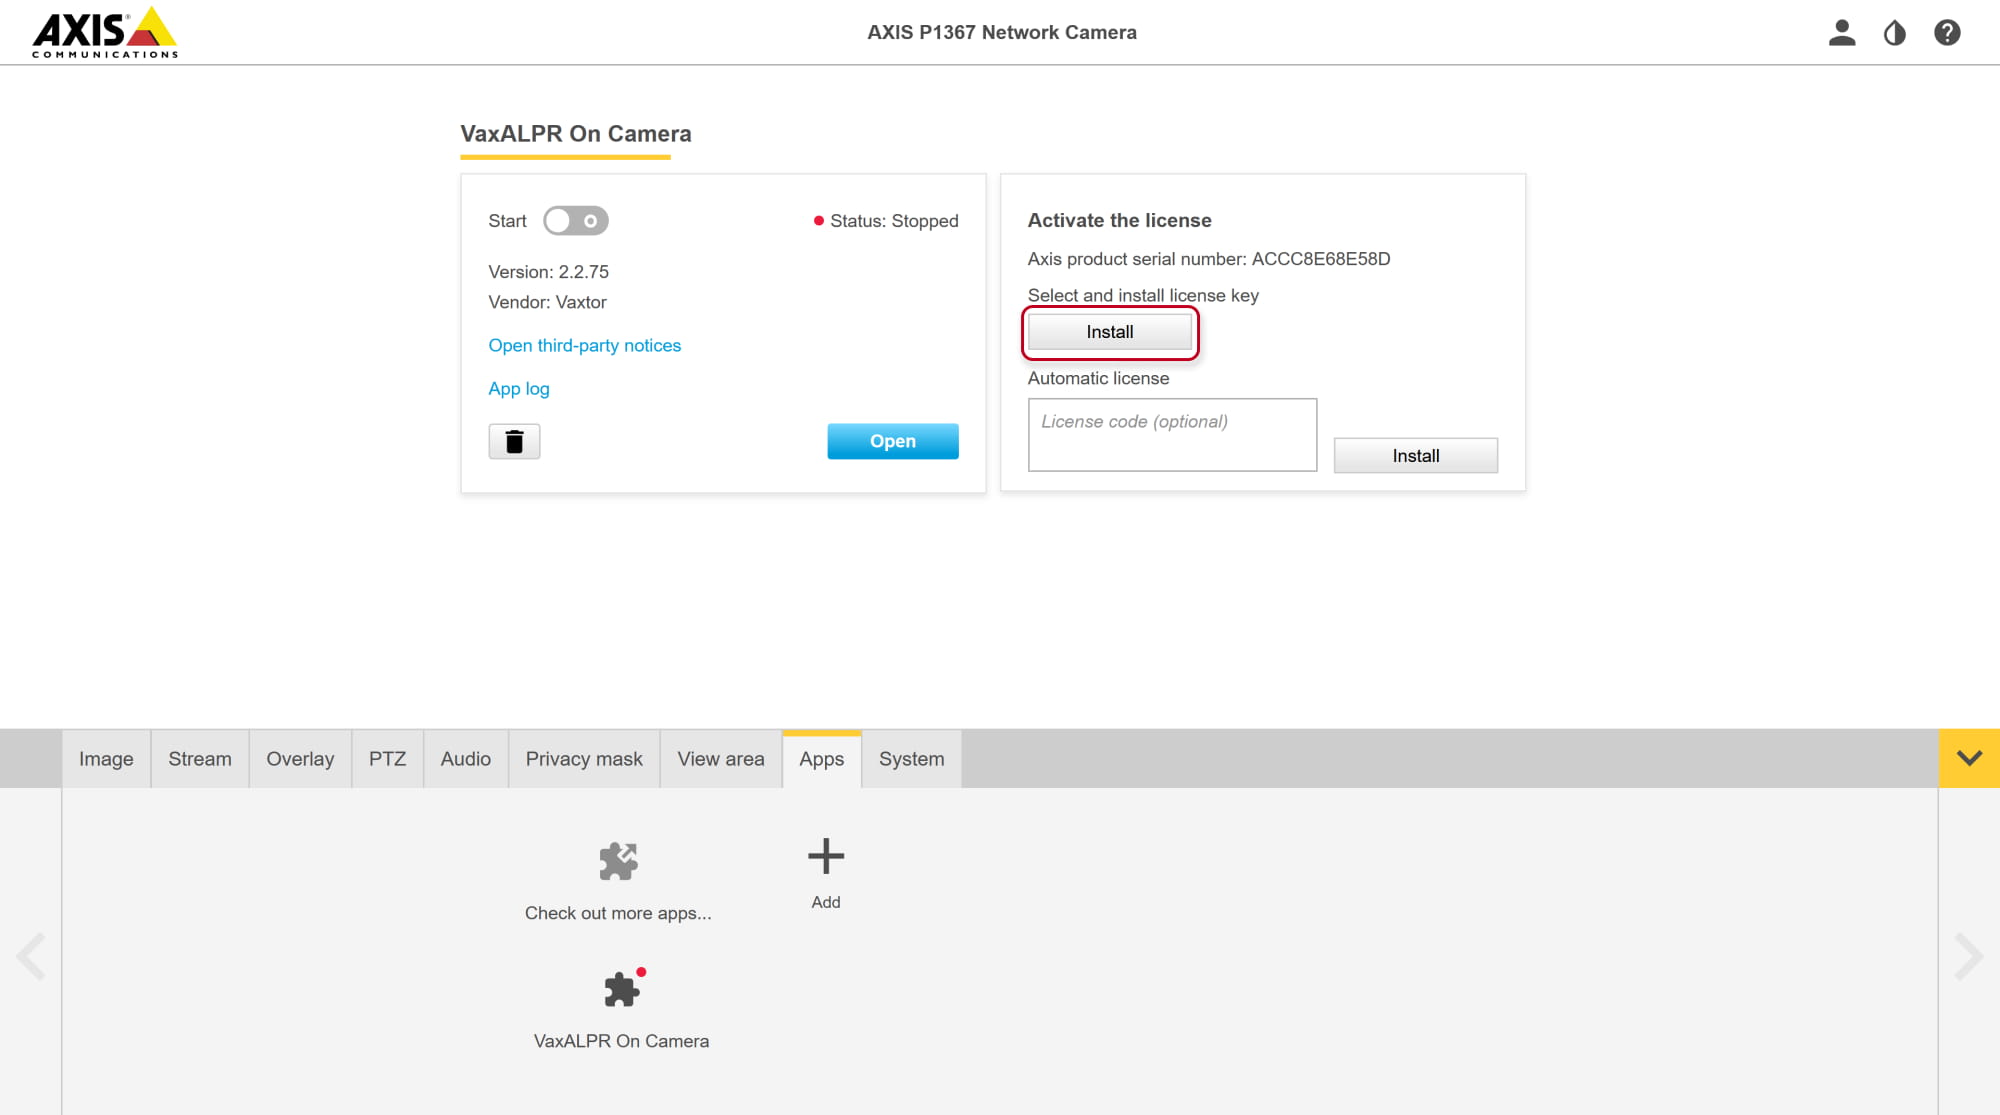
- Then start the app and open it to go to its configuration.
-
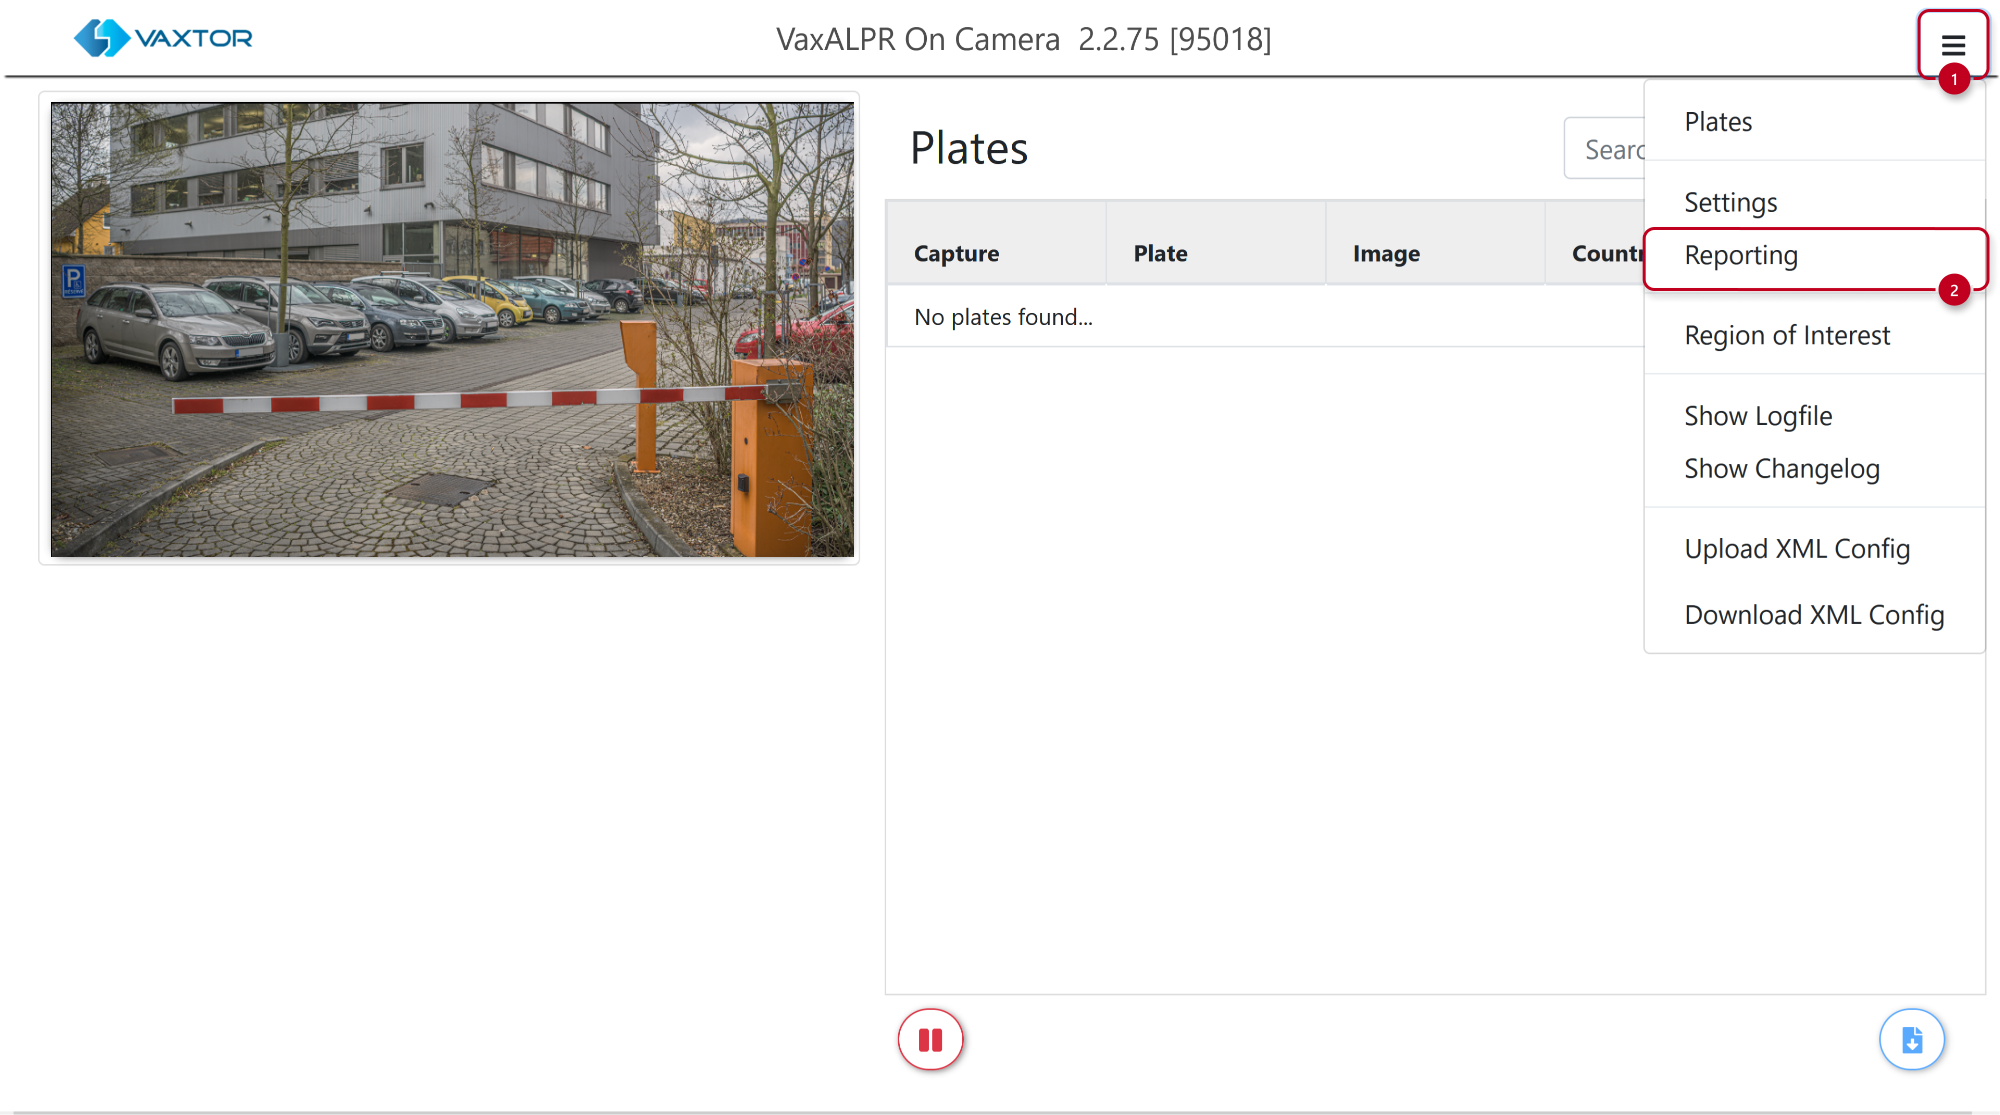
Open the hamburger menu and select Reporting.
-
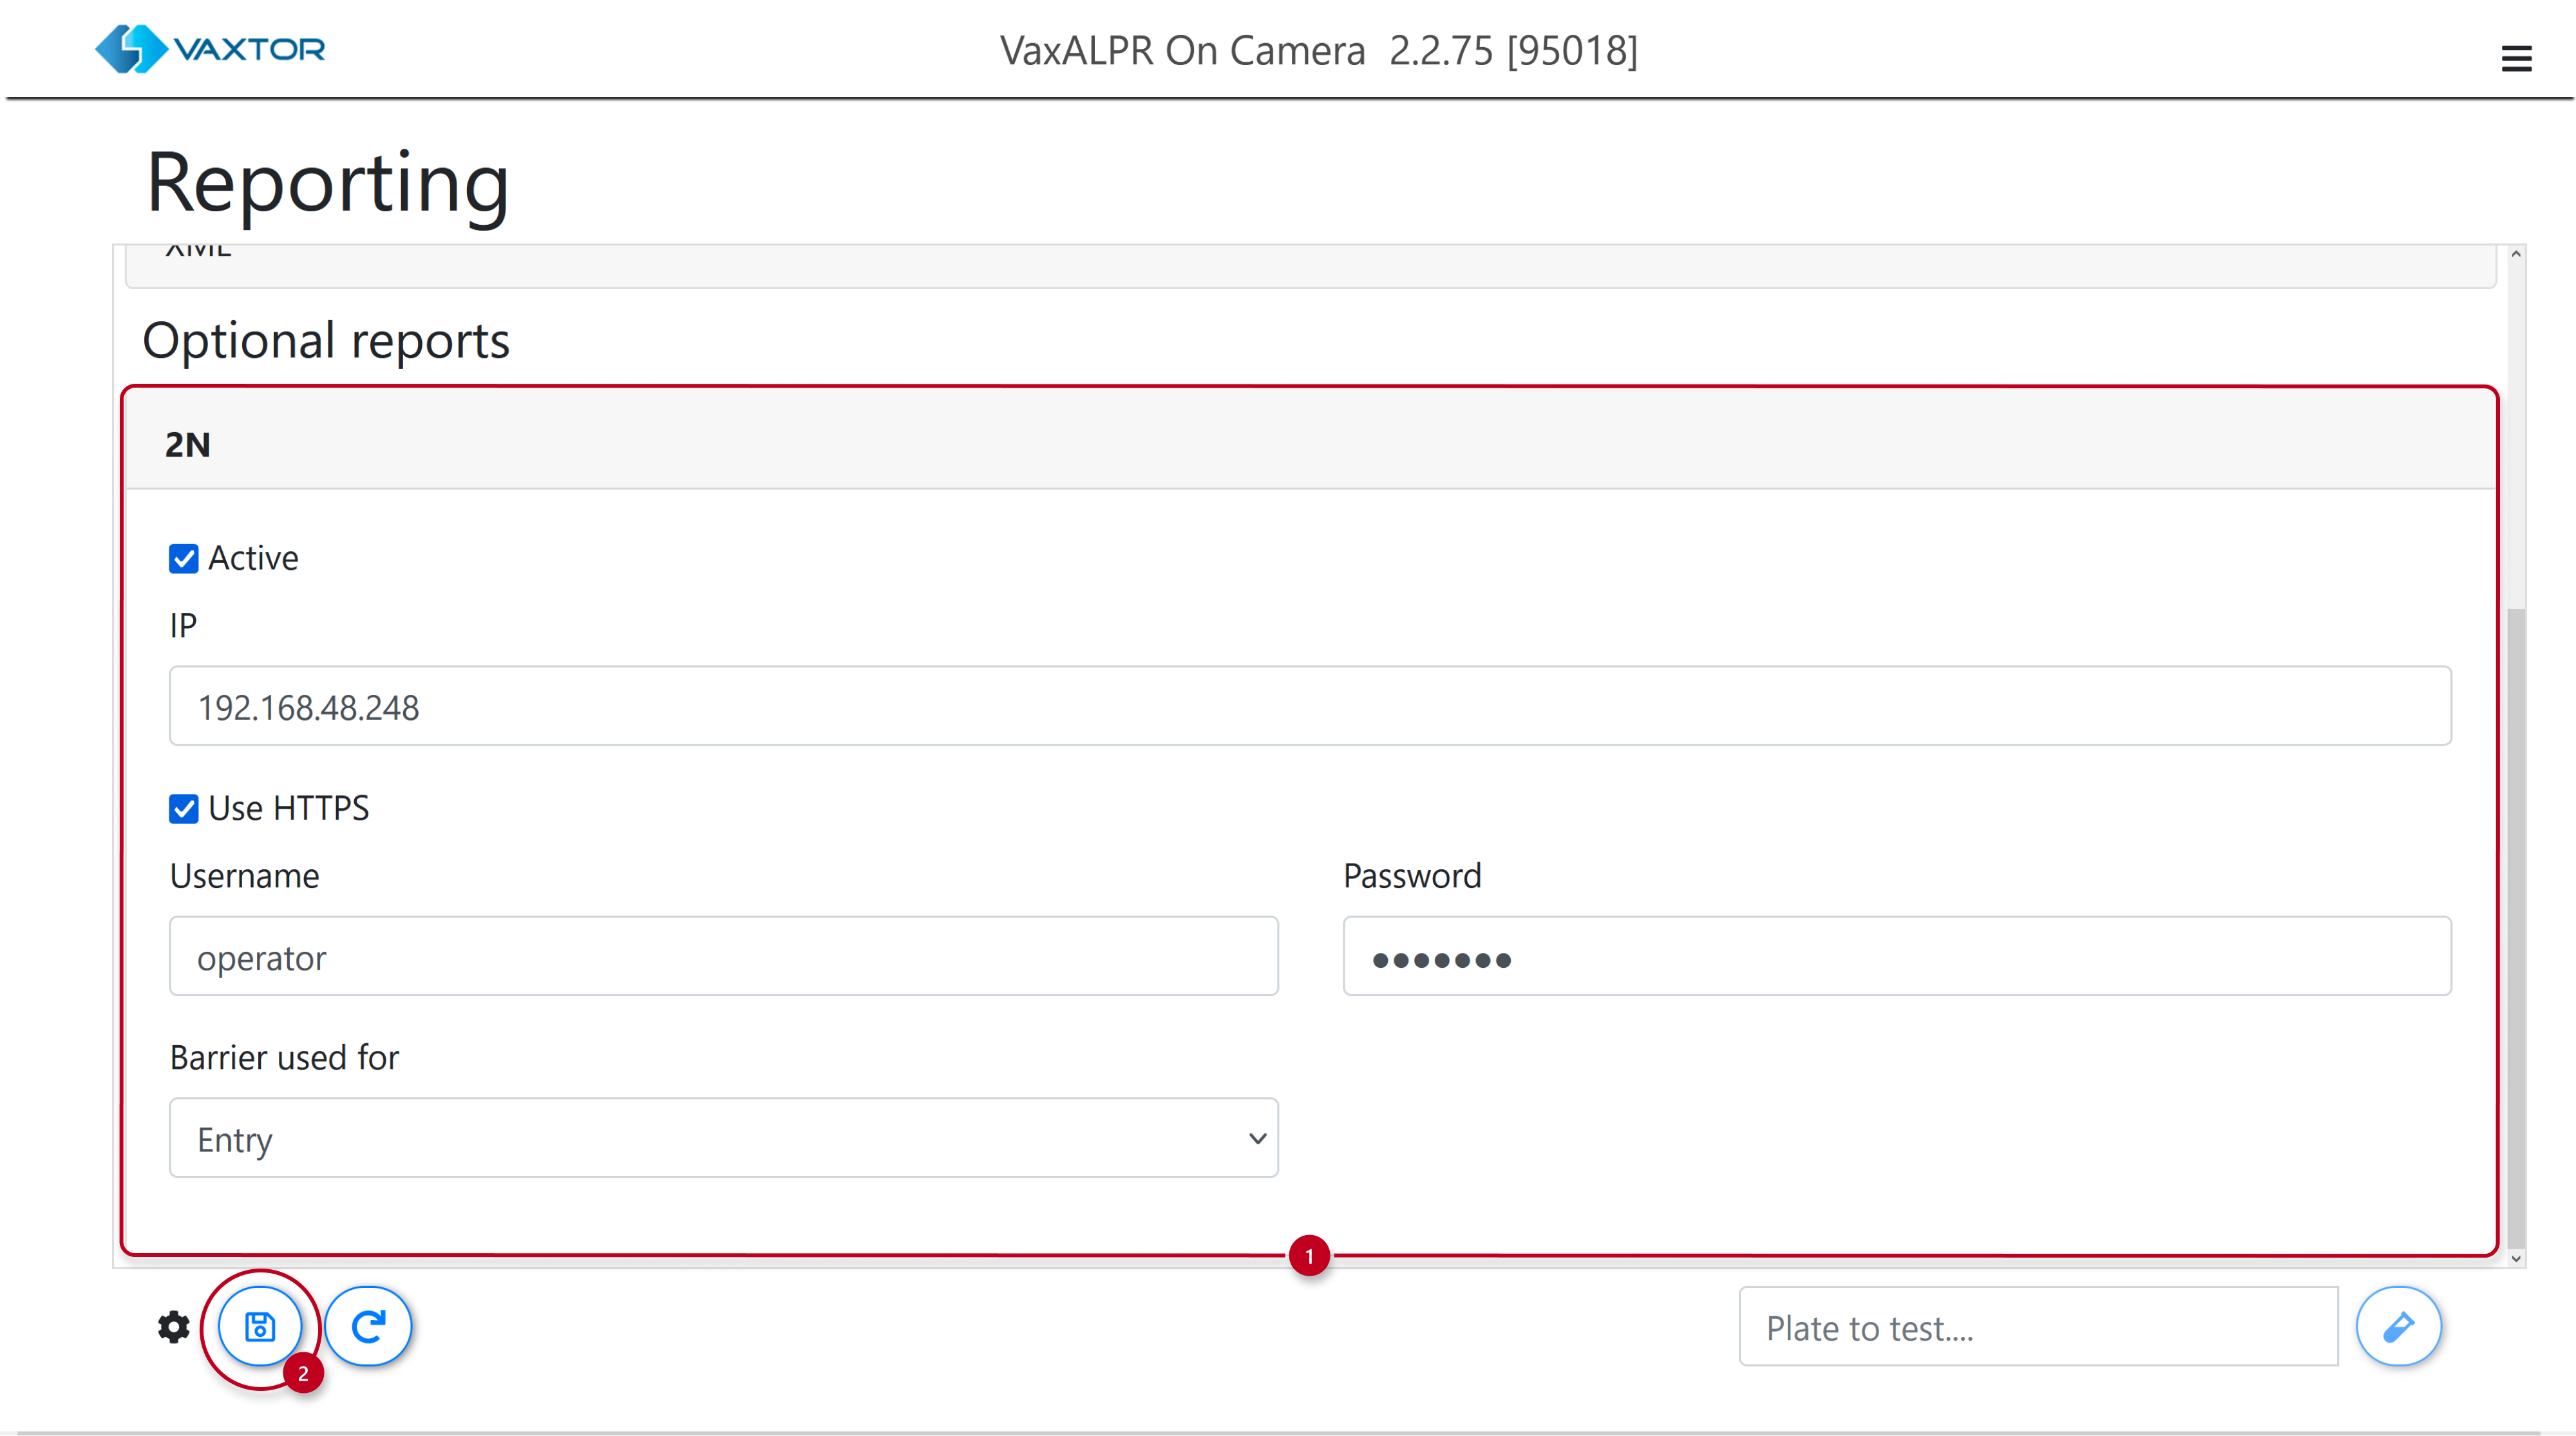
Scroll down to Optional reports and enable 2N.
Fill in your 2N device’s IP address and configure the rest based on the security settings and credentials you entered in the HTTP API section of the 2N device. Save.
-
Open the hamburger menu again and enter Settings.

-
-
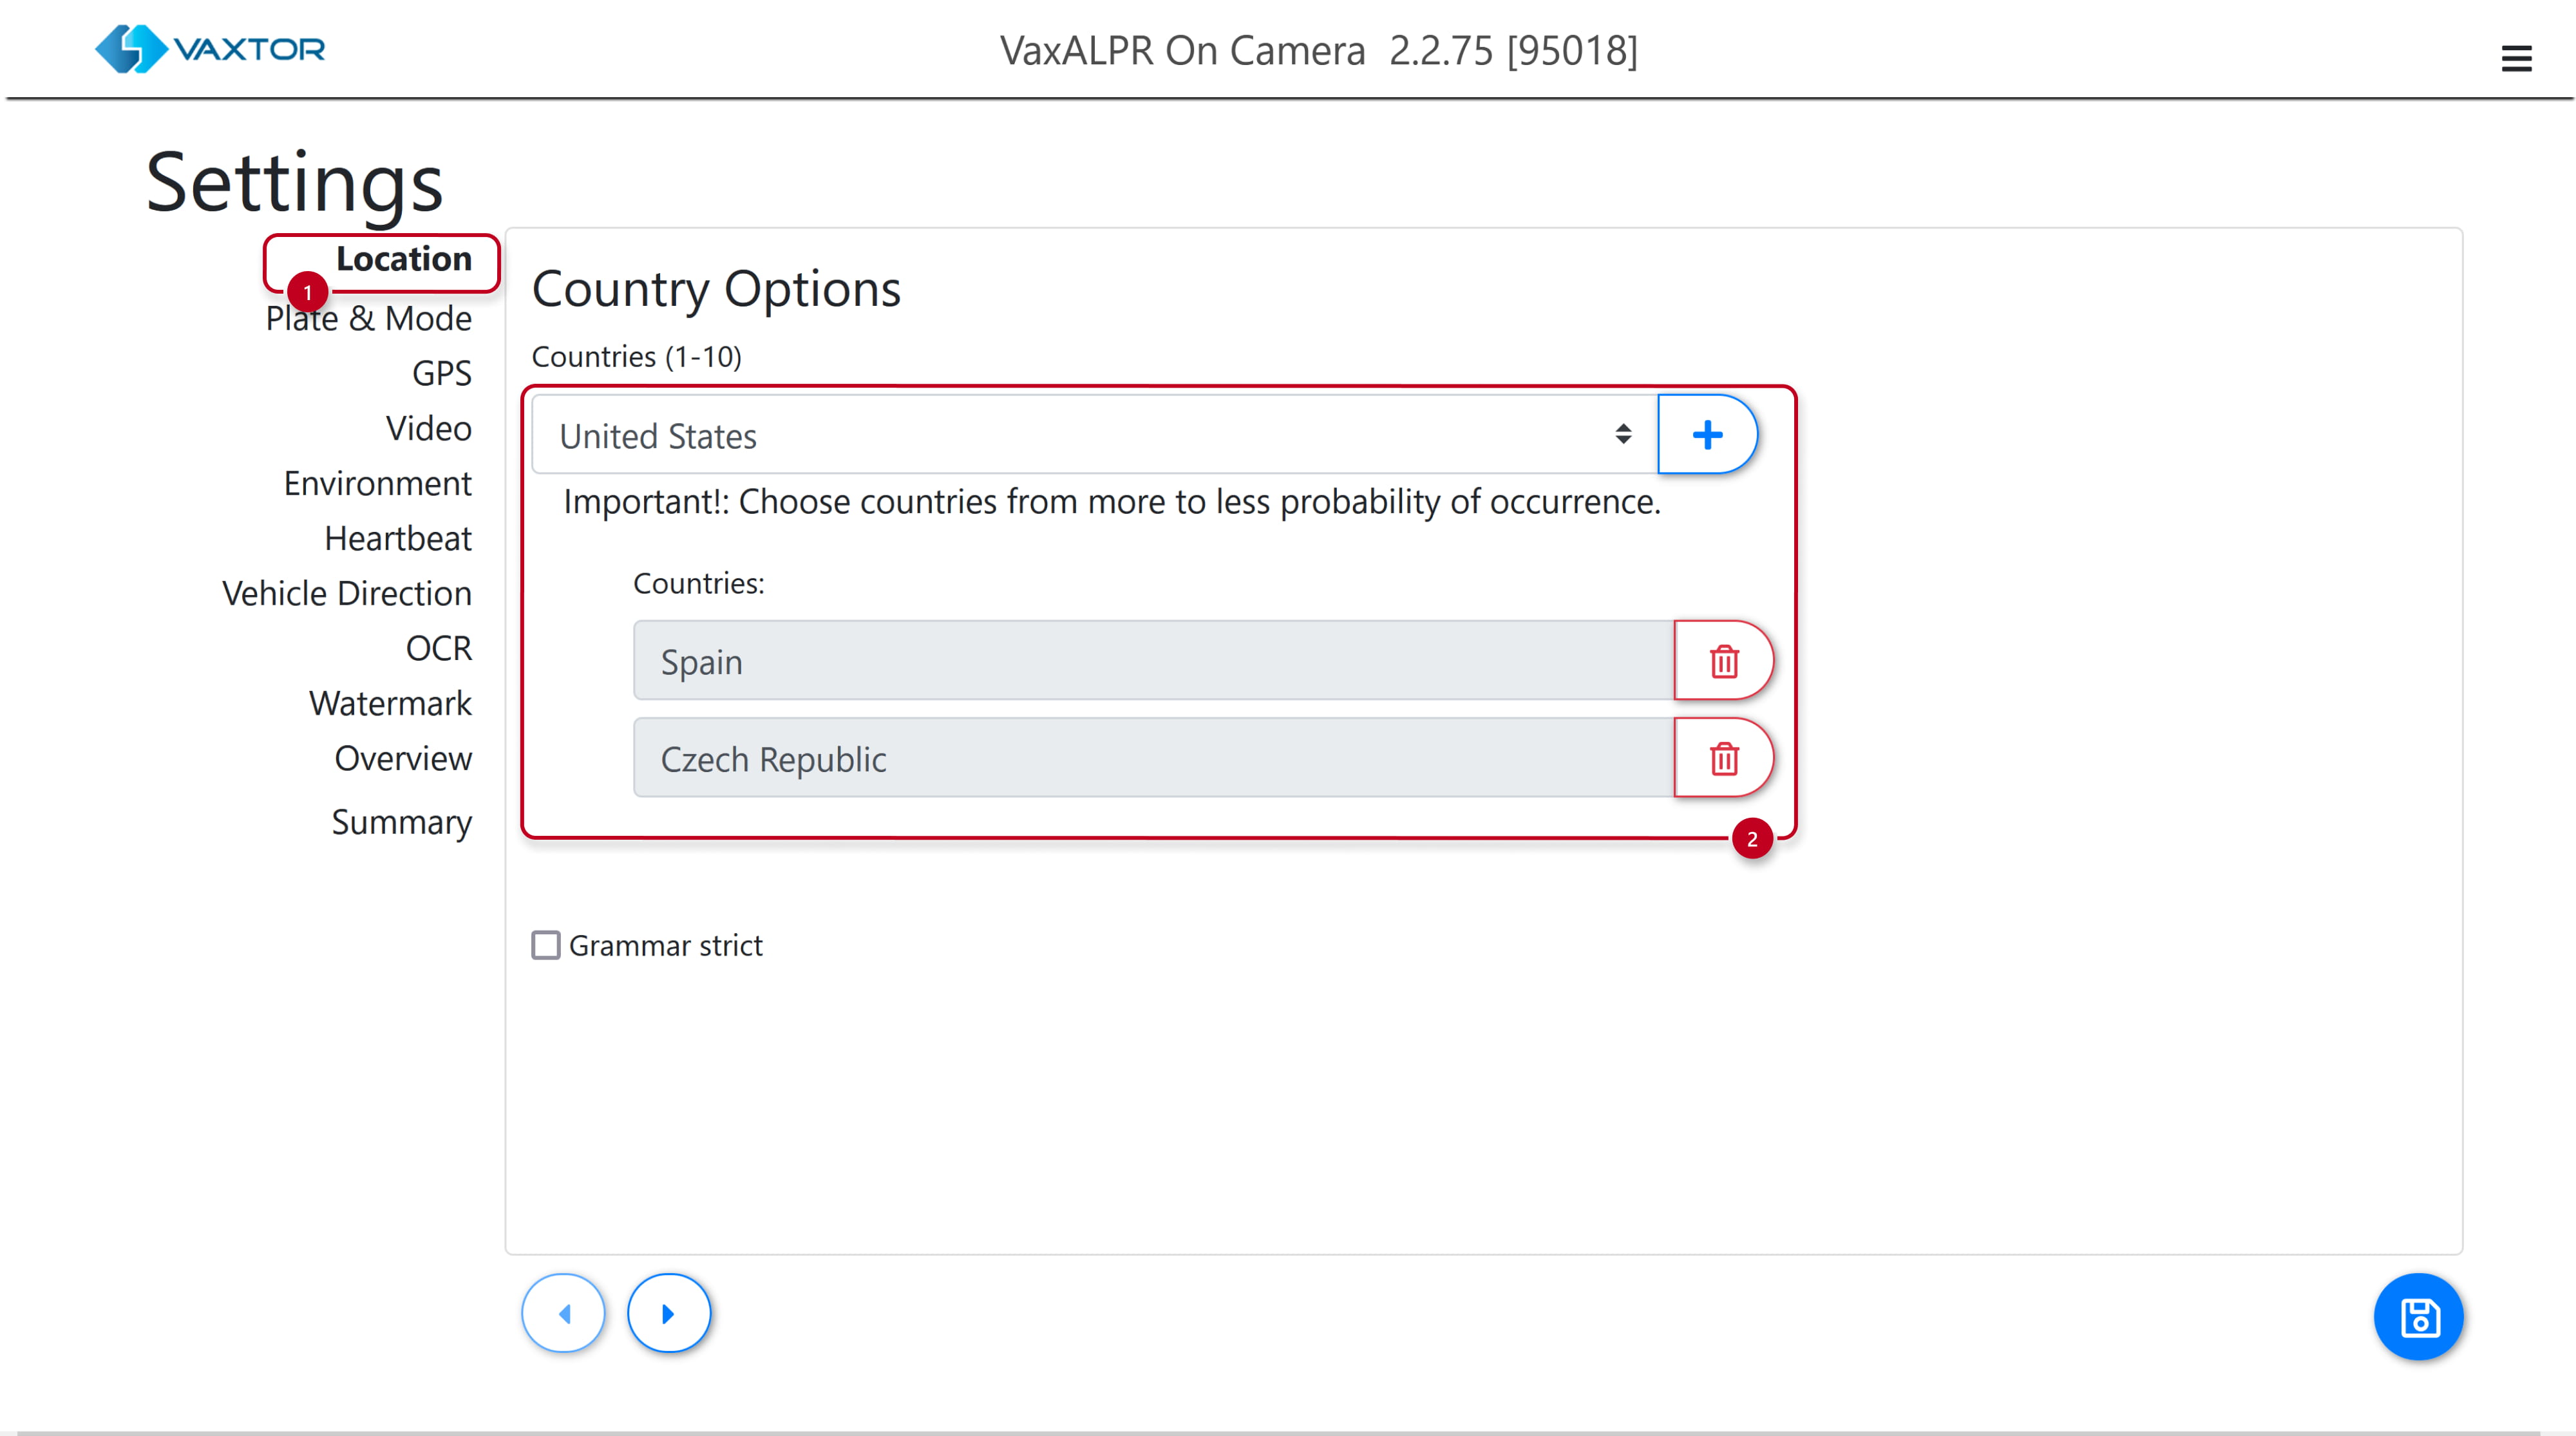
The Location part contains settings which define the countries whose license plates should be recognized. You can select up to 10.
-
-
-
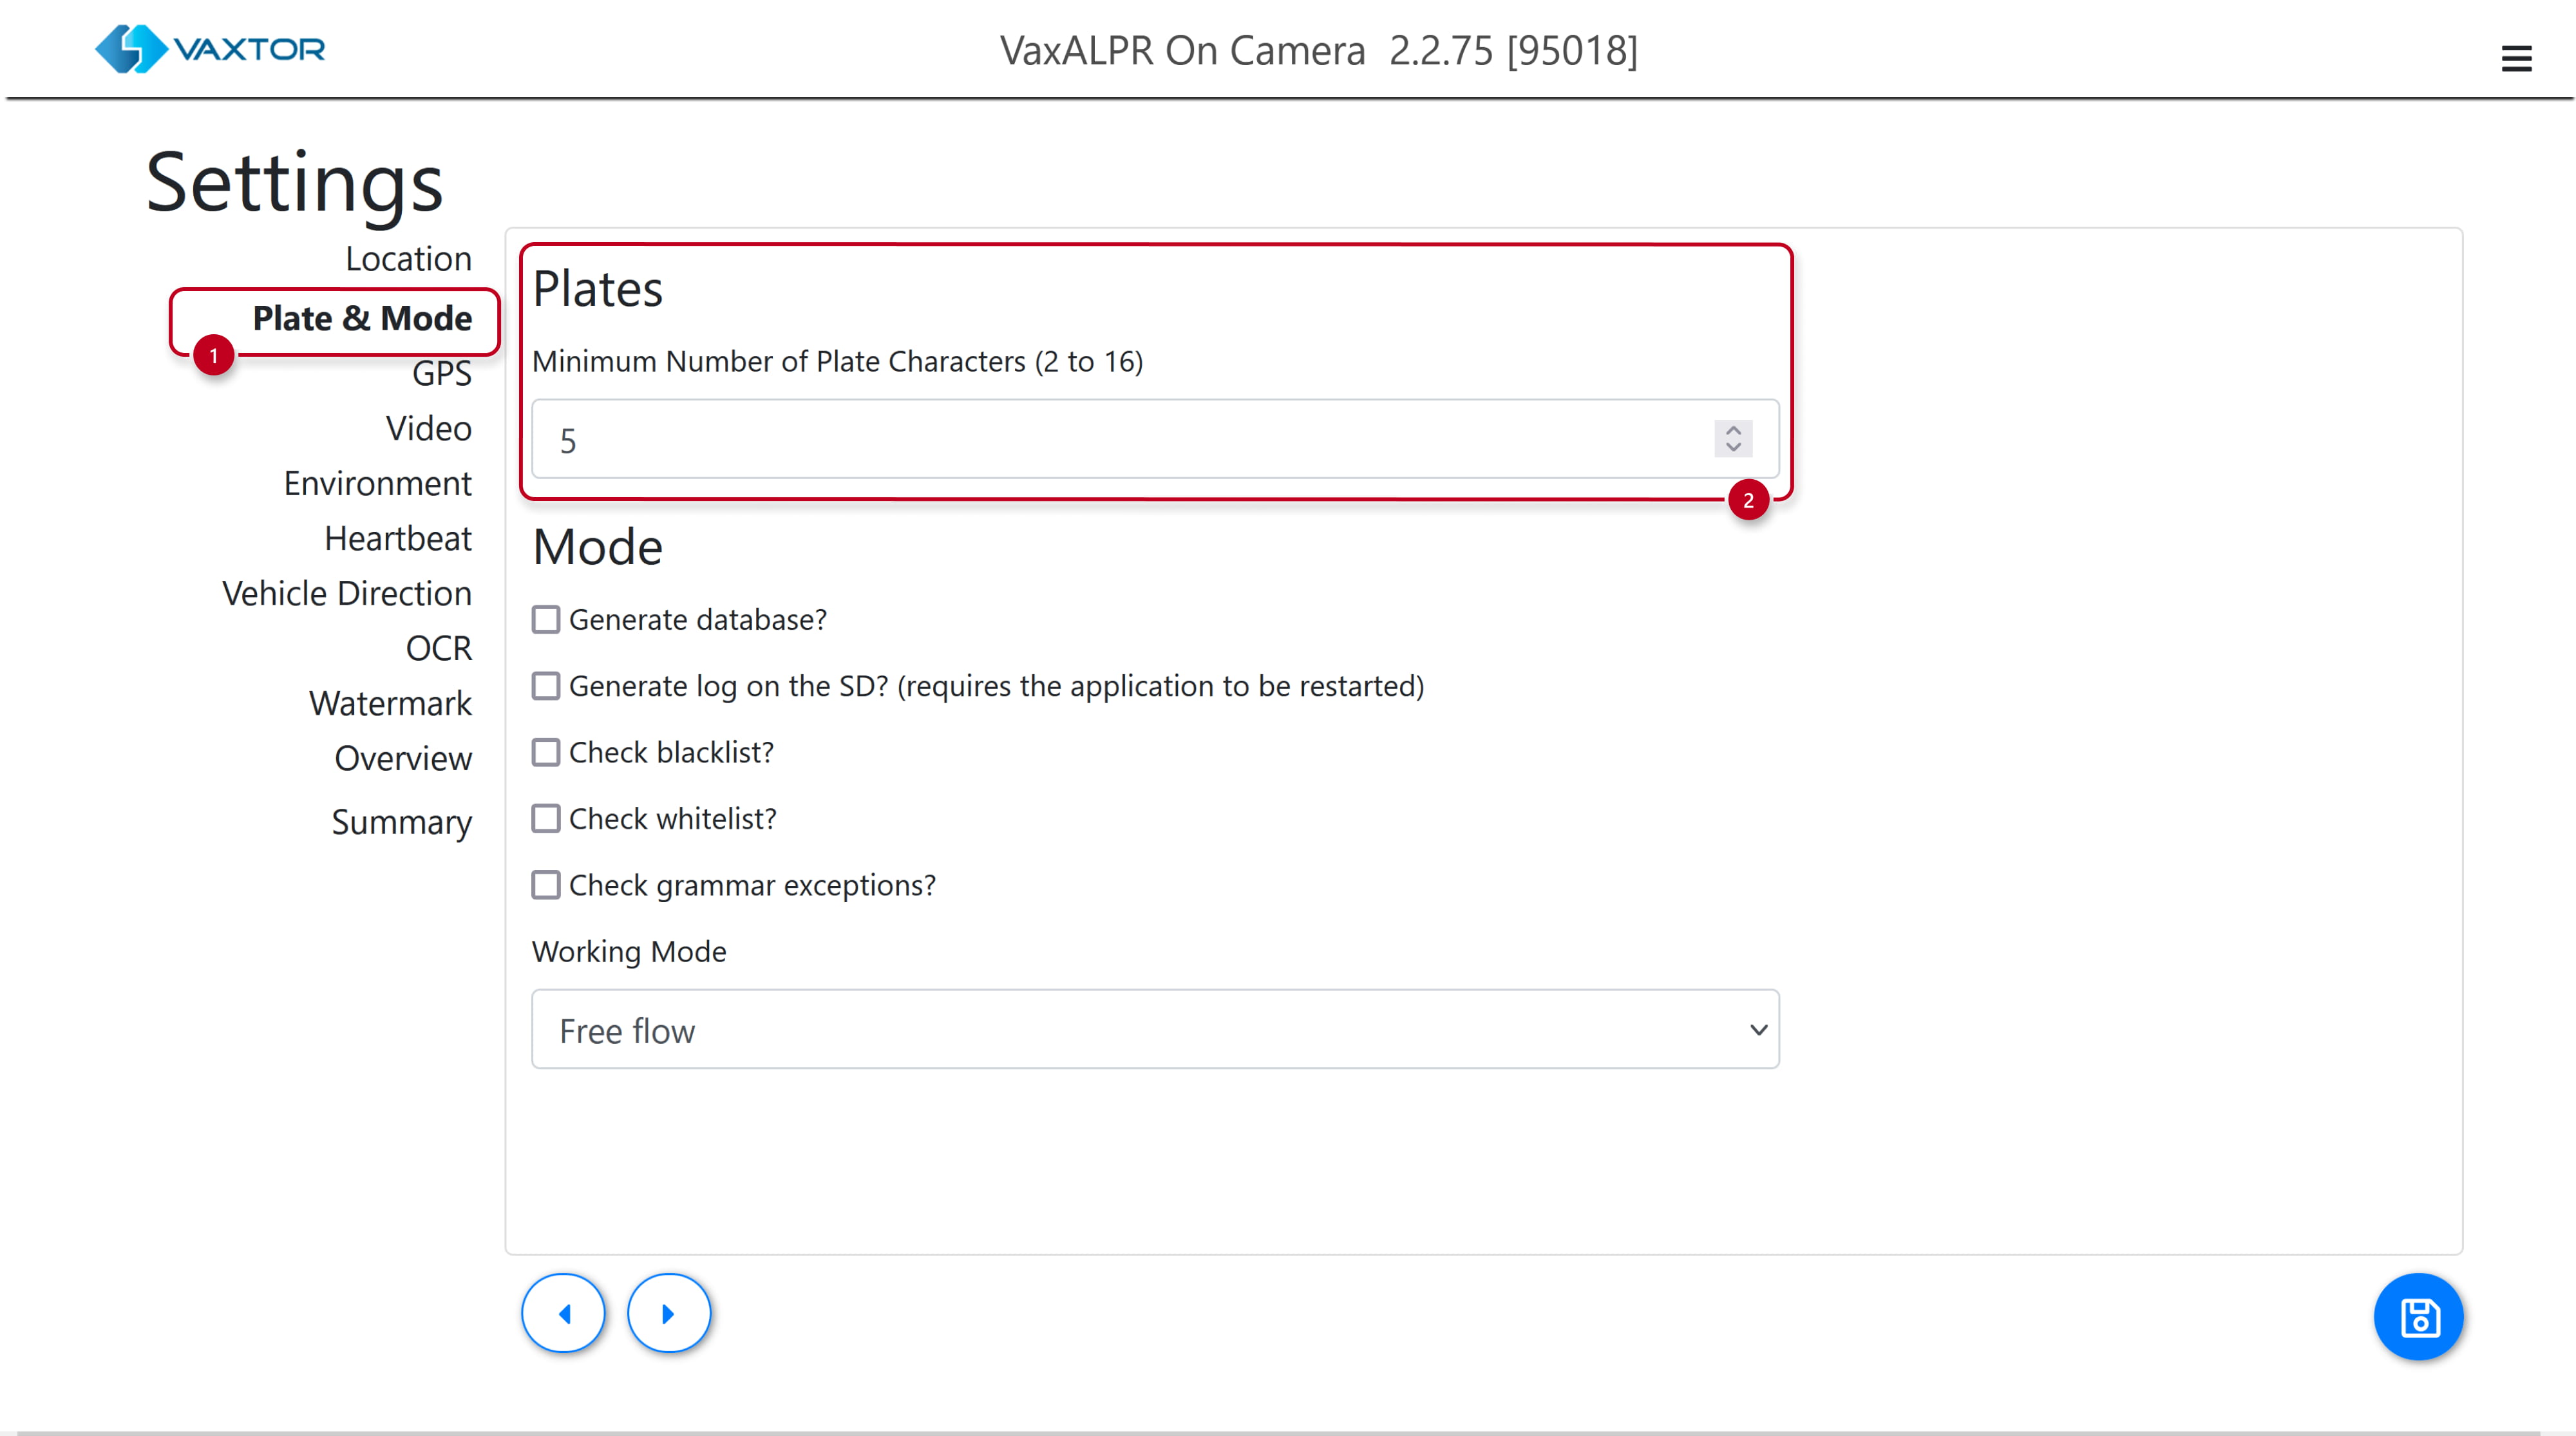
In the Plate & Mode part you can set the minimum number of characters.
-
-
-
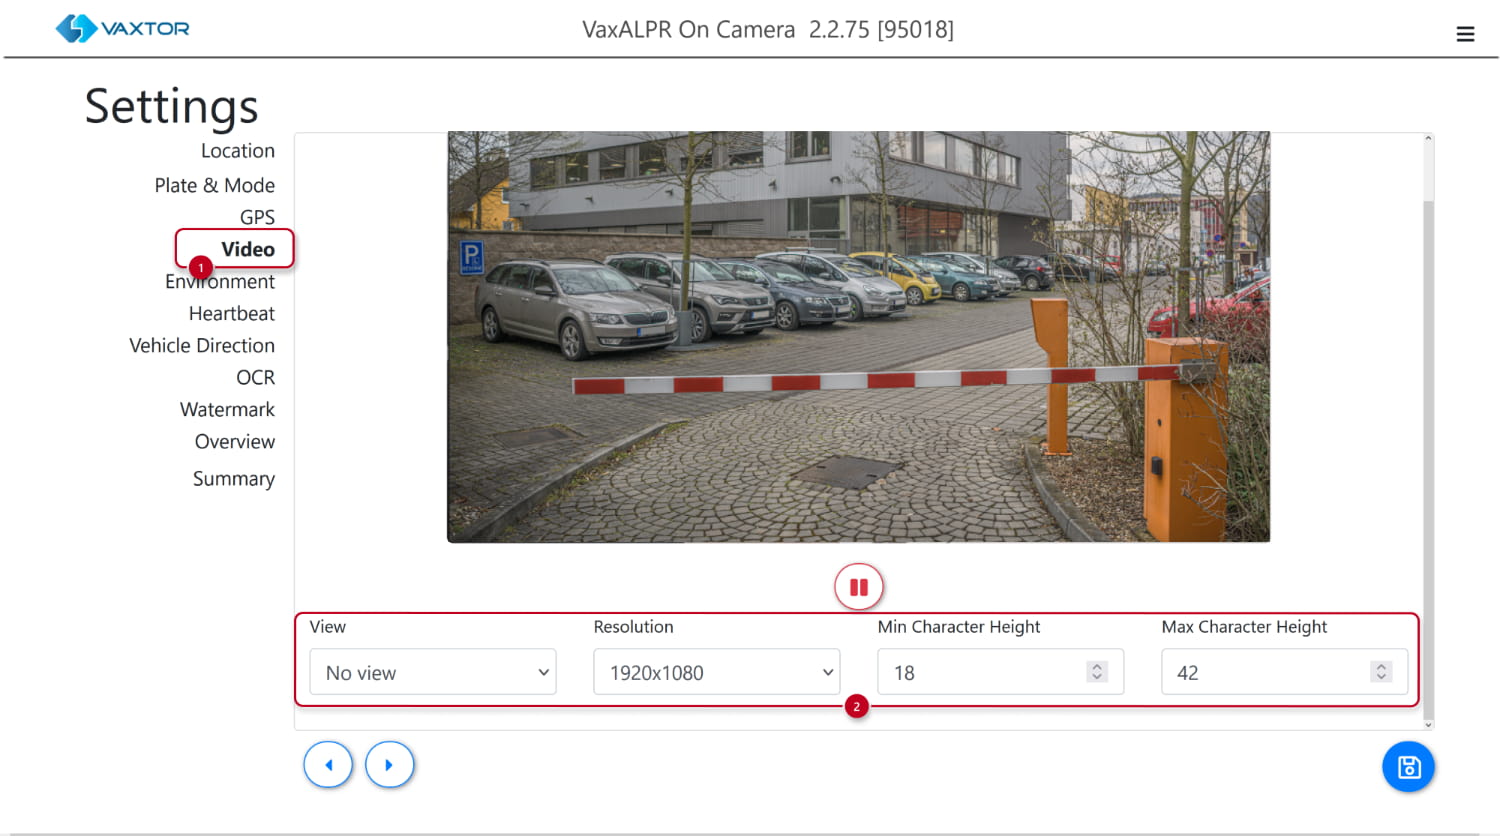
In the Video part you can set the minimum and maximum character height. Optimal settings are dependent on numerous factors, please see the VaxALPR manual for more details.
-
-
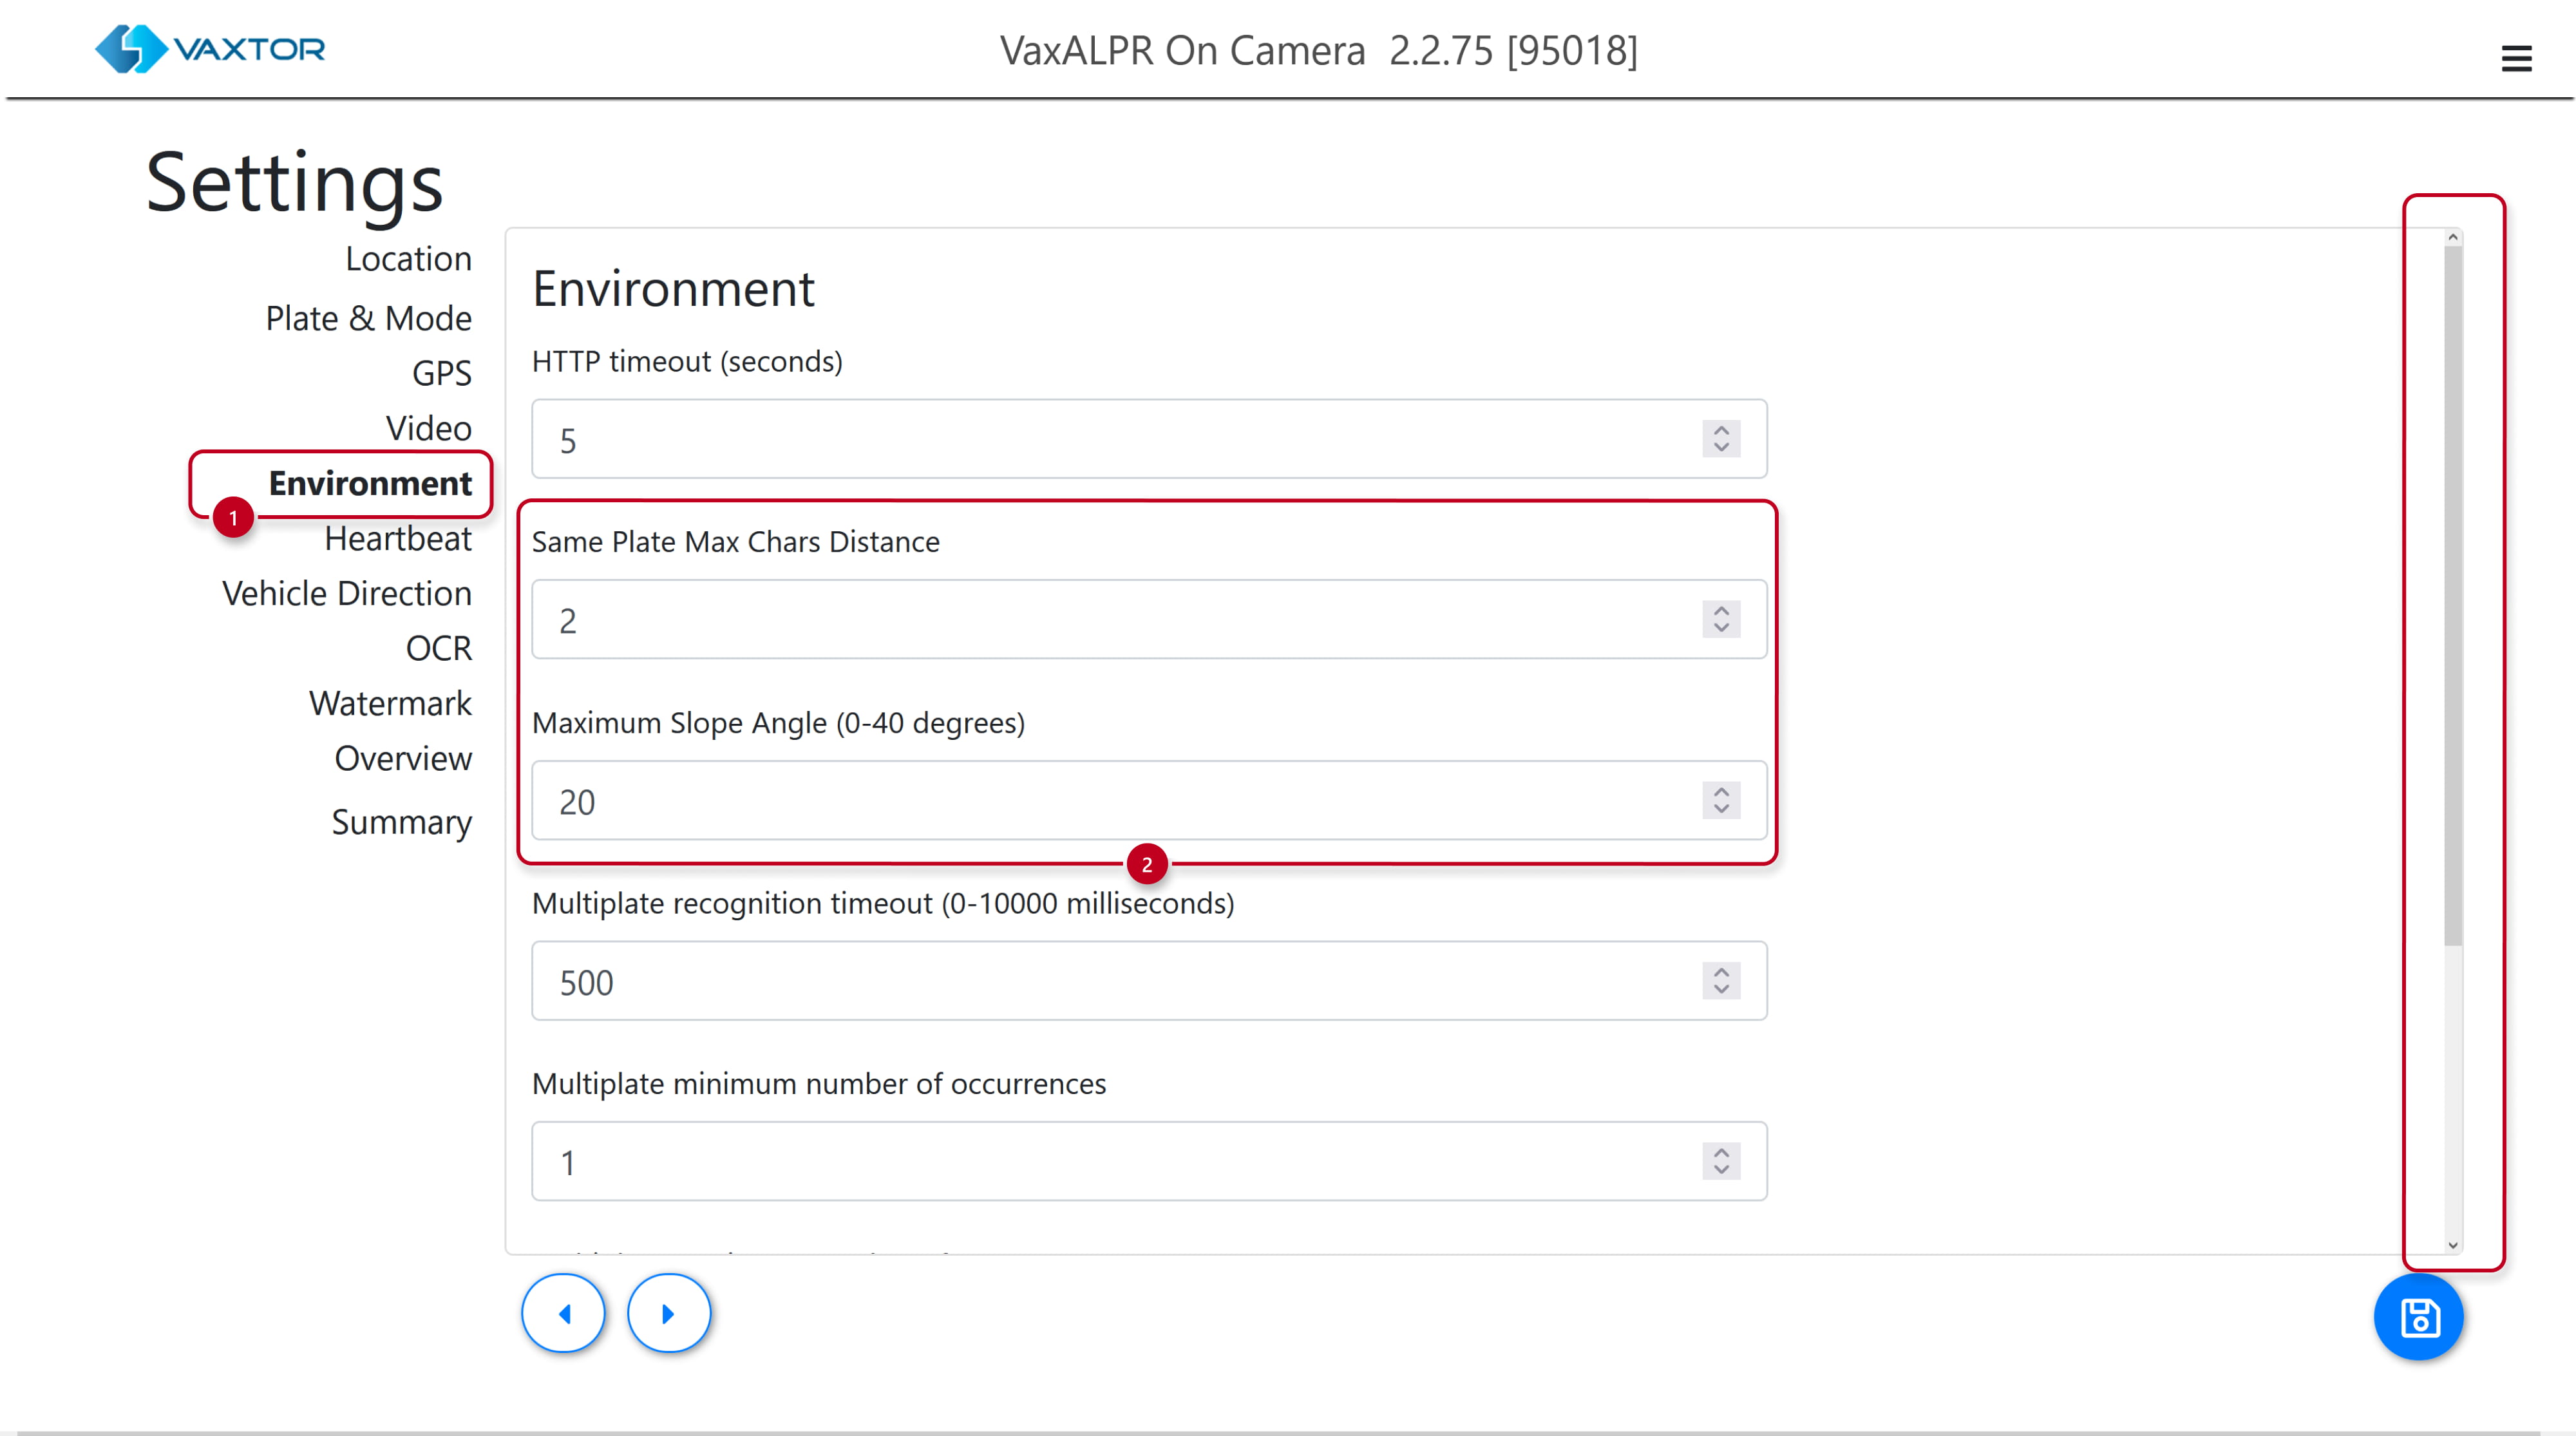
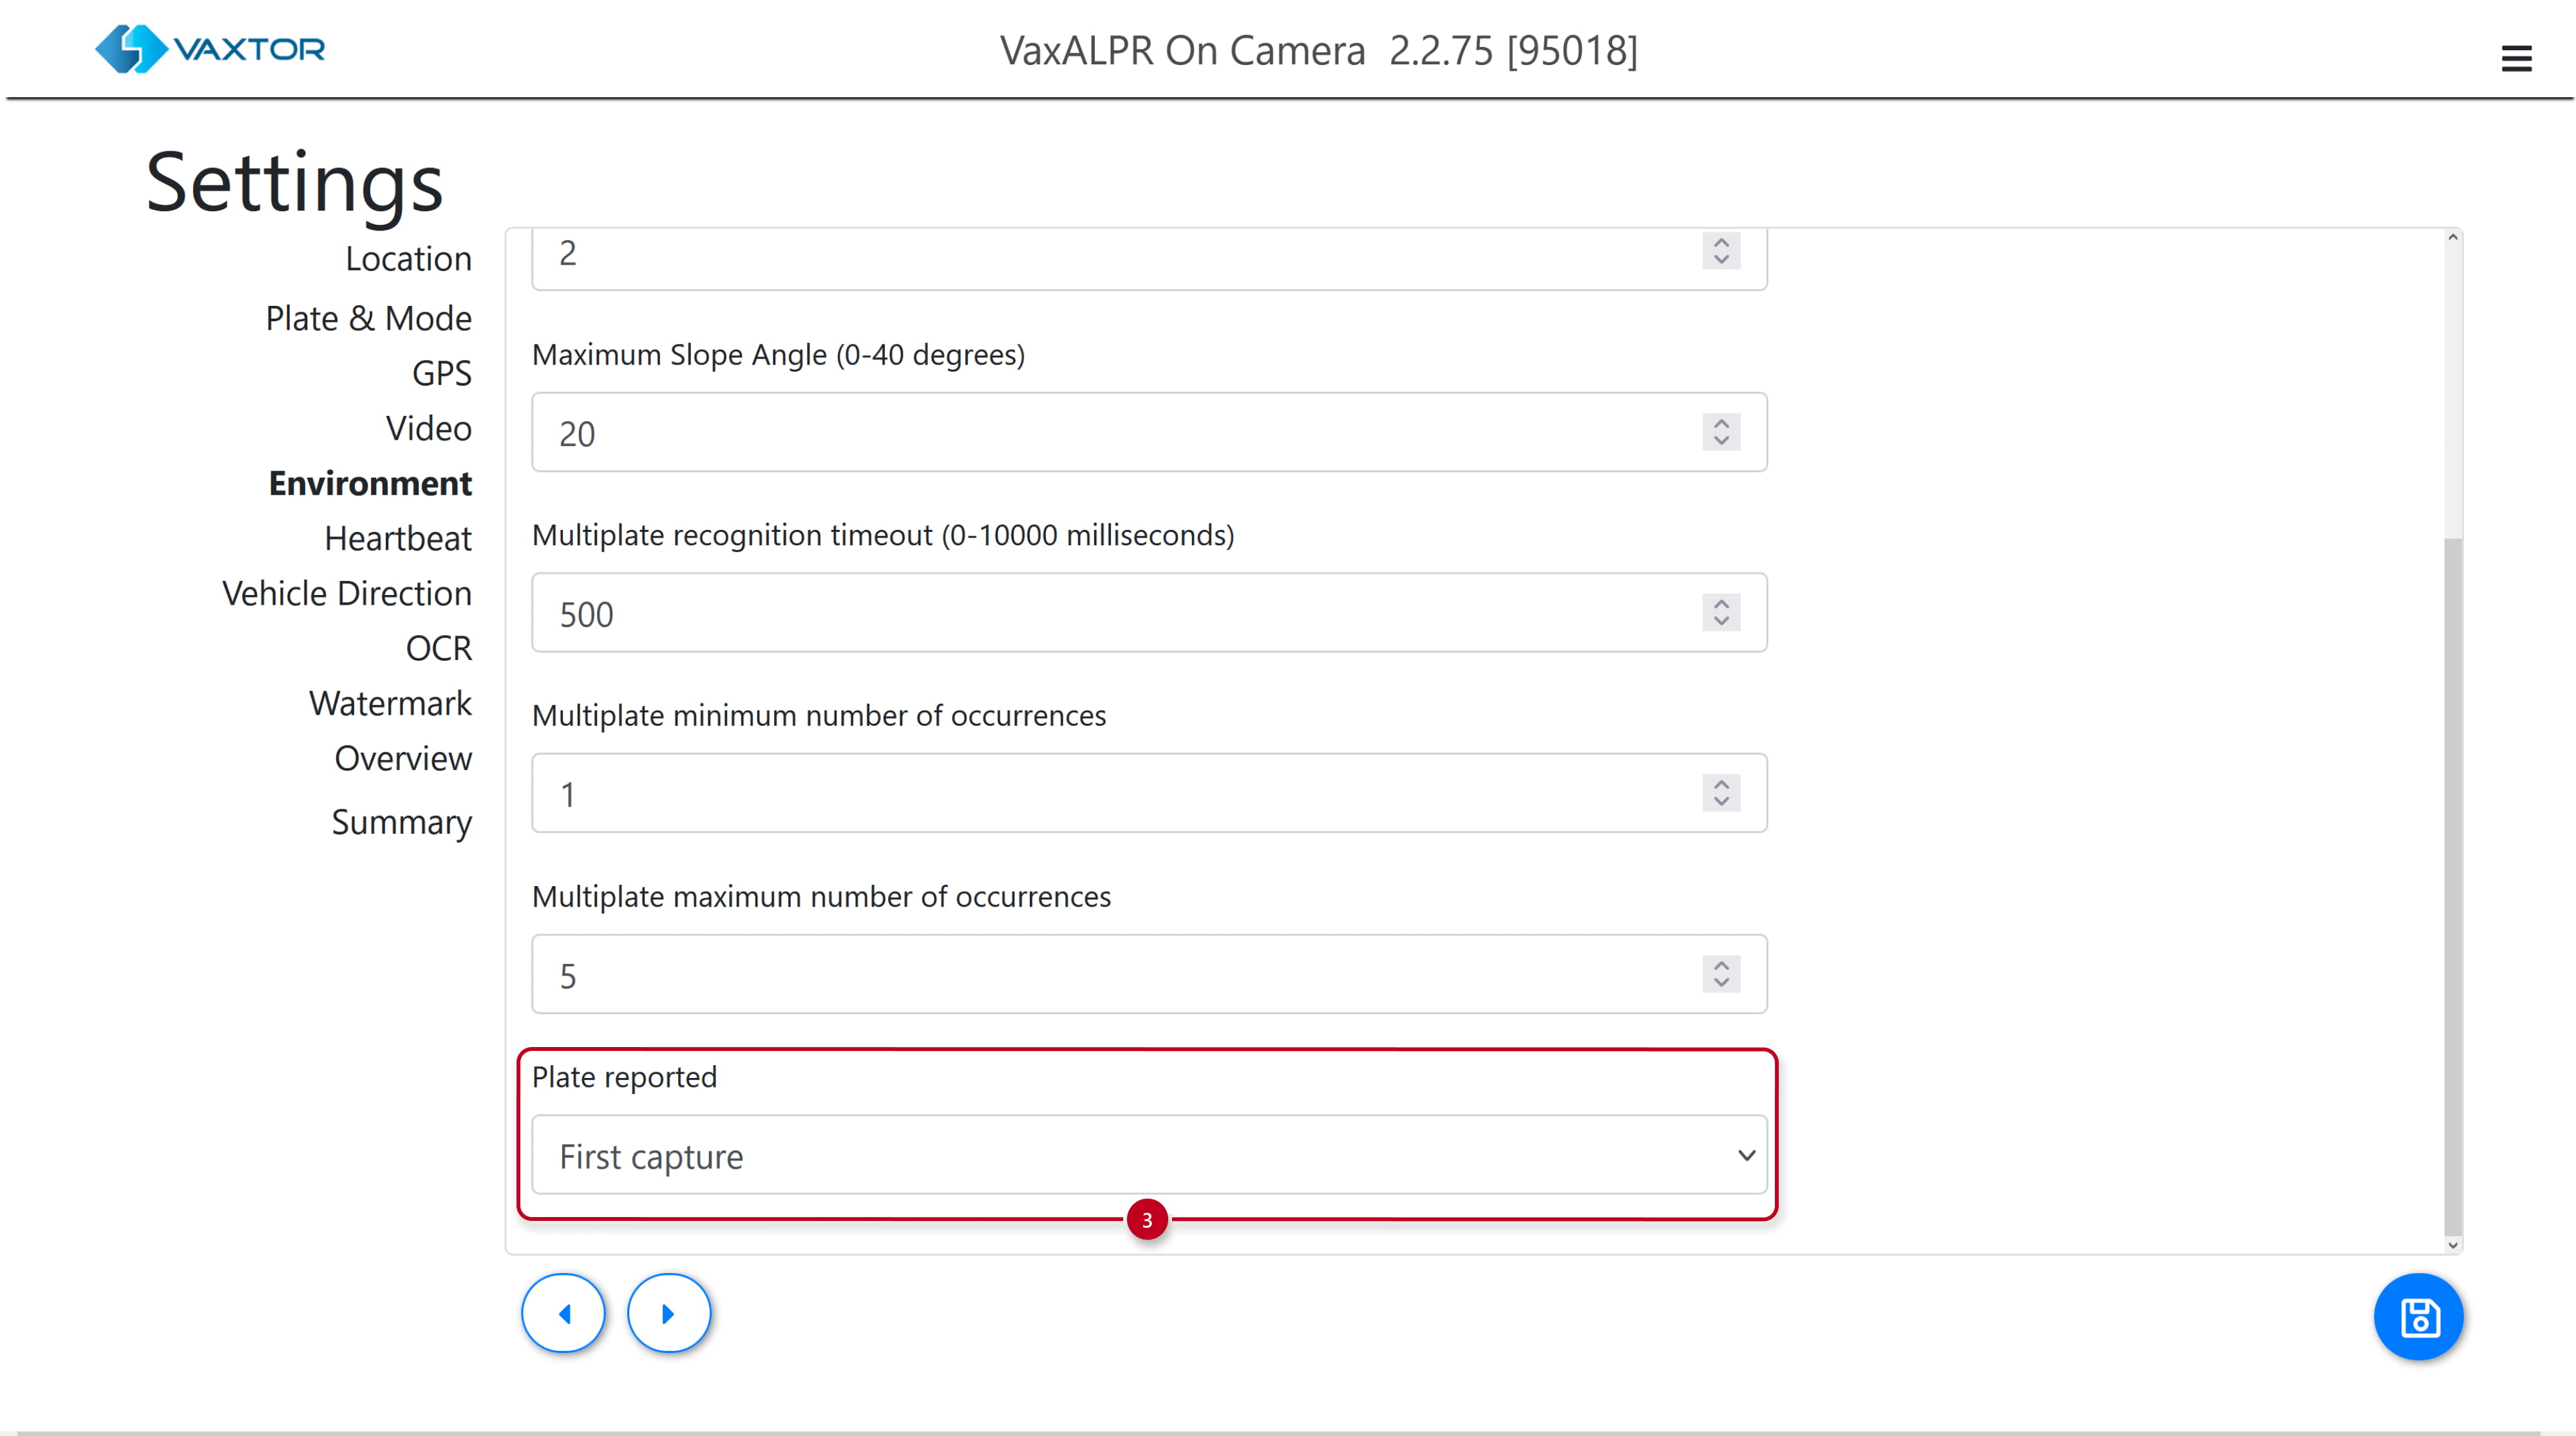
- In the Environment part, you have the option to adjust how often can the same plate be authorized, what’s the maximum angle under which OCR should recognize license plates and most importantly, when to report a recognized plate.
-
-
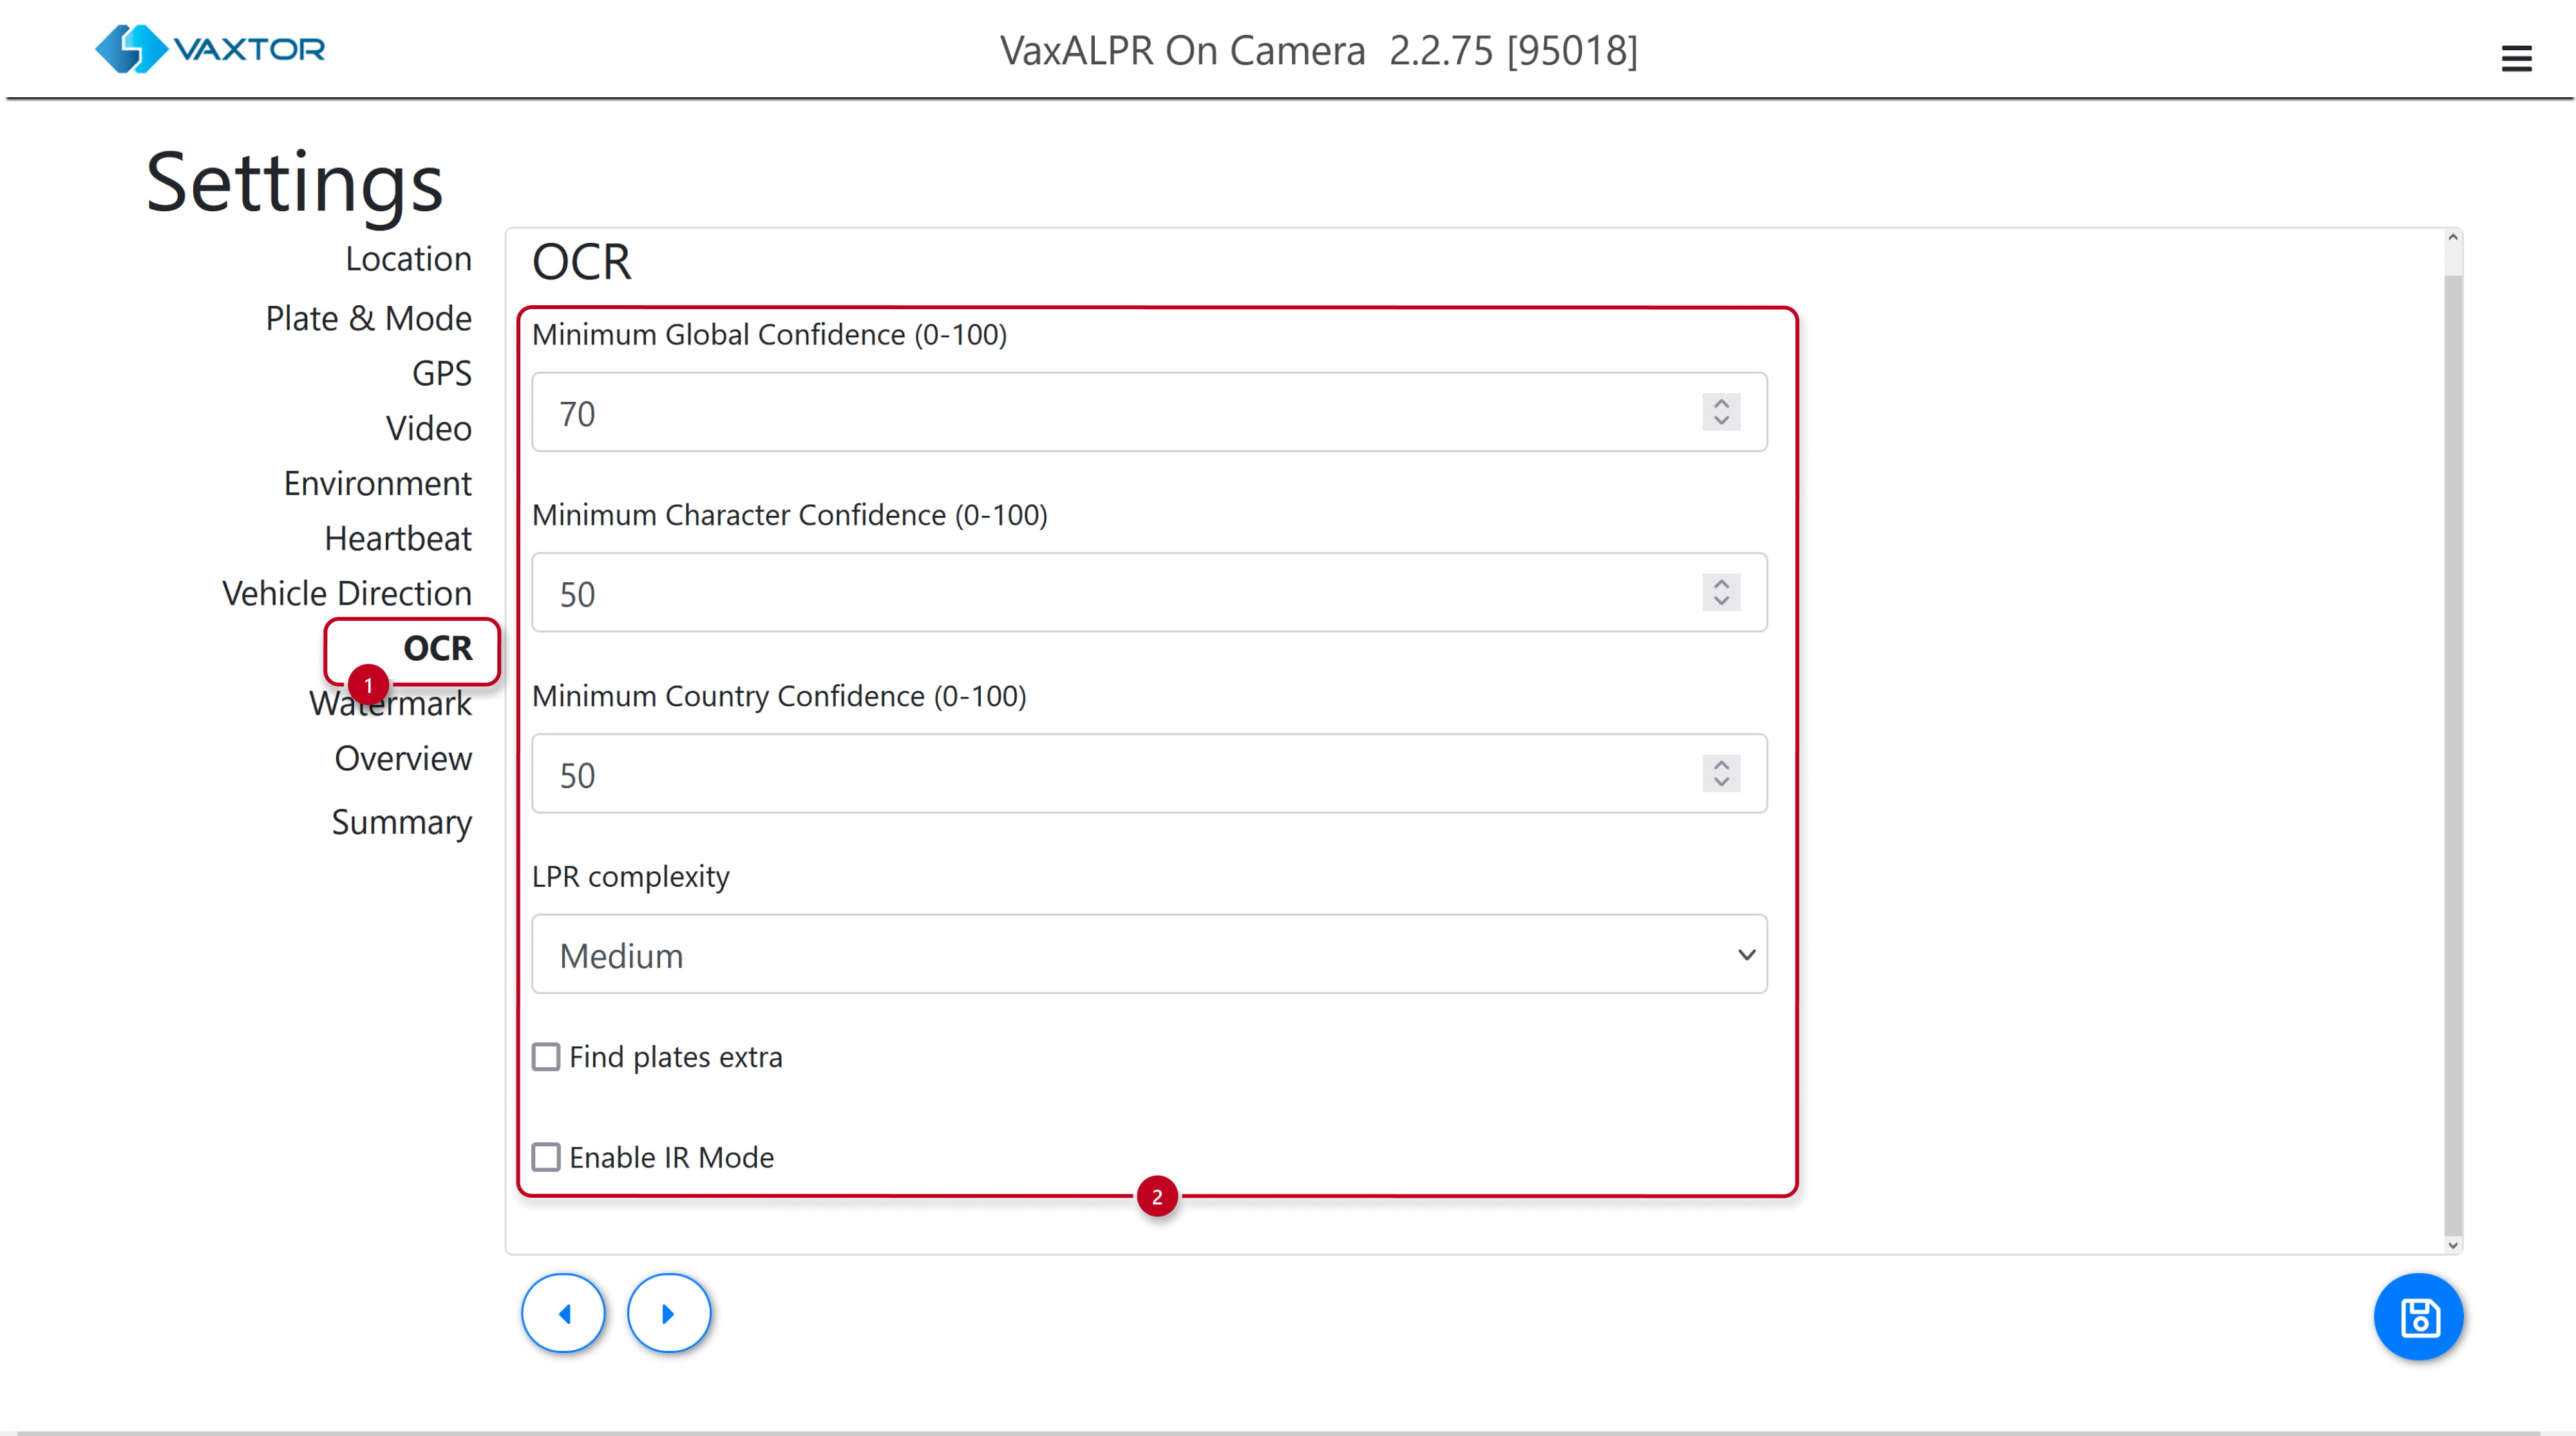
The OCR part lets you fine tune the LPR confidence.
-
-
-
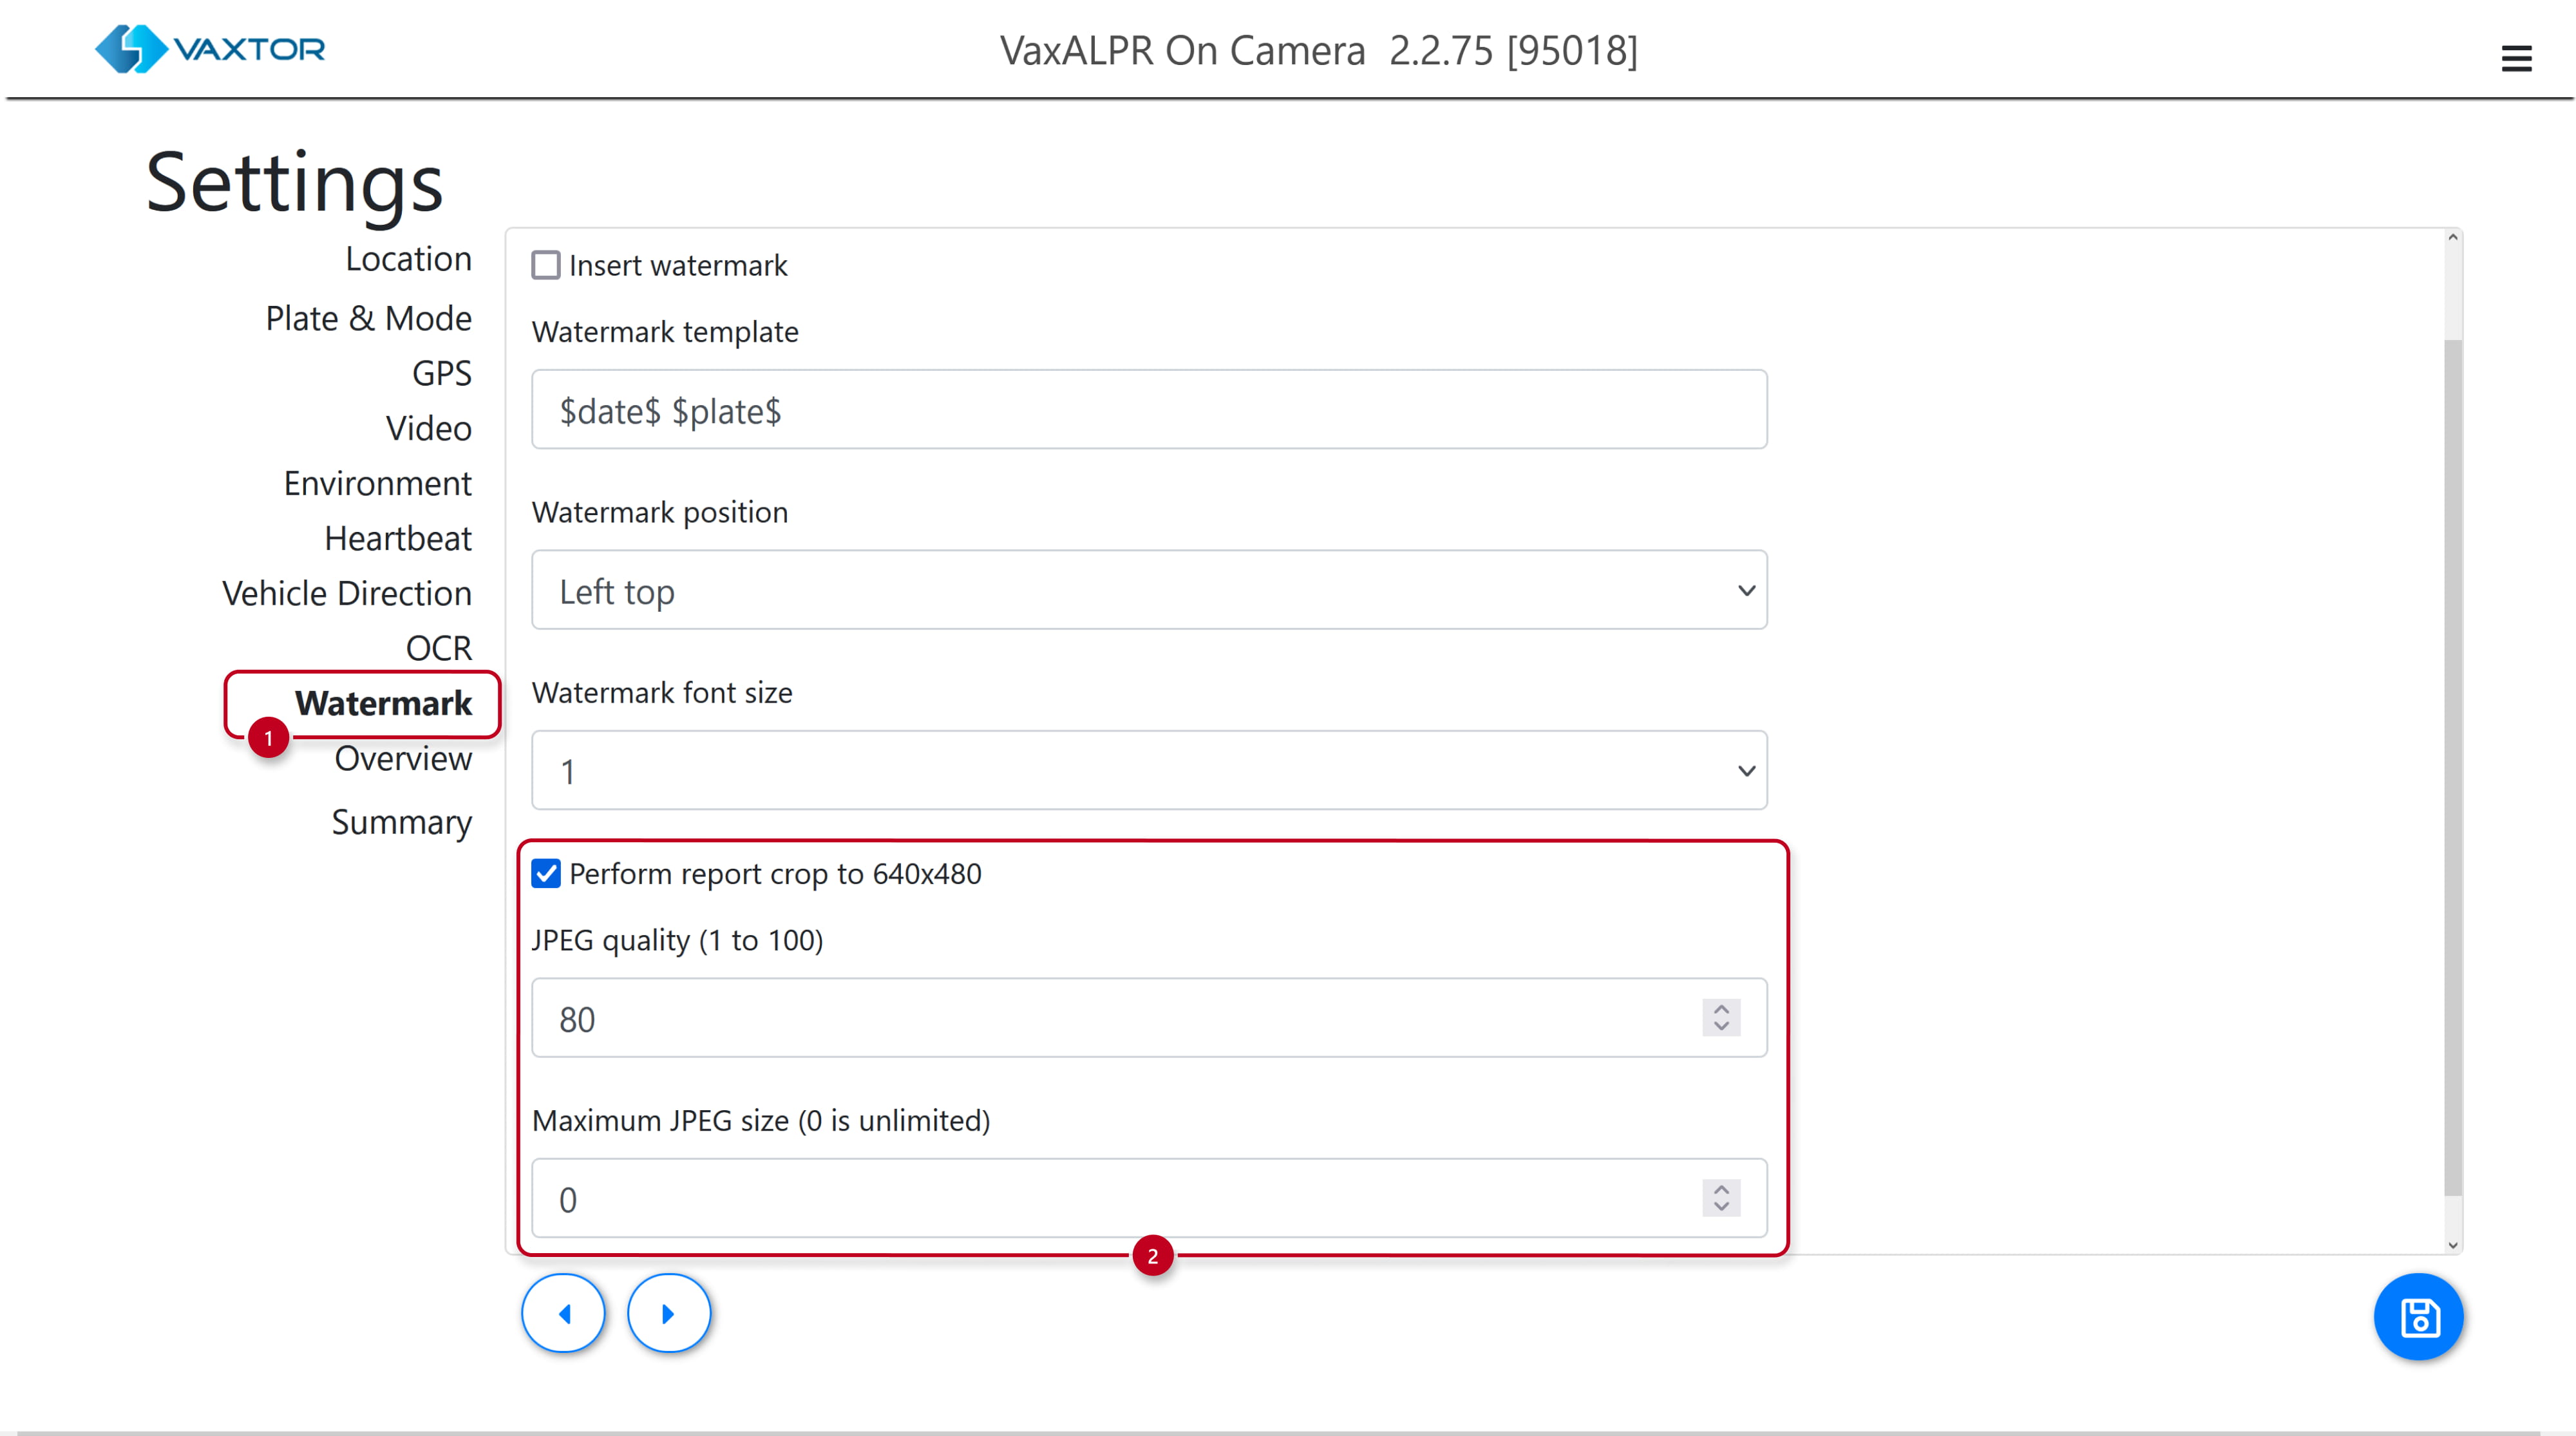
The Watermark part lets you adjust the images sent to 2N devices. Leave the Maximum JPEG size filter set to 0 as the maximum image size sent to 2N devices is 256 kB anyway – if the compressed file is bigger than that, it won't be sent. Thus you should adjust JPEG quality accordingly, we recommend setting it to 50 if your camera has a resolution around 1920×1080 px. For lower image resolutions or when "Perform report crop to 640×480" is checked you can set the quality to a higher value.
-
-
-
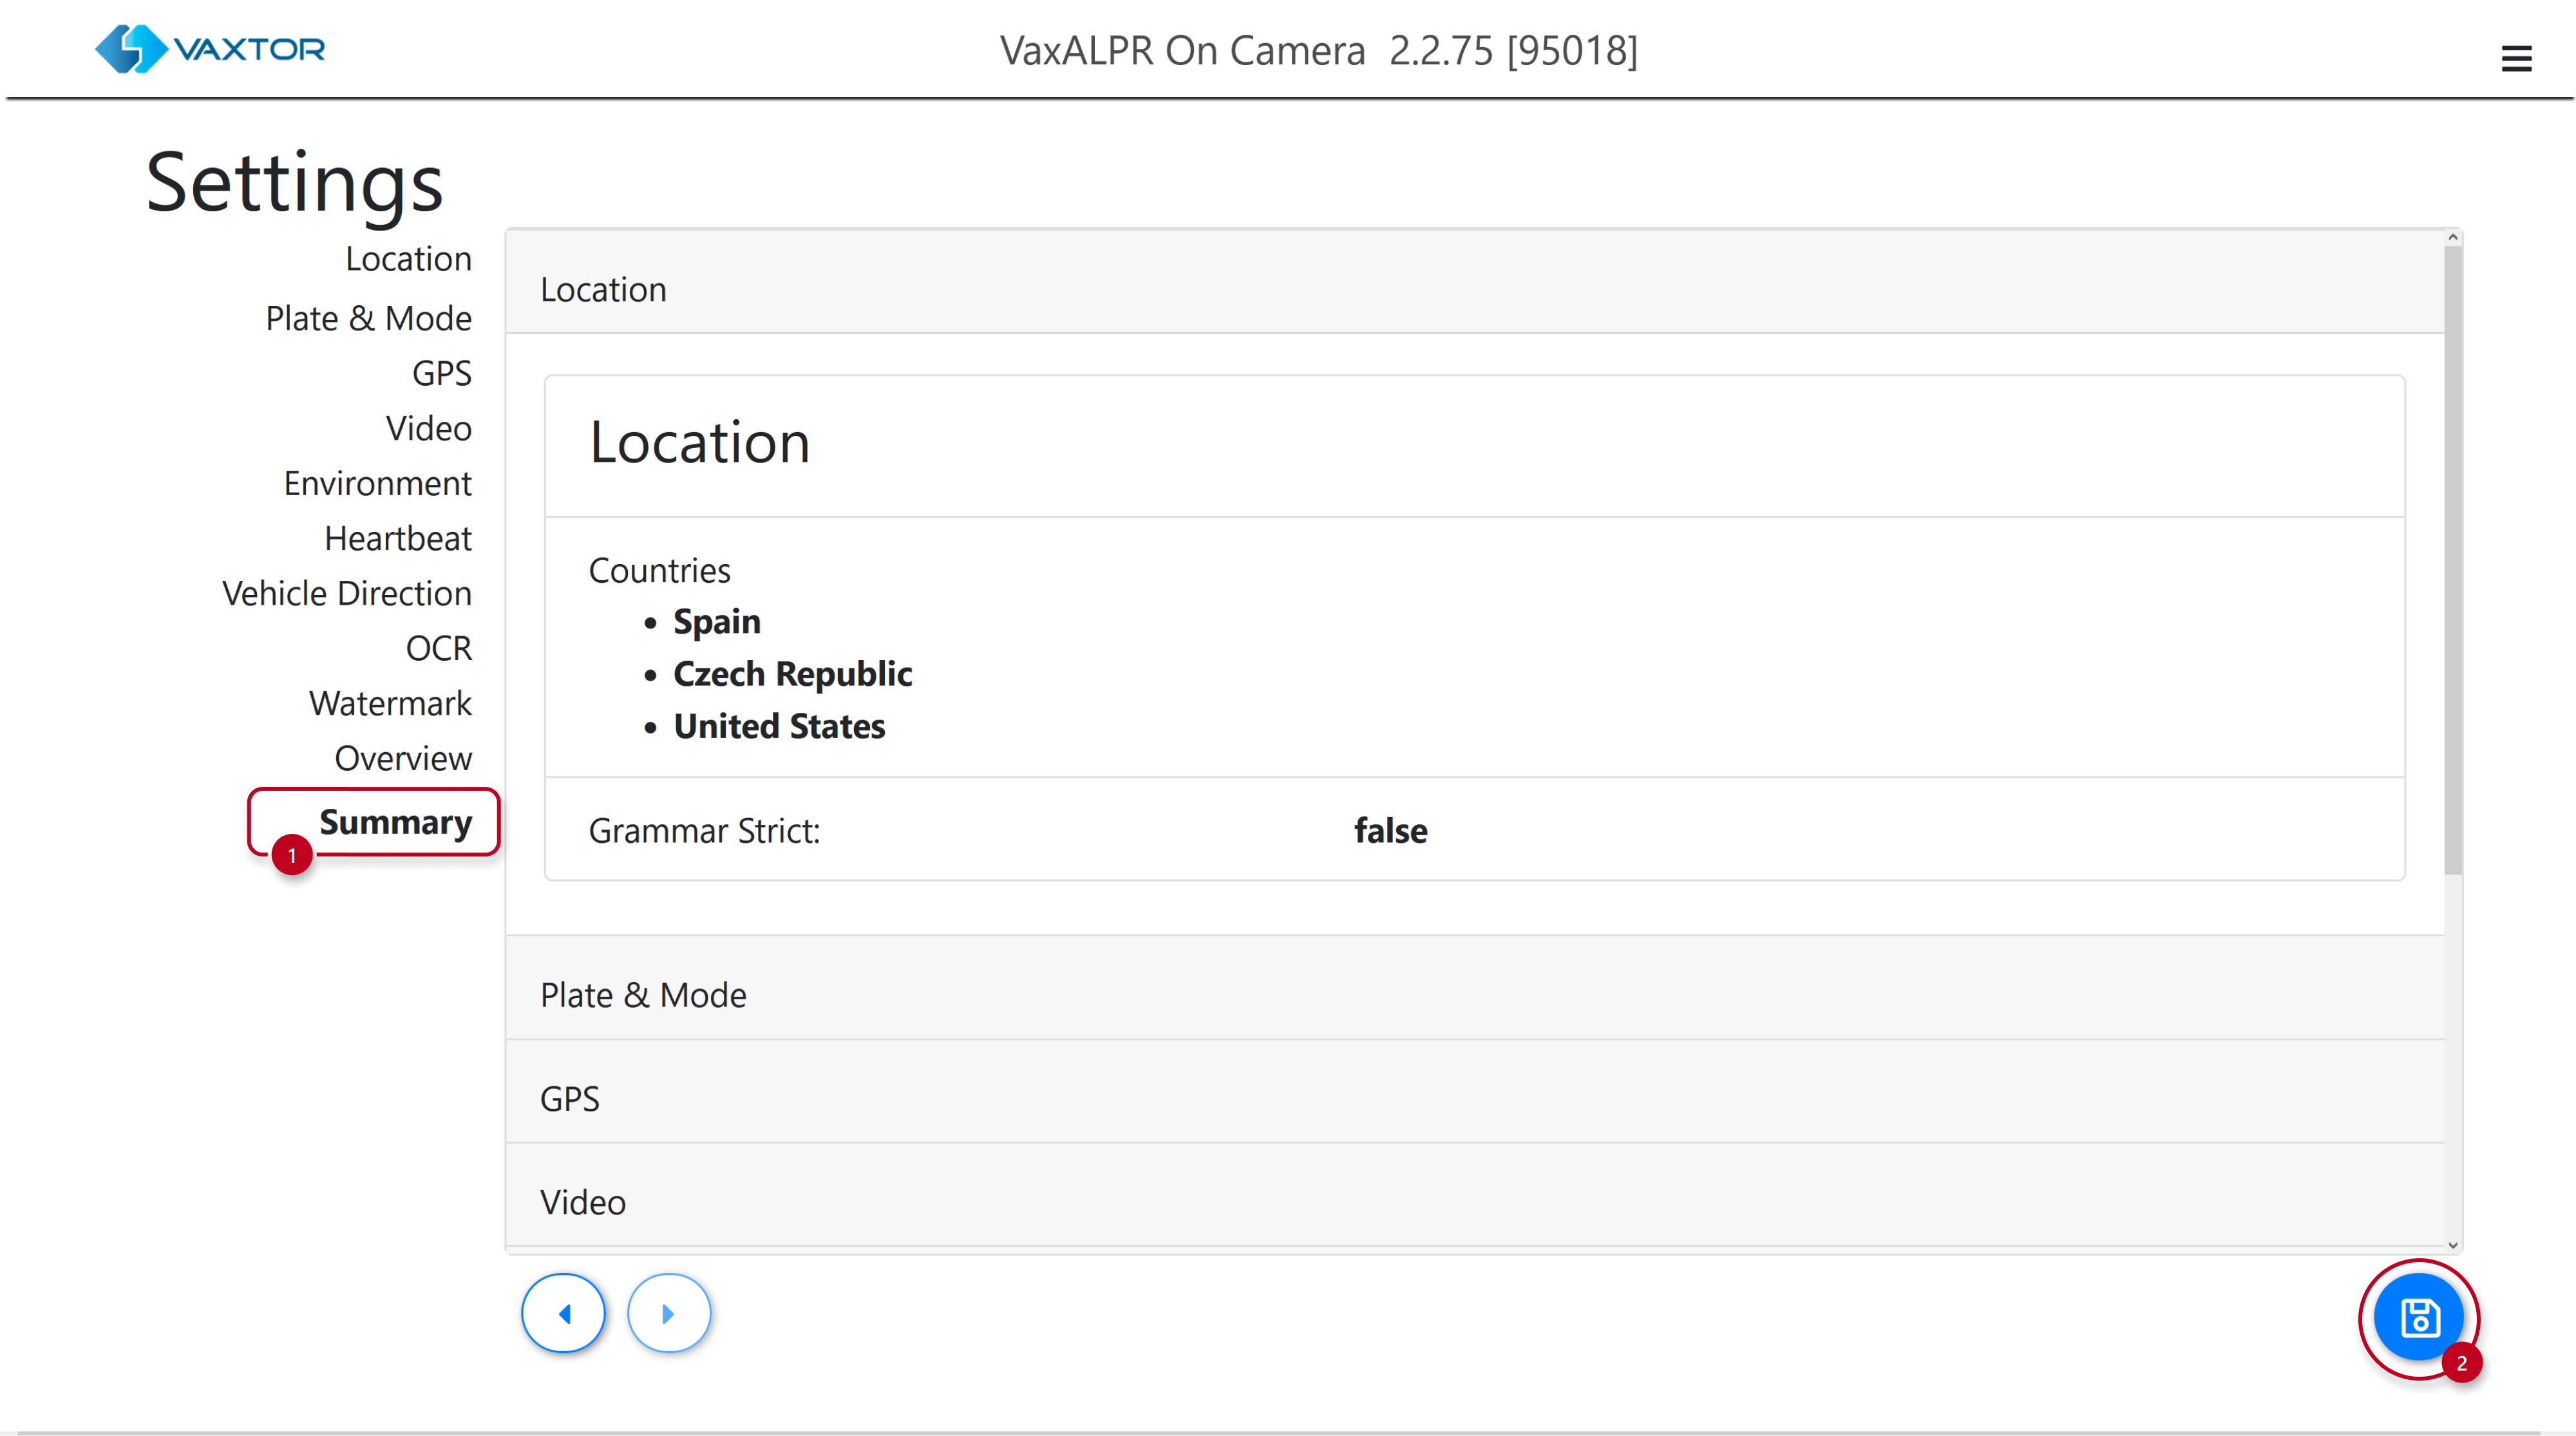
The Summary & Submit part contains an overview of all previously configured settings. Save the changes you made
-
-
Now, if everything is configured properly and a license plate is recognized, it’ll be sent into your 2N device.
Based on whether this plate is valid or not, the barrier/door will open.
-
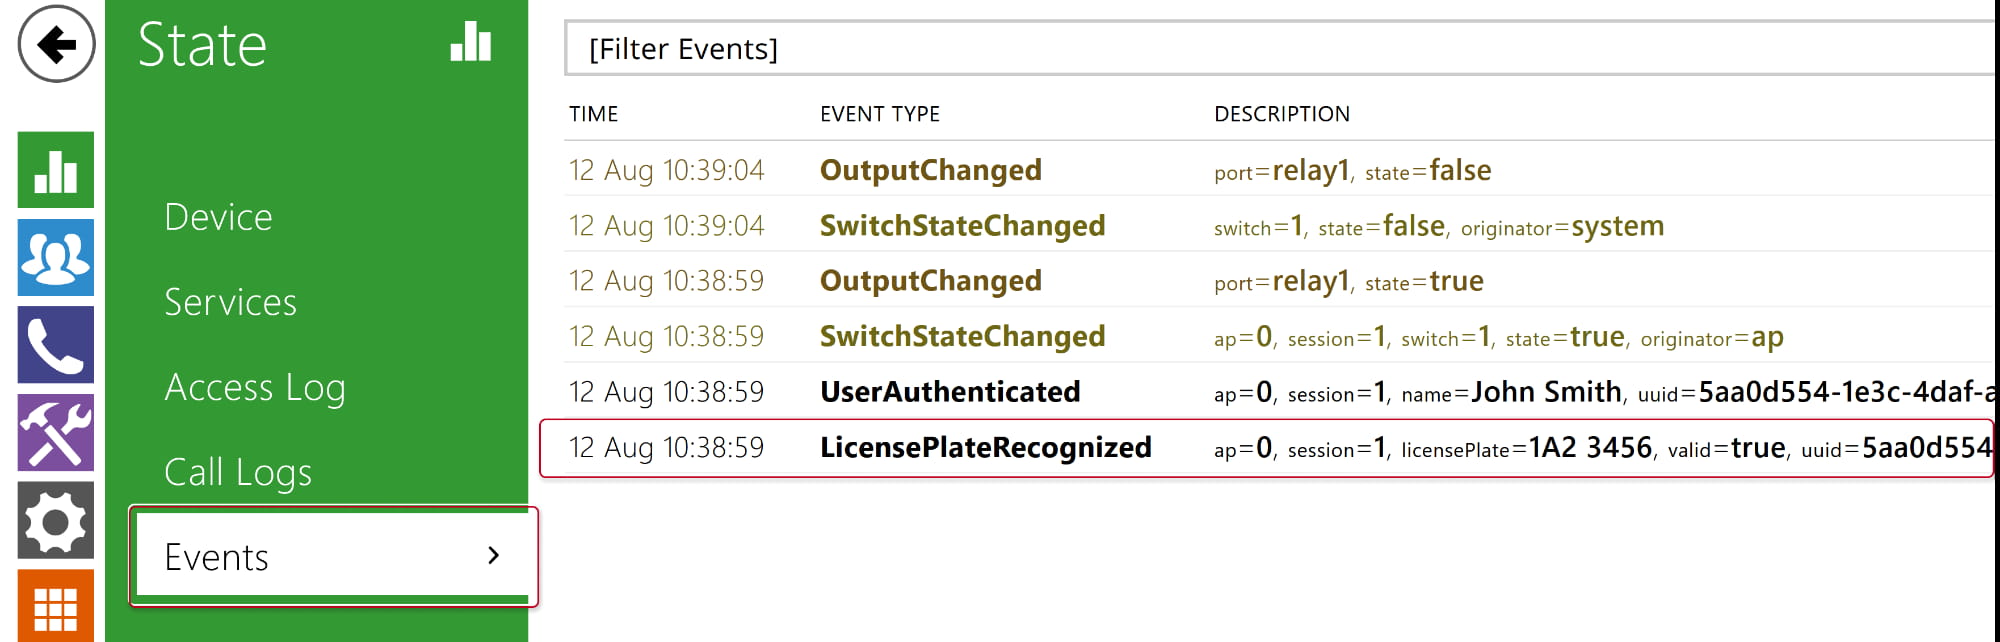
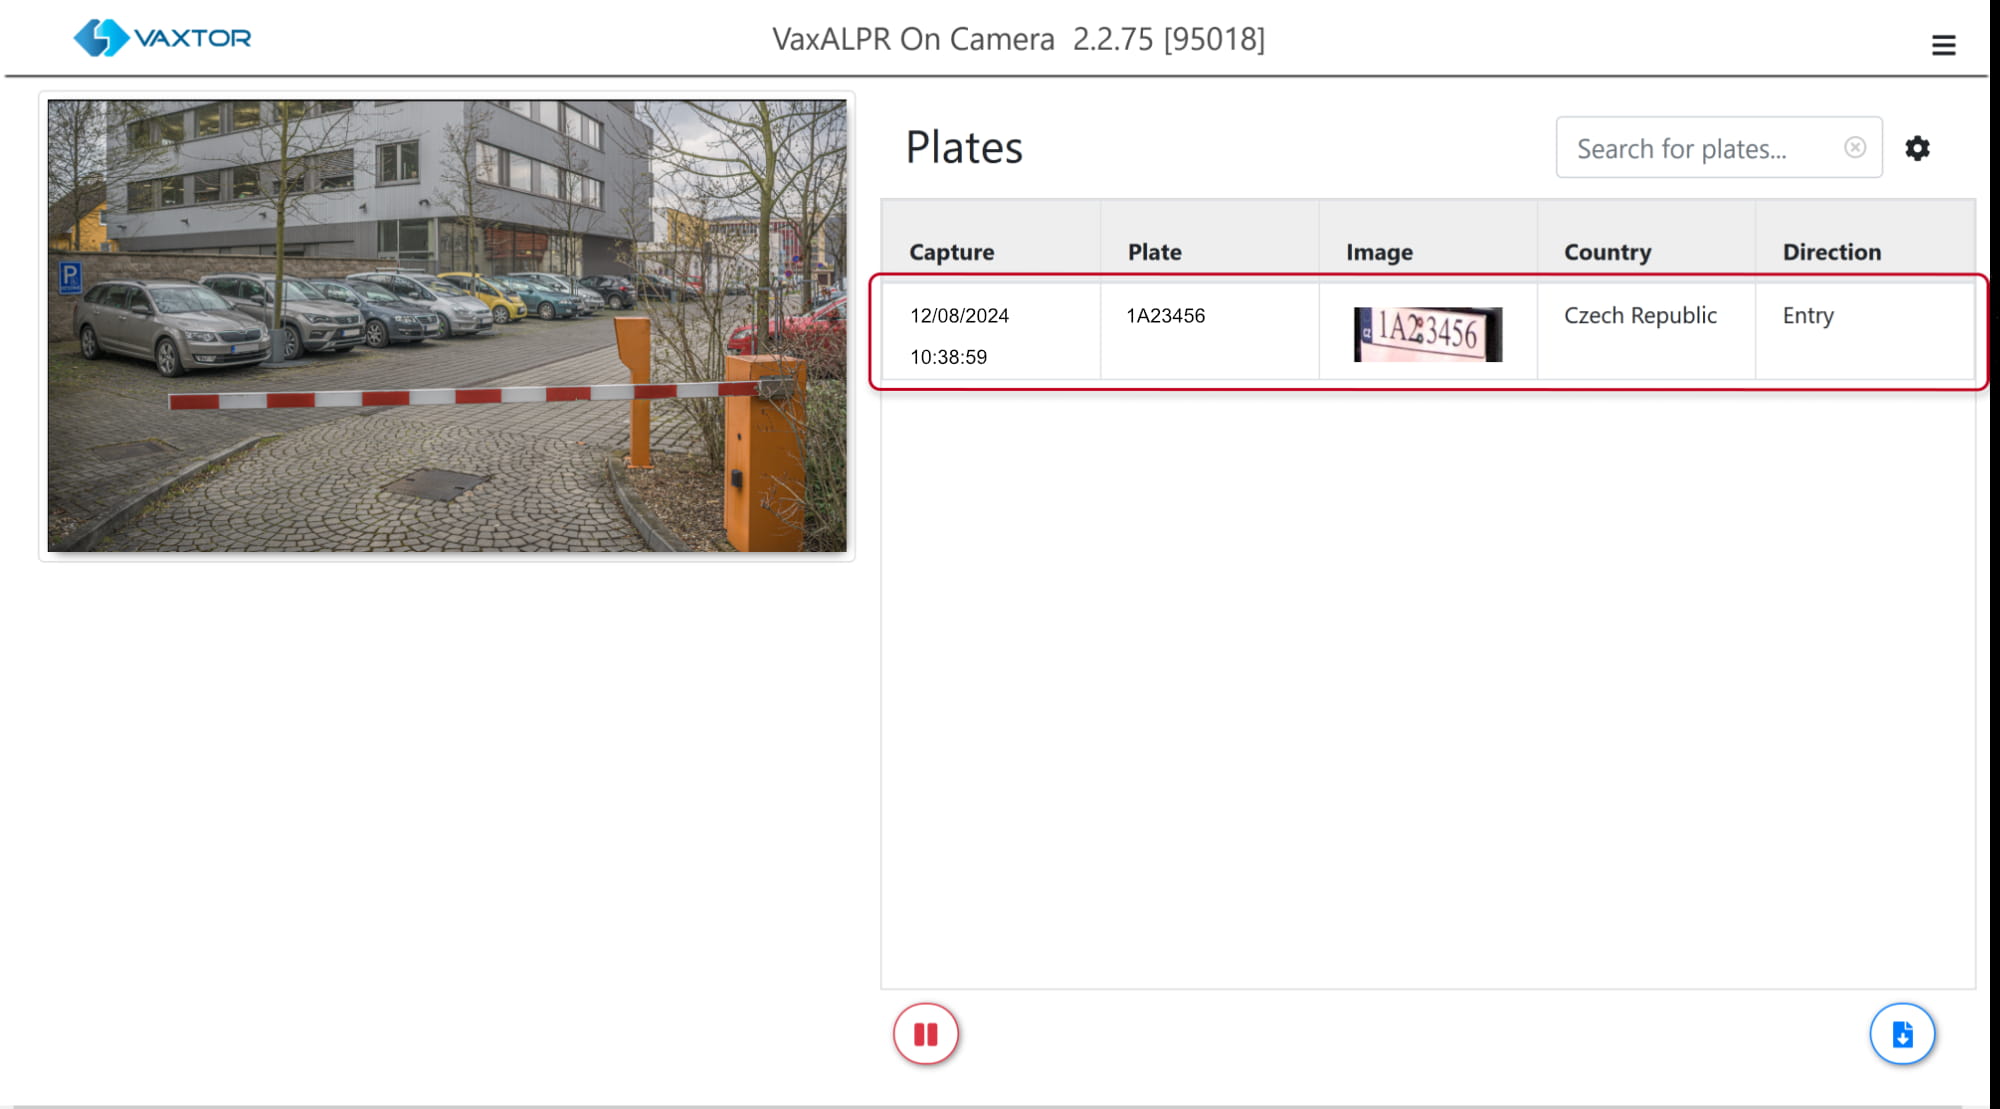
Received license plates will be shown in the 2N device web interface, section Status - Events Log.
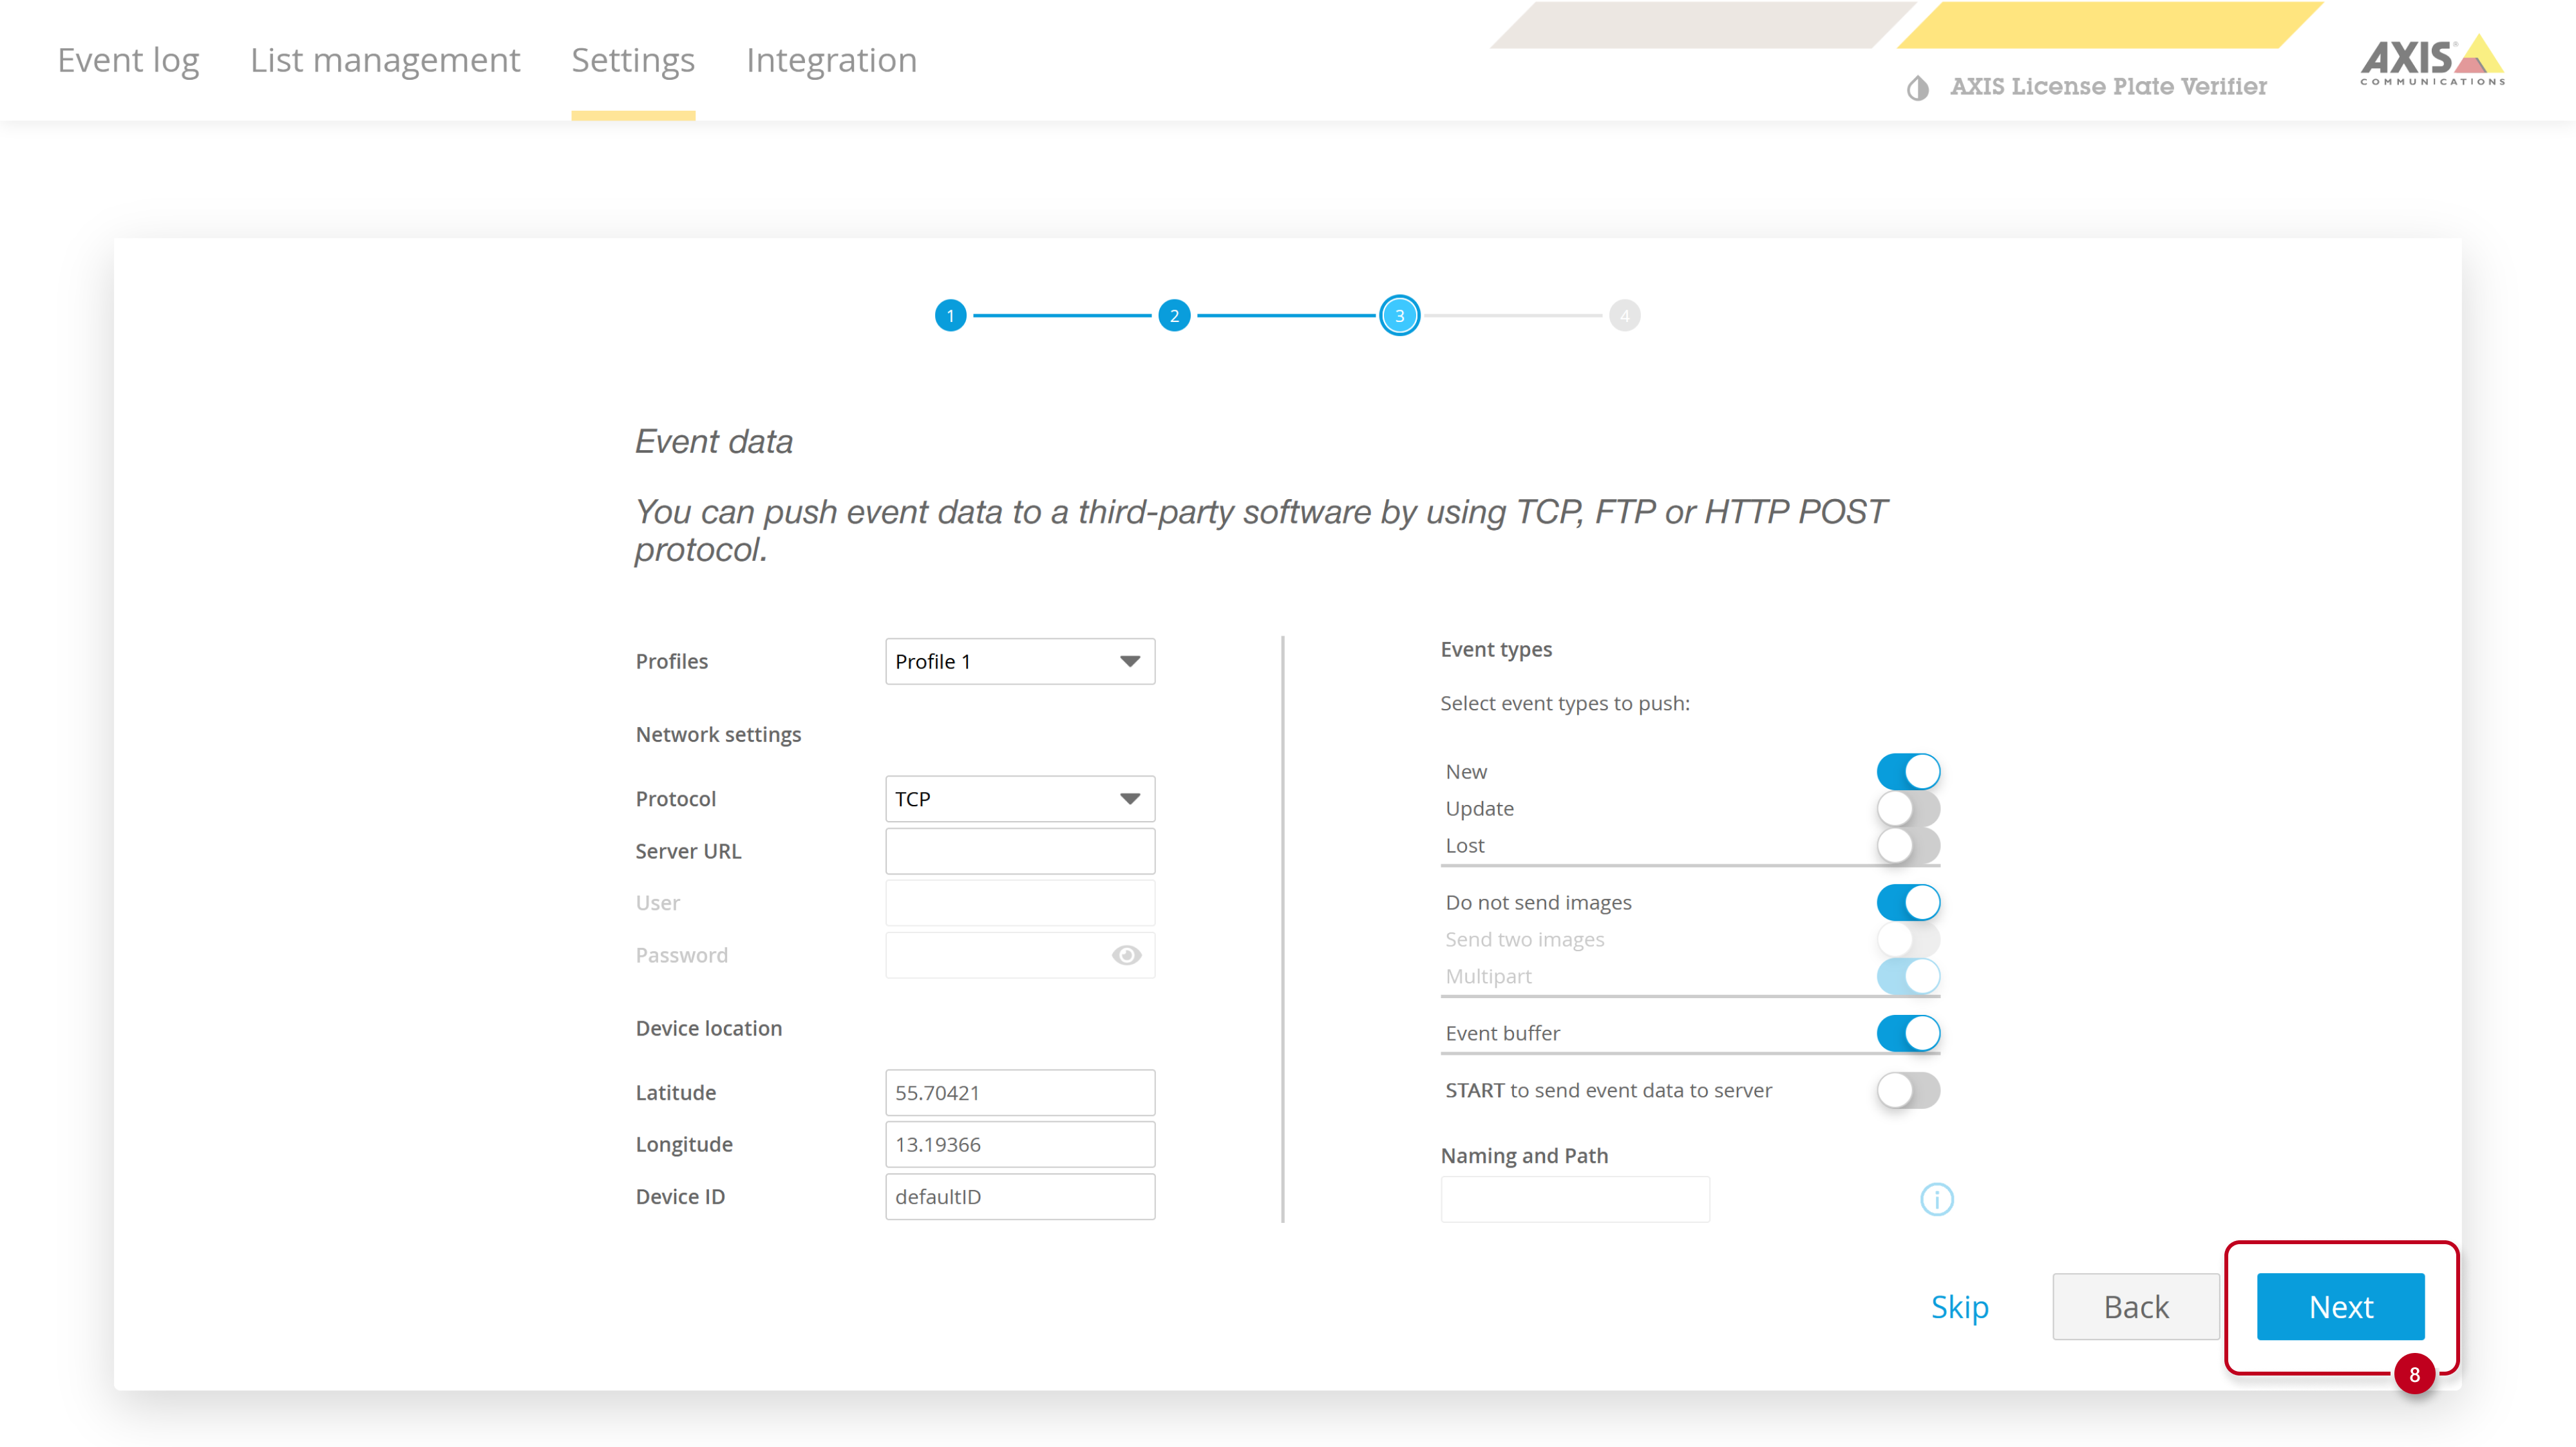
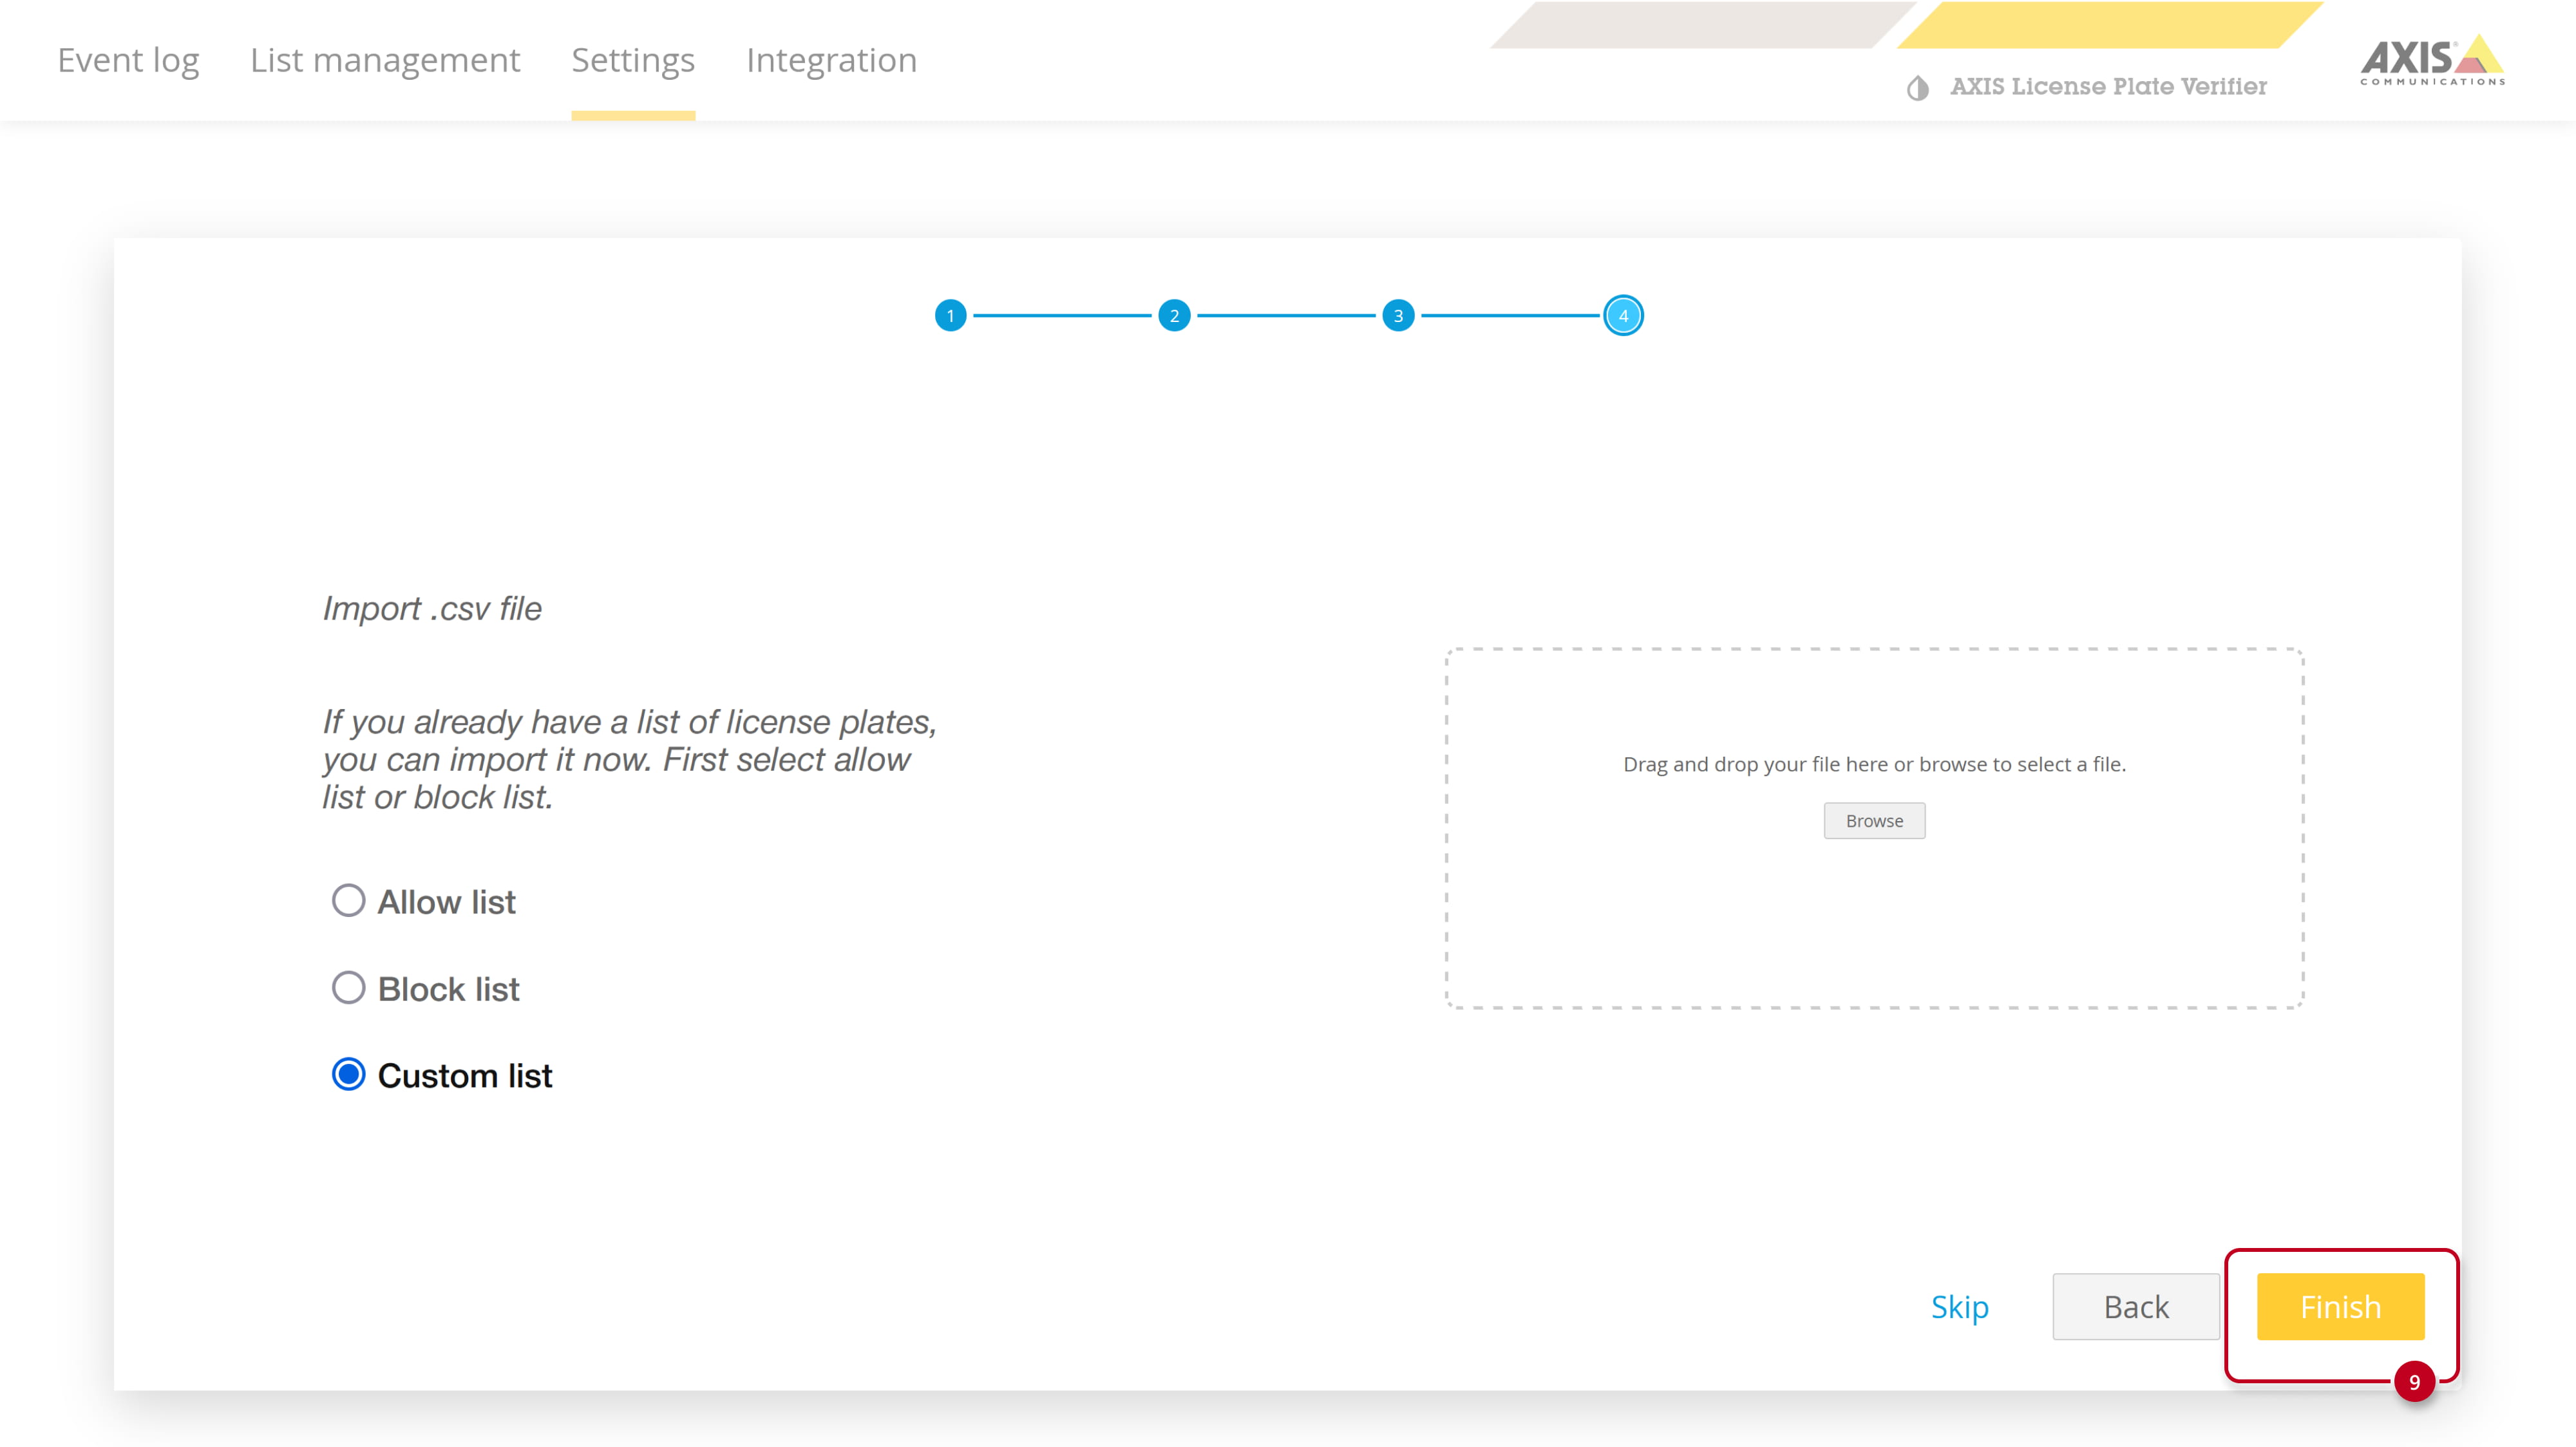
Axis License Plate Verifier
We’ll only configure the most important settings, for detailed information please see the ALPV user manual:
https://help.axis.com/en-us/axis-license-plate-verifier
-
Log in to suitable Axis network camera with ARTPEC-6 / ARTPEC-7 / ARTPEC-8 chip
and enter Settings.
-
Go to the Apps tab and add the new one. Locate the .eap file from Axis.
Once appeared in the list of installed apps, click on it.
-
Activate your license key you have got from Axis for this scenario.
- Then start the app and open it to go to its configuration.
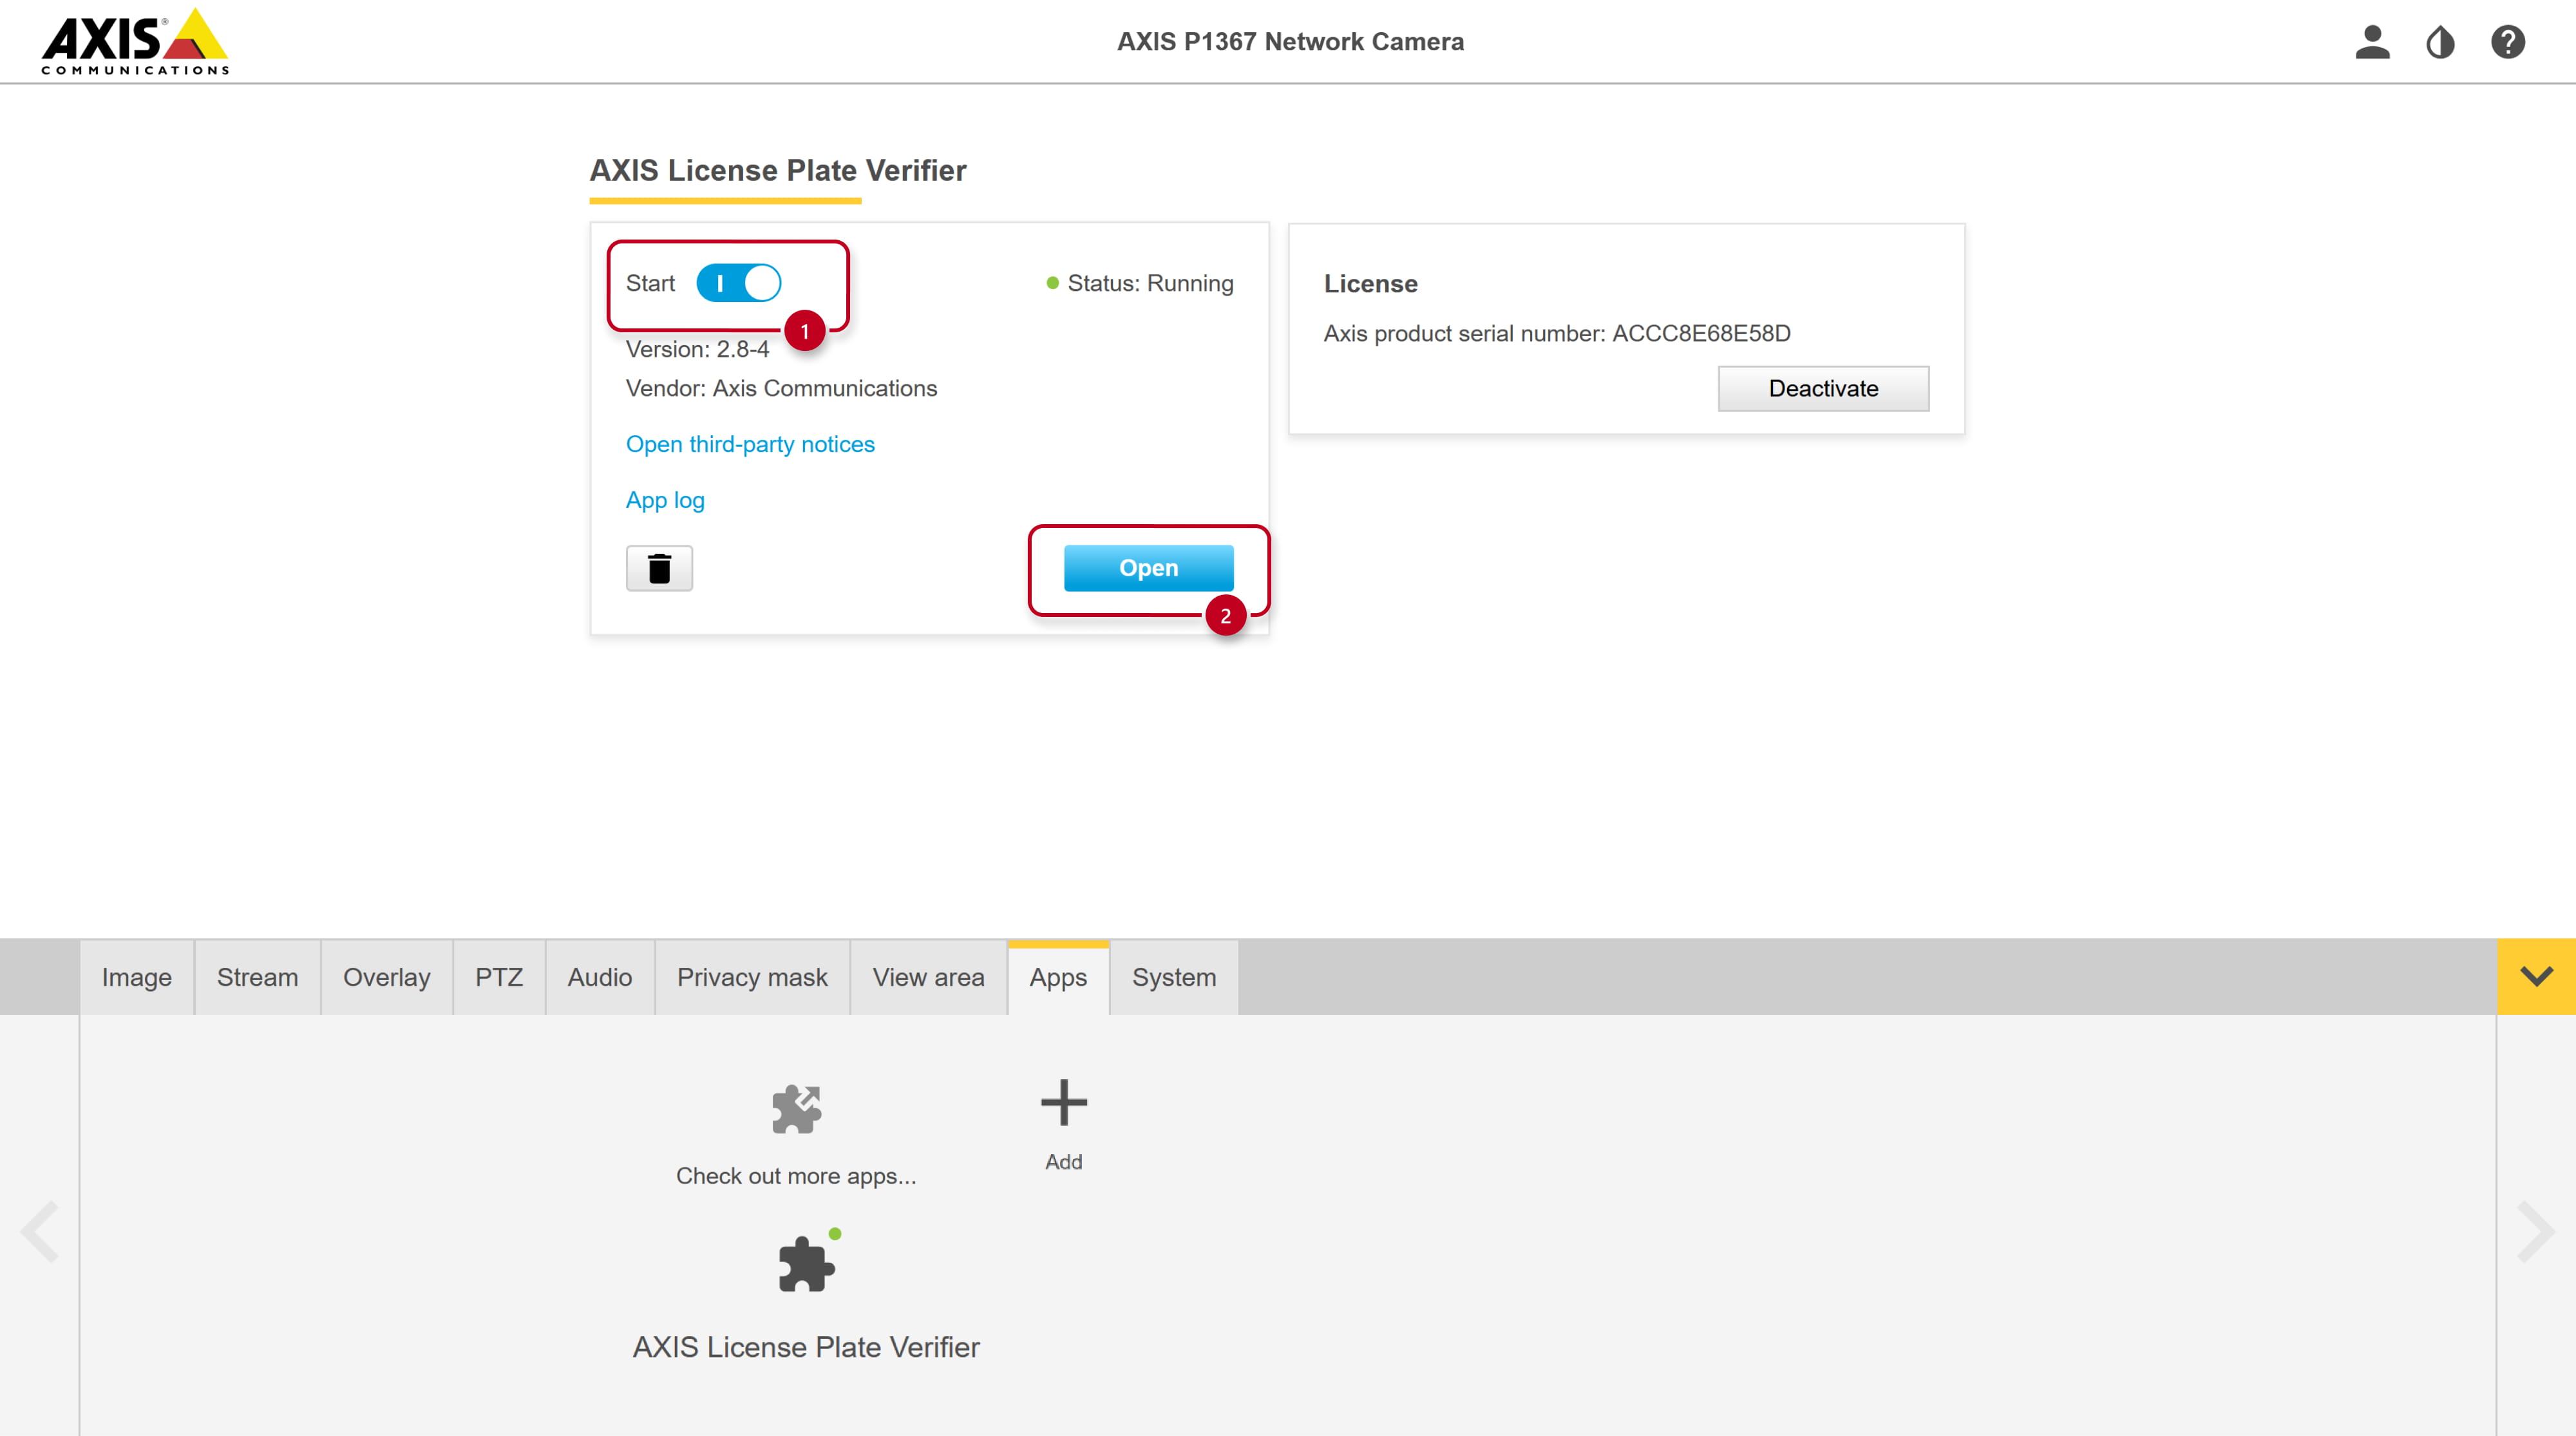
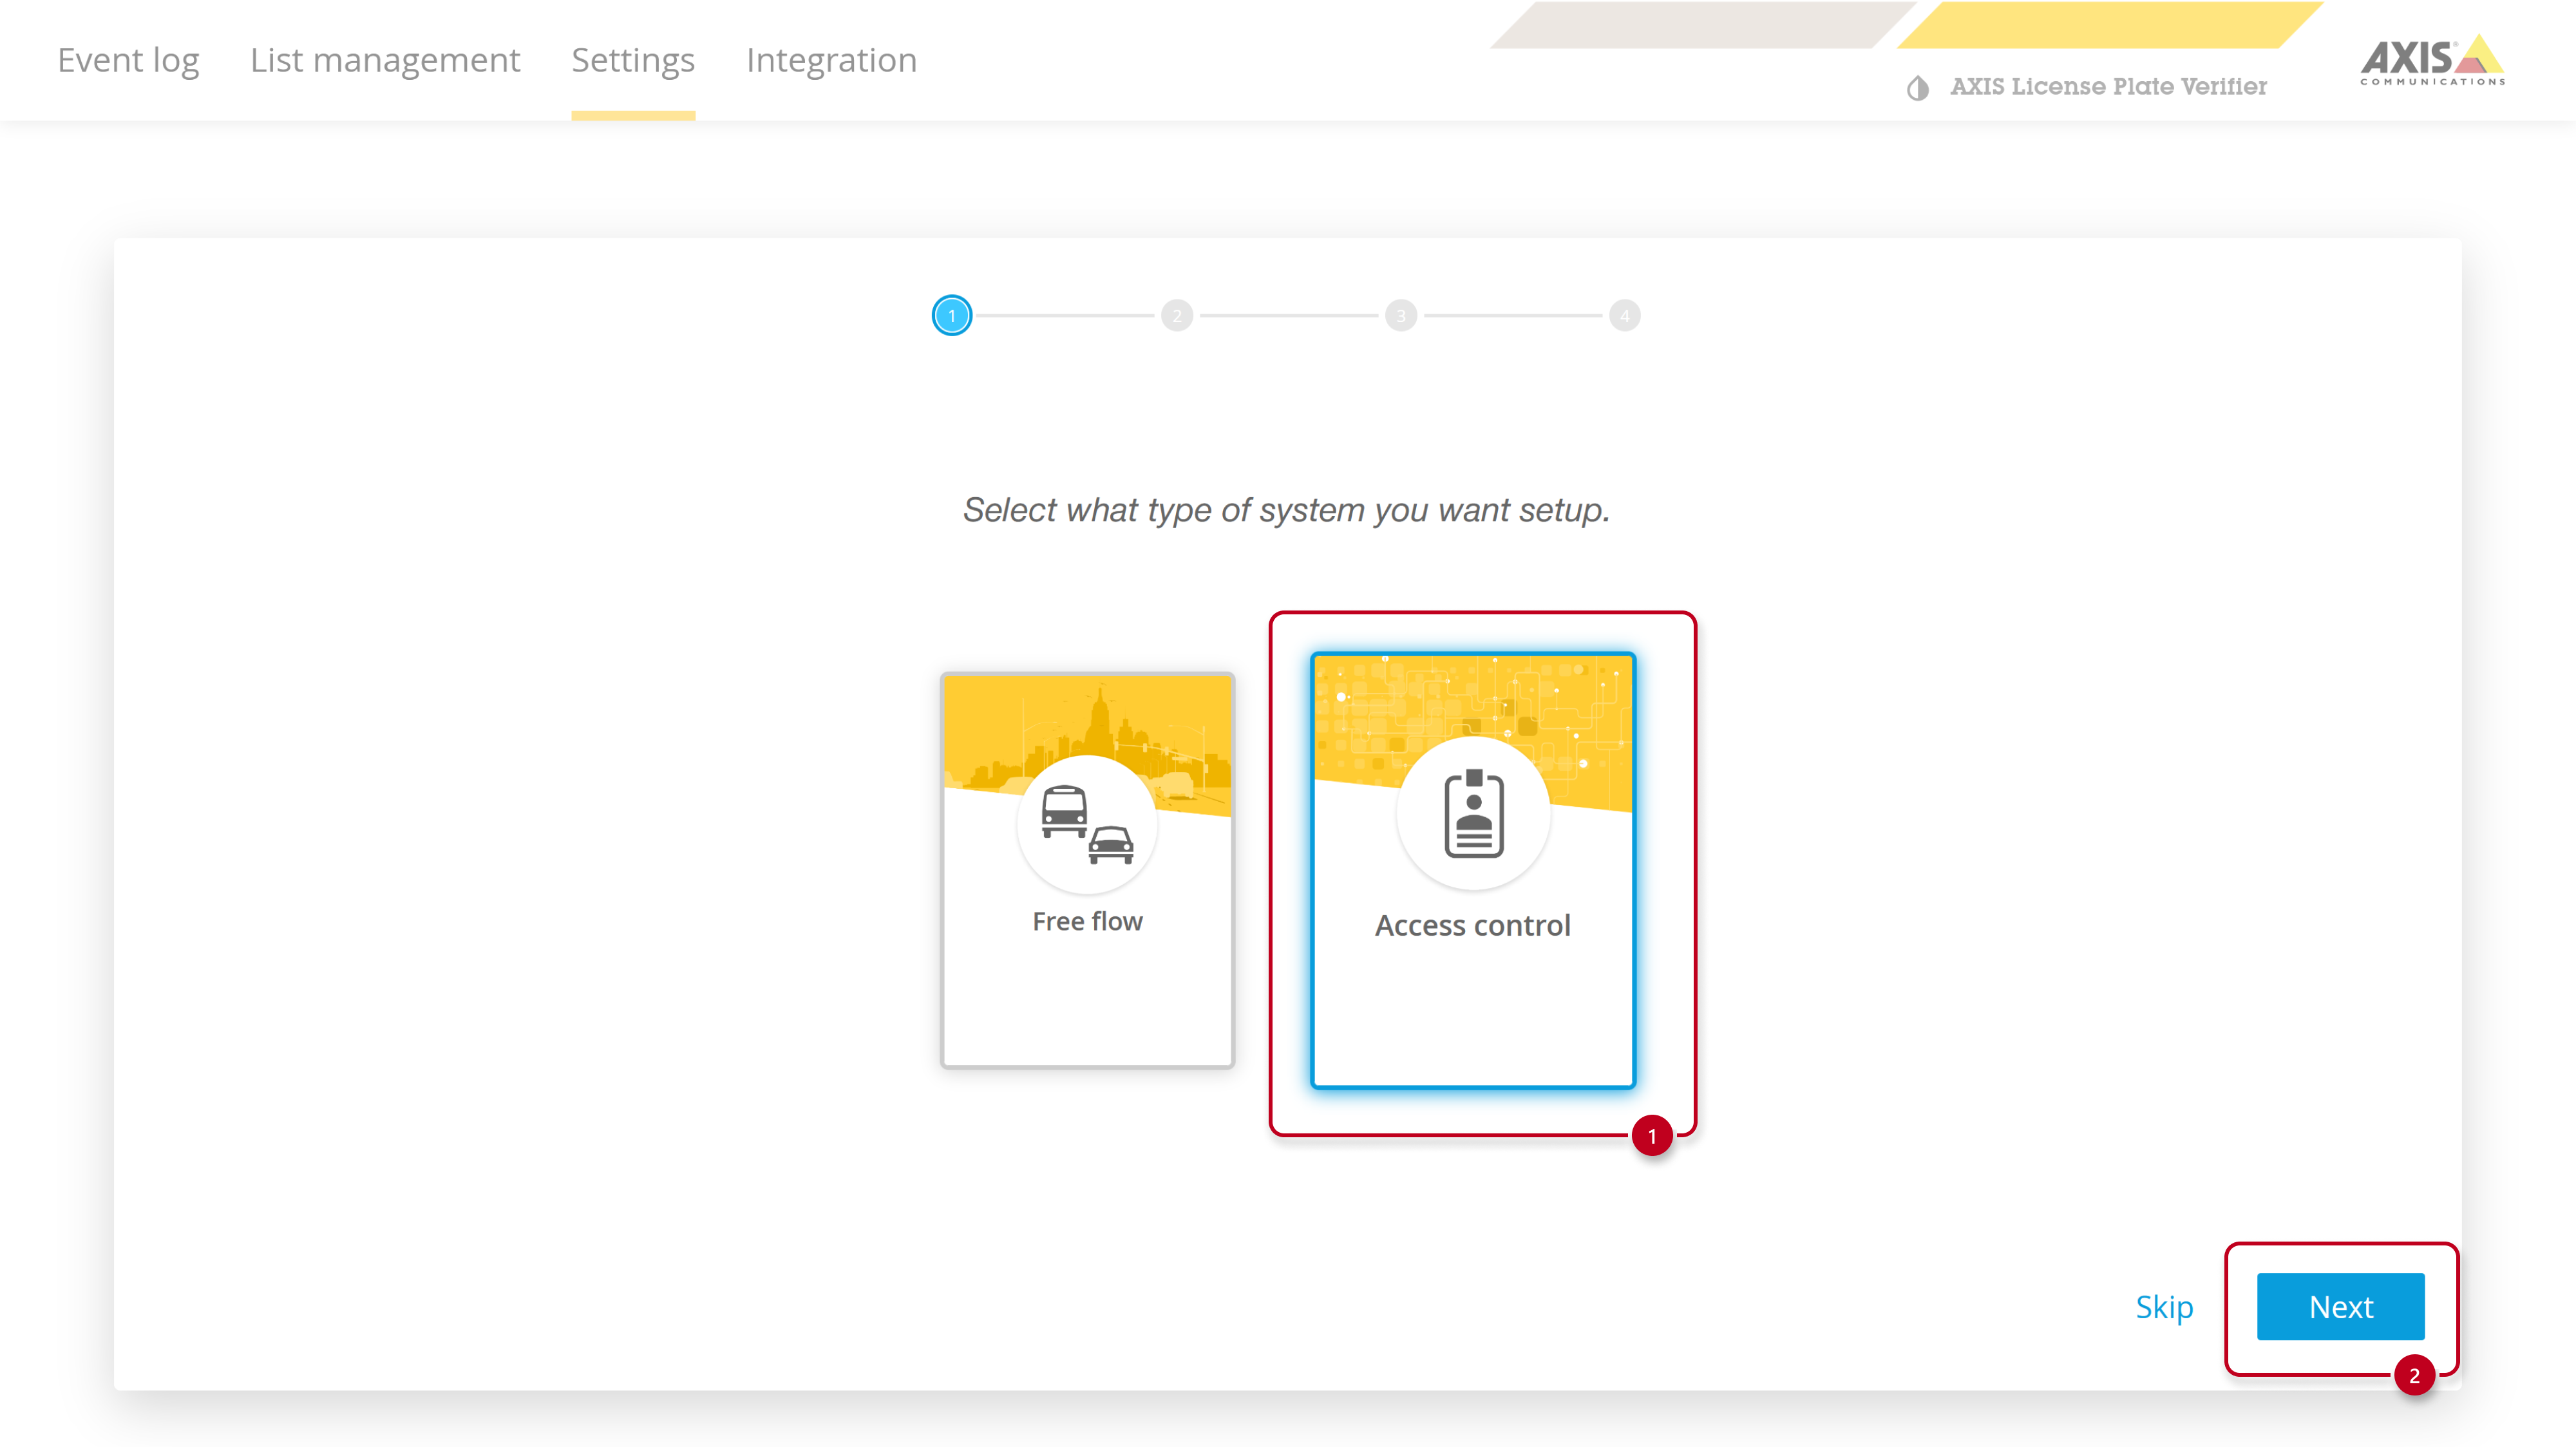
- We will go throw the initial settings wizard.
- Select Access control type of system.
-
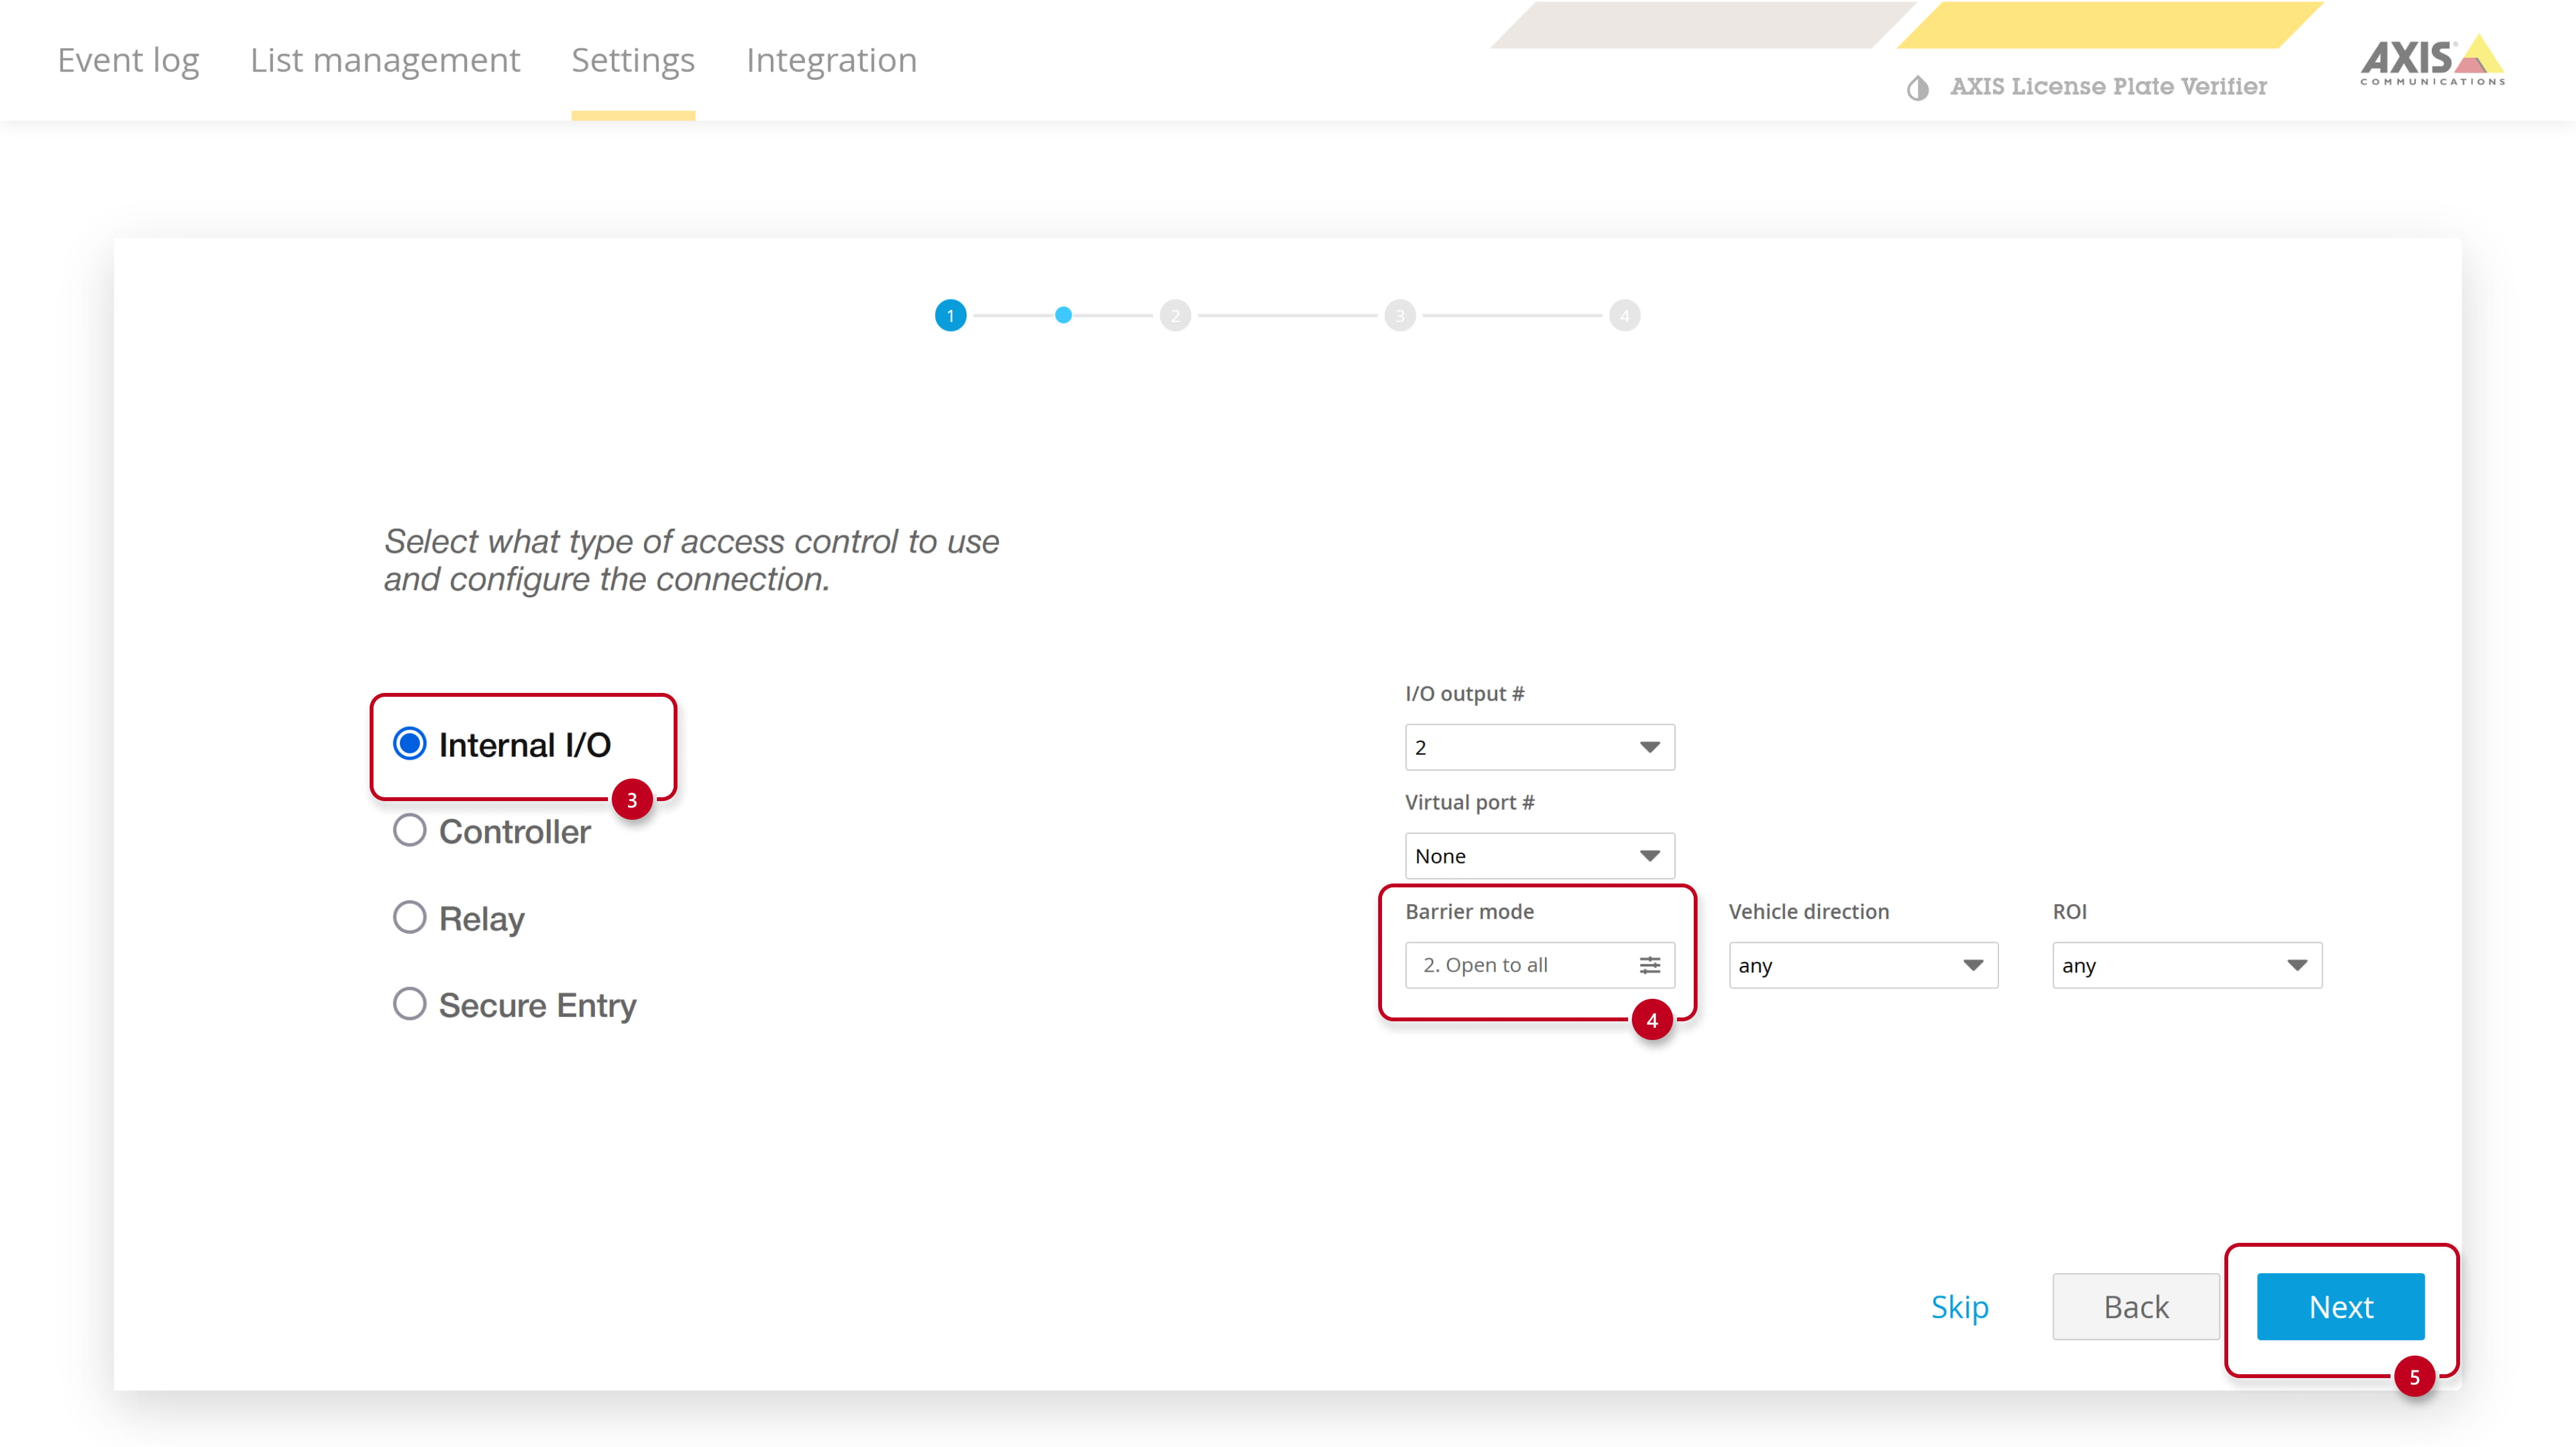
- Select Barrier mode to Open to all.
-
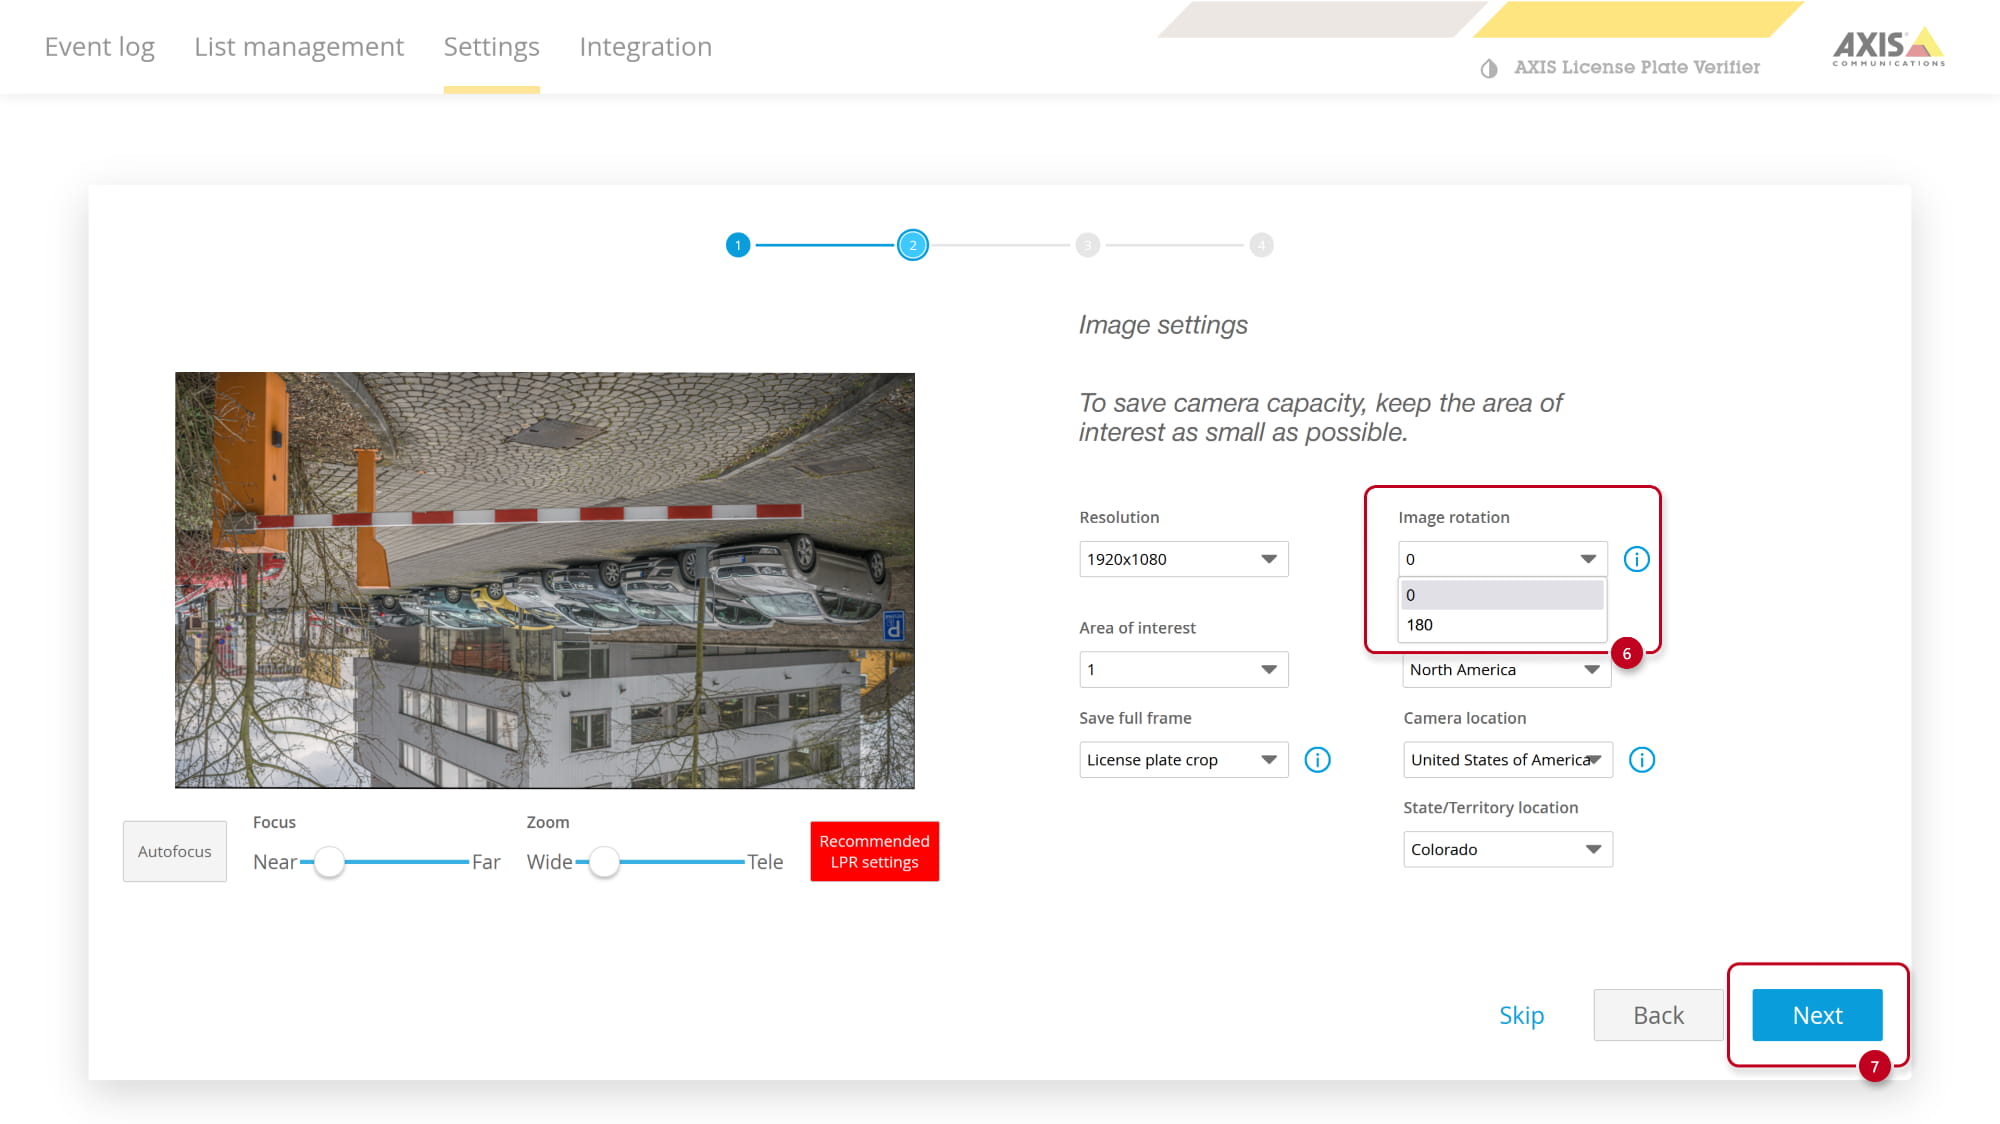
- If your camera view is upside down, change Image rotation to 180.
- If your camera view is upside down, change Image rotation to 180.
-
- Next steps do not require any changes.
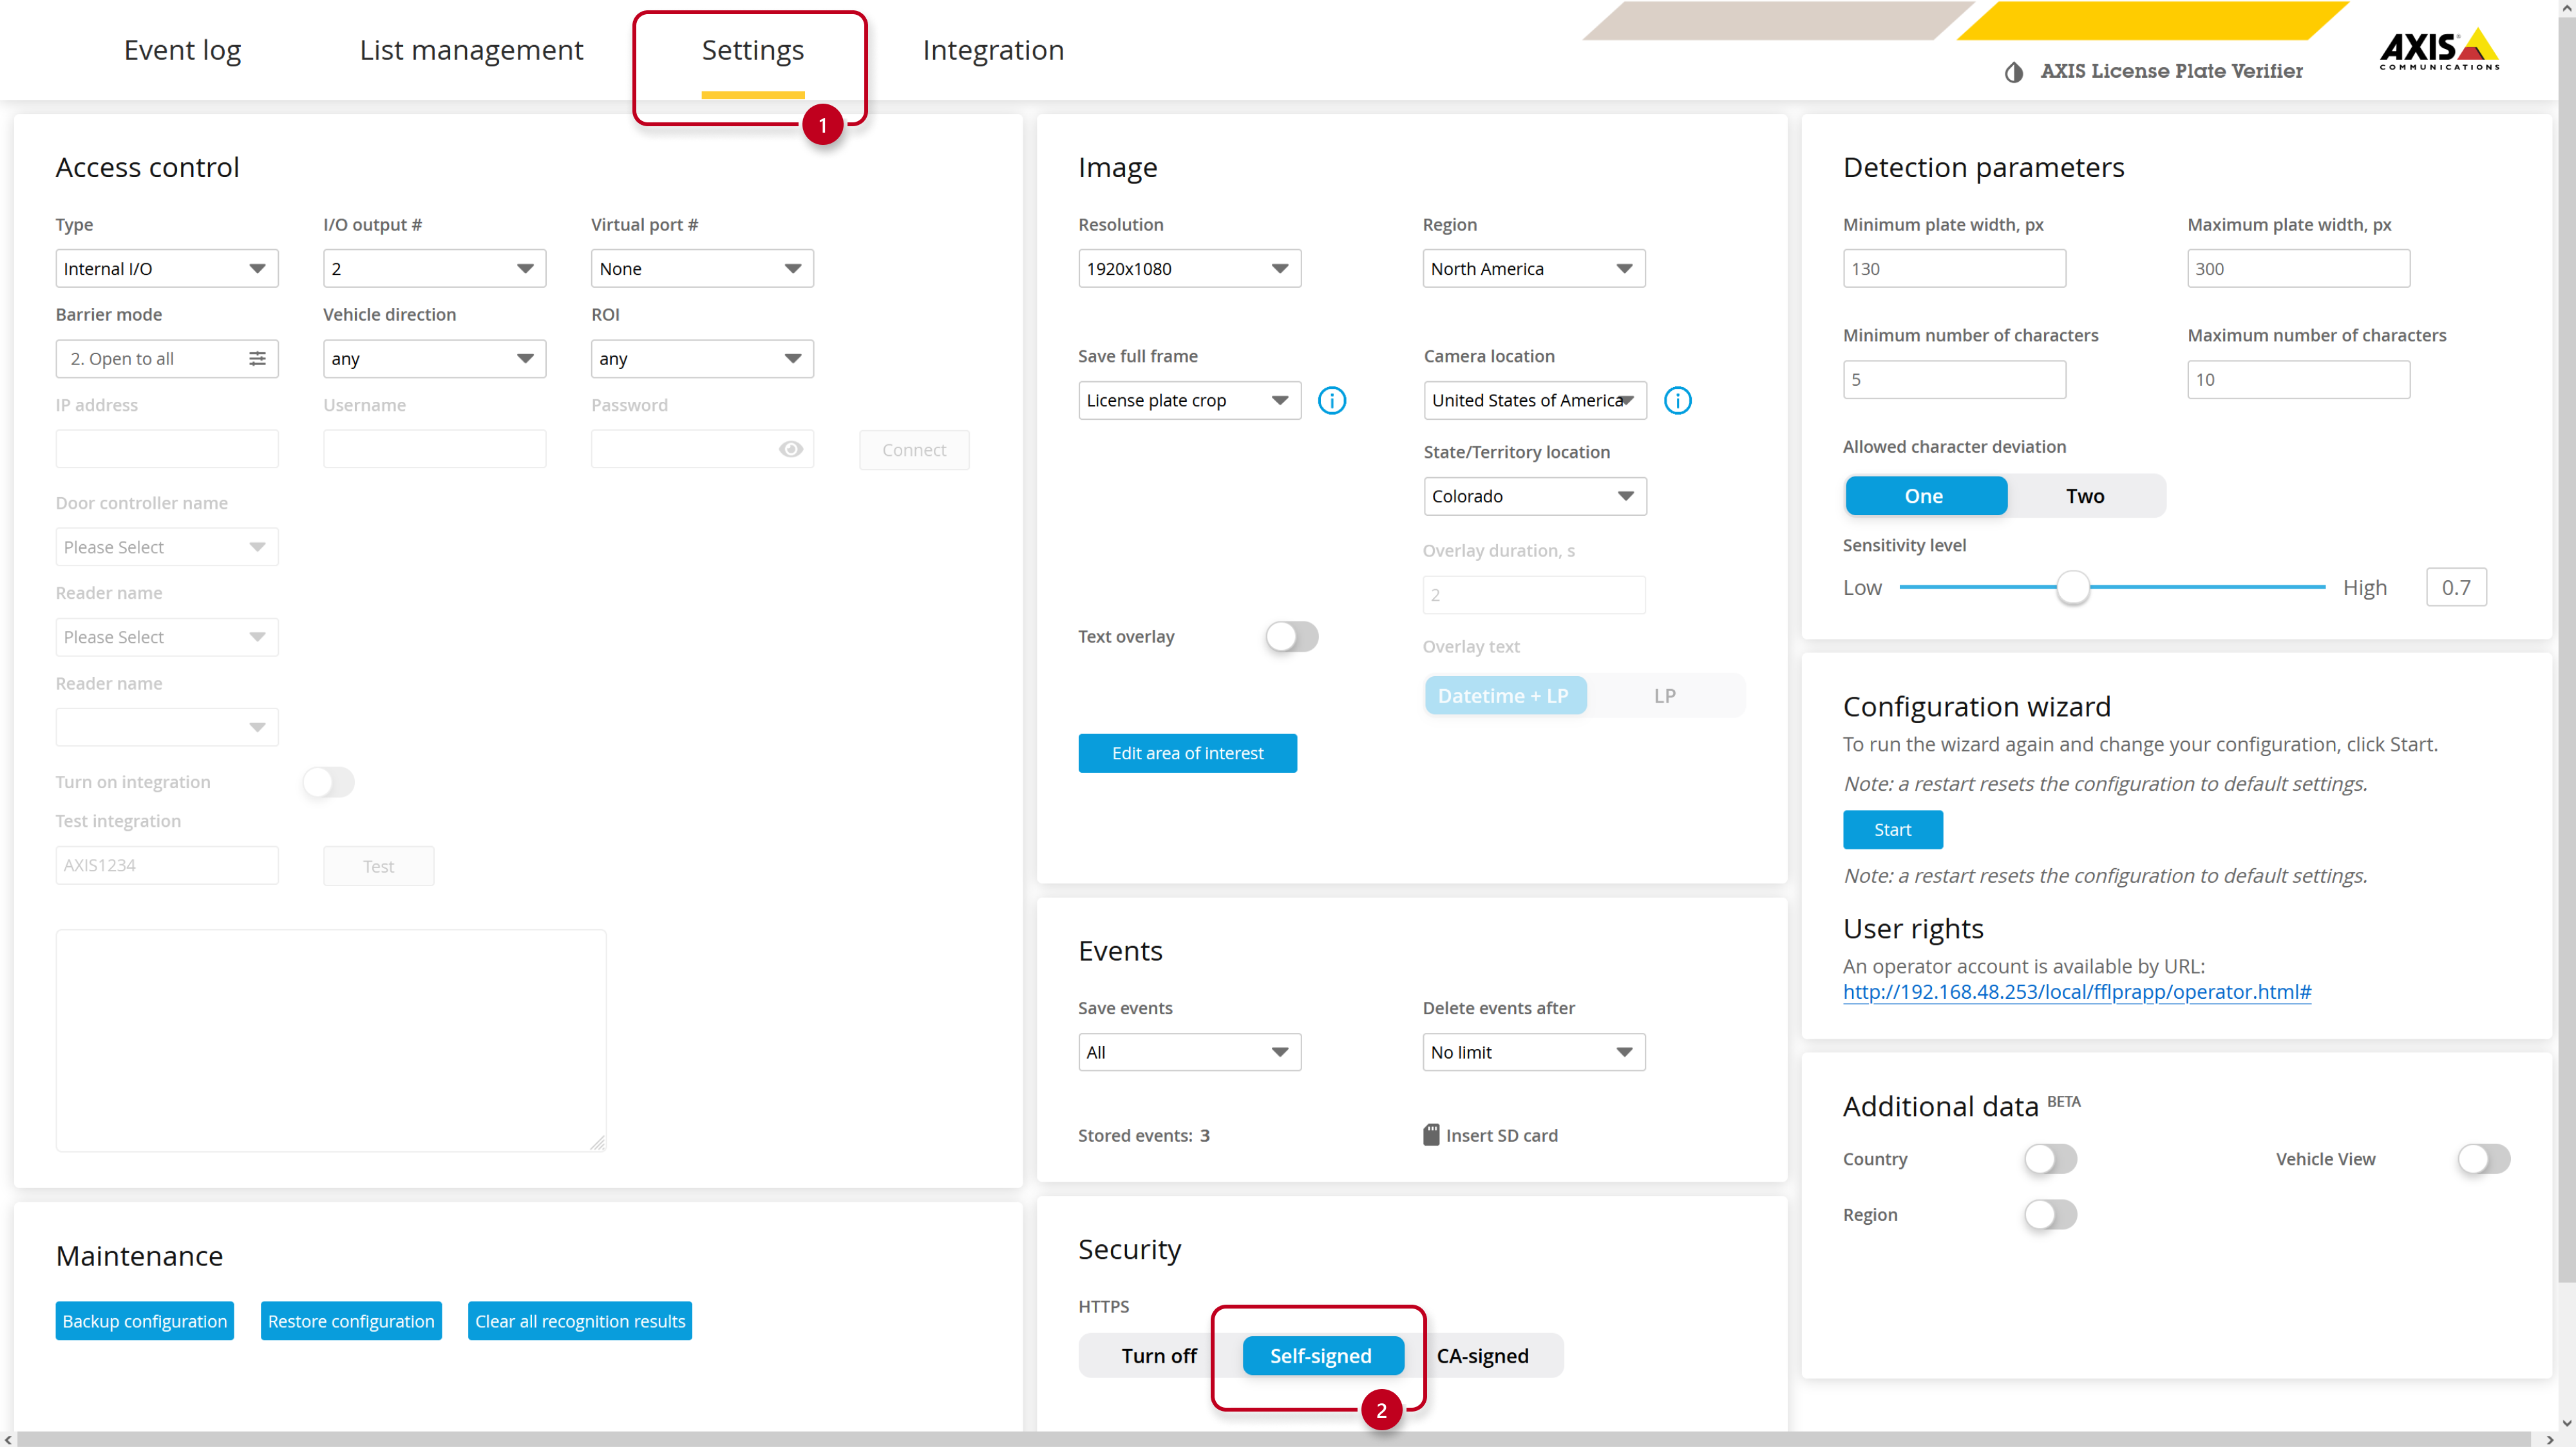
- After the wizard we will adjust one more parameter in the Settings tab. Please enable Self-signed certificate in the Security part.
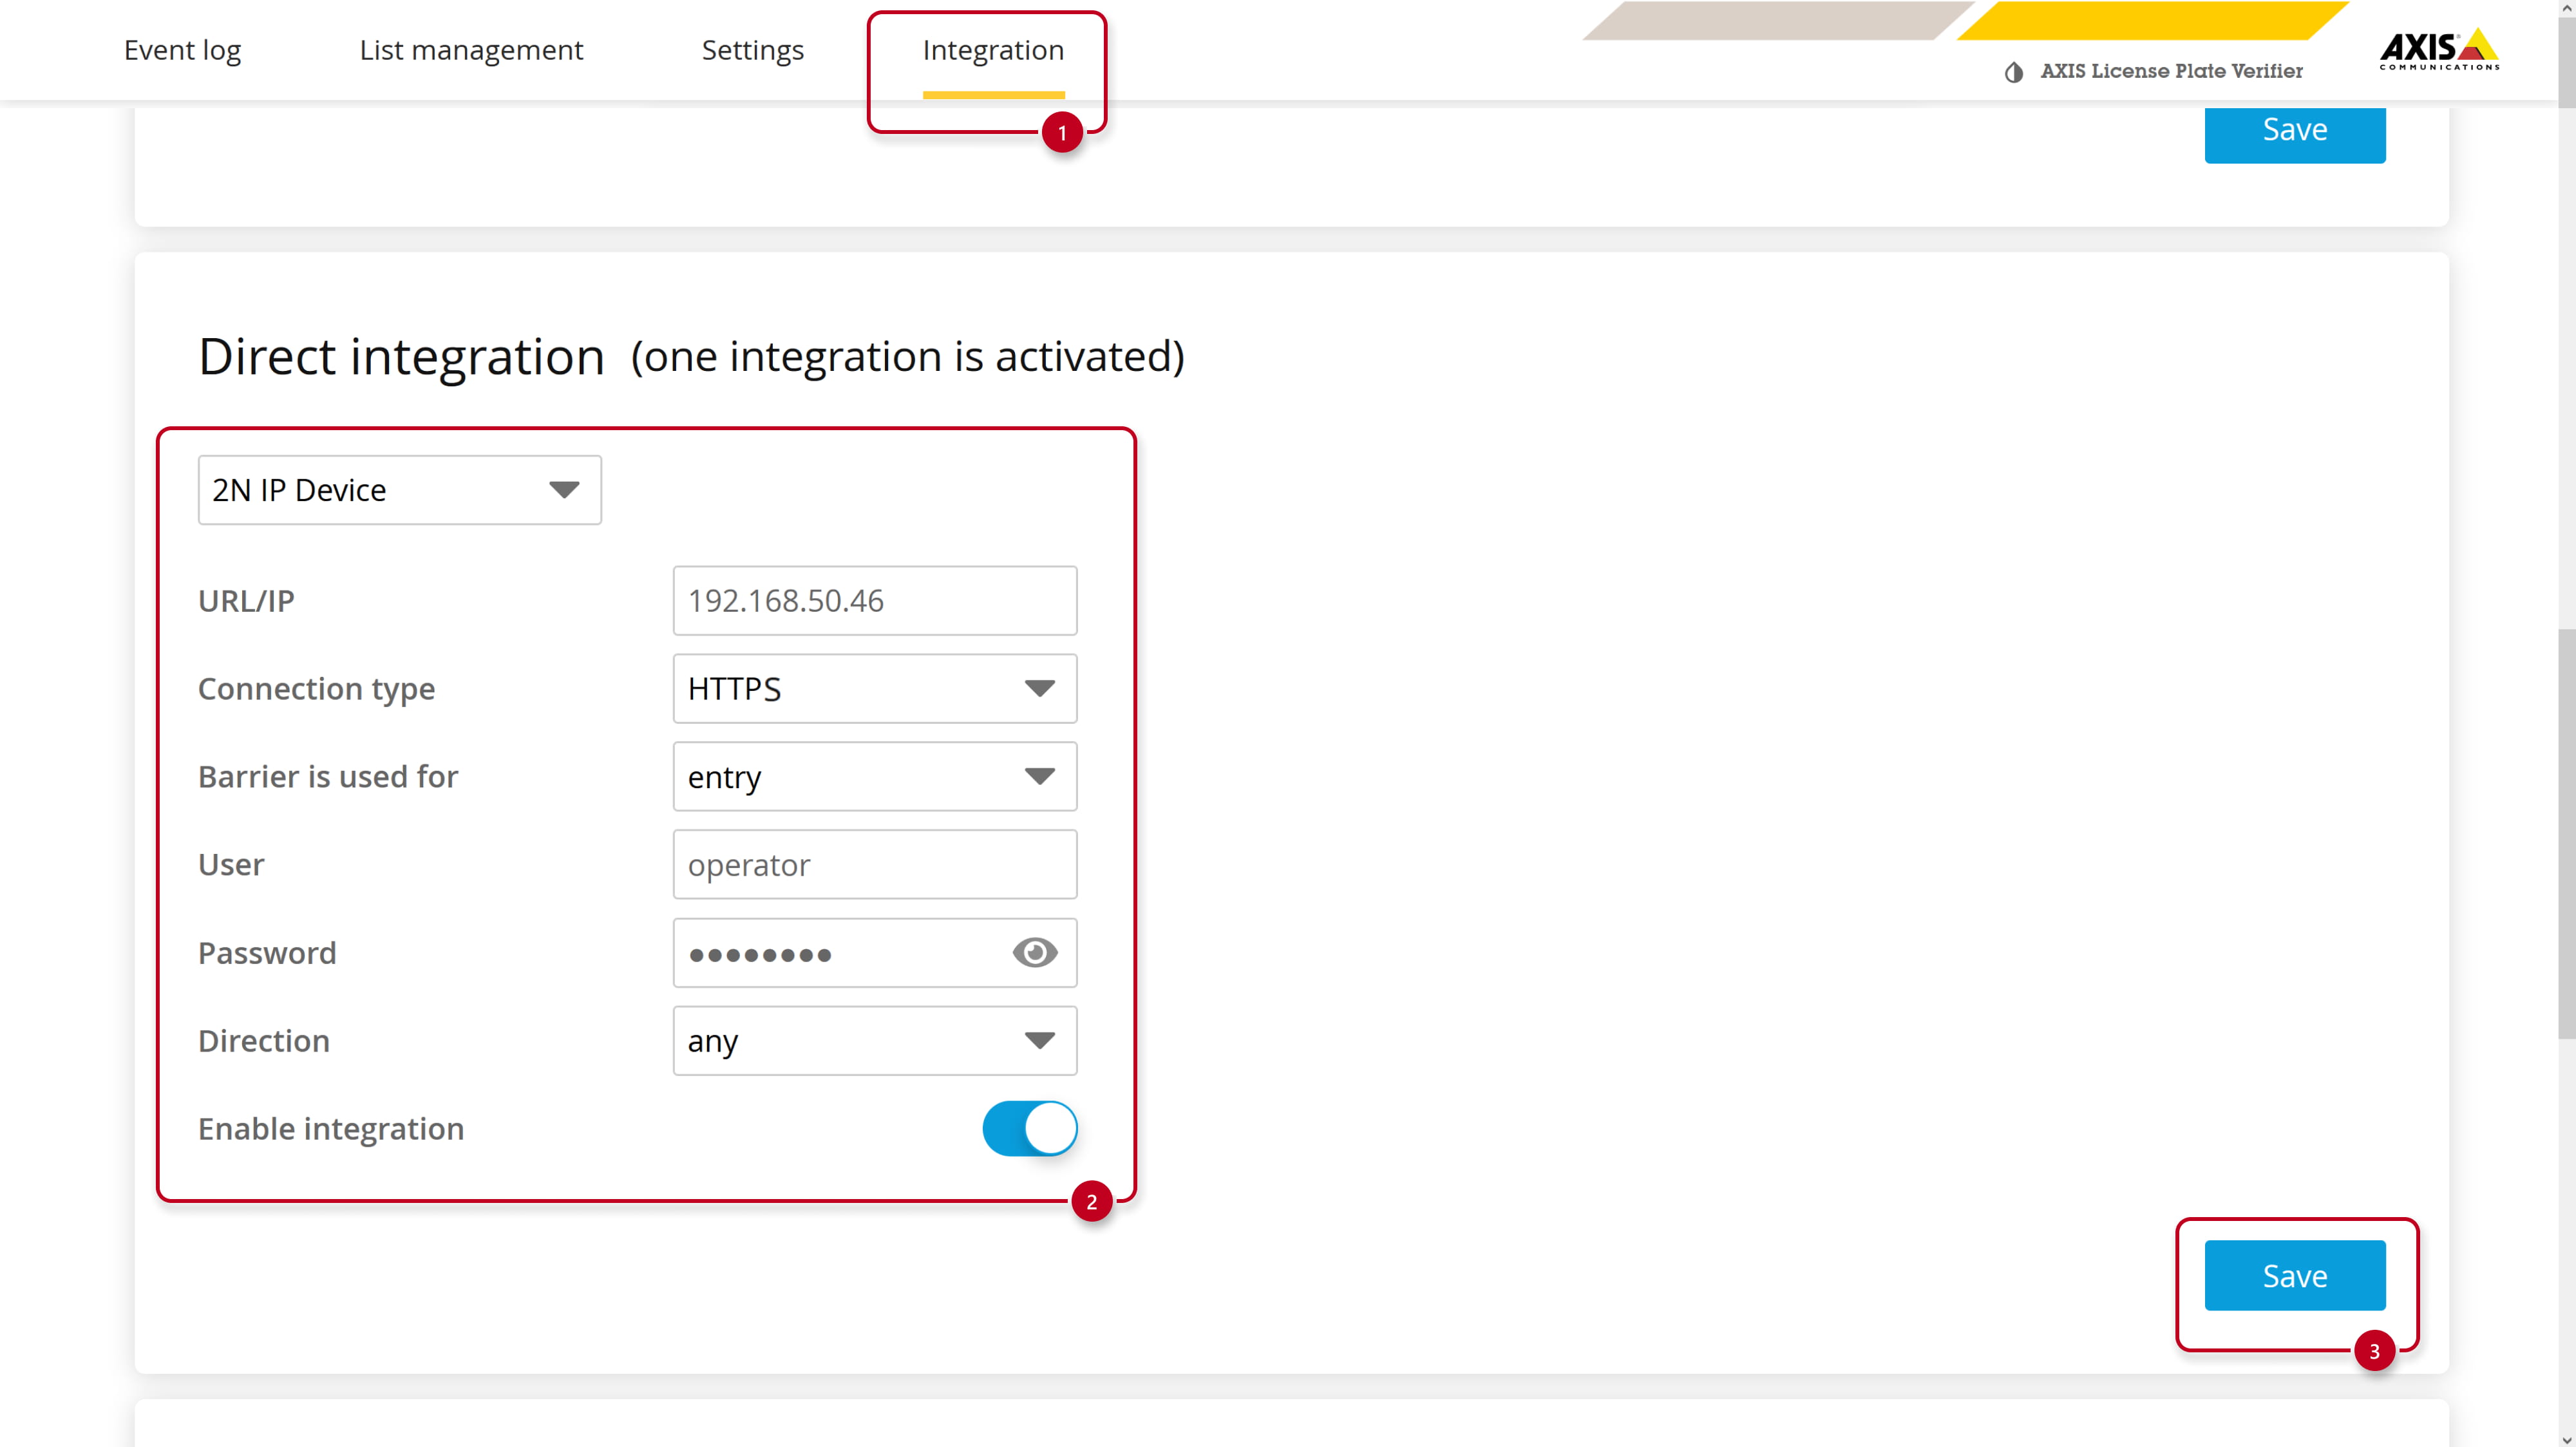
- In the Integration section, Direct integration part, Enter your 2N device’s IP address and HTTP API credentials.
Select HTTPS as connection type and enable the integration.
-
Now, if everything is configured properly and a license plate is recognized, it’ll be sent into your 2N device.
Based on whether this plate is valid or not, the barrier/door will open.
Accordion summary…
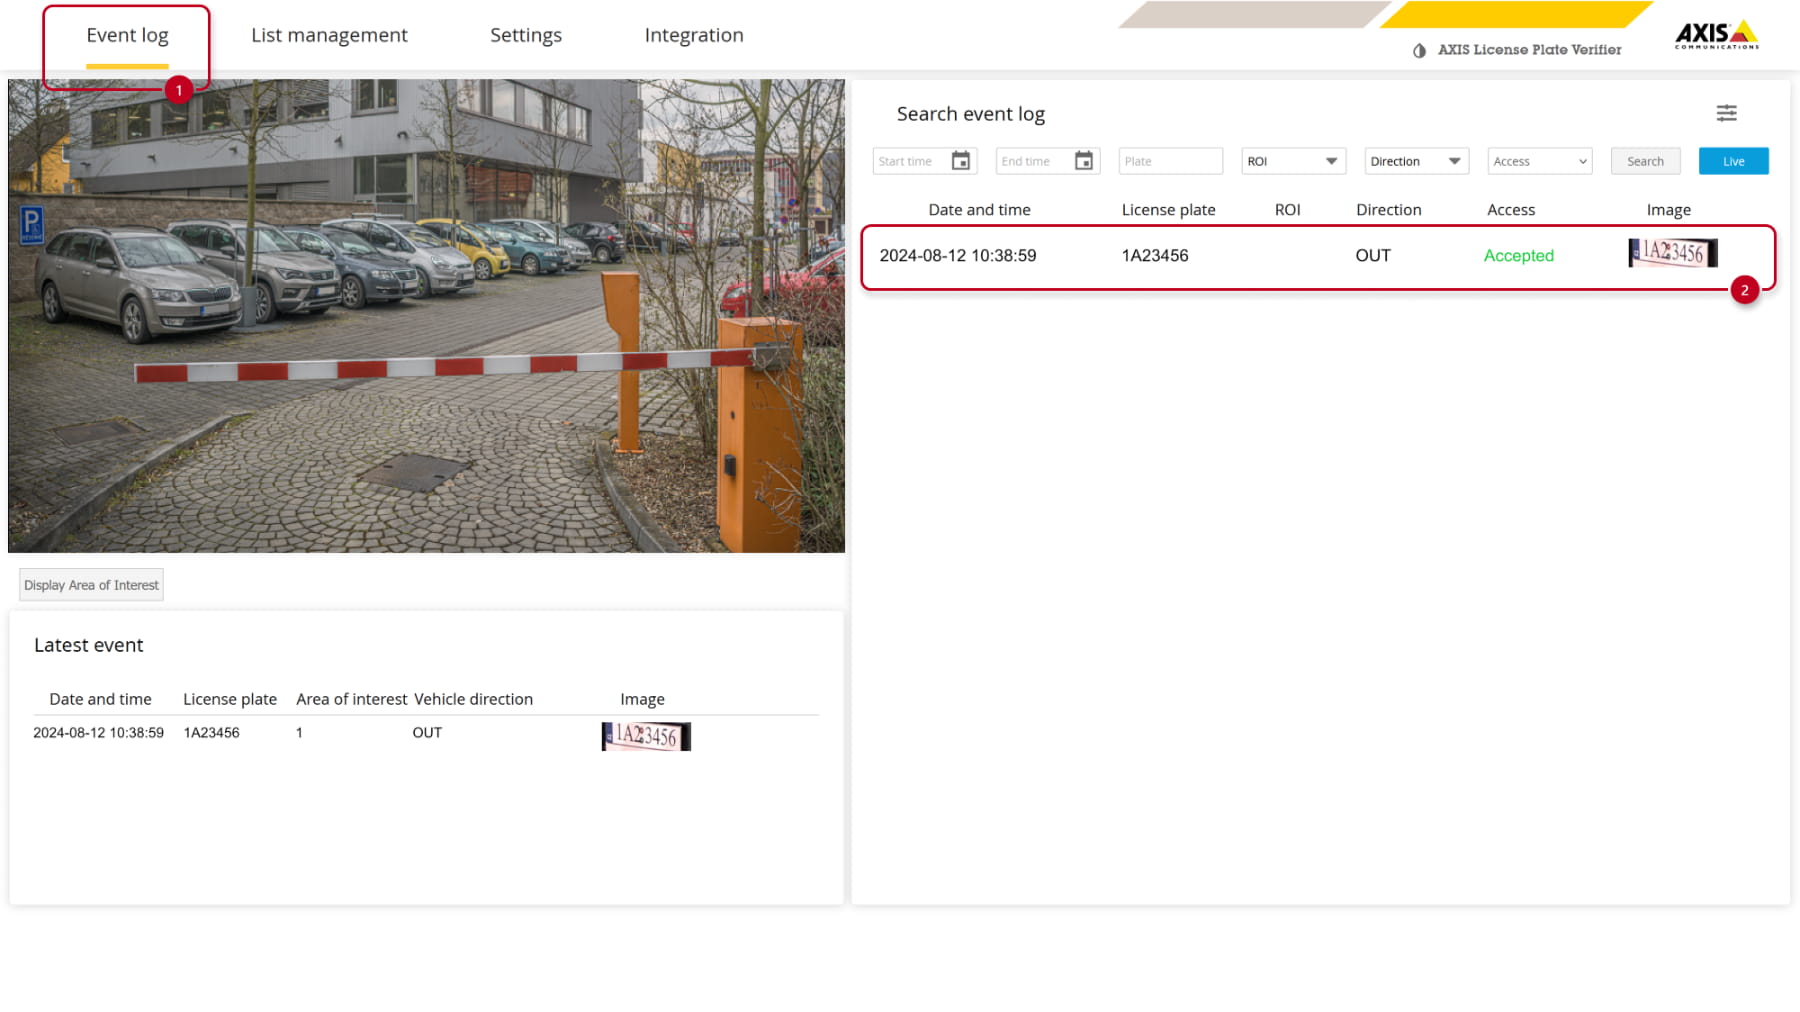
- Received license plates will be shown in the 2N device web interface, section System - Events Log.

Version 2.50 (LTS) or earlier
-
Received license plates will be shown in the 2N device web interface, section Status - Events Log.