2N Access Commander can be integrated into the Milestone XProtect camera system using the 2N Plugin for XProtect Access tool.
It allows you to monitor events and control devices from 2N Access Commander directly in the Milestone Xprotect Smart Client application.
You must first configure the Milestone XProtect Management Client and the XProtect Access module, if you haven't done that yet, please follow this FAQ first:
Milestone integration - How to setup with 2N Access Commander | FAQs | 2N
Access Control interface
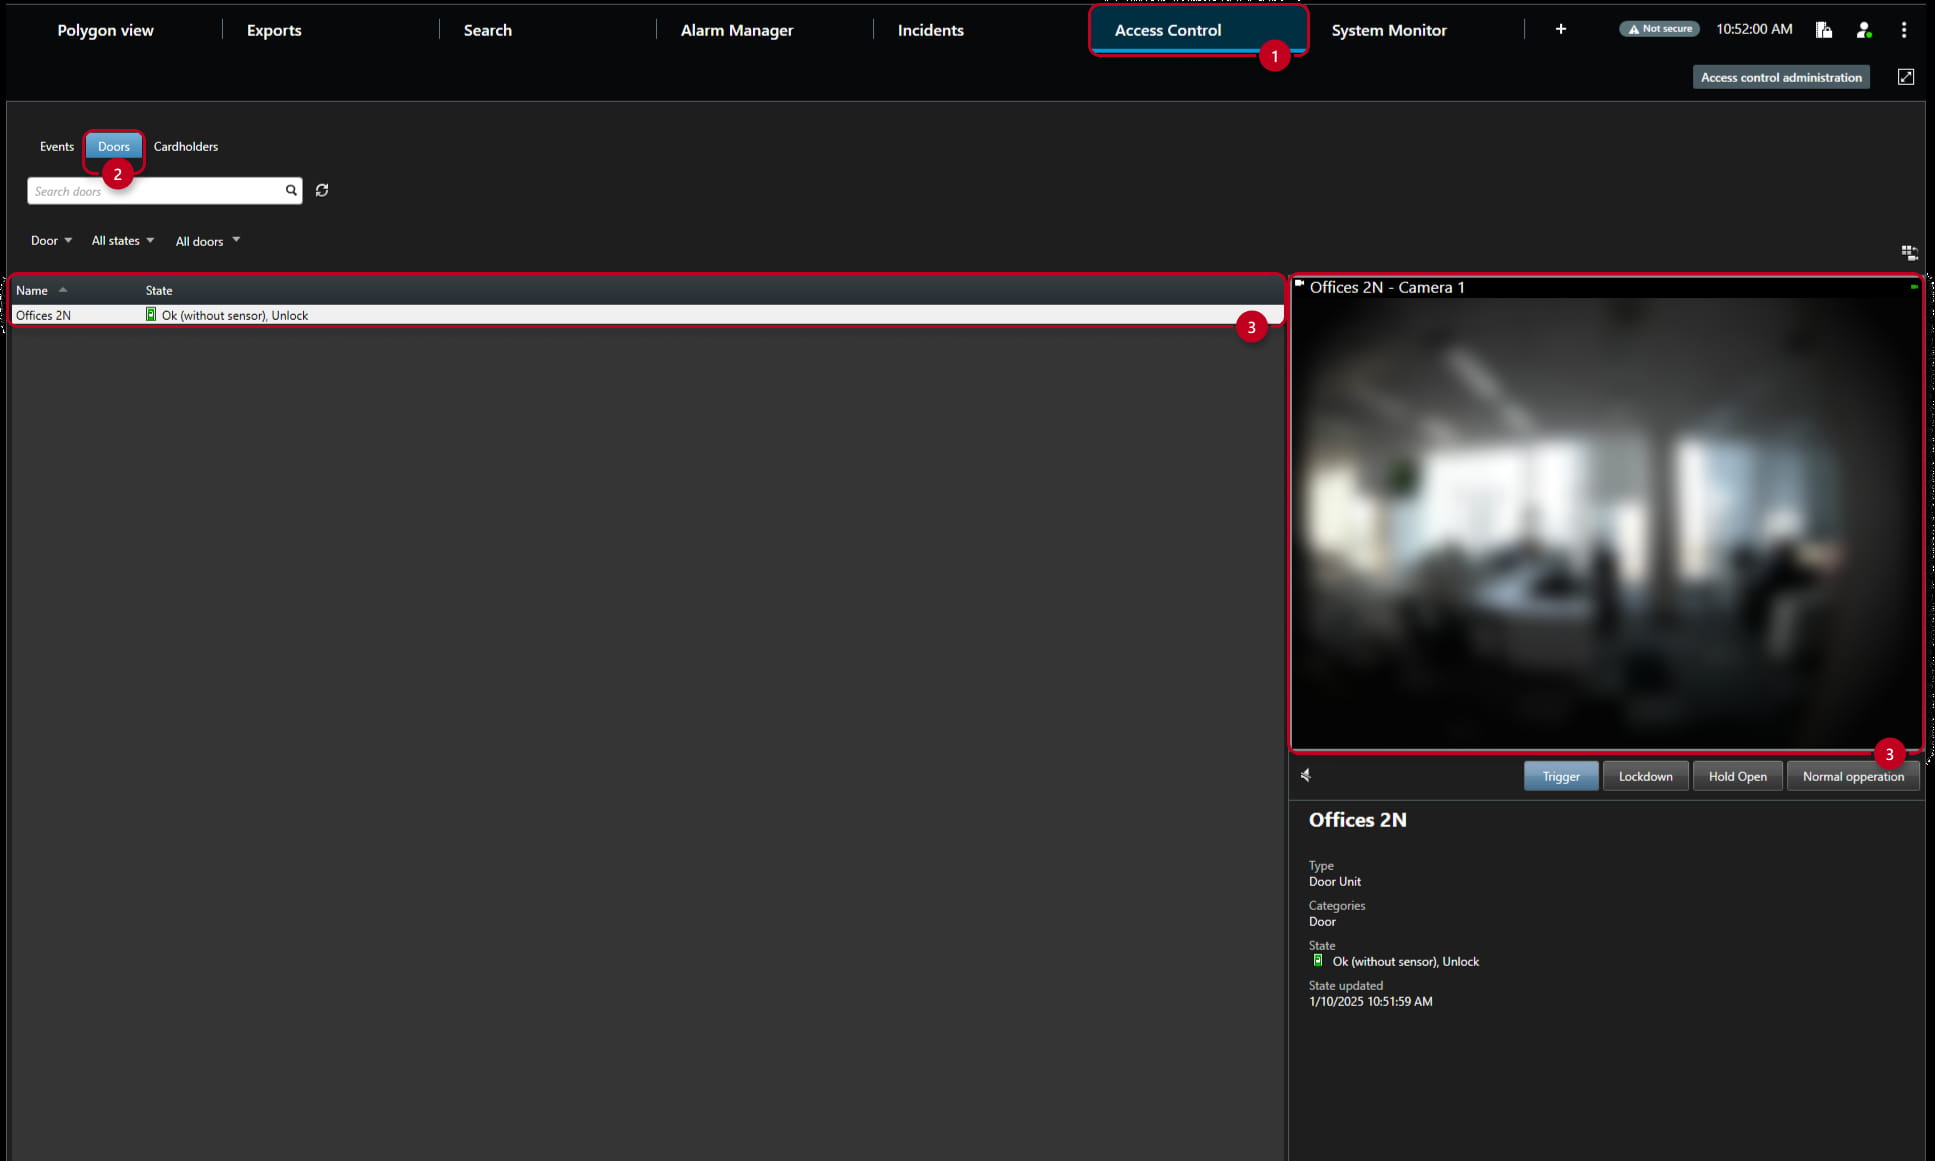
In the Milestone Xprotect Smart Client application, go to the Access Control (1) section and the Doors (2) subsection, where you can immediately see whether a specific "door" is closed or open.
- At the top right you can also see the camera image of the selected "door" (3):
Door Trigger
-
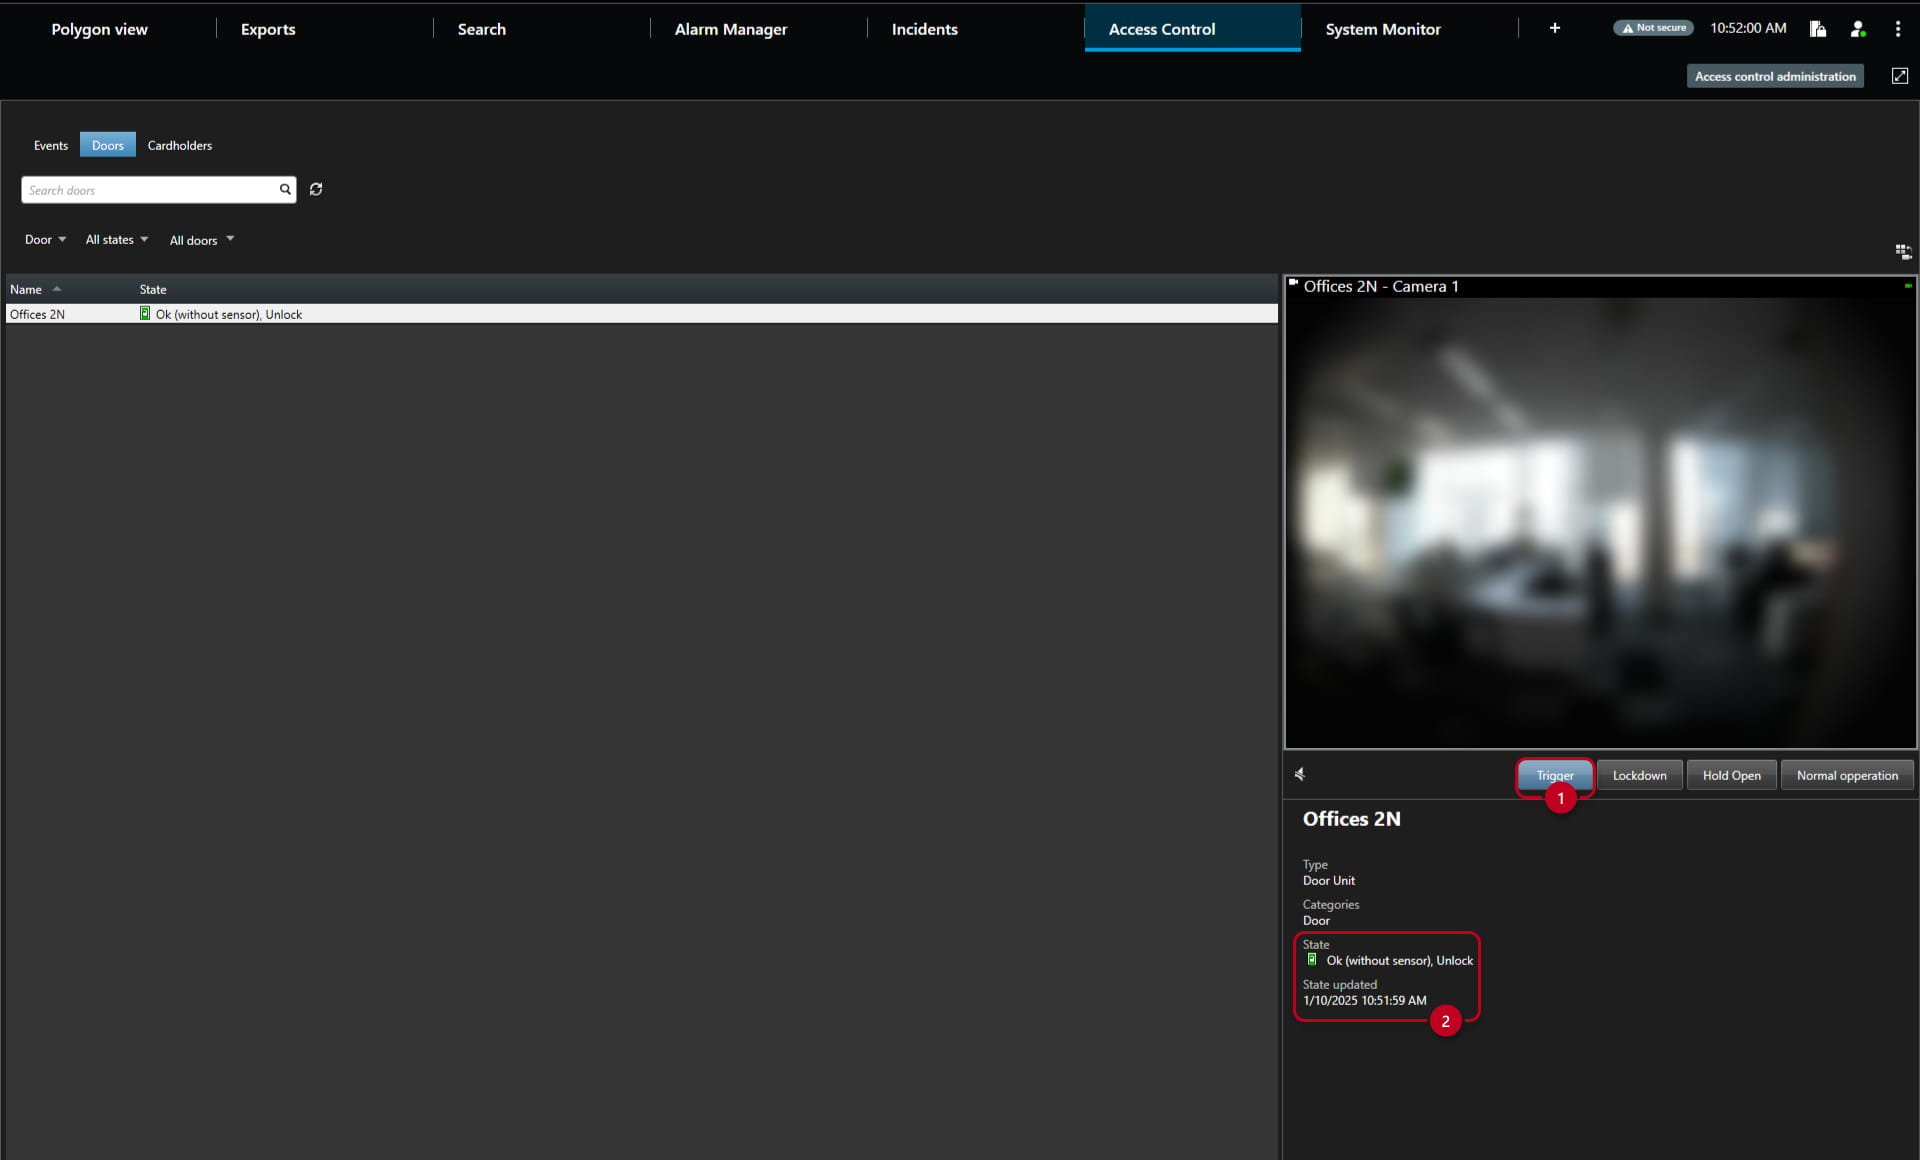
Activated by clicking on the "Trigger" button (1) on the right (after clicking on the given door in the list on the left) you can also control it (or the assigned switch on the given unit) and at the bottom you can also see directly the door State (2), whether it is open (as in the picture below)
-
You can see the current state (2) under the camera picture:
Door Lockdown
-
Activated by clicking on the "Lockdown" button (1) - and using the "Normal operation" button next to it, the lockdown is deactivated again
-
You can see the current state (2) under the camera picture:

Door Hold Open
-
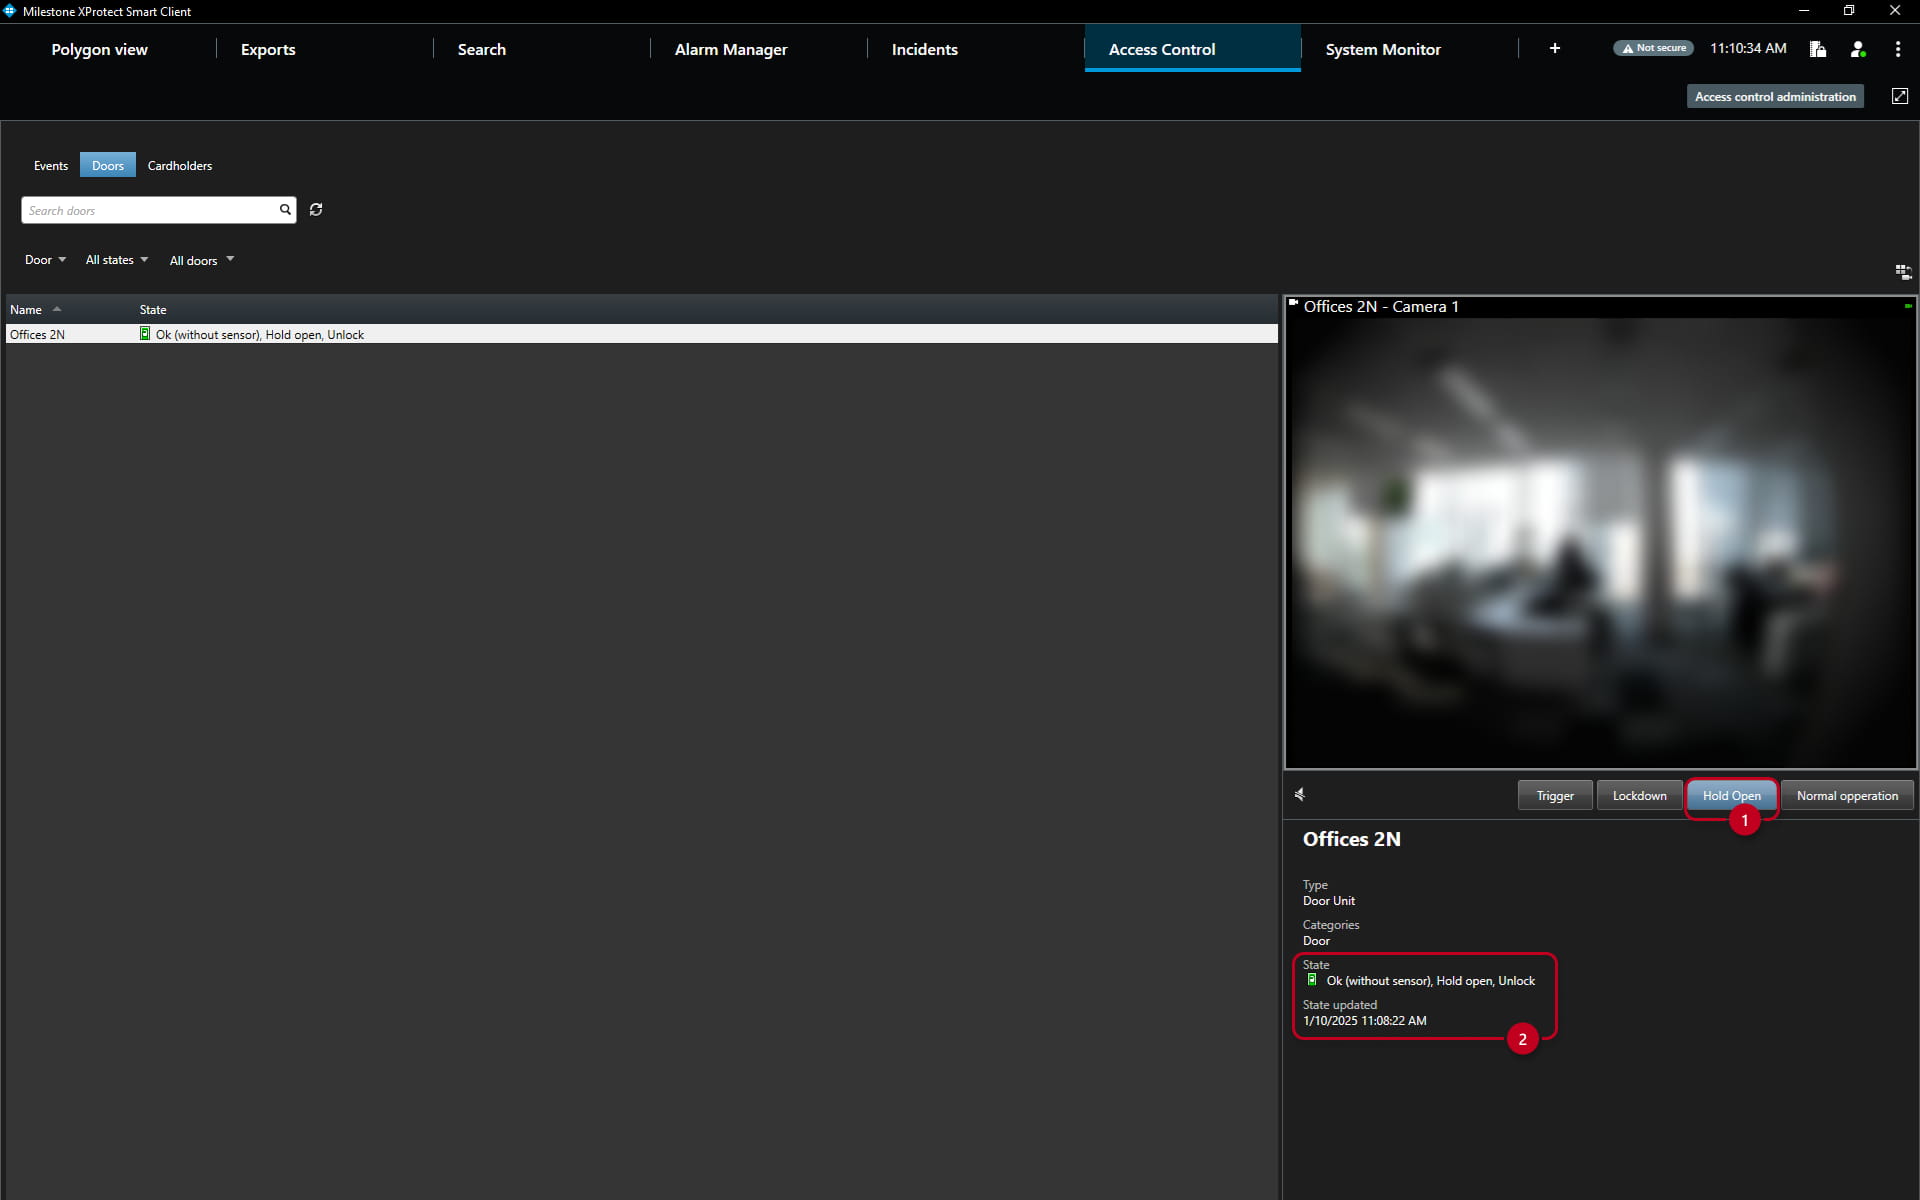
The door can be kept open using "Hold Open" button (1) and using the "Normal operation" button, the door can be closed.
-
You can see the current state (2) under the camera picture:
Live interface with map
You can import a map to better manage the view of the interface:
-
Prepare a map of the object (floor plan in JPEG / BMP / PNG format)
-
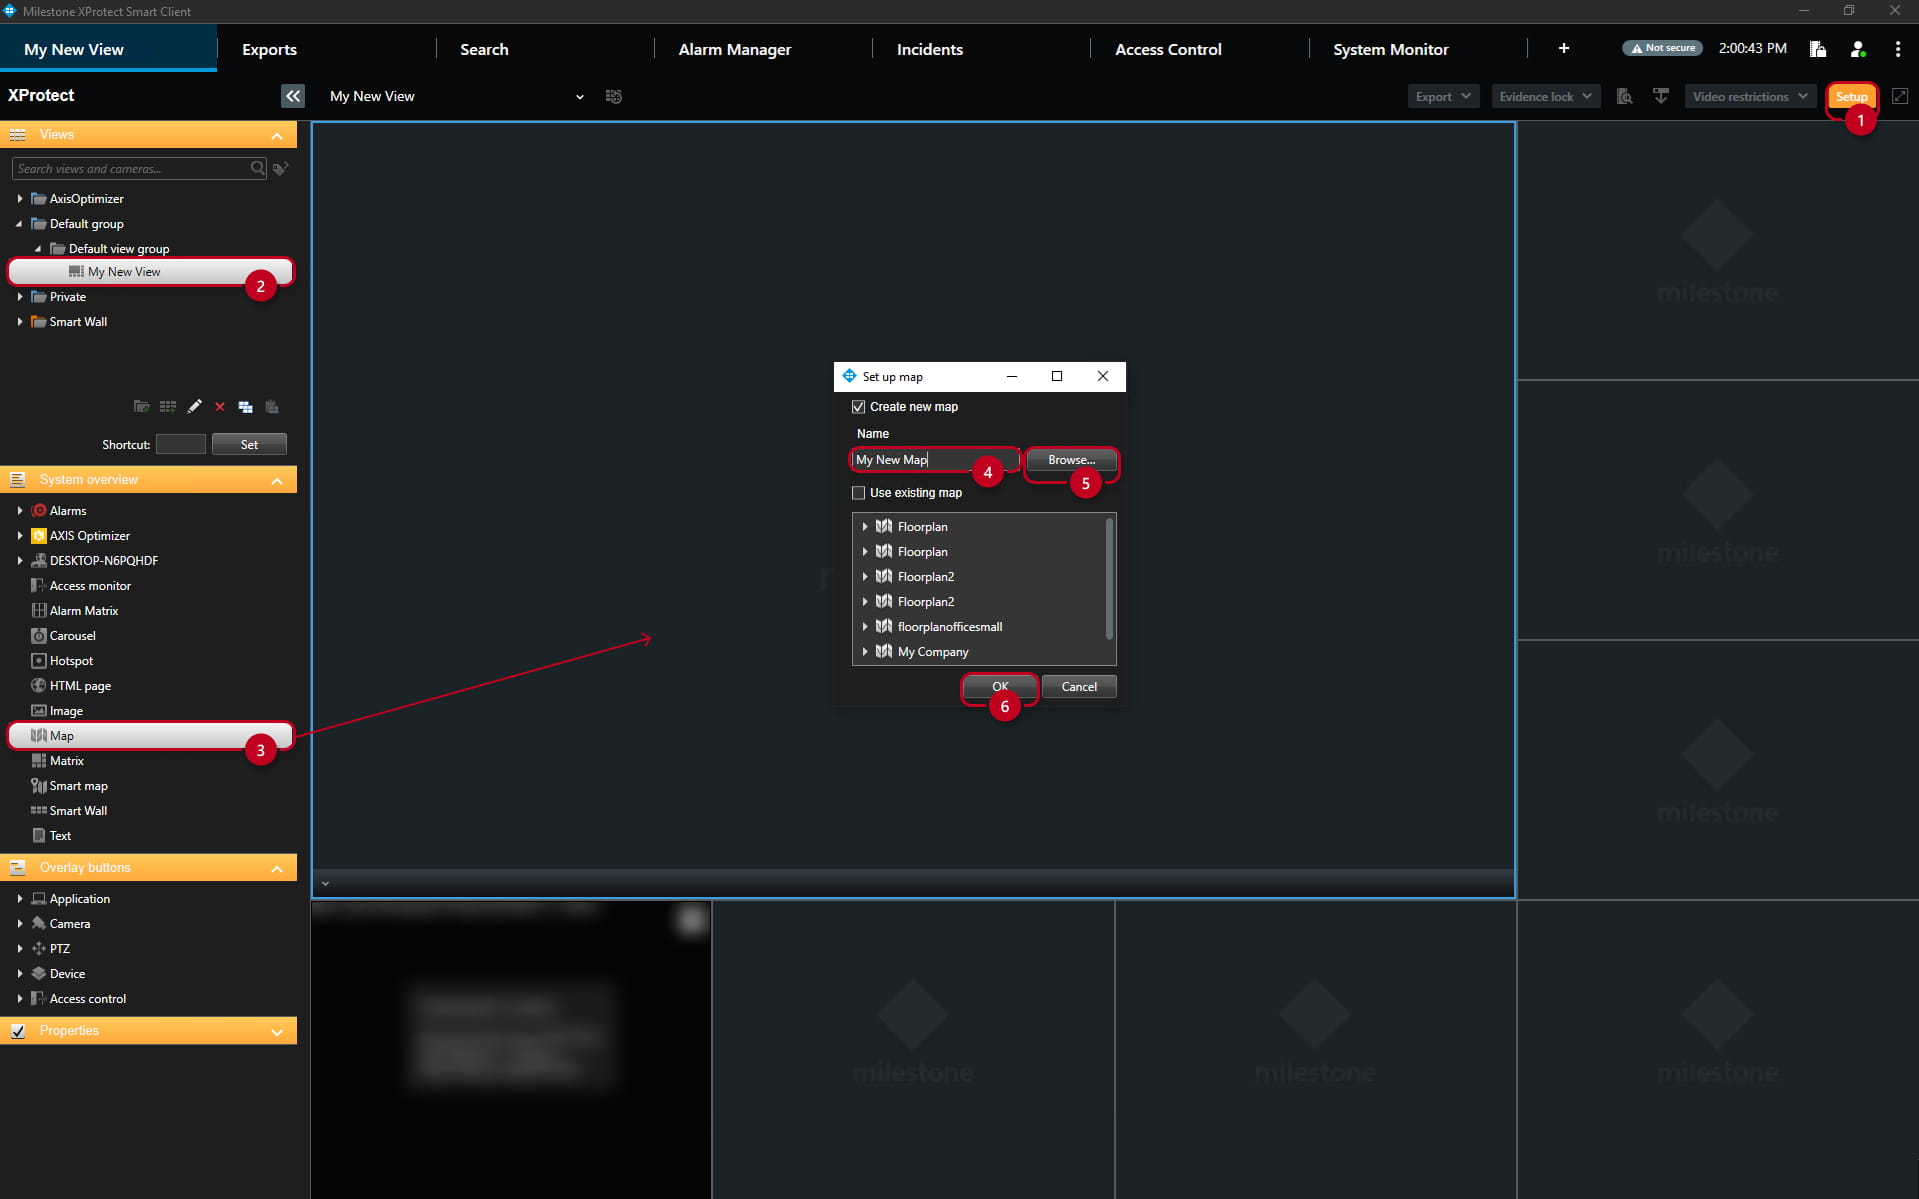
In the Milestone XProtect Management Client, in the Live view section, click on "Setup" (1) in the upper right and left in the Views subsection firstly click on the "View" (2) where you want to add the map.
-
Then in the System Overview subsection drag the "Map" (3) object to the selected window of the chosen "View".
-
A window will appear where you can name the map (4) and after clicking on the "Browse" (5) button, select the map from your directory.
-
Click "OK" (6) to confirm:
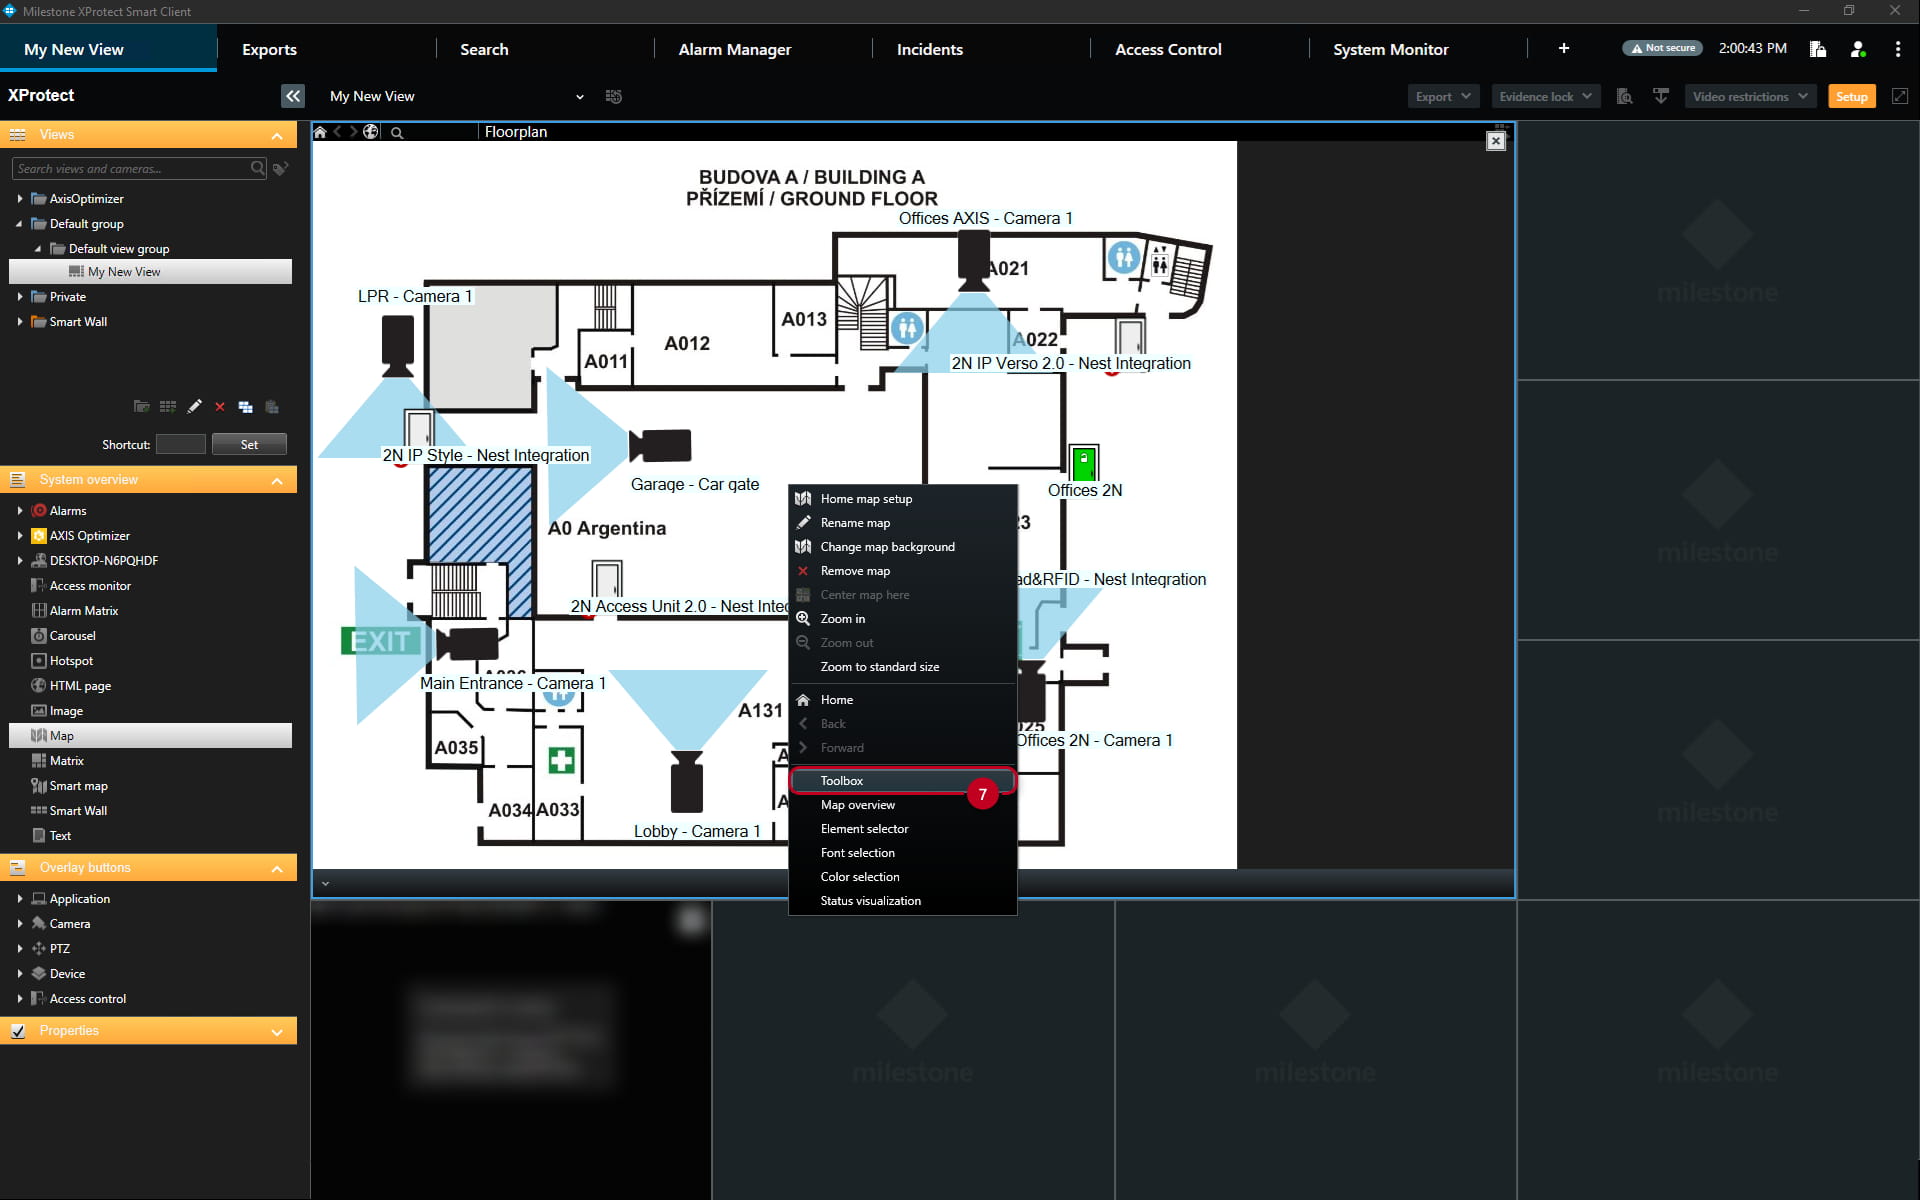
Your map will appear in that window
- If the toolbox does not automatically appear - right-click on it and select "Toolbox" (7)
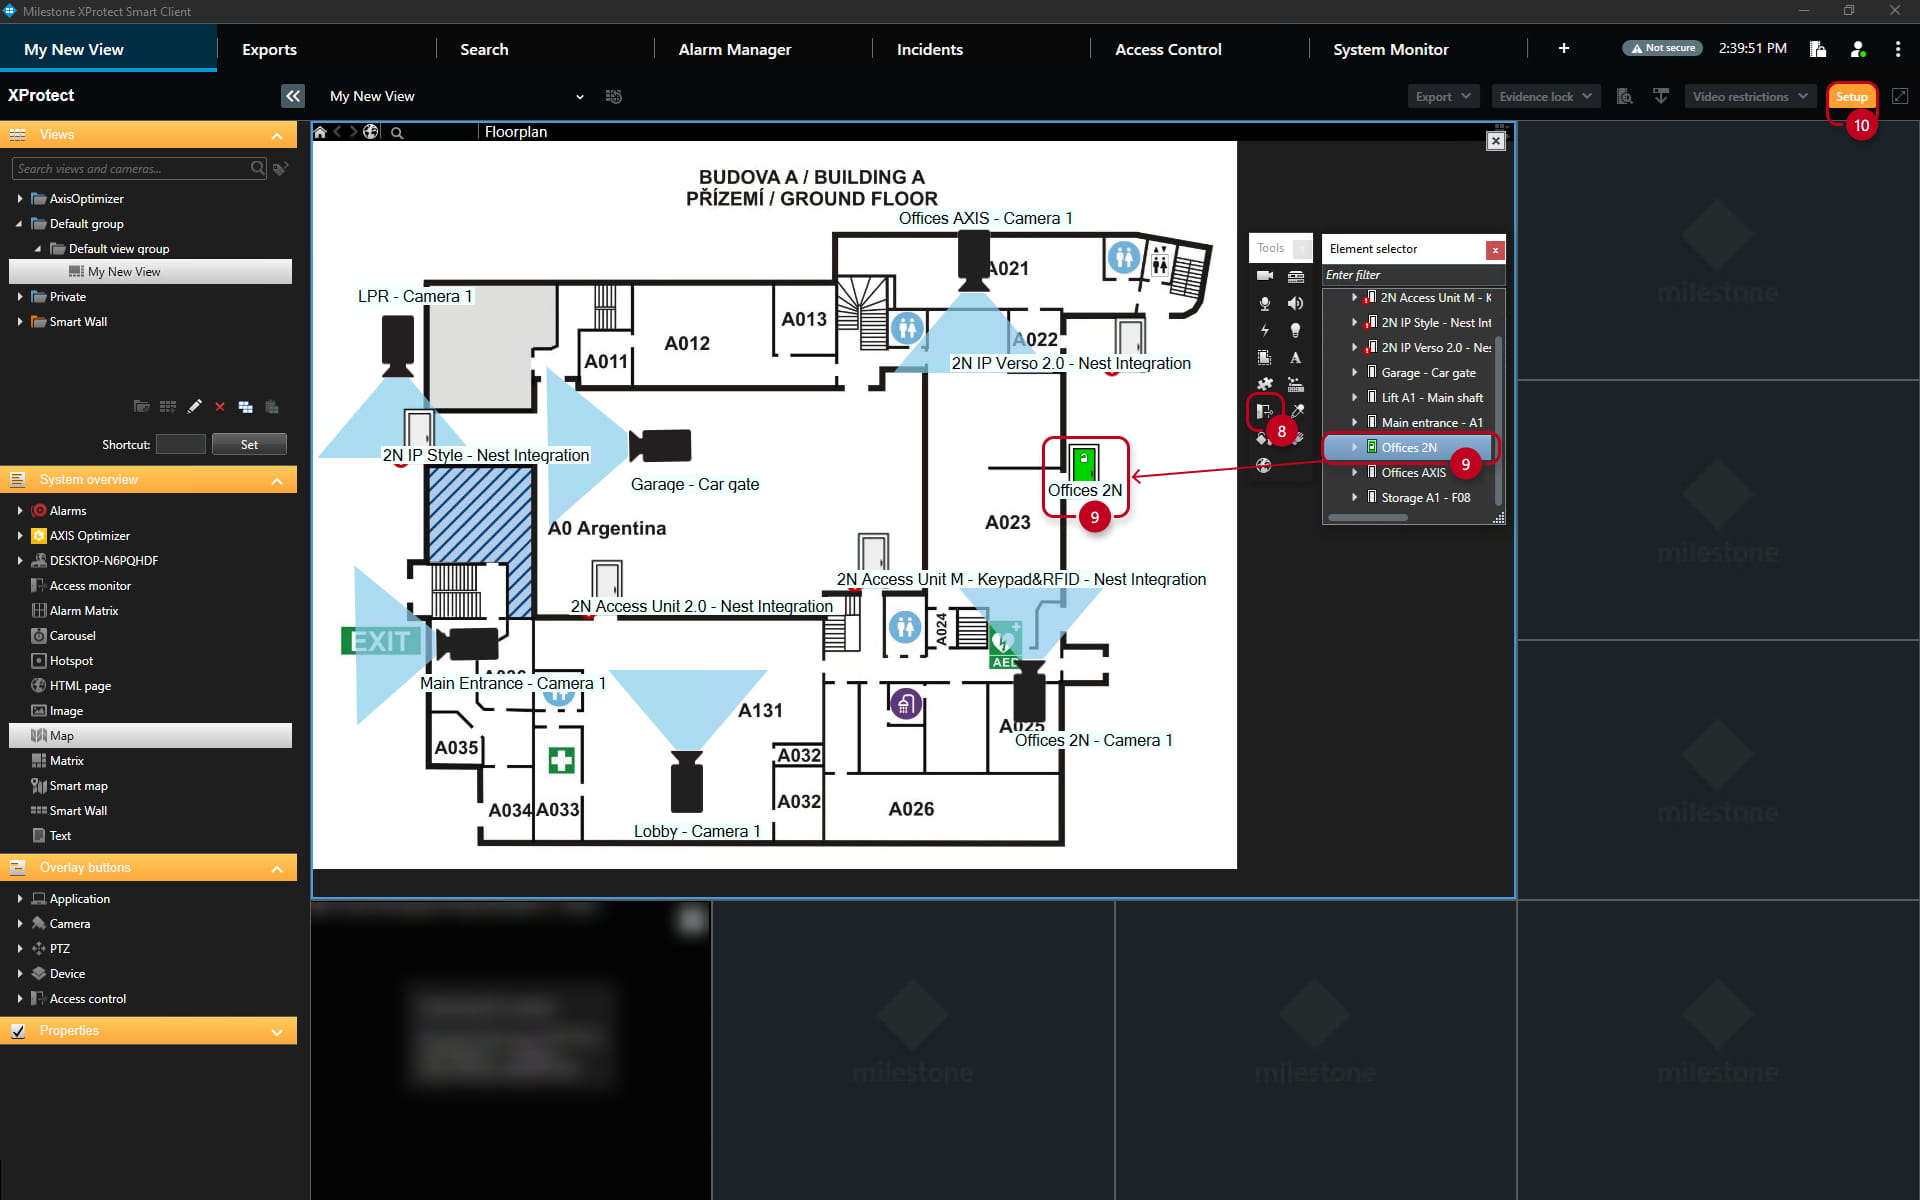
In the Toolbox (7), click on the door icon (8) and then click on "2N Access Commander" on the right (or the appropriate name of the integration created in Milestone XProtect Management Client) - in this example - "Offices 2N" (9).
-
Then you can see the relevant 2N door units, which you can drag and drop (9) to the appropriate place on the map.
-
In the same way you can also place the camera and other available elements on the map.
- Finally click on the "Setup" (10) button again at the top right.
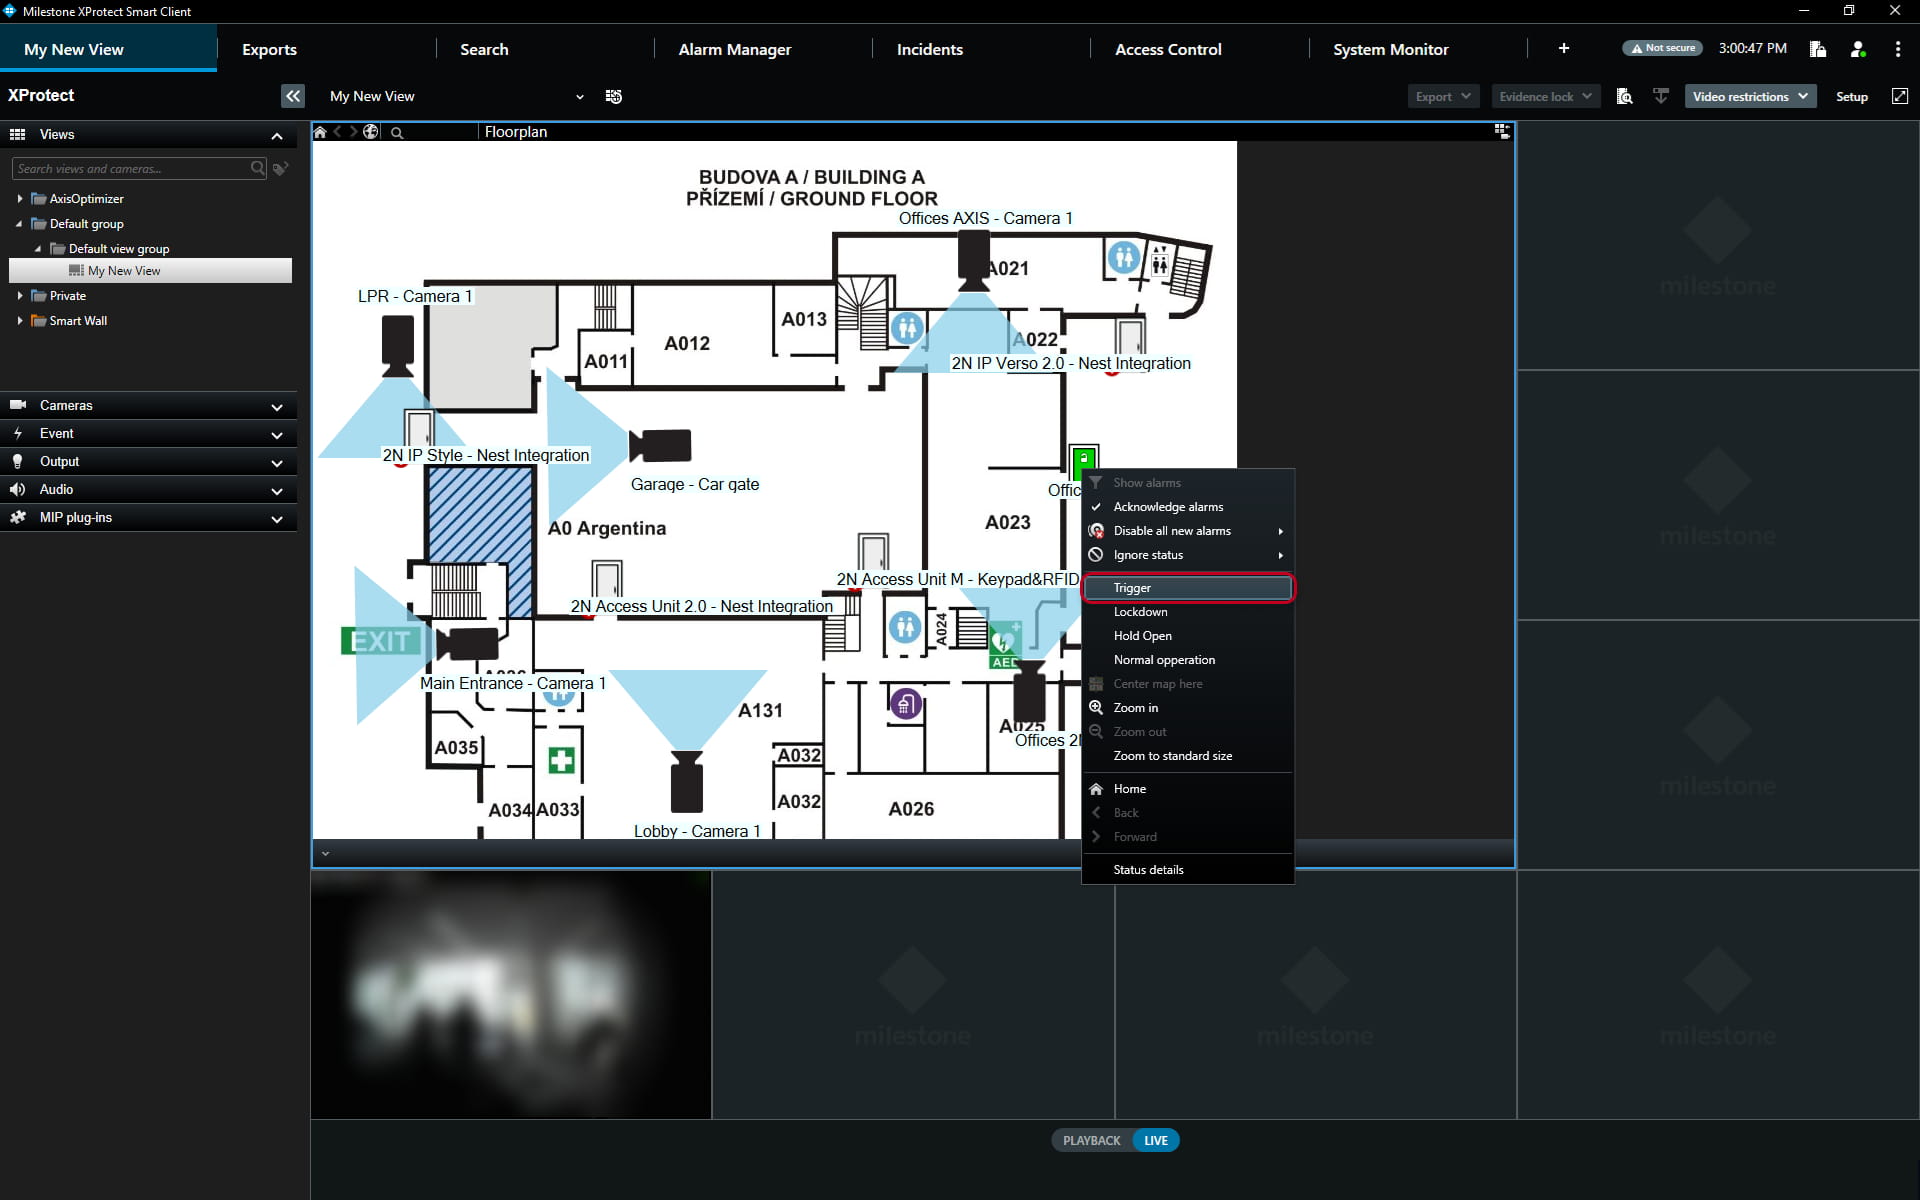
Now on the map you can see the status of the door, which you can also control by right-clicking on the selected door icon, see bellow:
-
"Trigger" to activate the given switch (=> open the door).
-
"Lockdown" to permanently lock.
-
"Hold open" to keep door opened.
-
"Normal operation" to cancel the lockdown or stop holding door.
Overlay buttons
You can add an overlay buttons to the live stream, like so:
- You can check this article for detailed procedure how to add the additional overlay buttons, under "Overlay Buttons" - Milestone XProtect and 2N IP Intercom integration | FAQs | 2N

Door Status Icons
Examples of icons representing the different states of doors:
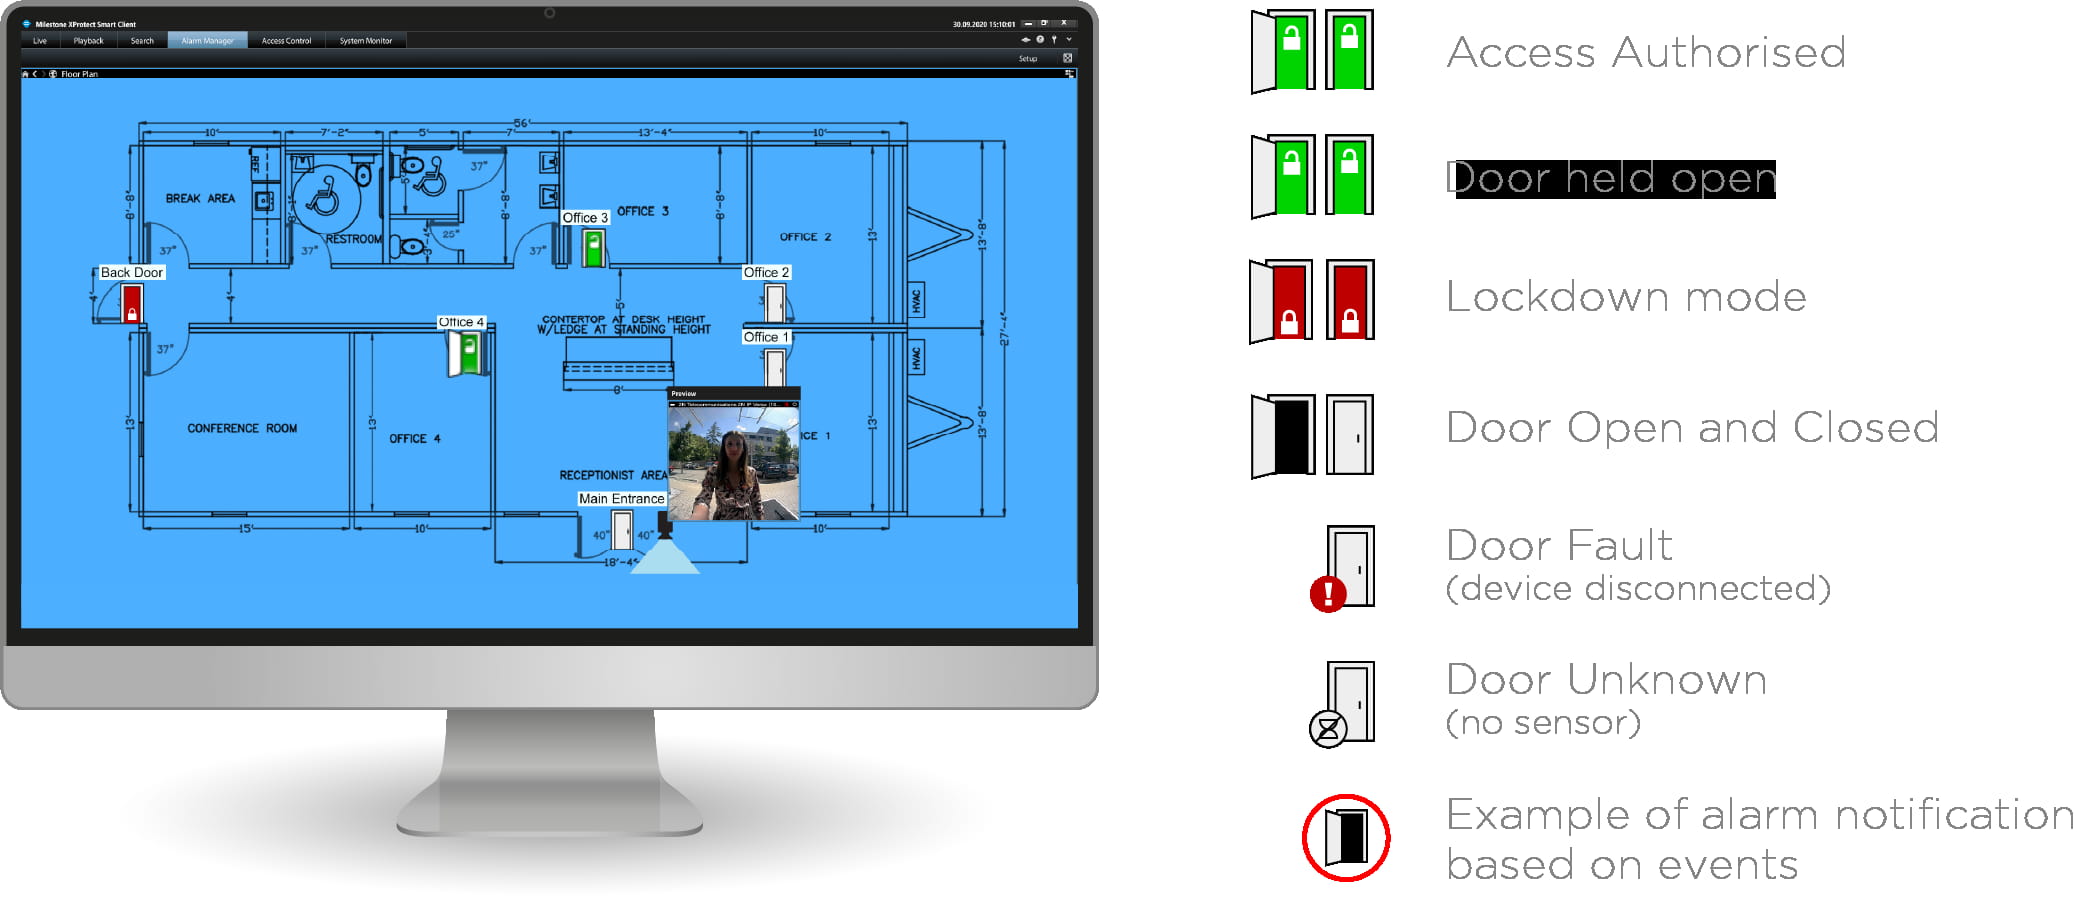
|
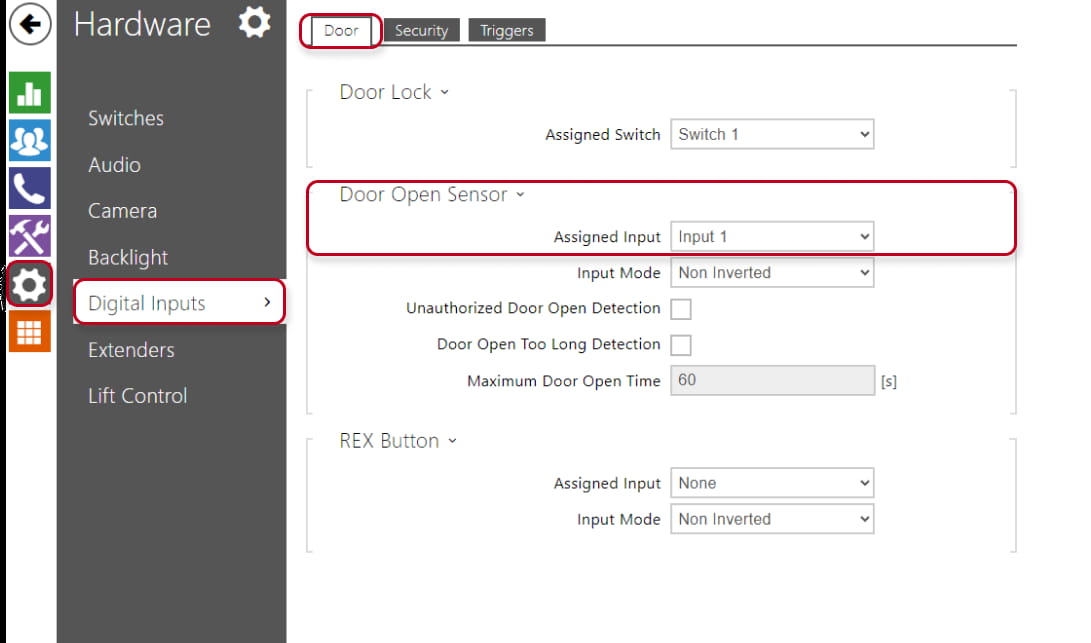
Note - If no input is assigned in the web interface of the 2N unit in the Hardware > Digital Inputs > Door Open Sensor section, where the door sensor should be physically connected,
|
Alarm Manager interface (with map)
To register alerts when a door is open for a long time or when a door is opened unauthorized, make the necessary settings for the mentioned functions directly on the unit - see here:
Door open too long
Unauthorised door opening
Access control events
-
In the Milestone XProtect Management Client go to the Access Control (1) section and click on the added integration with 2N Access Commander in the column Access Control (2) on the right.
-
In the new window select the Access Control Events (3) tab below and for the items "Door Forced Open Alarm" and "Door Open Too Long Alarm" select "Alarm" as the Event Category (4) on the right:
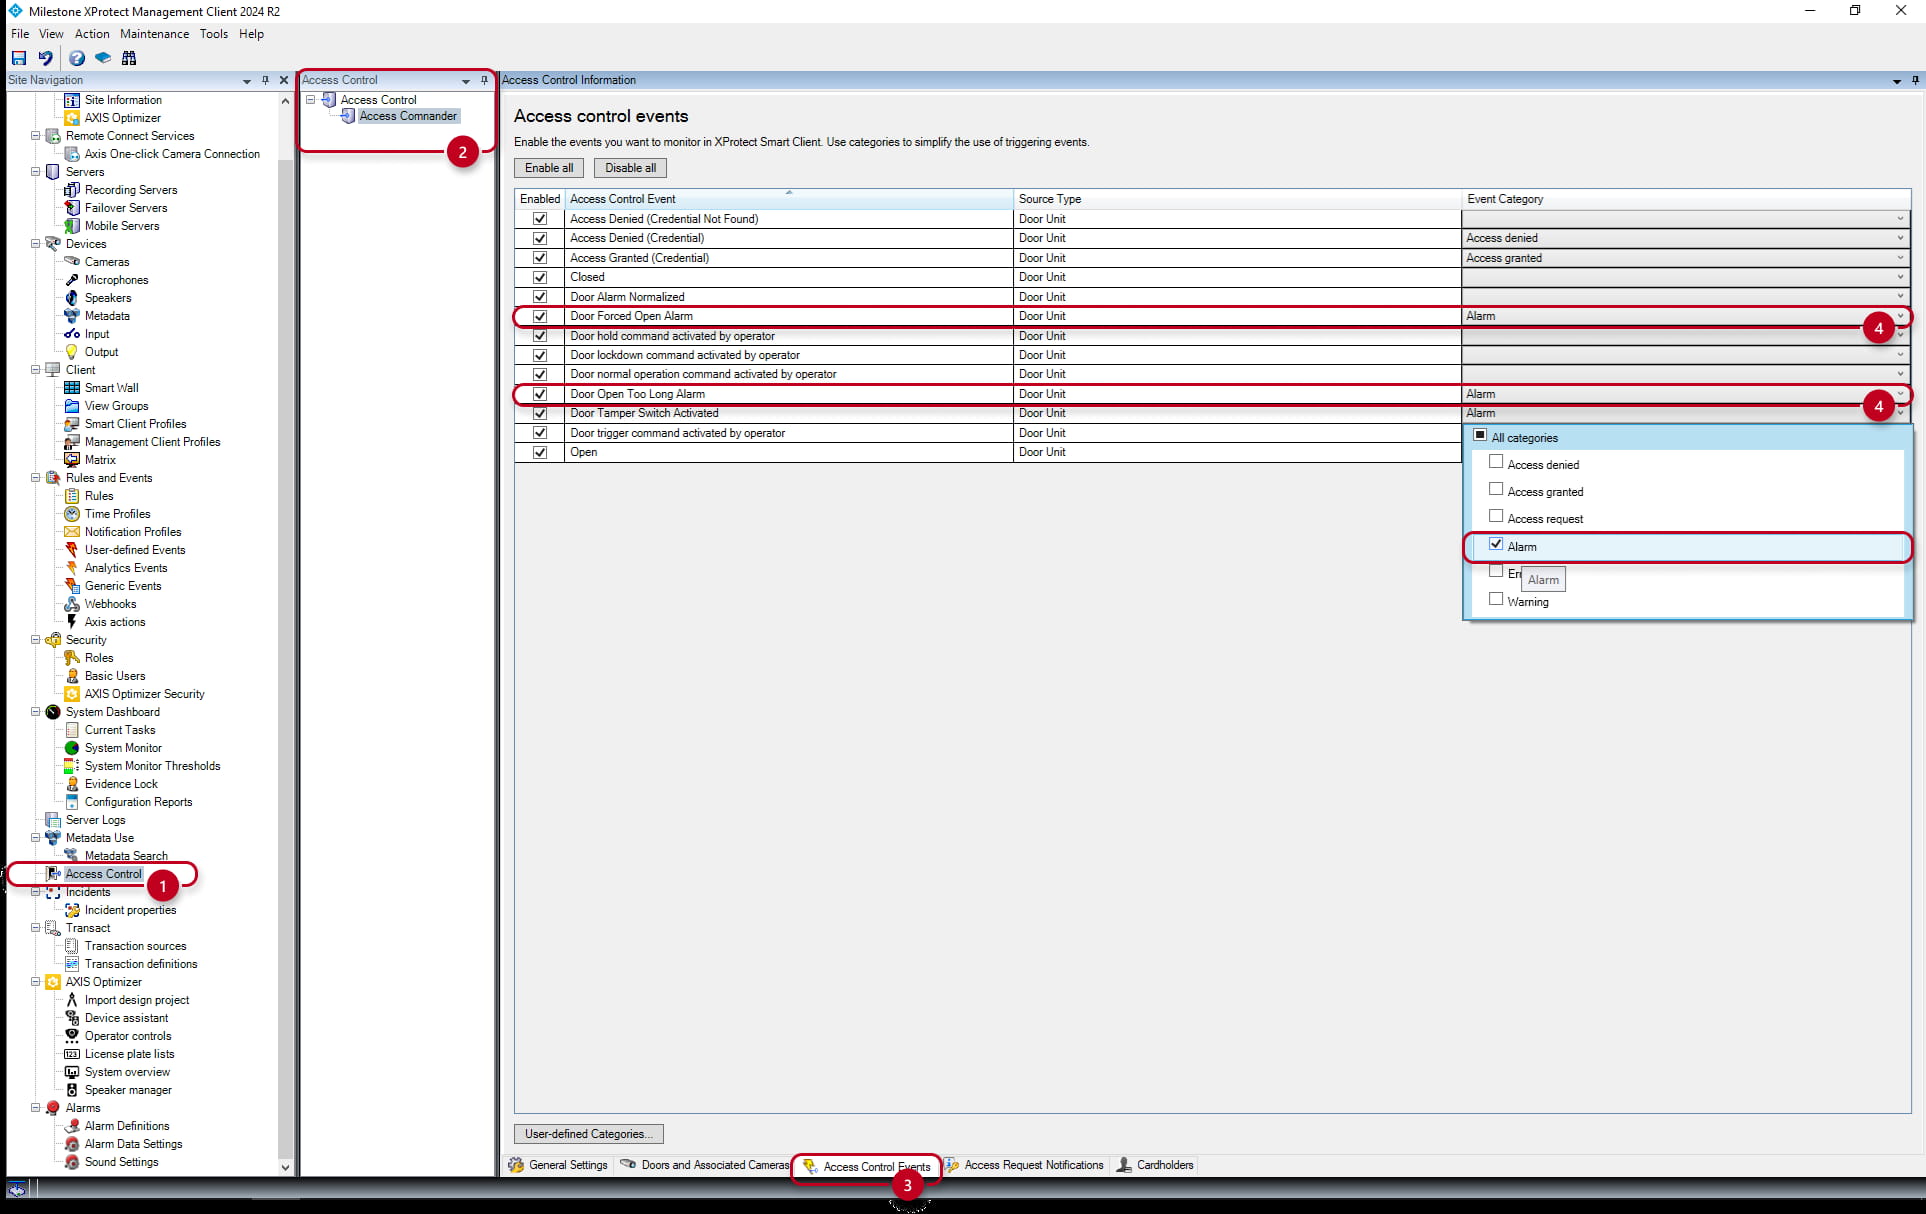
- Then save the made changes at the top left.
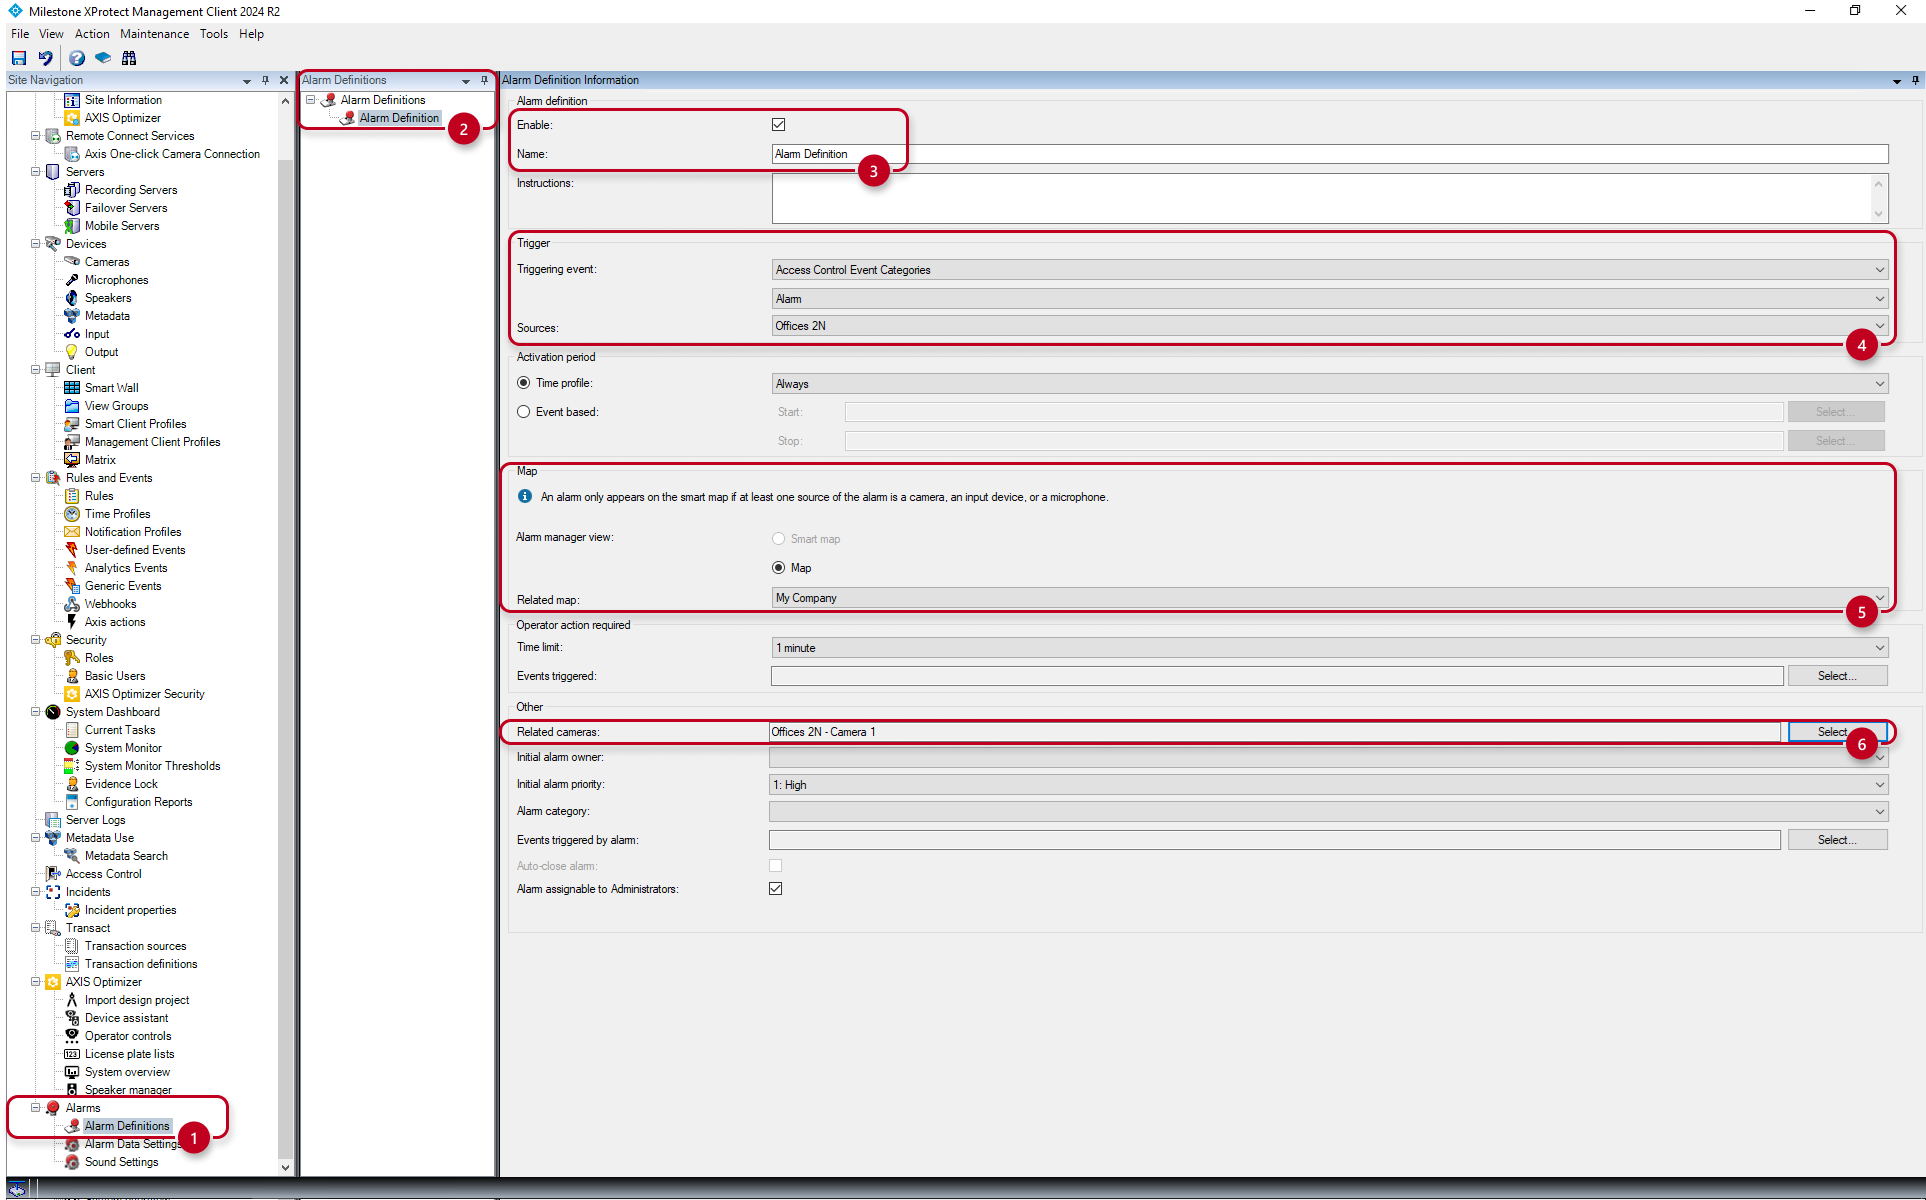
Alarm Definition
-
Go to the "Alarms" (1) section and the "Alarm Definitions" (2) subsection, where in the next column right-click on Alarm Definition Information and select "Add New":
-
Select a Name (3) the alarm.
-
For Triggering event select "Access Control Event Categories", "Alarm" and the given door unit (4).
-
For Related map select the map you have created (see the previous chapter "Live" interface with map") (5).
-
Under Related cameras (6) you can also select the camera (of the given unit), the image of which you will then see together with the given alarm (see the blue frame in the picture above).
-
Then save the changes again at the top left.
Recorded Alarms
-
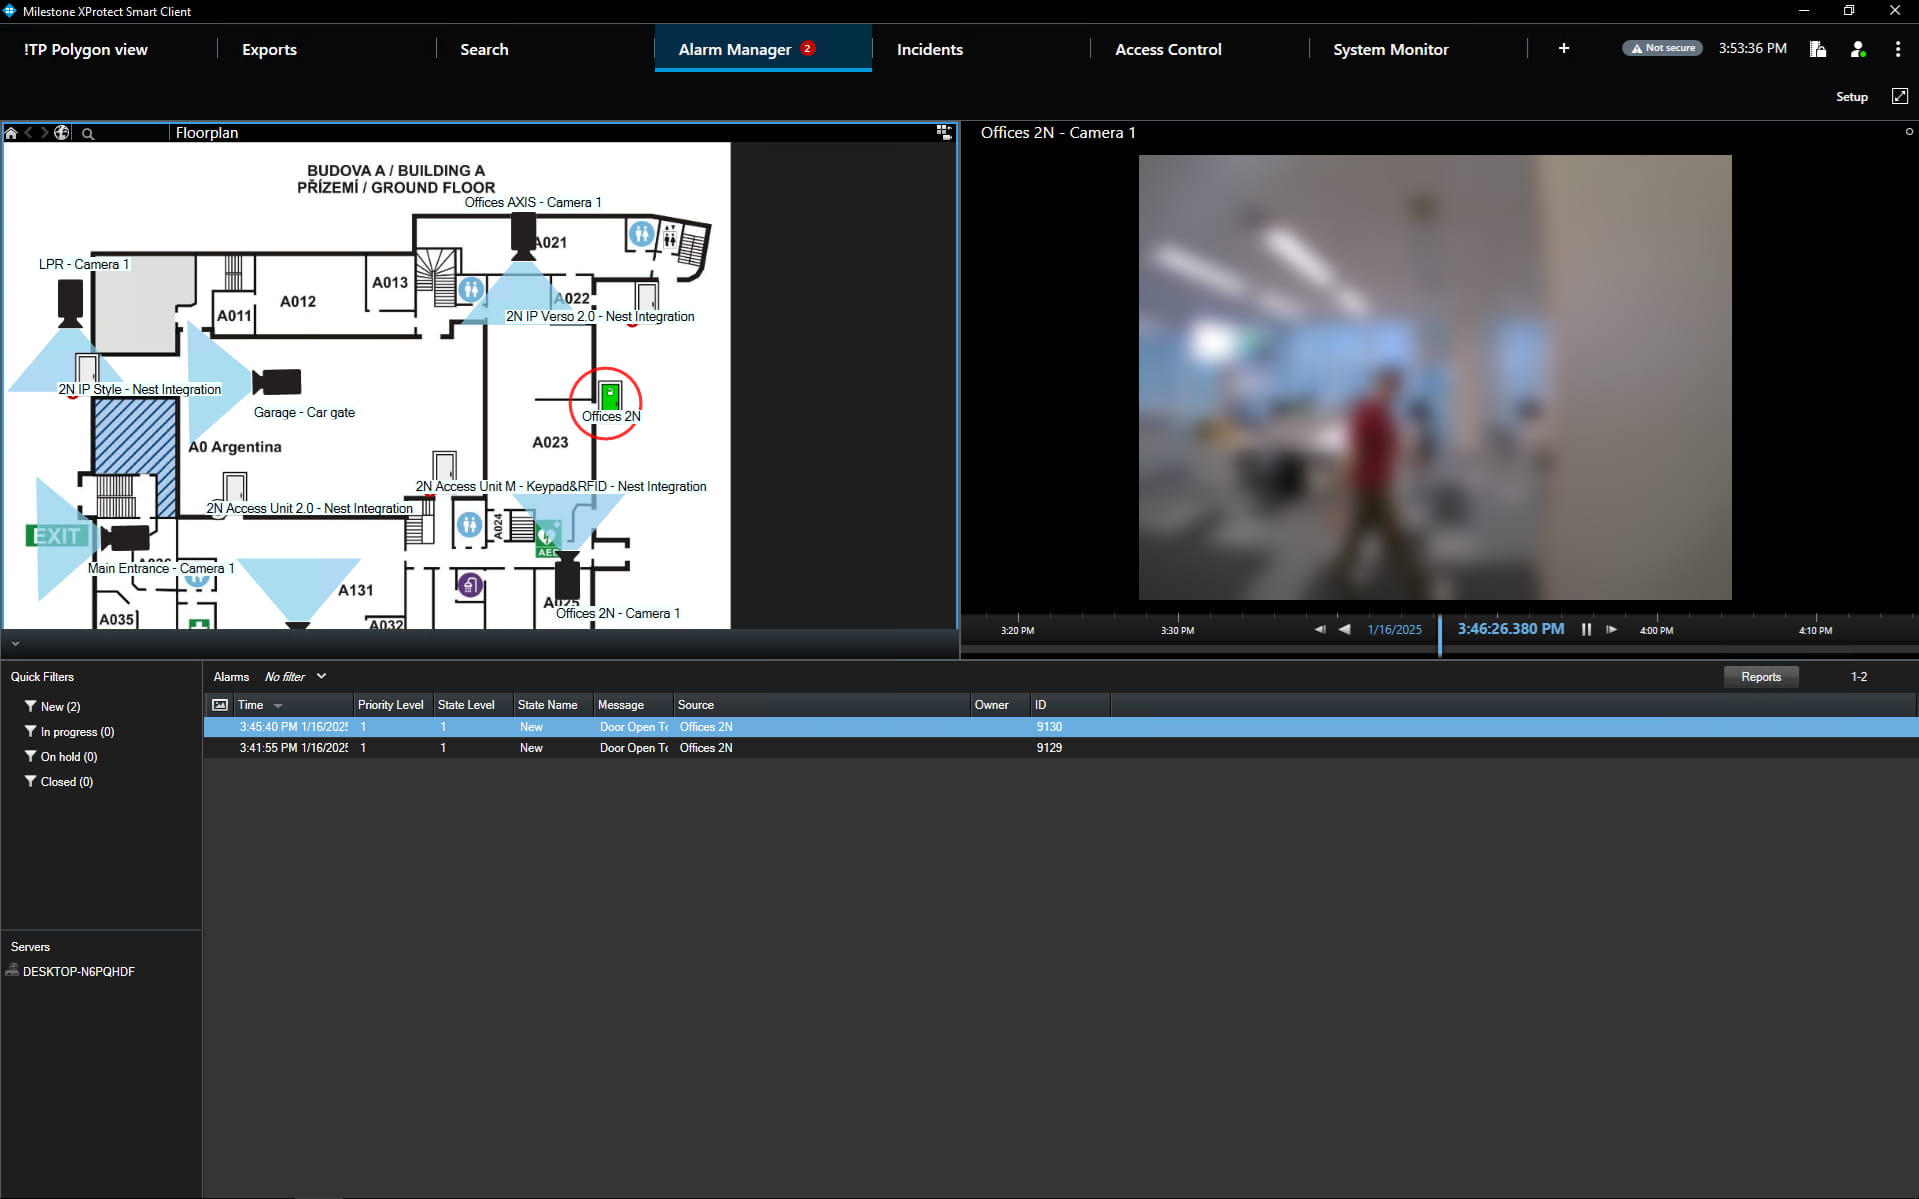
In the Milestone XProtect Smart Client application go to the Alarm Manager section, where in case of activation of the created alarm (see the list at the bottom of the picture).
-
You will see the added map with icons on the left side (which can be used to control the selected door as in the "Live" section) and at the same time a flashing red circle around the door appears.
-
On the right you will also see the image from the assigned camera, with the recording of which you can then continue working.
-
You will see the same on the map in the "Live" interface and the name of the alarm as well as in the "Access Control" interface for the given door on the "Doors" tab.