2N Fortis - mechanical assembly and disassembly
This FAQ article describes the assembly and disassembly of the 2N Fortis Handle and Cylinder.
2N Fortis Handle
General assembly instructions
- Check the approval when installing the 2N Fortis door handle in a fire/smoke-resistant door or in an escape door
- If a cylinder holder is present in the door, then it should be sealed properly, for e.g. using a dummy cylinder.
- Ensure that the latches or seals fitted to the door do not hinder the proper operation of the 2N Fortis Handle.
- Ensure that the door handle does not protrude and prevent the door from swinging freely.
- When installing the 2N Fortis Handle door handle in the circular rosette version, the hole in the door for inserting the handle pin should have a diameter of at least 25 mm.
- Before assembling the door handle, always check whether all the components can move freely.
- After assembly, check the function with the door open.
- The pre-tension in the mortise lock or the deviation of the horizontal basic position must not exceed 3°. If the deviation is greater, the electronic door handle cannot engage or disengage.
Assembly
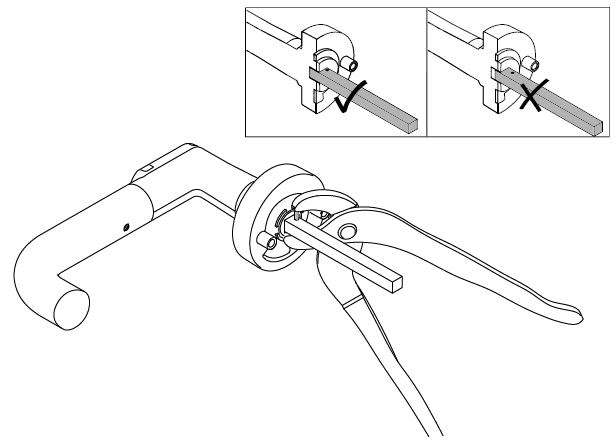
The square pin has to be assembled before installation on the electronic door handle (outside). This applies to all the versions and is shown here using the circular rosette.
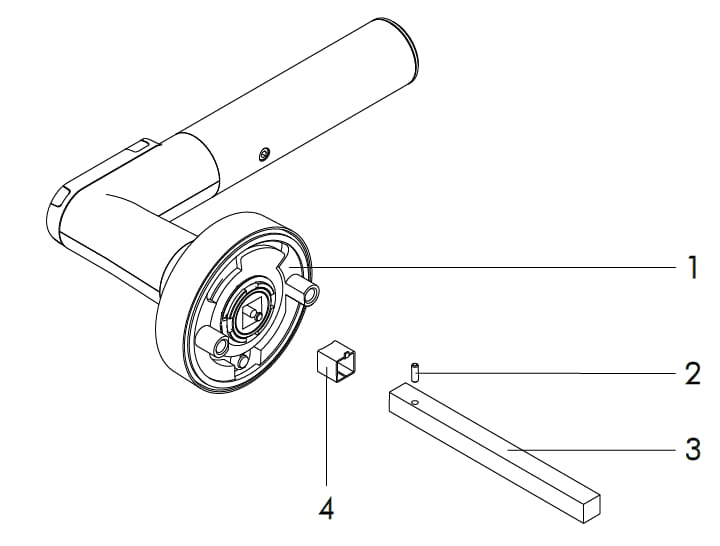
1 Electronic door handle
2 Spiral clamping pin
3 Square
4 Adapter sleeve for square (only for 7 mm square)
Insert the adapter sleeve into the square holder (if available)
Insert the square onto the retaining pin and into the square holder
Insert the spiral clamping pin into the square
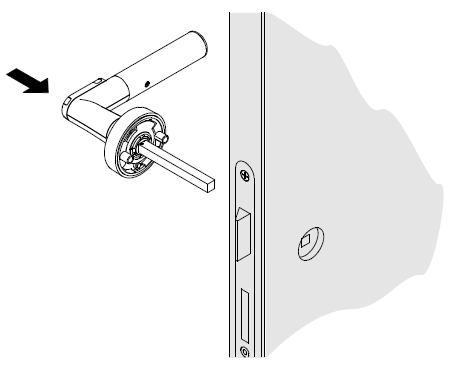
Insert the square pin of the electronic door handle into the square nut of the lock.
Place the drilling template on the square pin, align horizontally and centre punch the hole markings.
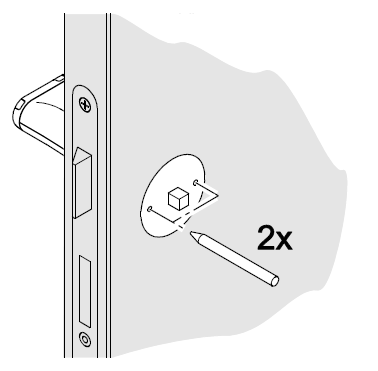
Remove the square pin again.
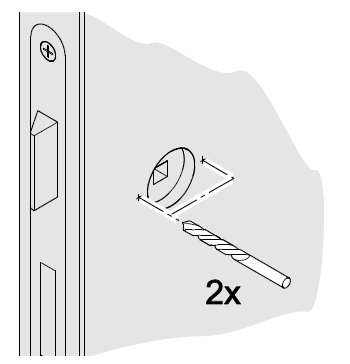
Drill holes of diameter 8 - 8.5 mm at the marked positions. Do not drill into or through the lock casing.
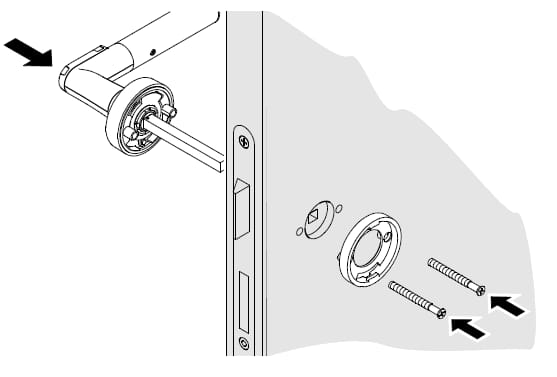
Insert the square pin of the electronic door handle once again into the square nut of the lock. If necessary, place the adapter sleeve supplied on the square pin.
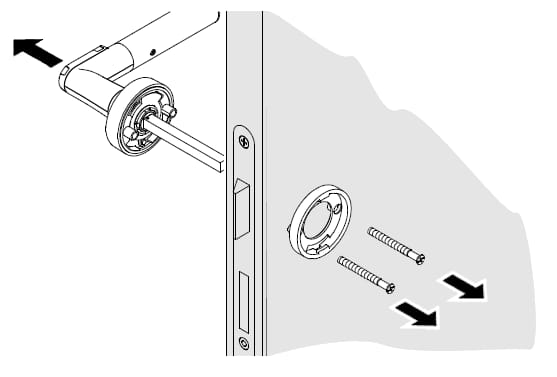
Insert the holder of the mechanical door handle from the other side and screw it along with the electronic door handle through the door panel. Use the supplied mounting screws.
Insert the mechanical door handle, keeping it in a horizontal position. For door handles pointing to the right, tighten the rosette towards the left, guide it over the handle holder and engage the bayonet lock. Accordingly, tighten the rosette towards the right for door handles pointing to the left.
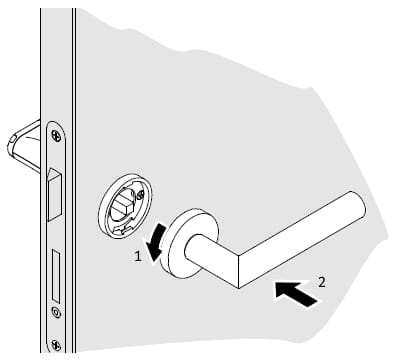
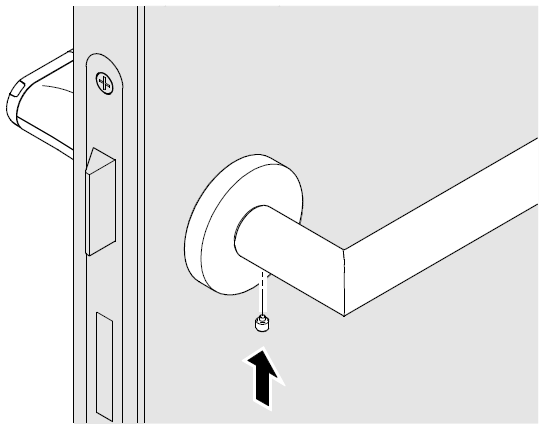
Insert the locking screw from the bottom of the handle and tighten it.
Check the functionality and easy movement of the door handle with the door open. The handle is already engaged when delivered. When engaged, the catch of the lock should be completely inside the lock casing when the latch is pressed down.
To operate the door handle, insert the battery and close the housing (see FAQ Battery replacement). The electronic door handle disengages only after the battery is inserted.
After holding up an authorised key for the first time, only the two upper LEDs light up as an indication. When inserting the battery, make sure that the handle is in its designated horizontal position. This is necessary for the orientation sensor to calibrate and the device to function correctly.
Disassembly
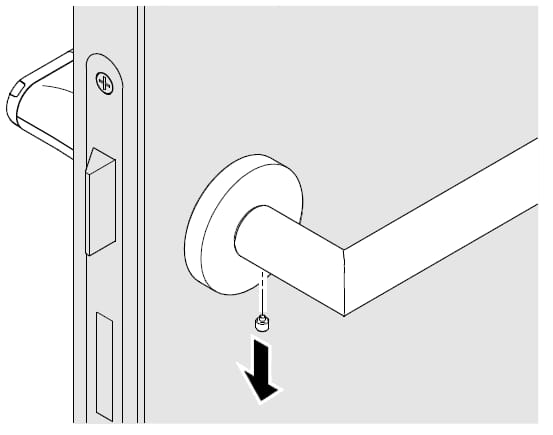
Remove the locking screw from the bottom of the handle and take off the handle.
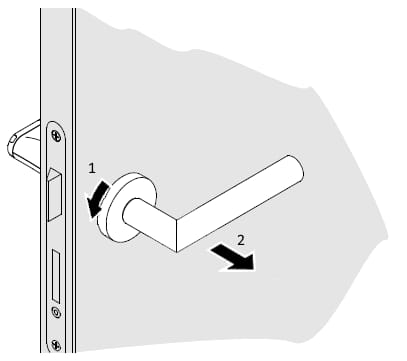
Remove the supplied mounting screws from the holder of the mechanical door handle and then the electronic door handle.
2N Fortis Cylinder
General assembly instructions
- Before assembling the 2N Fortis cylinder in a fire/smoke-resistant door, please recheck the fire certification to ensure conformity.
- Ensure that the sealing affixed on the door does not hamper the proper operation of the product.
- Ensure that the 2N Fortis Cylinder projections do not obstruct the free swing of the door.
- As 2N Fortis Cylinders are supplied in a completely assembled state as standard, it may be necessary to perform the steps for disassembly, as described in Disassembly part of this FAQ article, before mounting.
- To activate the 2N Fortis Cylinder, insert the batteries or remove the battery tag, if present, and close the casing (see Battery replacement FAQ article)
- Before mounting the 2N Fortis Cylinder, always check that all components move freely.
- Carry out the assembly with the door open.
- Only for cylinders supplied as single components: During initial installation, put in 1 to 2 drops (max. 0.1 ml) of a non-resinous oil in the cylinder body. It should not be sprayed directly into the cylinder body with a spray can.
Assembly
Remove the fixing screw of the cylinder existing and dismantle the present cylinder.
Push in the cylinder body and fasten with fixing screw. Tighten the fixing screw by hand, do not use a battery-operated screwdriver with a high torque.
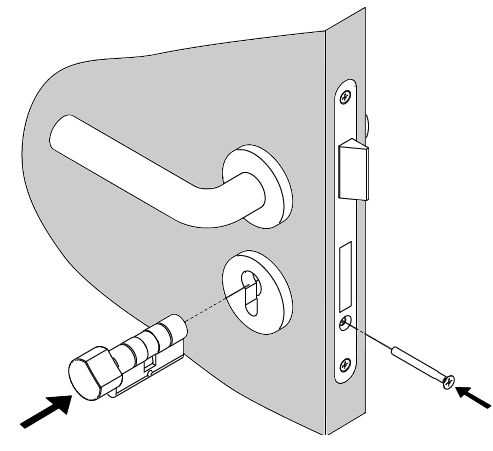
| The cylinder body must not project outside its enclosing fitting by more than 1 to 3 mm, but it should also not be installed sunk in the upholstery. |
After inserting the battery (see Battery replacement FAQ article), use the Service card previously configured in the Access Commander (see FAQ) to set the 2N Fortis Cylinder to service state.
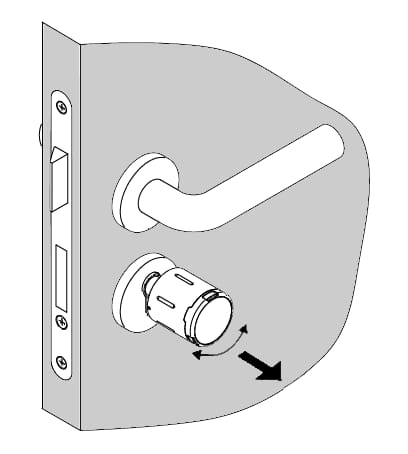
The electronic cylinder is mounted into the cylinder casing by inserting and turning at the same time.
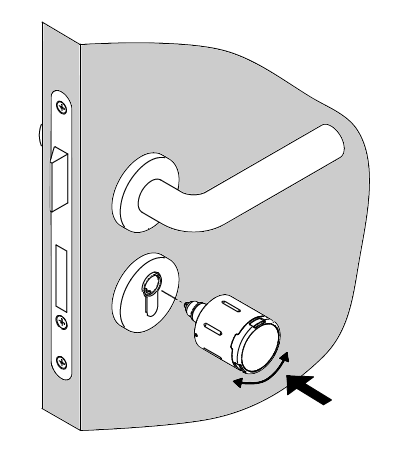
Scan the previously configured service card again to "lock" the cylinder in place.
Make sure that the knob cylinder operates easily and smoothly with the door open.
Disassembly
Use the Service card previously configured in the Access Commander (see FAQ) to set the 2N Fortis Cylinder to service state.
The electronic cylinder can be removed from the cylinder casing by pulling and turning at the same time.