The Anti-passback function enhances the access control system with monitoring of unauthorised re-entering of a reserved space.
-
STEP 3: Configure ACCESS POINT 1 and ACCESS POINT 2 in devices.
-
STEP 6: Set which ACCESS POINT is for Entry and which ACCESS POINT is for Exit
- STEP 9: Additional settings
Anti-passback requires:
-
Access Commander 3.0.1 and later (It is recommended to use the latest version)
- Access Commander Pro license or Unlimited license
-
IP intercoms / Access Units with firmware 2.38 and later (It is recommended to use the latest firmware version)
-
At least two access readers (RFID / bluetooth / fingerprint / keypad)
-
No one can enter/exit area without authorization, there is no REX button, etc.
-
Permanent operation of Access Commander. Connection between Access Commander and devices must be ensured.
STEP 1: Configure basic access for users
Before you start configuring anti-passback, you need to have users created in the system and their access assigned to the relevant doors. Without this, it won’t be possible to set up the access logic correctly.
You can find the procedure in the official manual here:
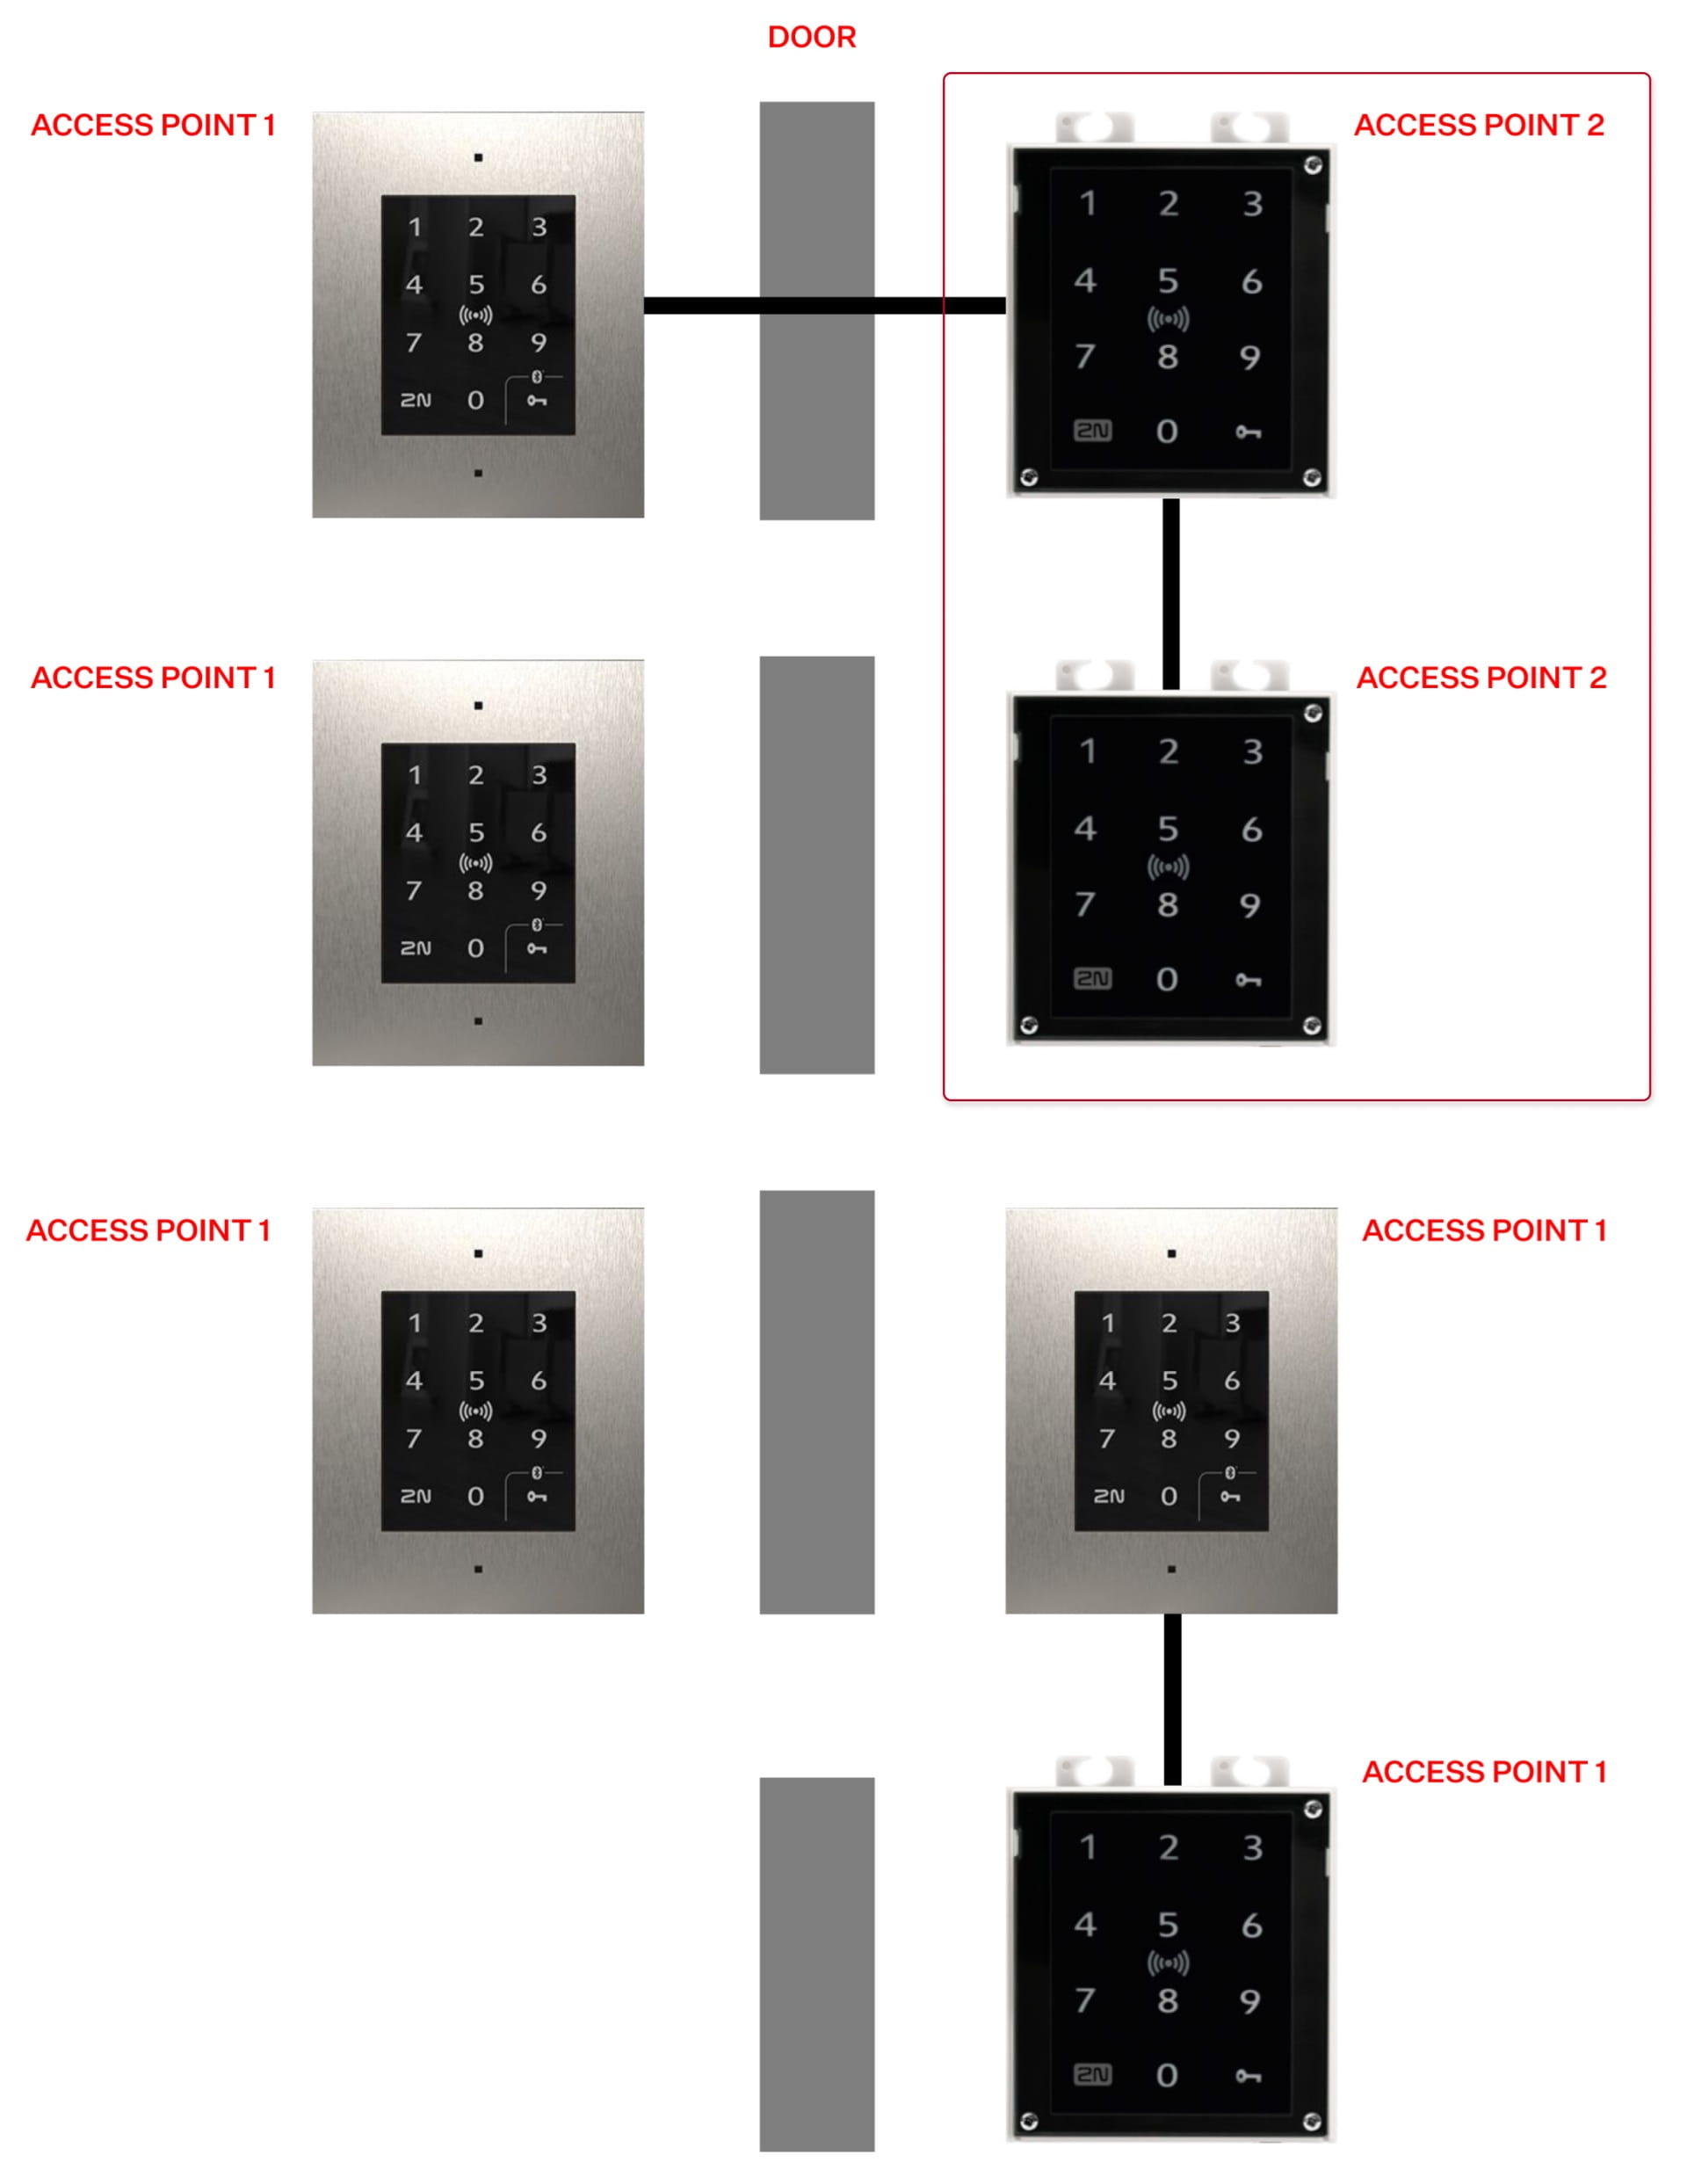
STEP 2: Explanation of ACCESS POINT 1 and ACCESS POINT 2
- There are two ACCESS POINTS (directions) - ACCESS POINT 1 and ACCESS POINT 2.
- Access Units and IP Intercoms with one reader, please set as ACCESS POINT 1 (follow STEP 3).
If there are connected extension modules as well:
A) All extension readers that are on the same door side as the main unit please set as ACCESS POINT 1 (the same as the main unit, follow STEP 3).
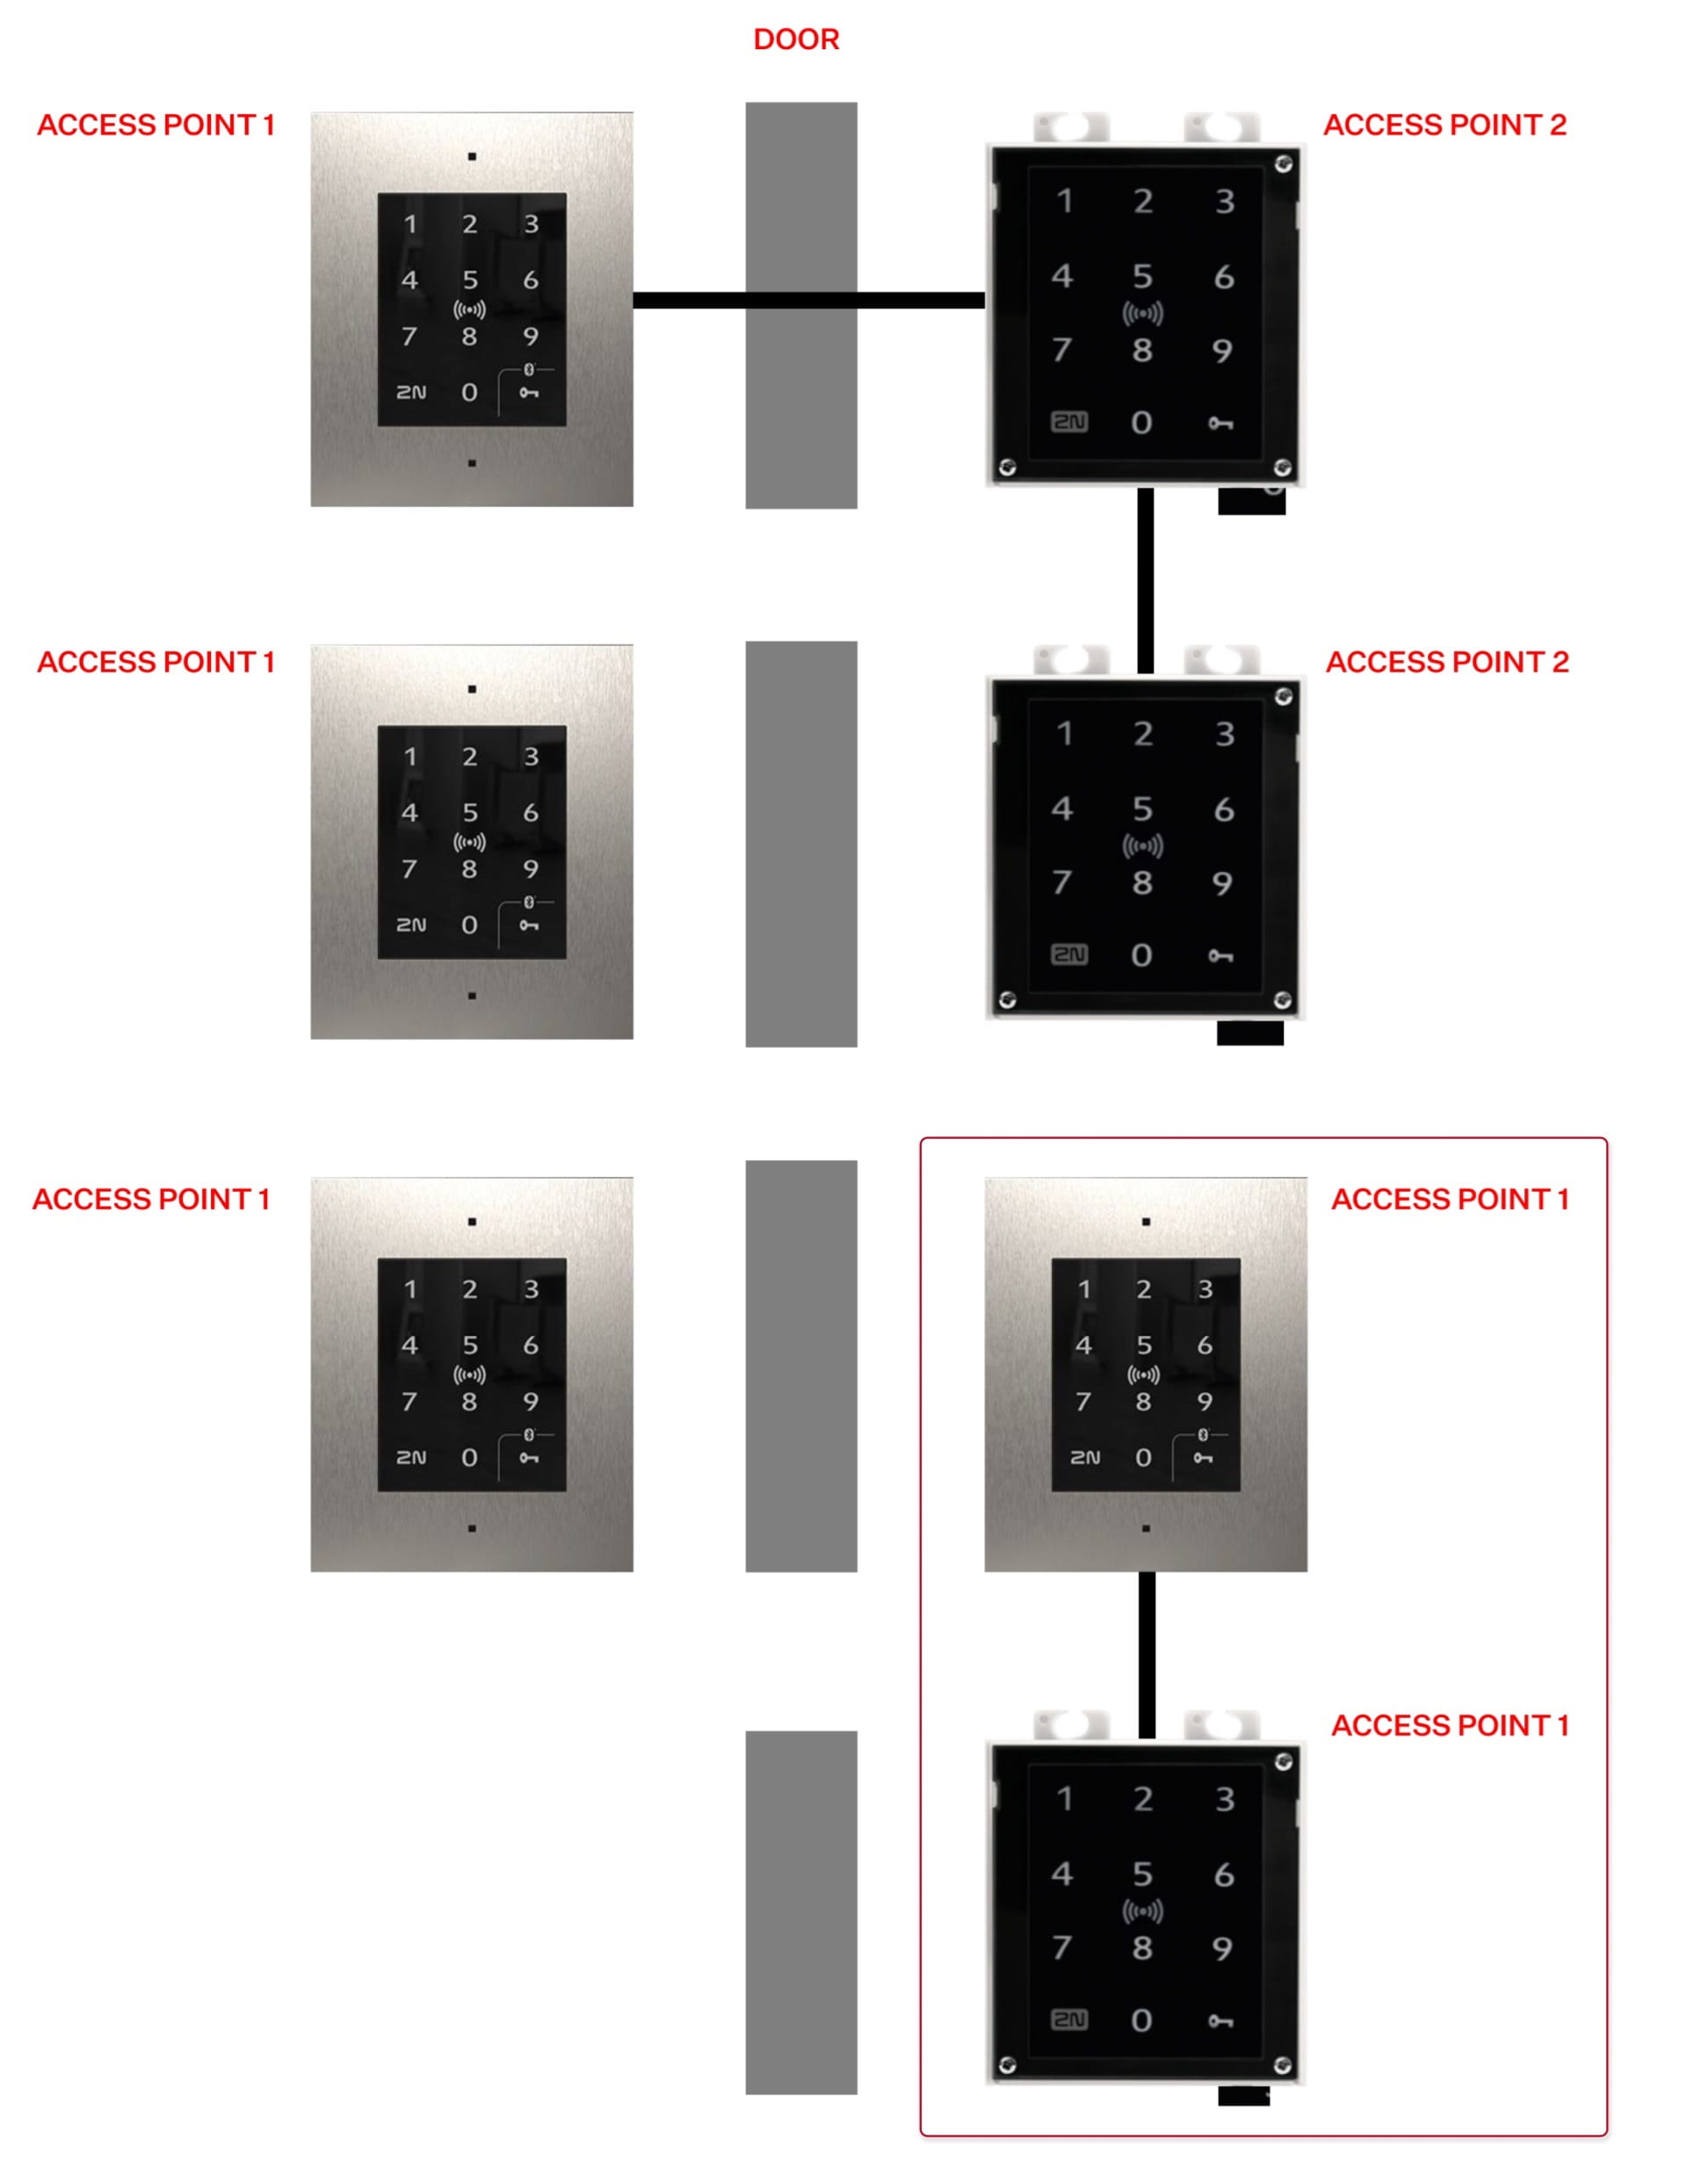
B) All extension readers that are on the opposite door side than the main unit please set as ACCESS POINT 2 (follow STEP 3).
STEP 3: Configure ACCESS POINT 1 and ACCESS POINT 2 in devices
- Go to device's web management. You can use Access Commander feature:


Version 3.0 or newer
- In your device go to section Access -> Access rules and select ACCESS POINT 1 or ACCESS POINT 2 for access modules.
- ACCESS POINT 1 is substituted by "Door Entry" value, ACCESS POINT 2 is substituted by "Door Exit" value.
- Door Entry, Door Exit:
-
- "Door Entry" = ACCESS POINT 1
- "Door Exit" = ACCESS POINT 2
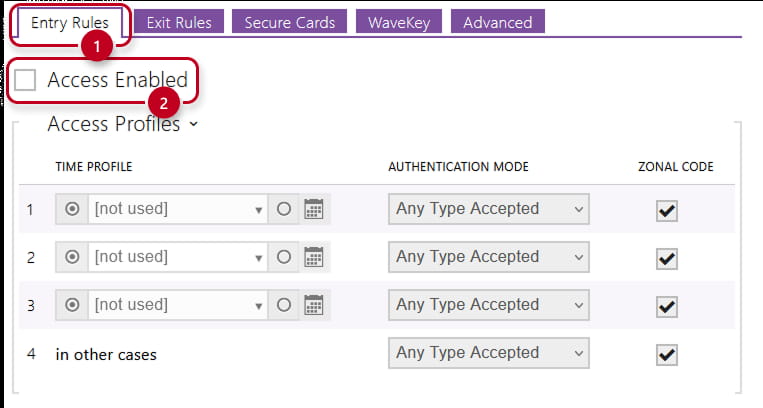
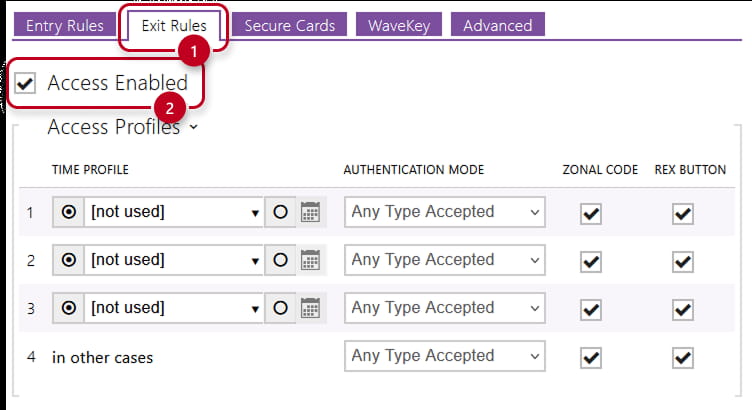
- If there is only ACCESS POINT 1, please go to section Access -> Access rules, enable ACCESS POINT 1 (Entry) and disable ACCESS POINT 2 (Exit).
- If both ACCESS POINTS are used in the device, then please enable both ACCESS POINTS (Entry Rules and Exit Rules).
- If both ACCESS POINTS (Entry Rules & Exit Rules) are disabled, device can't be added to Anti-passback area in STEP 5.

- At the same time you have to assign what module you set as Entry and what modules you set up as Exit.

- If you are using your device for both entry and exit you need to allow both Entry and Exit and set modules you want to use for entry as entry module (or exit module) under Access -> Access rules -> Module -> Manage.

- If you want to use the unit for Entry only, turn off the Exit, and assign all your modules as entry.

- If you want to use the unit for Exit only, turn off the Entry, and assign all your modules as exit.

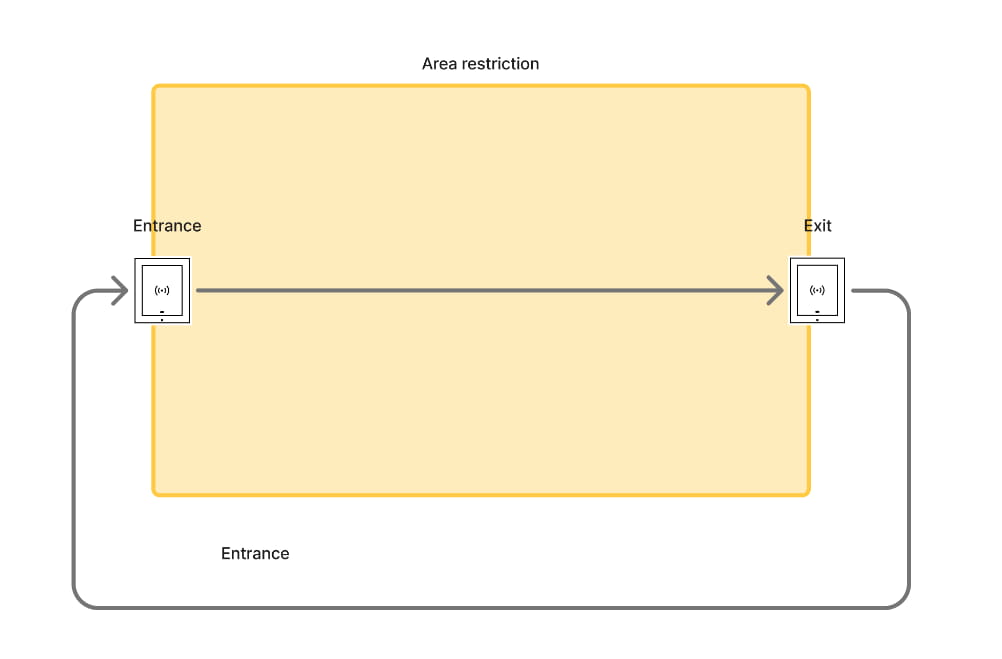
- If you set up two devices, one for entry and second one for exit you can create area restriction where you have to use one for entrance and second one for exit:
Version 2.50 (LTS) or earlier
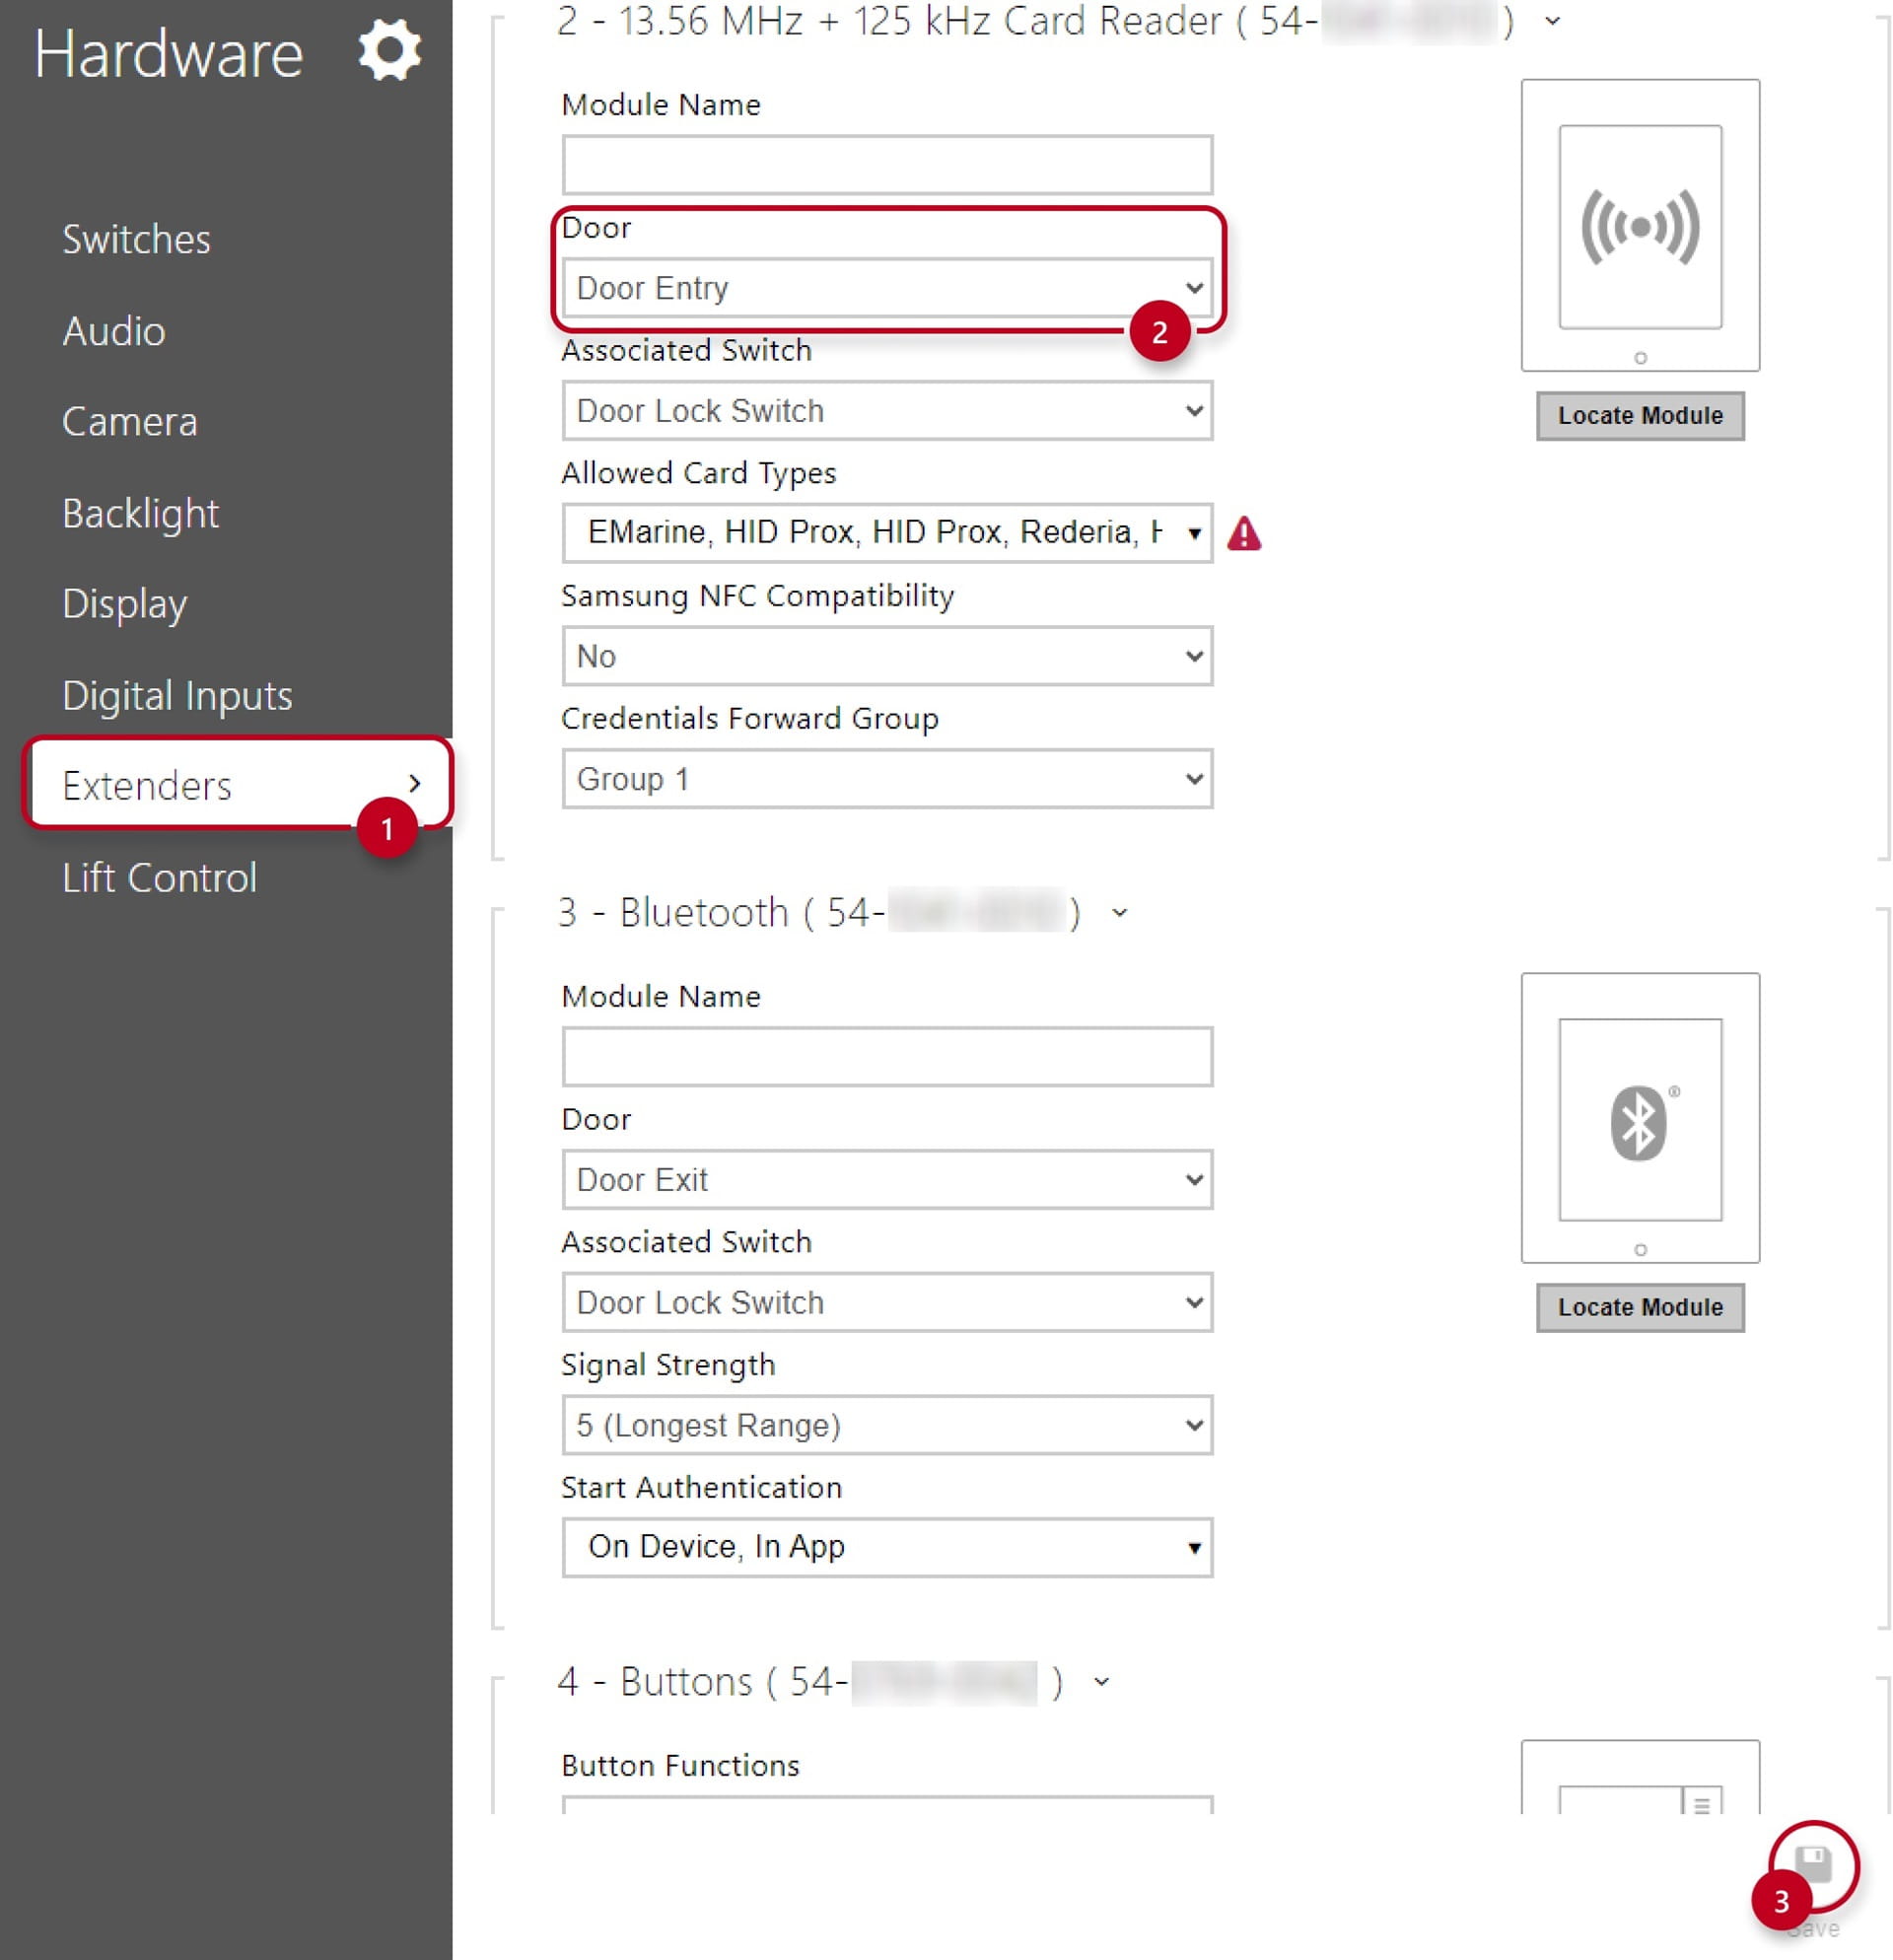
- Go to section Hardware - Extenders and select ACCESS POINT 1 or ACCESS POINT 2 for access modules.
- ACCESS POINT 1 is substituted by "Door Entry" value, ACCESS POINT 2 is substituted by "Door Exit" value.
- Door Entry, Door Exit:
-
- "Door Entry" = ACCESS POINT 1
- "Door Exit" = ACCESS POINT 2
- If there is only ACCESS POINT 1, please go to section Services - Access control - Exit rules, enable ACCESS POINT 1 (Entry Rules) and disable ACCESS POINT 2 (Exit Rules).
- If both ACCESS POINTS are used in the device, then please enable both ACCESS POINTS (Entry Rules and Exit Rules).
- If both ACCESS POINTS (Entry Rules & Exit Rules) are disabled, device can't be added to Anti-passback area in STEP 5.

- If you are using your device for both entry and exit you need to allow both Entry and Exit (ACCESS POINT 1 and ACCESS POINT 2) and set modules you want to use for entry as entry module under Access -> Access rules -> Module -> Manage and set modules you want to use for exit as exit modules.


- If you want to use the unit for Entry only, turn off the Exit, and assign all your modules as entry.


- If you want to use the unit for Exit only, turn off the Entry, and assign all your modules as exit.
- If you set up two devices, one for entry and second one for exit you can create area restriction where you have to use one for entrance and second one for exit:
STEP 4: Configure Area Restrictions (Anti-passback area)
- Go to Access Commander - section Area restrictions - Area list and create restricted area for Anti-passback rule.

STEP 5: Add devices to Restricted Area.
- In the created Restricted area click on Add devices button:


Device can't be added
-
If a device cannot be added or you cannot see device after you add it to the Anti-passback area, please check in STEP 3 that at least one ACCESS POINT (Entry Rules or Exit Rules) is enabled.

STEP 6: Set which ACCESS POINT is for Entry and which ACCESS POINT is for Exit
- Click on configuration button and select which ACCESS POINTs (readers) are used for Entry to the area and which ACCESS POINTs (readers) are used to Exit the area:

Example:


There is an error message after adding the device
- Verify the device is added to the Zone - if the device was added to the restricted area but later removed from the Zone, the restriction will not work correctly.
- If there are "problems to be solved" as in the picture below, please go back to STEP 3 to check configuration of ACCESS POINTS ("Entry rule", "Exit rule" in devices).
- Make sure that all access rules on the devices are set up correctly.
Make sure that all modules are correctly assigned to Entry or Exit.
- Make sure that all access rules on the devices are set up correctly.
- After resolving the issue we recommend to delete the device from the Anti-passback area and add it again.
- If the device is functioning correctly but still showing an error, try removing it from the Restricted Area and adding it again.
- If all the devices are set up correctly but still not working as expected (no anti-passback), try removing them from the area restrictions and adding them again.

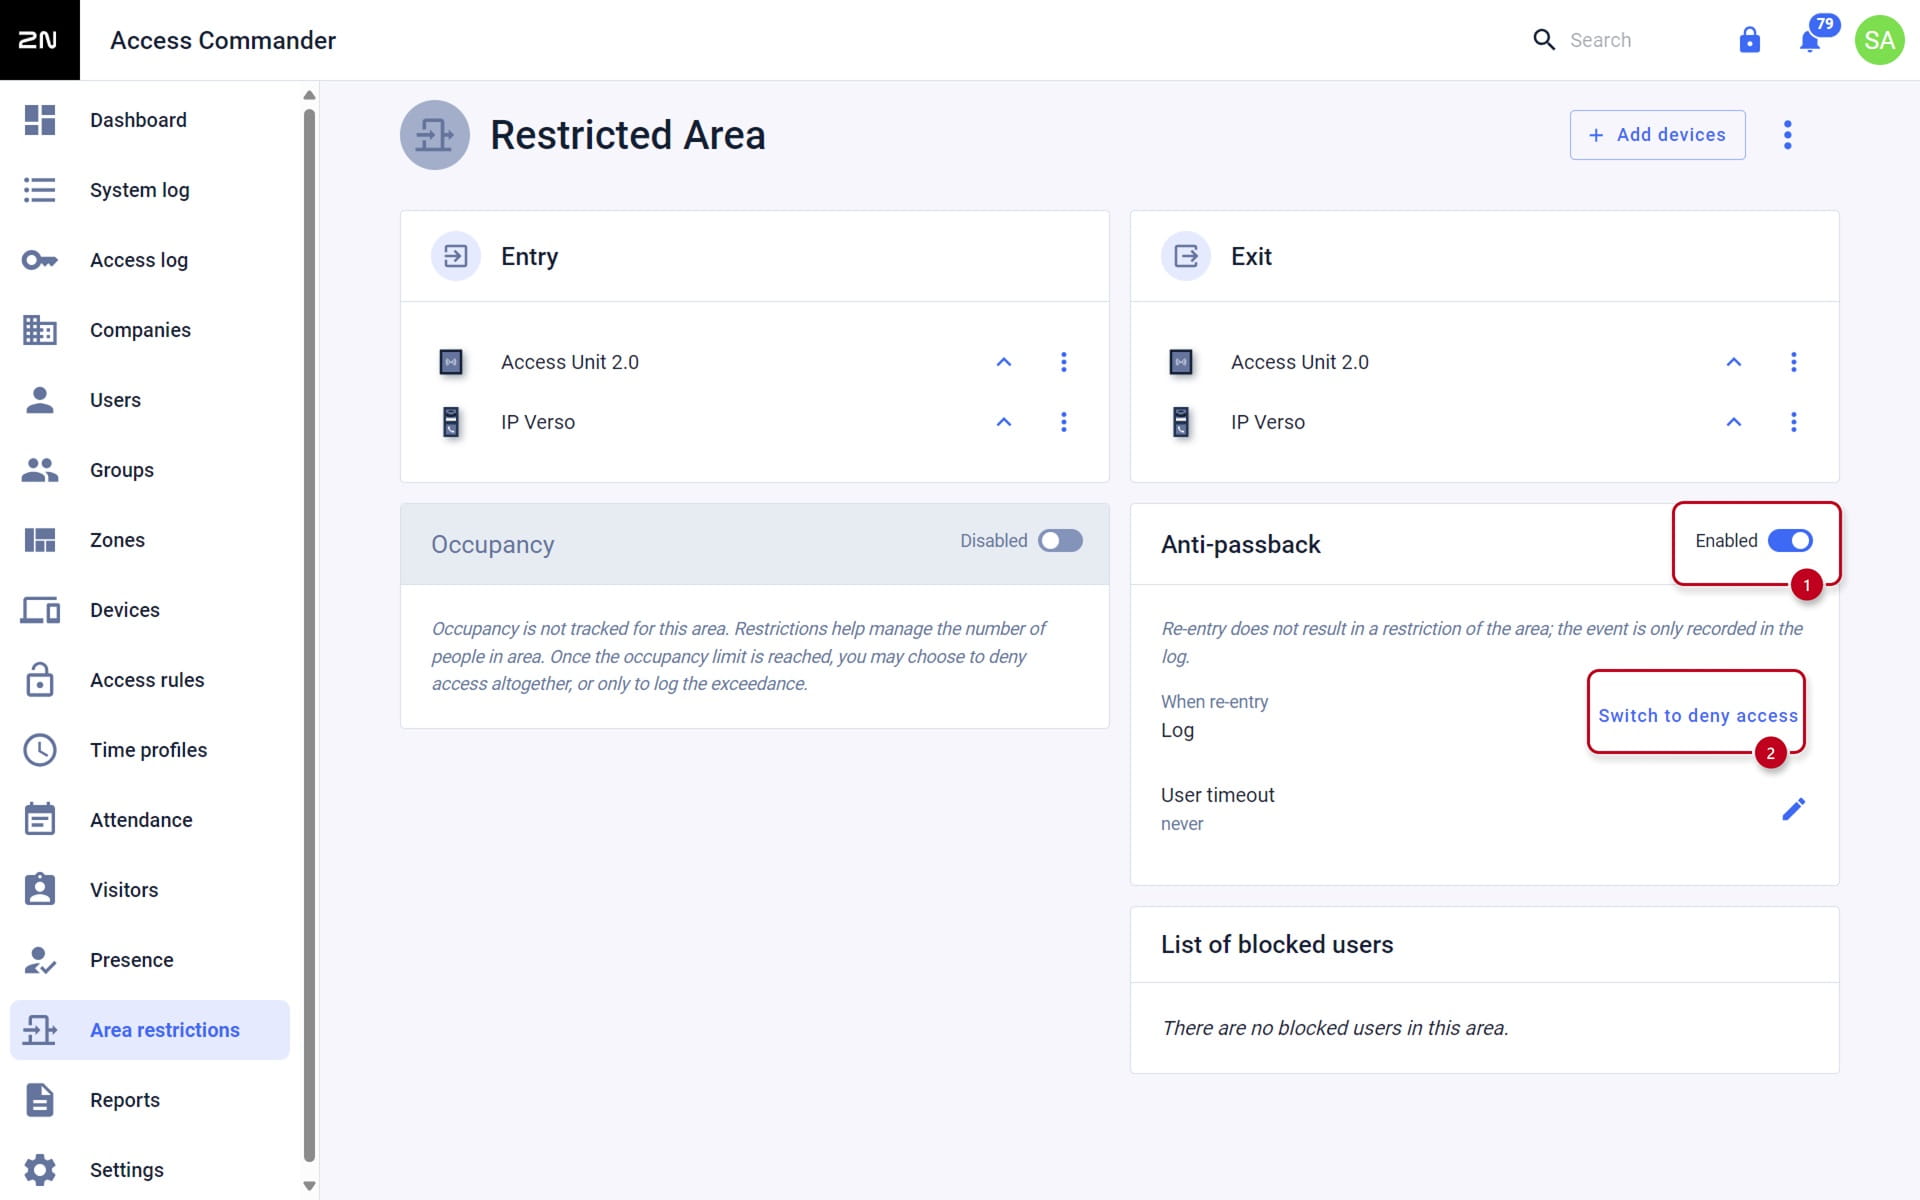
STEP 7: Select the Anti-passback mode
Go to Access Commander - section Area restrictions - choose your area, you want to set - "Restricted Area" (in my case):
-
Switch to log – no Anti-passback area access is limited if the rules are broken; the event is only logged with an optional administrator notification.
-
Switch to deny access – the Anti-passback area access is limited temporarily or permanently and unblocked as a result of the time limit, system administrator's instructions or exit passage.
STEP 8: Anti-passback is configured
- This feature requires a permanent operation of Access Commander. Connection between Access Commander and devices must be ensured.

STEP 9: Additional settings
There are additional settings for Anti-passback that you can find in Access Commander under Settings -> Anti-passback.
Here you can set up which users would be exempt from Anti-passback (3) so it would not apply to them, whether you want users to be notified by email (4) if they are breaking the Anti-passback rule, or if you want area restrictions to unblock all users and reset the current count (5) of users in an area.
