Sending or receiving multicast stream from/to 2N IP Intercom is a feature that can be used for emergency calls or just for any announcement that will be sent from/to 2N IP Audio Manager. How to set both scenarios can be found in description below.
How to receive multicast stream from 2N IP Audio Manager
If you want to set 2N IP Intercom as a audio destination for 2N IP Audio Manager , you must connect it as a RTP destination.
2N IP Audio Manager setting
Open 2N IP Audio Control Panel and go to section Destinations & Zones. Here click on right mouse button and choose the option "Create RTP destination".
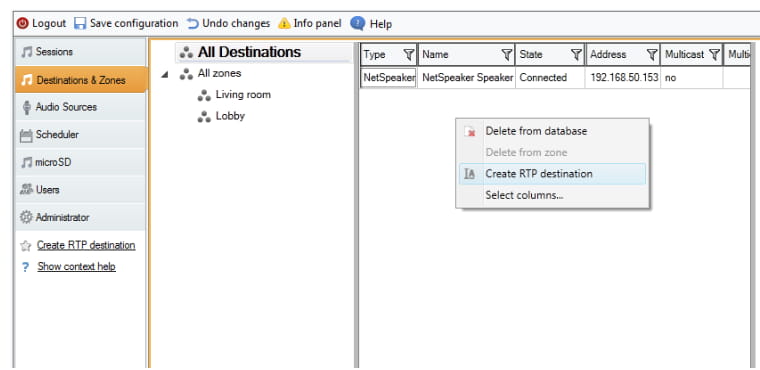
Then choose created RTP destination and specify IP Address and Port on which your 2N IP Intercom will be listening.

As a last step in 2N IP Audio Manager settings go to Sessions, create a new session and assign previously created RTP destination as the destination for audio broadcasting.

2N IP Intercom setting
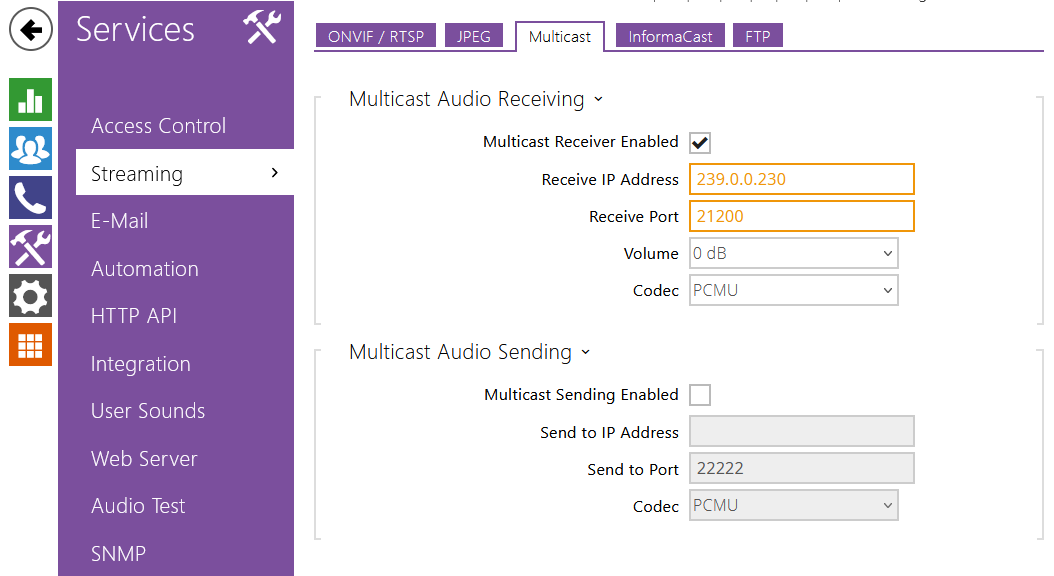
Configuration on 2N IP Intercom side is very easy, all you need to do is to go to the section Services -> Streaming -> Multicast and activate the multicast receiving. In Address and Port parameters specify the same IP address and port which you added to 2N IP Audio Control Panel.
How to send multicast stream to 2N IP Audio Manager
If you want to use 2N IP Intercom for making announcements to all speakers connected to 2N IP Audio Manager , you must connect it as new RTP source.
2N IP Audio Manager setting
Open 2N IP Audio Control Panel and go to section Audio Sources. Here create new RTP source and specify for it Port and IP address on which you will be sending announcements.

When the RTP source is created, go to section Sessions and create a new session. Here add a new RTP destination as audio source, specify units or zones to which you want to broadcast and the activate the session.

2N IP Intercom setting
For setting the paging function on 2N IP Intercom you have to use Automation feature. How to do this is described in this FAQ: Automation, Multicast paging - How to configure paging from 2N IP Intercoms
The settings mean that if any user presses the quick dial button 5 on the 2N IP Intercom (for this settings you need to have the intercom with 6 buttons), then the user´s sound is sent as a multicast request to all other devices. This sound takes 2 seconds. After that period of time you can start talking and 2N IP Intercom will stream this multicast traffic to 2N IP Audio Manager . If you want to stop multicast streaming, you just press the quick dial button 5 again.
|
Note: All commands used in the Automation section are deeply described in our 2N Automation manual where you can find also some examples. This manual is available on our web pages: |